Oldtoolsniper
-
Posts
276 -
Joined
-
Last visited
Content Type
Profiles
Forums
Events
Blogs
Gallery
Store
Everything posted by Oldtoolsniper
-
I made some walnut dye using hulls with denatured alcohol, I got just about the same results as what you're showing. It just drives faster on the leather but looks about the same. I put bugs and all in the hopper and strained the mess with pantyhose from the thrift store after the color leached into the solvent.
-
Most all steel wool has oil on it to retard rust. I clean mine with gasoline or whatever thinner I have around at the time. Liberon makes an oil free steel wool.
-
I've got one that looks exactly like that, made in Taiwan. It was a rust bomb that I got at a local auction for next to nothing. Mine had been sharpened on a grinding wheel so it took about four hours of work to get the blade back to proper shape. The blades are flat ground and the bevel is wide, it makes it easy to sharpen by hand. The bevel is wide enough so you can tilt the blade forward and it assumes the correct position. I sharpen with a granite surface plate and sandpaper. I do not do micro bevels. The one I have is the common third world casting with no finish work at all. I would say in comparison that it's shaped like an Osborne splitter rather than styled after it. It's very rough but it does work. Easy to sharpen if you can sharpen. Very poor casting. Even after sandblasting and repainting. Not pretty if your into that sort of thing. Lever and thickness gauge are pretty crude. Takes some skill to adjust since the blade is locked down by Allen head bolts, easy to misalign the blade while tightening. Comparing it to a vintage made quality splitter is like saying a Barry King Maul and a section of firewood log is the same thing. You can beat things with both of them, ones just a way nicer beater thing. I have no idea what the blade quality is, based on the casting I'm guessing not good. It has skived twenty or so pieces of leather so far since I sharpened it. I'm not a production shop, hobby only. Mine is most likely not tempered properly anymore (if ever) because of the monkey with the bench grinder.
-

What Is The Point Of A Head/round Knife?
Oldtoolsniper replied to Windrider30's topic in How Do I Do That?
Whatever you use learn to sharpen the tool at hand. Go on EBay and find a head knife for $20-30 and learn to sharpen it. I posted the picture of my pile waiting to be rehabbed in the box of chocolates for a reason. Forrest Gump said it. It's true with these knives, even from the same maker they can vary significantly and how they hold an edge and how hard they sharpen. Some of them have had a hard life, get those and learn so your mistakes in sharpening them won't cost you an expensive knife. Some are thick, some are thin, some are brittle and some just glide through whatever is in front of them. I rehab and sharpen old handsaws and the same thing applies to these. There were no computer controlled tempering ovens back then, a calibrated eyeball did the work and it might have had a few drinks the night before. -
What Is The Point Of A Head/round Knife?
Oldtoolsniper replied to Windrider30's topic in How Do I Do That?
Because they look so cool, everyone should have a chocolate box full of em. Utility knives just have no style and after all it's style that matters.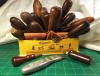
-
Dog Collar With Handle
Oldtoolsniper replied to Memorymode's topic in Collars, Cuffs, Leashes and Leads
If it's only to handle the dog supervised I can see a handle for correcting the dog at heel. I have a lab that I hunt with and I put a concho on a collar and was amazed at the crap he managed to bring back to me stuck in that concho. I would imagine a handle on a hunting dog collar while hunting would be a real safety concern. As for sharp. You can make a carpet or utility blade knife scalpel sharp and you should learn to do it. The blades are inexpensive and not hard to source locally. Make a strop and go to the local auto body shop unless you have a good automotive paint store locally and buy a 3000 and 5000 grit sticky disk to sharpen with. Do not get the Velcro backed ones you want PSA disks. They may have it in wet dry paper as well if so get that. Google "Scary Sharp " method with sandpaper read it and try it. There is a learning curve but you can get 100 utility blades for $10-15 on sale, once you learn to sharpen them it's a lifetime supply and they will cut way better then a factory edge. My recommendation to go to a auto body shop is because they use that high of grit to polish out clearcoat, most home centers stop at 600 grit wet dry. If you can find the sandpaper its more convenient for sharpening but most paint shops use the round 5 and 6 inch disks. After you figure it out get on line and order some in the grits you find work for you. When you get it right the blade will cut through the leather, the self healing mat and into the table below with very little effort. The leather will not pull and pucker when you cut it, it will just lay there and be separated. New utility blades are just not very sharp. Getting them and your other cutting tools sharp is a basic skill, learn on the inexpensive utility blades and then expand. -
My First Flask....
Oldtoolsniper replied to Jon P's topic in Purses, Wallets, Belts and Miscellaneous Pocket Items
The coolest thing is you made it, sure beats the heck out of a __________ purchased from the store, it's personal. -
A Few New Wrist Cuffs
Oldtoolsniper replied to immiketoo's topic in Collars, Cuffs, Leashes and Leads
Those are really nice. Like braiding until you try it I don't think folks appreciate what it takes to get stamping to look that good. Not only that but the use of colors like you have adds to the challenge. Fine workmanship all the way around. -
Thank you for that link. That's an interesting read. I would have assumed a makers mark would have a name not just an arrow. I'll recheck it and see if there are any marks I overlooked.
-
Kabar Sheath For A Friend
Oldtoolsniper replied to druid's topic in Gun Holsters, Rifle Slings and Knife Sheathes
I get it now. Thanks. -
Kabar Sheath For A Friend
Oldtoolsniper replied to druid's topic in Gun Holsters, Rifle Slings and Knife Sheathes
Is the pouch on the sheath for a 9 volt battery, if not what is it? -
Wood Grain Look...would Be Bracer
Oldtoolsniper replied to Windrider30's topic in Collars, Cuffs, Leashes and Leads
Thanks for sharing how you did it. A wooden bag? Barn board leather works. -
That Sir, is the most convincing thing I've seen in regards to practice. I'm going to try the twenty five rounders myself..
-
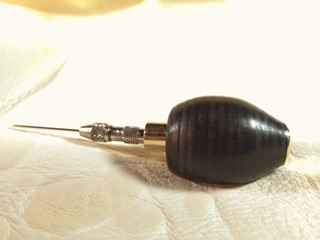
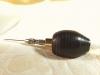
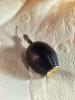
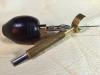
Rohn, I turn pens as well and I thought about that but I wasn't sure if it would allow the leather to rotate around the shaft. The other consideration was the tooling on the leather, I figured the epoxy would fill any voids and the super clue would not. After doing it I don't think they were any voids after compressing the leather in the clamp. I started it on the lathe but I did not have a good way to chuck it and the shaft on the pin vise was already in two pieces so it came apart on me. I re-epoxied it and then turned it with a drill against my 1x30 belt sander. The finish is just sanding it to 400 grit and then beeswax on a buffing wheel.
-
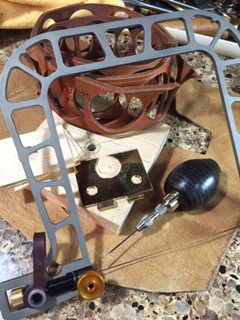
I wanted a long nosed tracing tool for marking or scribing around objects to make patterns. It's made from stuff I had on hand and was no longer serviceable in its present condition. I used: A practice tooled belt from an eBay auction A size A Starrett pin vise that was in two pieces A brass compression fitting from some plumbing project long since forgotten A broken eyed John James needle A piece sawed from a broken solid brass hinge A 6x32 brass screw from a lamp fixture Epoxy It was a fun and challenging way to make a tool and learn some new things about leather. I used up a bunch of stuff that was basically going to the trash so I'm pleased at how well it came out. I have a box of these belts from different sources, word of warning here, one of the belts came from a heavy smoker and it wasn't bad to work with until I started sanding down the stacked leather to get my final shape, it just reeked like a moldy ashtray, it was disgusting so I tossed it. If it smells like cigarettes when it's whole it won't be to bad, start sanding it and the bouquet will intensify 20 fold. I used epoxy rather than Weldbond contact cement to hold the leather washers together because the shaft on the pin vise is round and I didn't want the handle to rotate. The leather washers were cut from a tooled belt, I just clamped them until they were dry and as you can see from the edges the tooling in the belt did not cause an issue in the final product.
-
Wood Grain Look...would Be Bracer
Oldtoolsniper replied to Windrider30's topic in Collars, Cuffs, Leashes and Leads
That going to look pretty cool as a bracer, it will look like you are wearing hollow logs. I want to see it when it's assembled and on an arm. What was the process you used and the dyes to get the look you have achieved. I talking colors , get the swivel knife part and beeline from the picture. -
My Latest Shotgun Shell Pouches
Oldtoolsniper replied to l2bravo's topic in Gun Holsters, Rifle Slings and Knife Sheathes
Roger that! -
My Latest Shotgun Shell Pouches
Oldtoolsniper replied to l2bravo's topic in Gun Holsters, Rifle Slings and Knife Sheathes
The front rolled edge. I see what you've got going on now, trap shooting. It's hard to judge sizes from pictures with no reference. The shells give me that reference so I can see how big they are. What is the small pocket in the back used for? Thank you for taking the time to answer and post more pictures. -
My Latest Shotgun Shell Pouches
Oldtoolsniper replied to l2bravo's topic in Gun Holsters, Rifle Slings and Knife Sheathes
I like them, are they fitted to a box of shells? Can you show a picture of the inside? I'm interested in the front seam and how it's turned in, that's what I want to see inside. -
On those removeable round style punches I just chuck them in a drill to sharpen them. You only need to maintain the angle and it goes pretty fast with the drill doing the rotating. Obviously if they can't be chucked so they run true or don't wobble this won't work. Wet/dry sandpaper on thick glass or MDF will work to sharpen the tools at a minimum investment. Learn to sharpen and tools will be more useful, you won't be afraid to use them because you can maintain them.
-
Custom Armor Made By Me The Grinning Dwarf
Oldtoolsniper replied to TheGrinningDwarf's topic in Historical Reenactment
It truly amazes me what people see in a piece of leather, I see belts, holsters, and sheaths and you see Middle Ages battle armor. I'm impressed by what you have done. The chain mail and other metal parts really bring the whole chest piece together. Even your rivet placement Is well thought through. Well done Sir! -
Latest Leather Squadron/group Etc Patches .......
Oldtoolsniper replied to johnnysignor's topic in Art
You do nice work! -
JLS hit the nail on the head with his explanation of "rigidity" that's a better explanation than mine. I made my lining bigger and then trimmed it to fit after glueing it and before stitching it. Right or wrong, I don't know but it has worked for me.
-
What I learned by just doing it. This supports the advice already given. I made one lined belt and one unlined belt. Both belts are the same completed weight, about 10oz. One is from Herman Oak 9-10 oz belt leather and the other is Herman Oak non belt 5oz doubled up or lined. The lined belt is significantly more rigid and over three months has retained the shape much better than the single layer belt. The layered belt has zero stretch as well. The single layer has stretched a little. I've tested and worn both and I prefer the lined belt for those reasons. These are results based on wearing just the belt, not carrying a weapon or anything else on the belts. That being said the belts need to fit the person and the holes need to be correctly positioned. One inch is a lot when it comes to fit. I didn't think it mattered based on all the "Genuine Leather" belts I owned in the past. It does and I have some non fitting belts to test patterns on to prove it. Real belts from real cow hide leather not pressed, glued, sanding dust leather don't stretch like Spanx to fit your belly tank. This is out the window if you use the belly of the hide for the belt it will stretch and stretch a lot. Use the correct leather and fitting and you will be happy as will your customer.
-
Thank you for sharing your technique and taking the pictures to show us the steps. Very helpful for all of us to see.