Oldtoolsniper
-
Posts
276 -
Joined
-
Last visited
Content Type
Profiles
Forums
Events
Blogs
Gallery
Store
Everything posted by Oldtoolsniper
-
 I started a topic on airbrushing in the how to do it section.
 -
JLS I'm glad you are jumping in here. I was intimidated by all the voodo associated with an airbrush until I tried it. Getting it through my head that the object will look just like the object only a diffent color was the biggest hurdle. I use the Iwata brand and again that's the Ford vs Chevy thing. I just go from light to dark. Spray the whole thing light and then add the dark. You can always go darker from lighter and you can never go lighter from darker. Thinning the dye makes it lighter. Your right any dummy can do it in no time flat. I'm a complete amateur in both leatherwork and airbrushing. My work shows that, however I think you can only learn by doing it.
-
Couple of things I have learned. Sometimes dyes will blend and change colors. If you apply red over yellow for a sunshine fade you may end up with a green so always test on scrap. The base or leather has a color too so test on scrap. Tooling changes how the dye absorbs. Leather absorbs the dye and each piece will do that differently. Save scraps of that leather to practice your colors on each piece will be different in how it takes the dye. I keep a note book on how I mix the dyes so I can replicate the colors in the future. I mix by drops, not real scientific but I'm not building the guidance system for a rocket either. I'm not an airbrush artist, I can't even draw. The artwork is done already and you are simply coloring it not drawing it with the airbrush. To paint a chair black you do not need to be able to make the chair, you only need to be able to apply the paint to the chair and it will look just like a black chair. I use the alcohol based leather dyes so the solvent is alcohol. I also use Non Grain Raising wood dye as well. I use the alcohol based because it's the same solvent for my leather dyes and that way I'm not trying to mix water based and alcohol based dyes together. Wood dye and wood stain are two different animals. Wood dye is color and wood stain is pigment. Dye enters the leather and stain sits on top. I use the NGR dye because there are a lot more colors and you can mix them for different shades. I'm also very familiar with them from woodworking. Dye changes the color of the material and stain (pigment) coversup the material or sits on top. Dye leaves the leather visible and stain covers the leather up like paint only really thinned out. I only had wood dye when I started and since it dyes my fingers, clothing, wood, concrete floor and everything else it gets on I figured it would work on leather. It does for me. If it's right or wrong I'm sure is a long discussion that ranks up there with Ford vs. Chevy. Who cares as long as it works, it does for me. Trade name is below parentheses. I buy it from wood workers supply. (Behlen Solar Lux NGR Dyes, BehlenWood Dye HIGHLY FADE RESISTANT COLORS. Premixed, non-grain raising NGR SOLAR-LUX is ideal for use under any top coat) I'm pretty much convinced if you can use a can of spray paint you can airbrush. The only difference is cleaning and thinning what you spray. The beauty of the alcohol dyes is that you don't even have to be that clean conscious with them since they will clean up even after they dry with alcohol. A good example is water based paint, once it drys water will not remove it so it must be cleaned from the airbrush before it dries. This holds true for most of the acrylic leather finishes, they thin with water but cannot be reactivated or removed with water once they dry. The dyes for the most part are the easiest and most forgiving of all the things I have ever used in an airbrush. Even if you let them dry in the airbrush they wash right out with alcohol. I don't let them dry in the brush but it has happened to me by mistake. It will happen to you too. I'm not sure what the difference between "Leather Paint" and "Craft Paint" is besides the price. $4.99 and up for leather paint and $.89 for the same amount of craft paint when it's not on sale. Same thing with leather dye vs wood dye with the same solvent. Wood dye has more colors to use in mixing and there is a handy dandy color mixing wheel that is also for sale at woodworkers supply that really cuts down on the experimenting when attempting a new shade. Marketing is amazing and here is my point. The most expensive paint on the planet has got to be fingernail polish. Some of it is $8.00 an ounce, using math for Marines that is $1024.00 a gallon since there are 128 ounces in a gallon. Even that craft paint is expensive stuff when you break it down that way. I've used fingernail polish, ink, automotive paints, floor finish, craft paint, food dye, wood dye, lacquer, polyurethane, varnish, spar varnish, shellac, pre-catalyzed lacquer, polyurethane, varnish, spar varnish, shellac, two part clear coat, all of the oil based paints that come in quarts, gallons etc, rust oleum type stuff, contact cement and have determined that an airbrush is just another way to get the product applied to the object. You need to clean your airbrush the same as a good quality brush, if you don't well that's on you. Is an airbrush always the best way, no. It's just another way. I'm hoping this becomes a running discussion on airbrushing leather, it really is easy. The pictures here are examples of really super easy finishes done with airbrushing. It's way easier than any other method I've tried and the only faster way I've found is dip dying. The colors I do tend to be close to the same since I have those colors in quarts which is a lot of spraying before they are gone. I'm not an expert and I'm not an artist and I can't draw. I can push the button on an airbrush just like a can of spray paint and make a chair like object go from whatever color to whatever color without knowing how to make the chair like object. Thinning what you are spraying ( the thinner is what the directions tell you to use for clean-up) so it works, cleaning the airbrush with the appropriate cleaner and getting past the fear of using one is all you need to get started in that direction. It's not the answer for every situation, it's another tool to use.
-
Thanks everyone. Airbrushing is as simple as spray painting. It's even easier with leather dye. No need to take a class.
-
Axe Sheath And Forager Pouch
Oldtoolsniper replied to Richard M's topic in Gun Holsters, Rifle Slings and Knife Sheathes
Richard, Thanks for detailing that out. I'm going to give making one a shot. It's one of those things you see and wonder why everyone doesn't have one. Plus it's one more use for the smaller leather chunks piling up in boxes. -
Axe Sheath And Forager Pouch
Oldtoolsniper replied to Richard M's topic in Gun Holsters, Rifle Slings and Knife Sheathes
I like them both. Any chance on more details on the pouch so I can make one? Looks pretty dang useful. -
That is really nice, compliments the rifle, or the rifle compliments the scabbard.
-
I'm using that same one as well. I called and orderd mine, tell them you are from this site and he will set you up for leather related rather than bling for jeans.
-
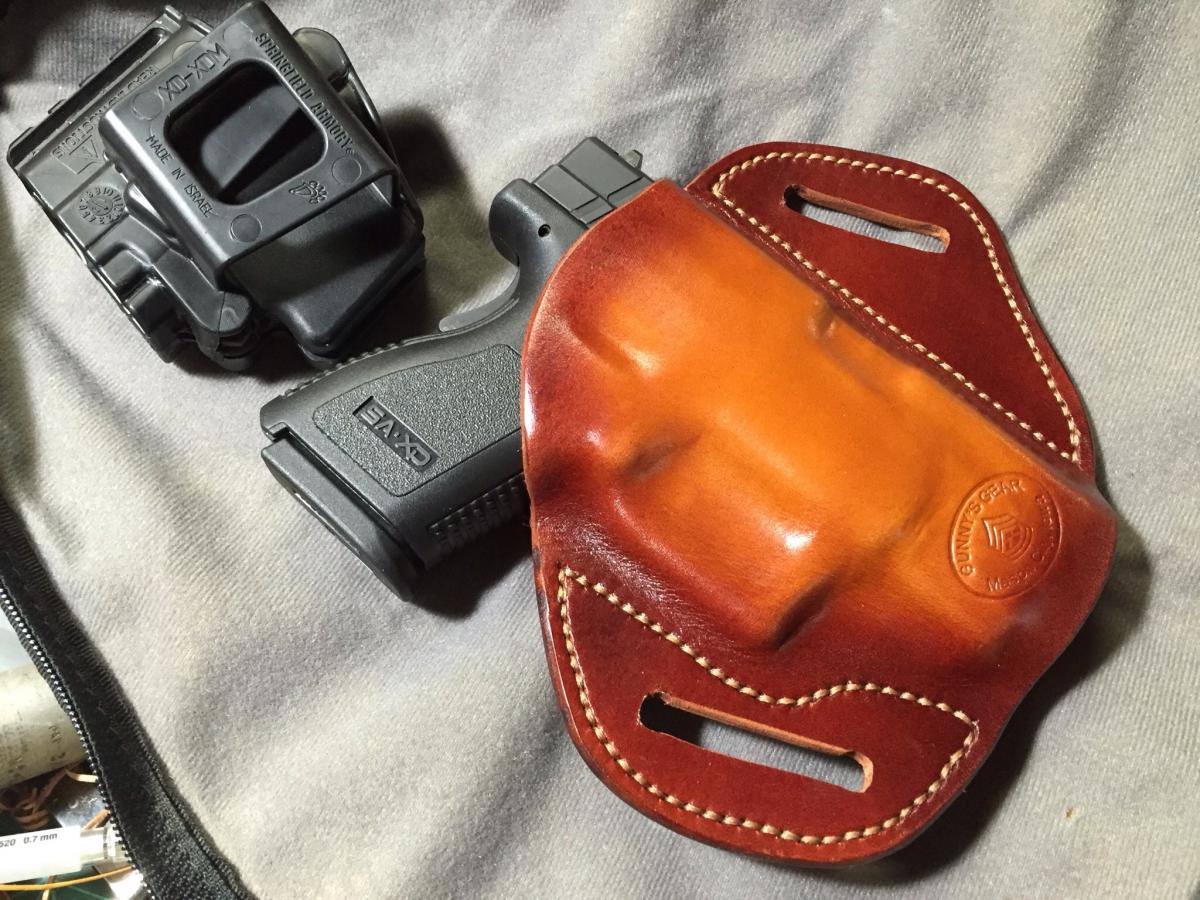
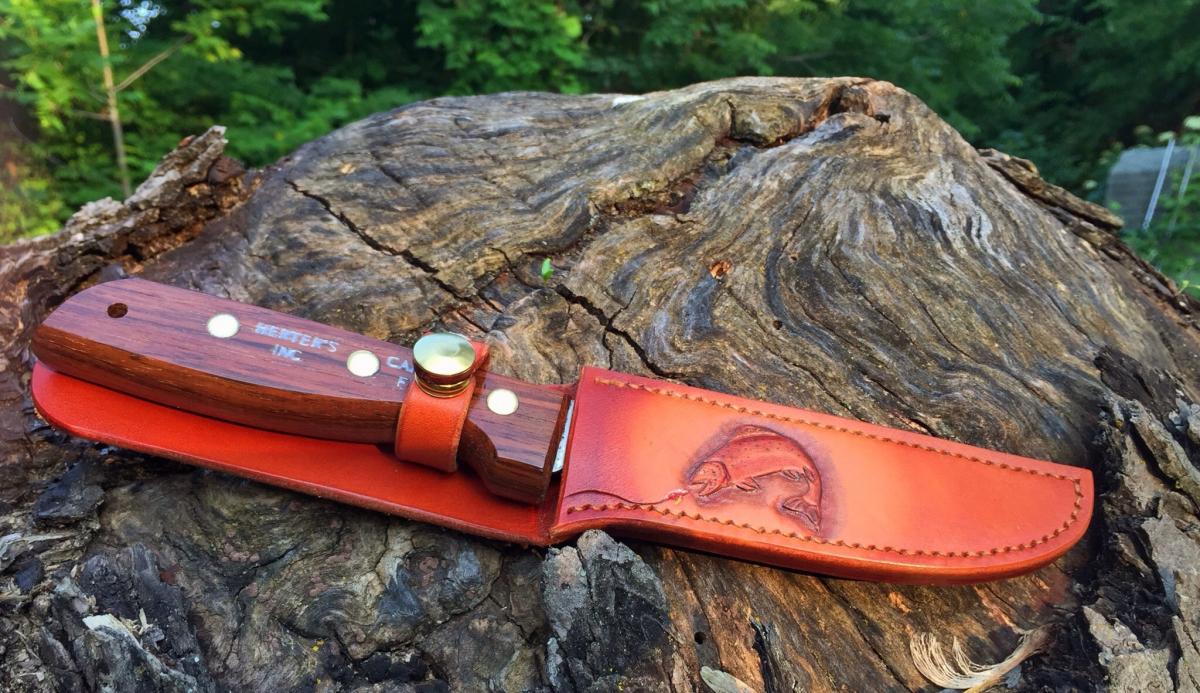
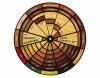
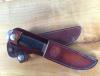
This is a "Herter's World Famous Canadian Fillet Knife" I made a new sheath for. If you are old enough to remember Herter's it was all "World Famous" and the best of the best. Having grown up within an hour of the place I remember it as a big adventure when I was a kid. I get these knives when I can at gun shows and such, they are nothing special as far as knives go but I enjoy them. This is Herman oak leather stitched with the Lin cable au chinois 332 beige thread, the trout is dyed using different shades of Fiebings pro oil dye. The fly is red and white acrylic paint to make it pop. The main dye is Tandy pro water based applied by airbrush. The top coat is future acrylic floor finish cut 50%, airbrushed. This is a first for me in a lot of areas.

-
I never gave that a thought. I bought a pile of stuff on EBay and it was included. That being said I can't find it anywhere on the net. I'm shocked since it is one of the more helpful books on the subject. I guess you'll have to watch eBay for a copy. I have the one by Al Stohlman from 1985 called coloring leather but I find Peter Mains to be a better reference on compatibility. 0-9578802-2-7 Is the ISBN number for a Google search.
-
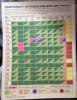
Here is a sample from that book.
-
Only, Here's what I've learned from years or working wood. Each piece is different, each piece takes dye, finish, and sanding different. There is the beauty of the medium, leather is the same. I for one like the scars and fat wrinkles as well as the different hues each piece takes on. Here is a book I bought and it has taken the mystery out of a lot of the different finishes and what is compatible with what. its mainly about coloring for pictorial carvings but the information applies to dying leather and dying leather is dying leather. There is a chart in the back that explains what works with what. The book is 32 pages "The main technique of coloring leather" By Peter Main
-
Iwb Holster
Oldtoolsniper replied to sdmf83's topic in Gun Holsters, Rifle Slings and Knife Sheathes
I may be a little biased, but I like it! -
I don't know how it sizes to number sizes on machine sewing but look at jig and fly tying thread it comes in everything and then some. Jig thread is generally heavier.
-
I have three fingers on my left hand that have no feeling, no where near what you are dealing with. I stab myself and by the time I figure it out I have to dye my leather brown. Here's what I started to do.. I bought some really thick shower shoes (flip flops) the foam type, I put the shoe under my leather and pre stab all the holes in my leather on the bench and then pony it up to stitch it. The holes don't close up enough to prevent stitching a long run, I just completed my first belt this way. If that works for you then changing the stitching pony to fit your chair in a leaning back position may solve your issue. Perhaps you can make a harness to limit your front lean if leaning back to stitch is a problem.
-
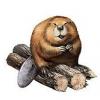
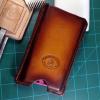
My first belt. After having the ends rip off, sagging, stretching and general repeated failures of my "Genuine Leather" belts I decided to make my own. Two layers of 7oz Herman Oak. Weld bond red can contact cement and 1mm black tiger thread. Beaver tails were inlayed and the belt was made grain side out on both sides. Dyed with Fiebings black pro oil dye and top coated with future floor finish cut 50% and sprayed on thru my airbrush. Required 7 thread changes or seven sections of thread to complete the belt. This was my first time doing something that I had to start new thread before it was complete. I just left the needles hang at the end of the run and started a new set of needles and thread. I delt with all of the thread clipping when I was completely done with the belt. I simply started the new thread two holes back (backstsitch) and locked everything this together that way. The belt holds my biggest handgun with ease. It creaks a lot but that will lessen as it breaks in. I'm quite surprised at how much nicer my handguns stay in position. I really learned a lot doing this belt. When you are a healthy eater you get lots of practice saddle stitching. Inlays make the belt custom fit to you. Three inlays means it has to fit or nothing is symmetrical. I know why fat Cowboys have their names centered over a hip instead of under the center belt loop now.

-
On the airbrushing side of this I used it to apply the blue with no taping it off, I wanted the color to blend to the edge and not be a sharp cut off or line like you would get if the stamping were taped off. I've used fingernail polish, ink, automotive paints, floor finish, craft paint, food dye, wood dye, lacquer, polyurethane, varnish, spar varnish, shellac, pre-catalyzed lacquer, polyurethane, varnish, spar varnish, shellac, two part clear coat, all of the oil based paints that come in quarts, gallons etc, rust oleum type stuff, contact cement and have determined that an airbrush is just another way to get the product applied to the object. You need to clean your airbrush the same as a good quality brush, if you don't well that's on you. Is an airbrush always the best way, no. It's just another way.
-
I'm with you on the color. I used it to see if I would get bleed through and to see if the floor finish top coat would yellow it. This whole thing is a scrap done to torture test the products used. It's now riding on the dashboard and cooking in the sun in my truck. I'm not sure what the difference between "Leather Paint" and "Craft Paint" is besides the price. $4.99 and up for leather paint and $.89 for the same amount of craft paint when it's not on sale. Same thing with leather dye vs wood dye with the same solvent. Wood dye has more colors to use in mixing and there is a handy dandy color mixing wheel that is also for sale at woodworkers supply that really cuts down on the experimenting when attempting a new shade. Marketing is amazing and here is my point. The most expensive paint on the planet has got to be fingernail polish. Some of it is $8.00 an ounce, using math for Marines that is $1024.00 a gallon since there are 128 ounces in a gallon. Even that craft paint is expensive stuff when you break it down that way.

-
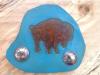
JLS, I can't paint a fish. I do paint fishing lures all the time but the shape of the fish is already there I'm just coloring it just like the black chair analogy. This is a test piece that is in my truck toolbox to see how well the components hold up to real world wear and tear. It was painted with acrylic $.89 paint from Hobby Lobby. The top finish is future acrylic floor finish cut 50% with thinner (water). I made the conchos from the state quarters, Silver solder and Chicago screws, the idea came from this site but I don't remember who. The Buffalo is a large stamp I own and again the finish on the stamping is a test as well. The stamp is a bunch of animals inside of the Buffalo to make up the Buffalo. I'm still trying to figure out how to make them stand out. But that's a whole other subject.
-
I'm pretty much convinced if you can use a can of spray paint you can airbrush. The only difference is cleaning and thinning what you spray. The beauty of the alcohol dyes is that you don't even have to be that clean conscious with them since they will clean up even after they dry with alcohol. A good example is water based paint, once it drys water will not remove it so it must be cleaned from the airbrush before it dries. This holds true for most of the acrylic leather finishes, they thin with water but cannot be reactivated or removed with water once they dry. The dyes for the most part are the easiest and most forgiving of all the things I have ever used in an airbrush. Even if you let them dry in the airbrush they wash right out with alcohol. I don't let them dry in the brush but it has happened to me by mistake.
-
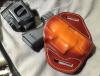
I made this sheath to replace the rotted one behind it. This sheath was dyed with an airbrush. Those lineish marks around the black in the example picture you provided would be pretty easy to do with an airbrush. Fading from one color to the next is easy too. Just remember in most cases you can go from light to a darker color but not from darker to lighter. Couple of things I have learned. Sometimes dyes will blend and change colors. If you apply red over yellow for a sunshine fade you may end up with a green so always test on scrap. The base or leather has a color too so test on scrap. Tooling changes how the dye absorbs. Leather absorbs the dye and each piece will do that differently. Save scraps of that leather to practice your colors on each piece will be different in how it takes the dye. I keep a note book on how I mix the dyes so I can replicate to colors in the future. I mix by drops, not real scientific but I'm not building the guidance system for a rocket either. I'm not an airbrush artist, I can't even draw. The artwork is done already and you are simply coloring it not drawing it with the airbrush. To paint a chair black you do not need to be able to make the chair, you only need to be able to apply the paint to the chair and it will look just like a black chair. I use the alcohol based leather dyes so the solvent is alcohol. I also use Non Grain Raising wood dye as well. I use the alcohol based becuse it's the same solvent for my leather dyes and that way I'm not trying to mix water based and alcohol based dyes together. Wood dye and wood stain are two different animals. Wood dye is color and wood stain is pigment. Dye enters the leather and stain sits on top. I use the NGR dye becuse there are a lot more colors and you can mix them for different shades. I'm also very familiar with them from woodworking. Dye changes the color of the material and pigment covers up the material or sits on top. I only had wood dye when I started and since it dyes my fingers, clothing, wood, concrete floor and everything else it gets on I figured it would work on leather. It does for me. If it's right or wrong I'm sure is a long discussion that ranks up there with Ford vs. Chevy. Who cares as long as it works, it does for me. Trade name is below parentheses. I buy it from wood workers supply. (Behlen Solar Lux NGR Dyes, BehlenWood Dye HIGHLY FADE RESISTANT COLORS. Premixed, non-grain raising NGR SOLAR-LUX is ideal for use under any top coat)
-
I just opened a new account, painless compared to some companies I've dealt with. I did it online through the site. I placed my first order and then called to confirm I had done everything correctly.. I got in touch with customer service, I spoke to a real live person who spoke to me in English and was very helpful in walking me through each step of the transaction to ensure I was doing it correctly. It's been three days and UPS has my package on the truck for delivery today. She took the time to explain that they publish a new catalog about every two years and that the latest or newest items are added to the website and to check there for the newest additions. The online ordering system was simple enough for a retired Marine to use so most anyone should be able to use it. I'm a new happy customer.
-
Dark Brown Lined Belt
Oldtoolsniper replied to lel's topic in Purses, Wallets, Belts and Miscellaneous Pocket Items
Very nice, you don't really appreciate a hand stitched belt until you do one. Nice straight lines, it looks great! -
How To Prevent Leather Edges From Bulging Out When Stitching?
Oldtoolsniper replied to thekid77's topic in How Do I Do That?
I'm assuming you are stitching by hand and not sewing with a machine. The closest solution I have found is to back the leather with a clean wine cork as you pierce the awl through. Pierce right though the leather into the cork and the leather doesn't stretch and bend as much. I just did my first double thickness belt and it helped immensely. Having an awl that is scary sharp helps as well. It takes a while to get the awl that sharp but storing it with the cork impaled on the end keeps it that way even if it drops point down on the deck. This method seems to work for me. Veg tan is pretty stiff and doesn't always need it, I bought a Horween side which required me to learn the cork method since it's a little more like trying to stab a soggy noodle with a plastic spoon if you don't support it. -
What Is This That Came With My Swivel Knife?
Oldtoolsniper replied to Billy Hell's topic in Leather Tools
Wish I had hair to tool! Sorry, couldn't help myself!