


dikman
-
Posts
4,828 -
Joined
-
Last visited
Content Type
Profiles
Forums
Events
Blogs
Gallery
Store
Everything posted by dikman
-
I don't know anything about the 1245, but Pfaff parts can be expensive and may not be as readily available as the Consew's.
-
Sark is correct, that plate should be sitting flat against the arm. Yes, that part you're pointing to is the hook and it should NOT touch the needle at any time. It looks like the shuttle assembly needs to be adjusted to the right. That is also most likely the explanation for your top thread catching. As Uwe said, best thing is to have someone who knows what they're doing look at it.
-
That is one neat looking foot, Uwe!
-
I have three servos (from China) and the control housing is the same shape as SARK9's (top photo), only difference I can see is the markings on the two buttons. I also bought a needle positioner but don't use it. For high speed stitching it's probably quite useful, but because I run at very slow speed I found it was more trouble than it was worth. With mine there are two main settings that can be adjusted (internally), start speed and max speed.
-
Singer Model 15-91..............good For Leather Work?
dikman replied to lb61906's topic in Leather Sewing Machines
lb, as has been said many times, lots of people advertise a machine as being able to sew leather, and technically they are probably correct - but it's the type of leather that's important here (as well as the needle size and thread size). When you come across a machine that you're interested in, do a google search on the model number first and if it's a domestic machine then give it a miss (regardless of what the vendor may be claiming). -
How To "test Drive" A Used Industrial Machine.
dikman replied to nascenta's topic in Leather Sewing Machines
Yep. My first machine, a Singer, came with a Singer clutch motor. Judging by the wiring, switch and overall look of it it is OLD! As long as the insulation doesn't break down I reckon it will keep working for a long time yet. -
Walking Foot Dilemna: New Compact Or Used Full-Size
dikman replied to nascenta's topic in Leather Sewing Machines
Looks to be in very good condition. Good deal at that price, I reckon. Got any specs on it - thread size, needle size etc? (Just curious). -
Search on the forum for Chinese shoe patcher, there have been a few posts about them. That one is slightly different to the one's that I've seen (and the one I have) as it appears to have a raised post, rather than the usual flat arm. Mine will only handle #69 thread. Darren probably knows more about those machines than anyone else I know.
-
Holster And Stuff Clicker
dikman replied to Red Cent's topic in Gun Holsters, Rifle Slings and Knife Sheathes
I see what you're getting at, Red Cent. I don't see why it shouldn't work. The bolt and U piece will hold the plate in place and the slots will allow the ram to push directly onto the plate. Instead of a U piece you could just use two "side" plates, saves having to bend it (unless you have a suitable bender) as there shouldn't be much stress on the plates. I started thinking of other ways, to save drilling the ram, but it all starts getting more complicated, your way keeps it simple. -
I was just looking at the outer foot and realised that the screw clamp is at 90 degrees to that on my 111 (which is the same as my 211).
-
G'day banjo, all of mine are two button controllers, other than the four button ones displaying a bit more info on the control panel there's not much difference that I can see. I found that the first two parameters, N1 (startup speed) and N2 (max speed) were the only ones that really had any effect. If you fit the needle position device and turn it on then other settings become active, but other than that you can't change much. I set both of these to 10, I assumed this meant 100 rpm for N1 and 1000 rpm for N2, even though they refer to "spm" in the description part of the table. From what I noticed if you set the max speed lower then the slowest speed is also lower, i.e. it will crawl along slower. Of course, having a speed reducer fitted also affects things, as 1000rpm on mine will be a lot slower at the needle than on your mates if he has a direct drive.
-
Looks very similar to my 111WSV77 (which as far as I can tell is the same as a 111W153), only differences I can see are mine's black (!) and yours has an extra sliding plate in front of the needle.
-
Pretty good for a first effort. We all have to start somewhere, and it's not until you actually make something that you learn what works and what doesn't. Each one you make will be better than the previous one.
-
Ralf, I have two of those and am very happy with them (I did buy the needle positioner with one, as it seemed like a good idea at the time, but after trying it out I took it off as at the slow speeds I work with it's not really needed).
-
A Few Holsters I Made Recently
dikman replied to LawrenceR's topic in Gun Holsters, Rifle Slings and Knife Sheathes
Nice work, I particularly like the last one, simple and elegant. -
Glad it worked out ok, banjo. I found even the 3/4 hp has plenty of grunt, particularly when used with a speed reducer pulley set or a larger pulley in place of the handwheel.
-
Info on the G model seems a bit rare, I could only find the 111W116 (I was curious what it was).
-
As far as I know the "footprint" for mounting an industrial sewing machine motor is fairly standard (at least for every one that I've seen), i.e. 3 bolts in a triangular shape. If you have this configuration then a servo motor should be a straight swap, although you may need a different size belt too. This is the link to the manual for the Singer - http://www.manualslib.com/manual/522893/Singer-236w.html - should help with the oiling.
-
Mcqueen Holster - Sort Of....
dikman replied to dikman's topic in Gun Holsters, Rifle Slings and Knife Sheathes
I've made belts using the same weight leather as you use (minus the suede) but I find them too stiff for my needs. Because I use a cross-draw rig the strong side (right hand, in my case) holster I tend to sit lower so that the belt is angled down across my body. The cross-draw holster is sitting higher, of course, but that doesn't matter. If the belt is too stiff it won't stay put where I want it! My holsters are also hard and the guns slide out easily - as long as I don't catch the front sight, but I'm learning! On the subject of suede, I originally intended to use it as you do, but after discussing it with the chap where I buy my leather I decided against it. I don't know if our suede is made different to yours, but he said it's pre-coloured (as it doesn't accept dyes) and the colour has a tendency to bleed out if it gets sweaty. Still, I might use it sometime just to try it out. The biggest problem I have is that I don't make them for sale, and there's only so many holsters I can make for myself . -
Steve Mcqueen Holster
dikman replied to dikman's topic in Gun Holsters, Rifle Slings and Knife Sheathes
Sorry goertzen, I can't help as I'm referring to a revolver holster (as used in The Magnificent Seven). -
Darren, if you're referring to me my wife asked me if had enough machines when I brought the last one home (the free one). I said I really only need one more, something for doing really thick stuff! I don't think she was too impressed. Maybe one day, if the right deal turns up......
-
Just tried the braided #138 on the Singer G166 and it works fine on that machine. I had a feeling that it might like the vertical shuttle design better.
-
Mcqueen Holster - Sort Of....
dikman replied to dikman's topic in Gun Holsters, Rifle Slings and Knife Sheathes
The (almost) finished product. Taking the photos against the green has made it look lighter than it is. This whole exercise was partly an experiment to see how the leather would look "natural". Although it doesn't show on the photos, the neatsfoot oil application came out a little patchy, something to watch out for in future. The belt is only a single layer of 8-9 oz veg (the thickest I had) because I didn't want a stiff belt, I wanted something that would tend to mold to the body and I wanted the rough side in to give a little friction. Only problem I think I can see is with the tongue, it may be a little thin for the overall weight of the rig. I may glue a piece of Kangaroo onto the inside of the tongue to reinforce it, as the Kangaroo is very thin but extremely tough for it's weight. The belt only has a single line of stitching around the edge for now, as I'm not sure what I want to do with it. I may stitch a pattern on it or just run a second line of stitching around it. Still thinking.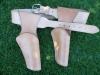

-
I watched the movement carefully under a magnifier and there's no sign of the material being moved backwards. Everything seems to be functioning correctly, so I figure I've got it as good as it's going to be. My 111WSV77 will do 4 1/2 spi, but it doesn't have reverse (which I've gotten used to!) and the 166 just feels a bit smoother overall. The 77 also has a left-toe-only foot, and I just found out it will fit the 166, so now I'll be able to get a bit closer to the edge on belts. Oh, one other thing, I also have a long-slot feed dog for the 166 - when would you use this?
-
Interesting point. The dog is set according to the manual, but I'll check with the magnifier again. I might as well have a play with the height as it's about the only thing I haven't adjusted yet!

