


fredk
-
Posts
5,999 -
Joined
Content Type
Profiles
Forums
Events
Blogs
Gallery
Store
Everything posted by fredk
-

What is this called and how to install them?
fredk replied to Jen the Canuck's topic in How Do I Do That?
They could be domed head ready-rivets, like these or pressed steel dome ornaments. like these or these, screw-back domes hth -
Sand some tan coloured leather, take the dust and mix it with some weather-proof PVA glue to get a thick paste. Apply to the wound and let dry. After apply some polish and buff lightly, do this several times and the wound should be less noticeable
-
In the old TV series "Sheriff of Cochise" John Bromfield wears a nice, very elaborately tooled buscadero type rig Seen clearest at the beginning, from 0.18 to 0.21 seconds. Clarity of the YT video is not great Anyone know anymore about it? Is there a pattern? Lots of questions An enquiring nosy-buddy wants to know PS; He seems to wear nicely tooled boots as well
-
This is all very interesting How did I miss it at the beginning?
-
The doctor told me last week I'd have to cut down on my drinking. Only one glass of whiskey per week So far I'm up to the third week of August 2217
-
I was bitten by a wolf today I had to go to the hospital for treatment The nurse asked me 'Where' I said 'No, just the usual ordinary type'
-
As I wandering the lanes of Scotland I heard a farmer shouting I think he was a Rolling Stones fan but he got some of the words wrong He was shouting ' Hey M'Cloud get offa ma you'
-
A. short finger nails are a must or latev/rubber gloves to cover them b. run a groover between all the stitching holes before you stitch edit to add; c. dilute any dye you may use and use multiple coats to get the desired colour or finish d. wet the leather before putting on the dye. not soaking dripping wet, just sponge some clean water on .this helps the dye spread thru the leather
-
you never know Ppl are fickle and they might buy them for the novelty
-
I just get the double-sided sheets off an ebay seller It takes a bit of practice to use the sheets tho
-
yup, a double-cap rivet. They go by many names I like to use bright brass rivets with one domed head. I think it looks a bit more 'classy'
-
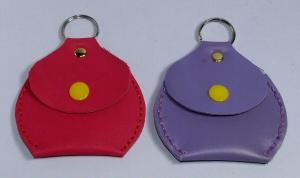
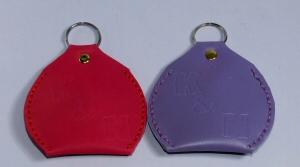
A small ready-rivet would do. I use one on my little key-ring coin purses. They have a similar way of opening Loverly job. A late friend of mine would have liked these. She was a radio-ham and in noisy places we used to communicate with code in morse
-
New to the forum and wanted to introduce myself
fredk replied to Second_Chance_Leather's topic in Member Gallery
Brilliant!! -
yup, it works fine. I use d/s tape I got in a £shop, 3 rolls of 19mm x something for £2 edit; I forgot to say you can buy sheets of d/s tape. I keep and use sheets about 8 inches by 6 inches. They're very handy for sticking fabric lining on to leather
-
@Heafty turnip Welcome to the mad house errr, I mean the Forum
-
@Steve855 Welcome to the mad-house, err, I mean the Forum
-
PPS; @OGL By the way, Welcome to the mad house errr, the Forum
-
PS. I forgot to say; go raid a charity shop (thrift store?) for wallets, purses and handbags. You can pick them up real cheaply
-
@OGL I sometimes buy a cheap item and take it apart to see how its made and how I would do it better. BUT, I only buy really cheap stuff and what I'm interested in. Its all good edumacation
-
Well, things I would do differently; 1. looks like the sewing was through punched out round holes; I would use a diamond hole, punched thru but not out 2. Stitching is heavier than need to be; I'd use a much lighter/thinner thread 3. the stitches lay on top of the leather; I'd have a groove cut or run for the stitches to lay into 4. I don't like the way the stitching goes over the edge at the top 5. I'd prefer a brown thread rather than a stark white 6. no edge finish at all. I'd slick and burnish that edge
-
afair I put a piece of spring steel strapping in a chap's sword belt to stop in twisting under the weight of a sword. It worked well. But as it was only a length of about 12 to 15 inches he had no problem folding up the belt. Being spring steel I couldn't bend it without tools so this chap never bent it
-
echo, me too. The pills are in aluminium & plastic vac packs. Some are nigh on impossible to break out. I have little felling in my fingers and thumbs but I still gotta break these damn pills out
-
You could use sail eyelets and run the cord through them
-
Welcome to the mad-house, er. . . the forum Patterns; Tandy library has plenty of free patterns, or put a shout on here and I can maybe send you a PDF of a suitable Tandy pattern Tools; tell us what you have and we'll help you spend your money
-
It rarely snows here but when it does its usually 1 inch deep. But in '81 I was snowed in on a Mountain for 4 days. It was a bad winter here, the petrol and diesel in the post vans froze solid. I was a postie and was delivering a telegram to a mountain farm. Getting there was no problem. I had a hot whiskey then found my van was snowed in. Stayed overnight at the farm and next day took to getting back to base. I only got so far. I abandoned the van and found a shepherds hide, a stone built shelter. It was fully equipped with survival gear - tins of soup, tins of beans, tea, coffee, the means of a fire and lighting it a few old wool blankets. I spent the night in there. The next day an army helicopter, out looking for me, spotted me but blizzard conditions were too bad for them to land so they dropped me more supplies. Two more days in the shelter then a bit of a thaw and I could get away. I left the extra supplies the army dropped in the shelter for the next person. I reckon my survival training in the RAF kept me alive I often take an 'emergency supply' of food and things in my car yet. And my #1 son used to laugh at it until one dark night. . . . but thats another story!