Dwight
-
Posts
5,247 -
Joined
-
Last visited
Content Type
Profiles
Forums
Events
Blogs
Gallery
Store
Everything posted by Dwight
-
Hunter, . . . you didn't say what you were using for the final finish, and that makes a lot of difference. Secondly, . . . if you are making belts, . . . you don't want to soften them up very much, . . . otherwise the aren't worth their weight in dead cats. I use Resolene for most final belt finishes, . . . then I start by bending them around the rounded front edge of my counter space, I then bend them in a horseshoe shape, . . . about 2 inches across, . . . and work the center of the horseshoe from one end of the belt to the other. It makes the belt pliable, . . . but not soft. Flexible and not stiff is what you want, . . . soft is for buckskin jackets, not belts. May God bless, Dwight
-
Murphy, . . . I am not expert on beading by a long shot, . . . but sometime back I did a piece you can see on my website, at the end of the long rifle gun bag, it is the globe, eagle and anchor of the USMC. I bought my beads at a "bead emporium" and the lady who sold them to me was very helpful in making sure I got the right stuff, . . . spending a lot of time explaining what I would have to do. Her one piece of advice I didn't expect was that anytime you can use it, . . . the best beading "string" is dental floss. Enter each bead left and right, . . . and of course put them in a loom. For what you are doing, . . . I'd skive out a pit to put the beads in, . . . the back being very thin when I got done, . . . lace the loom and beads to the belt through the pit, . . . then put a liner inside the belt to give it the strength. That way all your knots and strings would be hidden, . . . and of course cemented to the other piece of leather, . . . should never be a problem losing beads or anything like that. Best wishes, may God bless, Dwight
-

First-Timer In Need Of Help With Pattern
Dwight replied to samcolt45's topic in Gun Holsters, Rifle Slings and Knife Sheathes
A couple years back, . . . I was teaching a holster making class at Tandy's, . . . and a young man in a wheel chair had your exact problem. If I remember correctly, . . . he and I designed a cross draw rig with a thumb break, . . . that "kinda" looked like the Andrews "Carjacker" holster. It had something more like a 60 degree cant, . . . but Jimmy could grab it in a heartbeat, . . . that is what counts most, I think, when we're talking CCW. May God bless, Dwight -
Several decades ago, . . . I was doing some electrical work with a friend. His "formula" was simple, . . . figure out your material cost, . . . give that $$ figure a "times 3", . . . and you have a good starting point on the charge. Leather work, I have found is very similar, . . . at least for me. Another thing I personally appreciate, . . . therefore I pass on to my customers, . . . "Free Delivery". I build the shipping and insurance costs into my product. True, the guy up the street where I drop it off on my way to church, . . . he pays a bit more, . . . and the guy in Southern Cally gets a bit of a break, . . . but it washes in the long run as far as I am concerned. The main thing though, . . . you absolutely, positively, without a doubt need to know for sure how much it is costing you, . . . then you can work on how to price it to your customers. Get that down first. May God bless, Dwight
-
It was an absolute, . . . super duper, . . . pleasure to find this new playground. I don't know how you done it, . . . but it loads about 3 times as fast as it used to load, . . . the fonts seem crisper, . . . and if you decide to mess with the blue, . . . for cryin' out loud, . . . don't go pink,.................. I may be an old geezer, . . . but I like technology, . . . especially when it helps me, . . . and this is good stuff. May God bless, Dwight
-
Flat Backs On Iwb Holsters
Dwight replied to JeffChastain's topic in Gun Holsters, Rifle Slings and Knife Sheathes
Yeah, Jeff, . . . the math formula that works best is very simple: 1. Make the back 2. Make a front that is atttached to the back along the sight channel area 3. Soak the whole thing in water 4. Mold the holster to the gun, keeping the back on the table to keep it flat 5. Let the holster dry. 6. Insert the firearm and mark the edge of the front, cut and bevel. 7. Mark the stitch lines on the front 8. Flatten out the front so you can draw around it and get a good pattern 9. Cement, stitch, edge, burnish, dye, finish, and sell your holster. See, . . . only 9 mathmatical steps, . . . and while some may think this is a goofy way, . . . it works, . . . works well. May God bless, Dwight -
Poly Vacuum Bag Thickness
Dwight replied to SooperJake's topic in Gun Holsters, Rifle Slings and Knife Sheathes
SooperJake, . . . Sylvia told you about it for sure. I saw a friend's unit he uses for laminating doors, windows, door frames, . . . his was a bit thicker, . . . tried to use it on holsters, . . . seemed not to work to suit me. The first holster I made with this was for a full size 1911, . . . slid the gun out, . . . let it dry, . . . had to jam the gun to get it into the dried holster, . . . thought for a minute I would have to cut it off the gun. My bag is about 24 inches square, . . . I use a vacuum pump from Harbor Freight, . . . does everything I need. May God bless, Dwight -
Poly Vacuum Bag Thickness
Dwight replied to SooperJake's topic in Gun Holsters, Rifle Slings and Knife Sheathes
My bags are 15 mil purchased 45 inches wide from JoAnn Fabric. I fold over one end, . . . apply contact cement about 2 inches wide down each side, . . . and press together giving me a bag. I add my hose bib connection. The open end is sealed around a wooden dowel, . . . and I never need to cut off anything. May God bless, Dwight -
Pressing Down Stitching
Dwight replied to SooperJake's topic in Gun Holsters, Rifle Slings and Knife Sheathes
I took a phillips screwdriver, . . . A piece of 5/8" stainless steel round stock about 1 1/2 inches long, . . . Rounded and polished each end of the s/s piece, . . . Drilled a hole in the center of the round stock on the side (don't go all the way through), . . . Set the screwdriver in the hole and welded it in place with a couple of good heavy tack welds. It closes up the stitches super quick on a holster, belt, mag carrier, billfold, . . . whatever. May God bless, Dwight -
You can also use an adjustable V gouge. Set it just a bit deeper than the thickness of your leather, . . . put a scrap piece of leather underneath it, . . . run against a straight edge, . . . if it is sharp, it will give you the edge you want. Personally, when making some boxes, I like to use the gouge and not quite go all the way through, . . . Coat the gouge with contact cement, . . . when it dries, just fold it over, . . . It makes a really nice looking box in my opinion. May God bless.
-
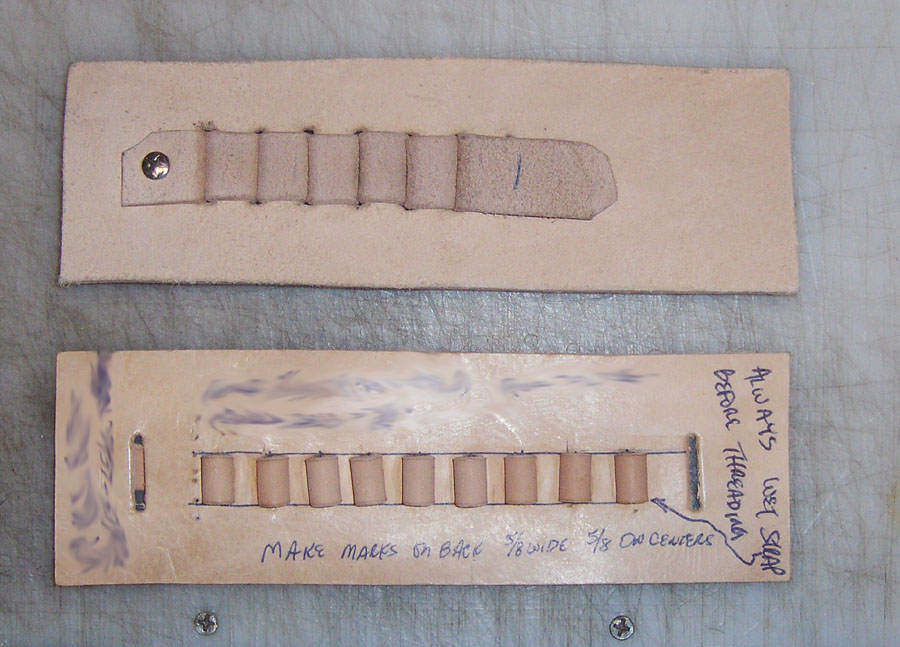
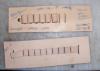
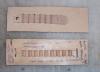
You can look on this post, . . . and see every stitch I put in my belt loops. Look at the enclosed pictures, . . . these are my 3D note pads I refer to when I am making a cartridge belt. At 67+, . . . somethimes the memory ain't worth a dime, . . . so I have cheaters. These are mine. This is how I do it. Yep, . . . the little ones are for .22's and the big ones are for .44 or .45. May God bless, Dwight

-
As far as the bullets go, . . . I usually pull them all out after I have riveted down both ends. By that time, . . . the sizing, forming, etc. has all been done, . . . and most of the stretching/shrinking has also taken place. I come back after dyeing & finishing and re-insert the bullets to make sure nothing has changed. Invariably, one loop will have tried to shrink on me, . . . but that is usually the worst. As far as advantage, . . . just a personal note, . . . I wouldn't give anyone two whoops for a sewn cartridge belt. I've owned em in the past, . . . doubt that one will ever grace my place again. I also refuse to make them for my customers. When they see my personal black rig, . . . that is usually enough, . . . And, . . . I can usually do a 24 loop section of a belt in just about 45 minutes, . . . that is from a blank belt back and piece of loop strap, . . . to a cartridge belt, punched, looped, and riveted, . . . drying so it can be finished up. May God bless, Dwight
-
I use 4 oz or so veg tan in my bullet loops, . . . do not sew them, . . . loop out and back through the same hole. Rivets hold the ends, . . . and it is always contact cememted to the liner. Always do em wet, . . . use actual bullet for sizing, shaping, etc. I use a 7/8 in wide strap pulling through a 3/4 in strap punch hole, . . . have never had any problems with it. Sometimes the first few loops are a bit tough, . . . but after it dries, . . . gets dyed, finished, etc.. . . they always look good to me, . . . customers are happy. Works for me. May God bless, Dwight
-
I bought my Boss back about 6 or 8 years ago, . . . NIB, . . . have not looked back. My hands are for hamburgers, . . . machines are for stitching leather. I guess I figure that anything I make at age 67 will long outlast me, . . . no matter which way I do it, . . . And if there is a company that stands behind their machines better than Tippmann, . . . it must be Zippo. May God bless, Dwight
-
Concealed Holster/case
Dwight replied to Dirck's topic in Gun Holsters, Rifle Slings and Knife Sheathes
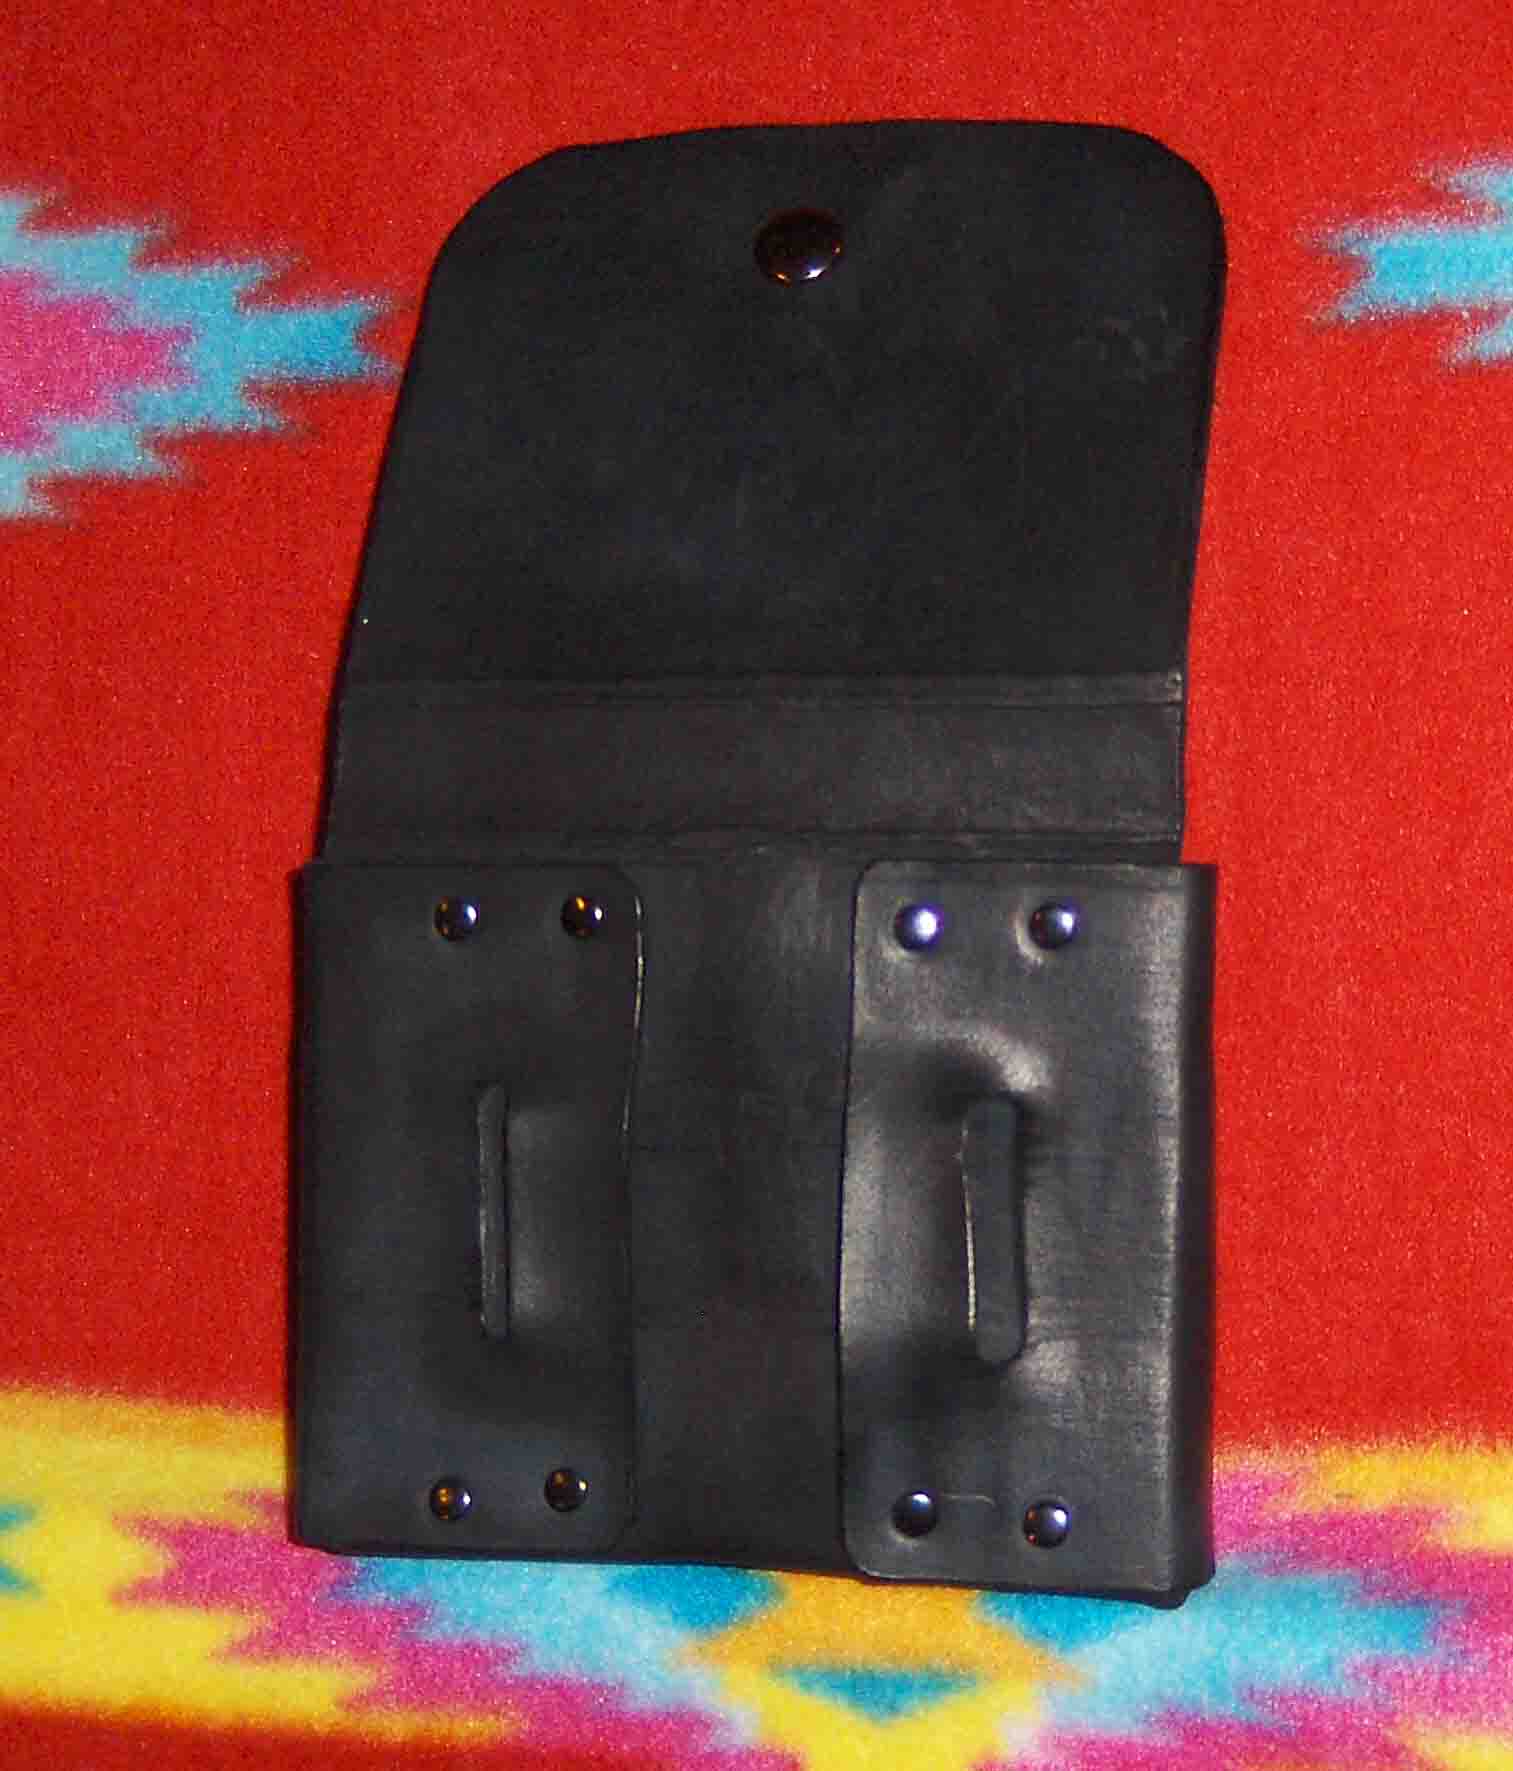
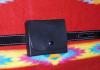
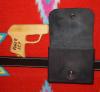
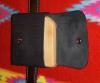
I actually make two different ones, . . . vertical and horizontal. I couldn't find a vertical pic, . . . but this is the horizontal one. inside the box are stacked, glued pieces of scrap leather that fill in opening under the barrel so that once it is dropped in, . . . it never re-orients itself in a different direction. The verticle one also had a small cut out for the trigger guard, . . . allowing a cleaner grip on the weapon. I never got to where I could present from this as well as my 1911 IWB, . . . but it was still pretty quick. May God bless, Dwight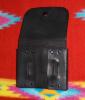
-
Concealed Holster/case
Dwight replied to Dirck's topic in Gun Holsters, Rifle Slings and Knife Sheathes
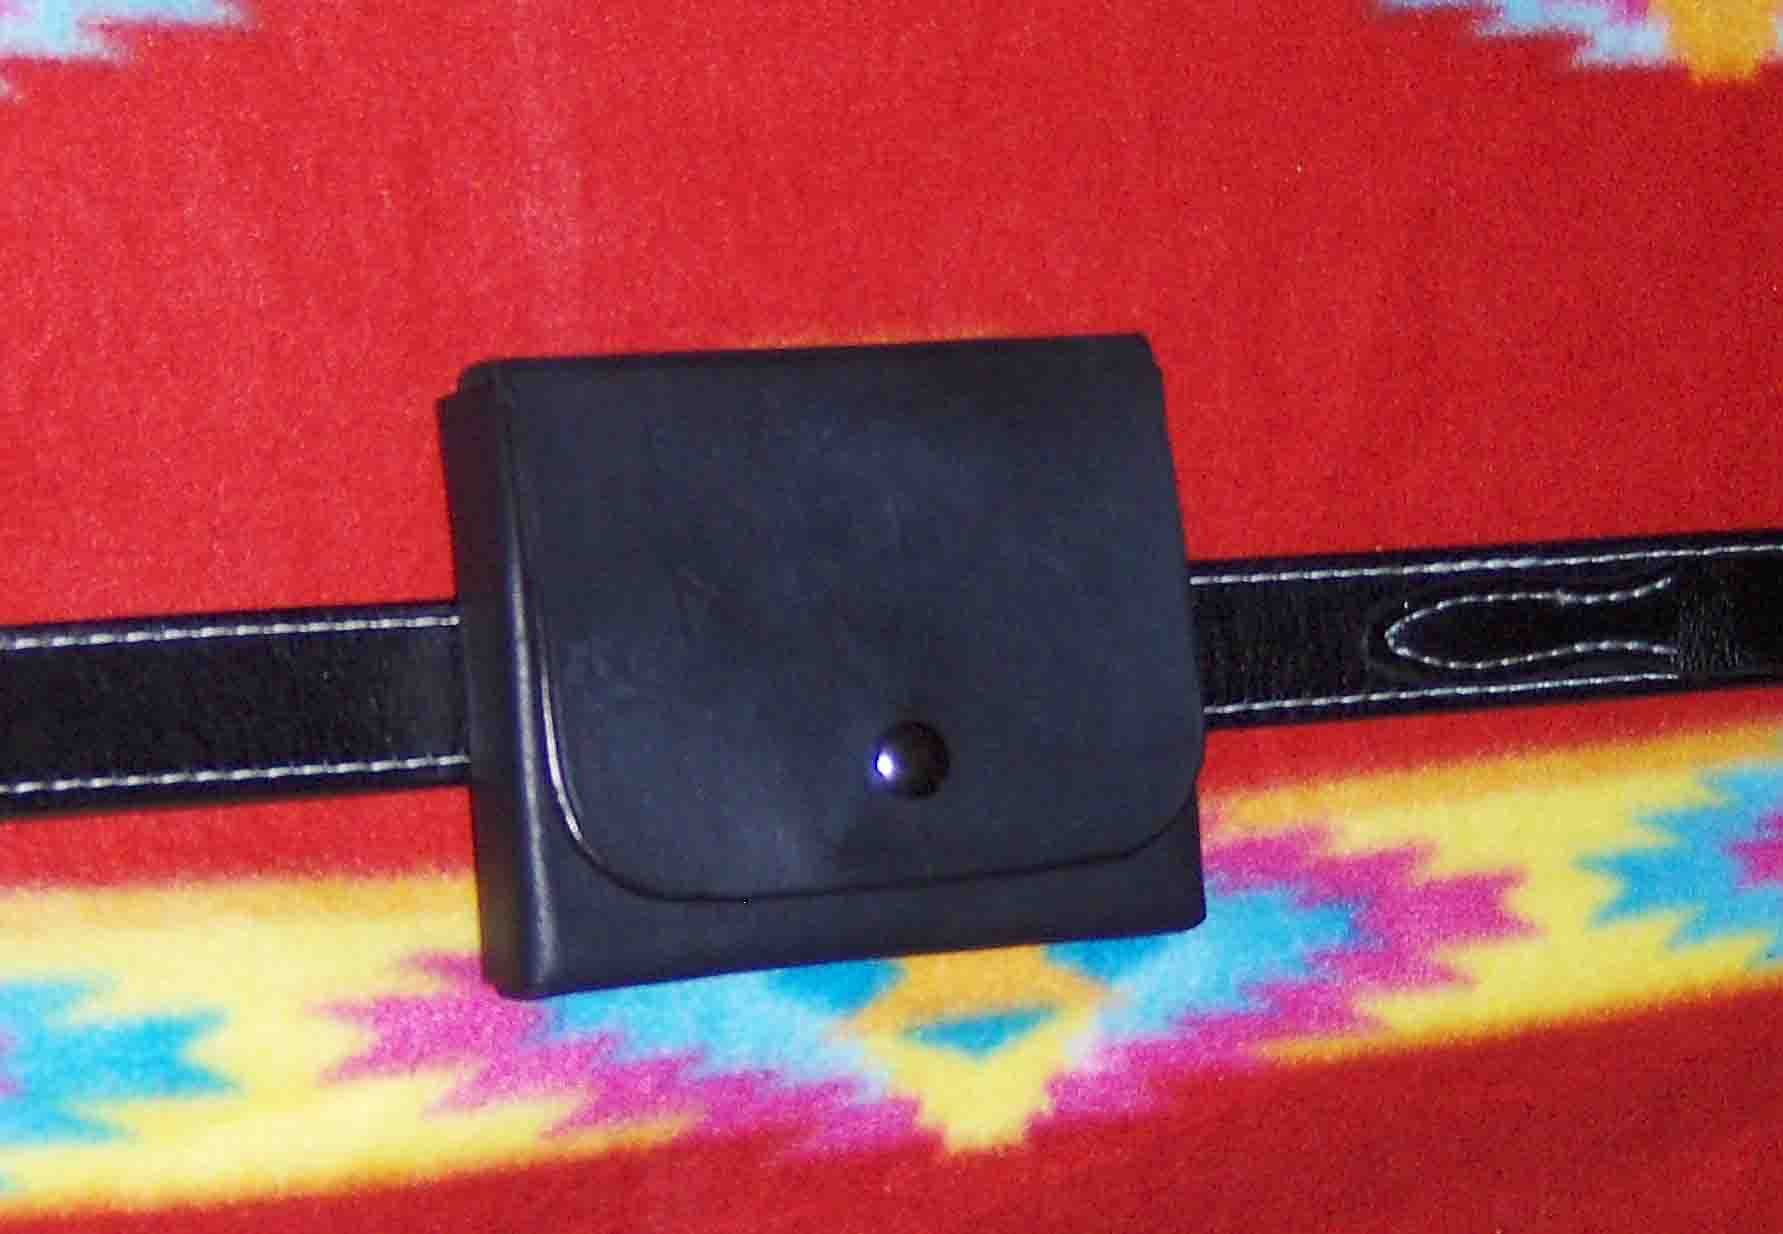
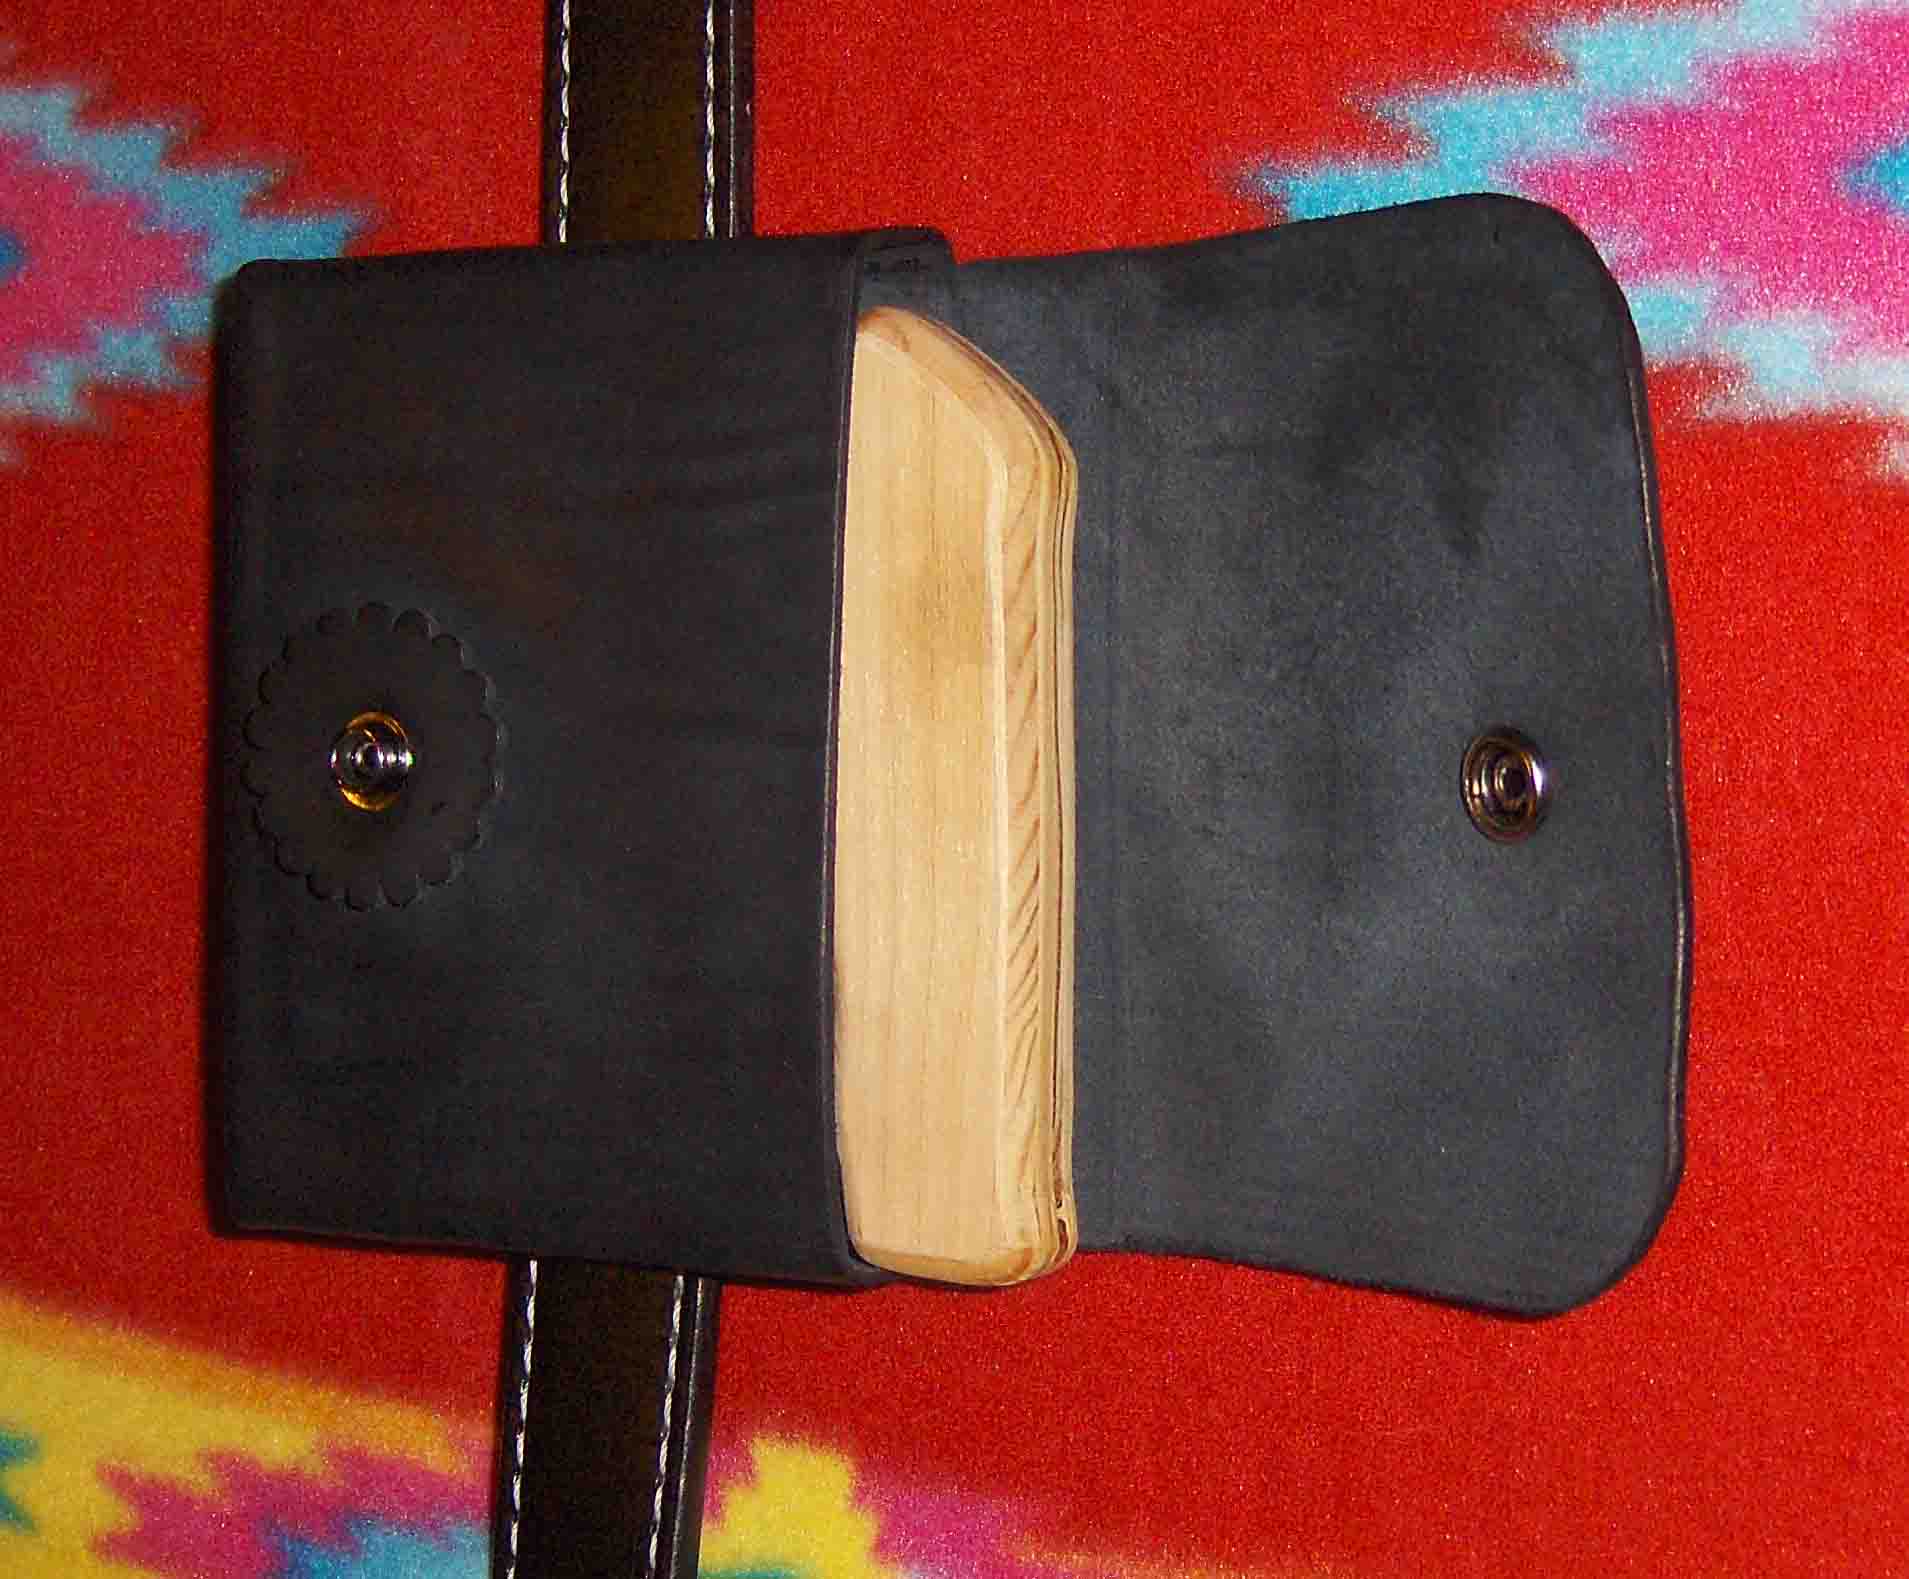
I have a customer for whom I produce a square, molded, leather box with a snap on the bottom flap, . . . holds an LCP perfectly muzzle down, . . . just like a holster, . . . I think that personally I would have issues with it snagging, . . . but it is so common looking, . . . doubt if anyone would ever be made with it, . . . Have never had one returned by an unhappy customer. May God bless, Dwight -
Need Advice On Saddle Repair
Dwight replied to Dwight's topic in Saddle Identification, Restoration & Repair
I went out today to the shop, . . . got a really good look at it, . . . the wool leather is gone, rotted, it is like watered down cardboard. You hit it on the head 'helmethead" (no pun intended,............) and that is exactly what I will have to do. Ahh, . . . well, . . . my fingers were just getting well after being smashed between two concrete blocks, . . . guess we'll see if they still work Hey, everybody, thanks for all the good words, suggestions, etc. Y'all make me glad I stop by here. May God bless, Dwight -
Need Advice On Saddle Repair
Dwight replied to Dwight's topic in Saddle Identification, Restoration & Repair
Kevin, . . . thank you, . . . I was really afraid of the cement idea, . . . but there just simply isn't much of a pool of help in this area. I really had liked your idea, . . . but had not formulated in my mind that the reason it split was maybe a fat horse, . . . and come to think of it, . . . he has some pretty "robust" stock. Seriously, . . . he does take good care of his animals, . . . Again, my appreciation. May God bless, Dwight -
A friend asked me to look at his saddle, said it needed a bit of repair. He brought it over, . . . the wool on the underside of the saddle is split, . . . from the very rear of the saddle, about 8 or 9 inches straight forward, . . . almost dead center of the saddle. He suggested I could maybe cement it up against the bottom of the rear skirt, . . . but I told him I would ask the experts, . . . on here. Personally, . . . I thought of just hand stitching the split back together, . . . would like to hear "What would you do?" Thanks, may God bless, Dwight
-
Newbie, Newbie, Fresh Outta Da Box Newbie
Dwight replied to BulletProof's topic in How Do I Do That?
The singular thing I like most about leather working, . . . it is the individuality and creativity that comes naturally with the project(s). As an example, . . . did two holsters and two mag pouches a few weeks ago for a customer. One set black, . . . one set reddish brown. Black set dyed with no problem, . . . brown set came out totally different. Looked as though different dyes were used. Most of it went away with the final finish, . . . but there was still a difference. Since they are worn on opposite sides, . . . I didn't think it was enough to re-make either of them, . . . customer was OK with the decision. Once you start decorating the stuff, . . . uhhh, . . . it get's habit forming, . . . fun habit forming, . . . Oh, . . . and welcome to the forum, . . . stick around a while, . . . you'll have fun. May God bless, Dwight -
A few years back, . . . I got burned on a piece of leather from Tandy, . . . it was in the wrong stack, . . . I was in a hurry, . . . unfortunately for me, I cut into it before I measured it. Ever since, . . . I take my dial caliper when I go to buy leather, . . . even if I'm going to Weaver's, . . . May God bless, Dwight
-
Gun Belt - What Size Leather?
Dwight replied to Matt Alsaker's topic in Gun Holsters, Rifle Slings and Knife Sheathes
I actually use a dial caliper for my belt material, . . . and I'll find two pieces I have that make a belt between .180 and .210. I really like hitting it .195 to .200, . . . they seem to be the better cross between pliability and strength. My belt I have on right now is about 6 years old, . . . measures .250+ and has been a real trooper. May God bless, Dwight -
I have not done it yet, . . . but I did talk to a company rep from down in Florida a couple of years back. They make custom band saw blades. I asked him if they could make me one without any teeth, . . . sort of like one endless razor blade. He laughed and said no problem, . . . something less than $30 for a 62 1/2 inch blade. Again, . . . I didn't do it yet, . . . but if my arthritis gets much worse, . . . the knives are going into the drawer, . . . I'll be getting a band saw knife to do my work. May God bless, Dwight
-
I'm happy with godaddy,................. Getting up in the morning has a learning curve, . . . Once you figure it out, . . . goes easier from there on out. May God bless, Dwight
-
Where Can I Get Duncan's Blue Guns?
Dwight replied to mojoewrkn's topic in Gun Holsters, Rifle Slings and Knife Sheathes
Apparently they changed it somewhat, . . . or I disremember, . . . anyway: click on Range and Training Supplies>Training Weapons>Blue Guns, . . . it should come up. If you don't see the one you want, . . . call them, . . . they'll get it. May God bless, Dwight