Dwight
-
Posts
5,254 -
Joined
-
Last visited
Content Type
Profiles
Forums
Events
Blogs
Gallery
Store
Everything posted by Dwight
-

Back To The Basics Pancake
Dwight replied to markush's topic in Gun Holsters, Rifle Slings and Knife Sheathes
The only rule or law you violated, . . . is one of pysics. The greater the angle you make your slots, . . . the longer they will have to be to allow a full size belt to go through both. That makes the outside edge also longer, . . . reduces the overall strength by changing the length/width/depth ratio, . . . which reduces overall strength and rigidity. Will it cause a problem? It can, . . . which means somewhere, someday, . . . it will. I tend to do more of the "straight up" slots, . . . but that's my way. May God bless, Dwight -
For tooling, you need a surface that does not yield, bounce, move, and is solid. Kinda like a piece of steel, . . . but marble is better. Tandy sells tooling size pieces for about $30 to $50 if I remember correctly. That piece will do you good. You can also maybe get a broken piece of a marble counter top at some lumber yards, . . . small piece of marble at a grave marker place, . . . be resourceful and cheap, . . . most of the time it pays. Weaver will cut the pieces of leather you need, . . . sized correctly, . . . etc. if you want to buy a bunch. They also have pre punched key fob stuff, . . . other things like that, . . . you need to search their catalog. Cutting leather is best done in my shop with a very sharp drywall type razor knife. Scissors are for real thin leather only in my shop. May God bless, Dwight
-
One place you may try: Weaver Leather, in I think, Berlin, Ohio. There web address is: http://www.weaverleather.com/ I personally deal with them, find them to be really good people. Use their "Contact Us" info, . . . call em up, . . . tell em what you want to do. Only problem you will have, they only do wholesale, so you have to be set up at least in if you live in Ohio with a Vendor's license. May God bless, Dwight
-
If at all possible, I personally measure the belt they wear when they talk to me about the new one. I go from that "most used" hole to the buckle end, . . . that is my critical measurement. I always put 7 holes in my belts, instead of 5 like you find at most stores. The center hole is my critical measurement hole. So far, I've never had any dress gun belts come back with that formula. May God bless, Dwight
-
I'd probably start out with one of those foam pop can holders. Don't forget to insulate above, below and all sides, . . . as any temp change there can cause condensation, . . . which we all know is not good for leather products. I'd go so far as making a waterproof shield between the product and the inside also as a JIC measure. May God bless, Dwight
-
I've never done it, . . . but my gut tells me that if I wanted that "look" a piece of clear vinyl from JoAnn fabrics would be just right to get that effect. Some of their stuff is 60 wide, . . . and if you got 1/3 of a yard (abut $16 a yd) you'd be out 6 bucks or so. It cuts real easy with scissors or a razor knife, . . . will not shrink, expand, rot, rust, or deteriorate over time either. Sandwich that between a couple pieces of 4/5 veggie tan, . . . you would probably have one really neat looking belt. May God bless, Dwight
-
I made a beautiful little dog collar for a friend for his little 3 pound mutt. The collar holds Mutt's shock collar device. Mutt's buddy figured how to unbuckle the thing ( I used a brass 3/4 inch bridle buckle ) and of course they then were free to run where ever without interference by the shocking device. My friend needs a new collar made that won't be so easy to get off. Any one else ran into this problem? If so, . . . how did you solve it? If not, . . . how would YOU try to prevent it again? Thanks, folks, . . . this ain't my specialty, . . . out of my league. May God bless, Dwight
-
You don't say how heavy the "thick" leather is you are cutting, . . . but Sylvia gave you some good starters, . . . also STAND UP when you are cutting. I see a lot of people (in my leatherworking classes I teach) who try to cut projects out while sitting. It works about as well as standing on your head and eating, . . . it can be done, but it sure is messy. Personally, I don't use much of anything other than a razor knife, . . . and I have a very special strop that I use to keep my blades clean, . . . and SHARP. I have three knives I keep sharp and when I am working on a project, I'll usually strop all three before I start cutting. A sharp knive is an absolute MUST HAVE for doing leather working, . . . and please believe me when I say that a dull knife will get you cut. Beyond the cutting, though, most of the "good looking edge" will come from the sanding, beveling, and burnishing, . . . the cutting just facilitates that work. A really good little sander is another MUST HAVE if you want to turn out quality products without a bunch of hard hand labor. I use both a 30 inch by 1 inch belt sander and a Dremel tool for my sanding, . . . they both work great, and have their own personal strengths. I guess I don't have any other suggestions, . . . except maybe don't try cutting leather with a splint on your thumb May God bless, Dwight
-
Ladyface, Cut, sew, punch, lace, mold, . . . including beveling of all edges: these are the first steps, and can be done in what ever order works best for you. I like to do a "first" burnish on all edges as I put the thing together, . . . I use only water. You talked about "casing" the leather, . . . does not need to be done unless you are molding something into it, . . . or if you are stamping, tooling, etc. If you use USMC black, . . . and you want a really good dye job, . . . forget the little 4 oz bottle, . . . get a quart. Also buy a cheap 9 x 13 non stick baking pan that's 2 inches or so deep. Pour the USMC black into the pan, . . . put on rubber gloves, . . . and dip the belt in, . . . making sure to just kind move it through the product, . . . making sure it is in the dye for a good 3 or 4 seconds anyway. I start at the buckle end, . . . and slither it through the dye like a snake, . . . sorta. Then lay the item down flat on newspapers, . . . flesh side down, . . . and leave it for about an hour. Take it up, . . . hang it up where air can get to it, . . . if you have a south facing door, . . . hang it between the door and the storm door, . . . let the sun bake it dry, . . . won't hurt it at all. Go get a pair of canvas gloves (or other kind you don't ever want to be seen in public again with), . . . get a couple of old worn out wash cloths, . . . and begin the bufffing / burnishing process. You want to buff that leather, . . . all sides, . . . all edges, . . . until you take a white paper towel and have to rub really hard to get any more residue off the item. This is especially necessary for the hair side of the leather (smooth side). When you get done, . . . your wrists and fingers should be a bit sore. Burnish the edges, . . . again with water only, . . . burnish them REAL smooth, . . . that is the difference between a leather butcher and a crafts person, . . . Take a CHEAP one inch bristle brush, . . . NOT nylon, . . . pig bristle works real well, . . . mix up the Resolene, . . . 50/50 with water, . . . shake well, . . . start on the flesh side, . . . and slobber the Resolene on. Brush it until you get a "lather" looking foam come up, . . . all along the flesh side, . . . turn it over, . . . do the same for the hair side. When I do belts, . . . I start out with them laying down, . . . after a good coat on both sides, . . . I hang em by the buckle to finish. You might want to take a scrap of leather, . . . dye and buff it (maybe 6 inches square) and practice your Resolene on it. The key is in the finishing strokes. You will put 2, or 3 wet coats, on, . . . one over the other, . . . getting a lather each time, . . . then quit applying, . . . start brushing out the bubbles, . . . left to right, . . . right to left, .. . up, . . . down,. . . sideways, . . . just keep lightly brushing until you have gotten all bubbles and the bluish tint of the Resolene gone. After you have let this dry for at least 24 hours, . . . get a dauber, . . . come back and re-burnish the edges with pure Resolene, . . . you might not notice a great improvement, . . . but that extra coating helps keep the water out of the edges. You can then do the shoe polish if you want, . . . but it will be darn near un-necessary. If I did use shoe polish, . . . I'd use the liquid "scuff kote". Anyway, . . . good luck, . . . happy Easter, . . . and may God bless, Dwight
-
Flesh Out Holster Finish
Dwight replied to Bob A's topic in Gun Holsters, Rifle Slings and Knife Sheathes
It'll wind up being one of those things you do want to do, . . . or you don't want to do, . . . and only you can decide. I've made them where there was nothing at all done to the outside, . . . and I've made them where I finish the inside and outside with Resolene just like a regular holster. The Resolene makes for a much firmer holster, . . . but a little slicker in the pocket. It's a trade off, . . . and you alone can determine which way is best for you. May God bless, Dwight -
Glad you got that figured out, . . . May God bless, Dwight
-
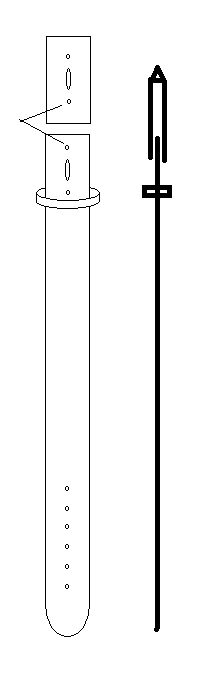
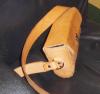
It won't work on every one, . . . but on most you can get away with making a piece for the billet end like Kevin said. I do it by opening my original belt up, . . . and adding a horseshoe shaped piece of leather to the belt body, like the little drawing shows. Opening it up will add an automatic inch or more depending on how you do your belts, . . . adding the horseshoe piece can give you however much you want. You can extend the horseshoe back to cover all the holes, . . . camoflage it by adding conchos or decorative studs, . . . you might get away with it. The other suggestion would be to cut it dead center in the back, . . . add the length needed, . . . and lace it back together with some fancy lacing. That is how I would do a cowboy action rig. Oh, . . . by the way, . . . I know you have figured this out by now, . . . but the unwritten rule # 1 on making belts: the people you are selling to have absolutely no idea at all as to what size belt they wear. They think that because that pair of jeans they bought 4 years ago (size 36 waist) means that they are still a 36. About half the time, . . . their fat little ( ? ) bodies have stretched those jeans out to 39 or 40 and they have to hold their breath to get em buttoned. And yes, . . . it goes for the gals as well as the guys. Long and short: take the belt they are wearing TODAY and measure it from outside of buckle to the most used hole. Make that measurement the center hole of your new belt you make for them. May God bless, Dwight
-
Really good looking, . . . thanks for the pics. May God bless, Dwight
-
You do fine work my friend. I really like the one on the bottom, . . . the big one. May God bless, Dwight
-
I'm not a fan of gum trag, . . . use it sometimes, . . . ruined a project one time when it got where it shouldn't be ( MY fault !!! ) and it blocked out the dye, . . . threw the project away. Just be careful with it, . . . Sometimes I like to dye the edges real dark if not black, . . . then go to the straight bees wax & polish the edges real good. That gives it an aura all it's own I think. May God bless, Dwight
-
Rings Blue Guns For 1911's
Dwight replied to triage1998's topic in Gun Holsters, Rifle Slings and Knife Sheathes
I cannot speak for all of them, . . . but I can speak for one of the Springfield stainless models, . . . just too dad blamed big. I had a SA loaded some time back, . . . and at first I didn't quite understand why it didn't feel right in my hands, . . . and it was because it was slightly larger than my GI SA, . . . and my Rock Island 1911. I've made holsters for a bunch of 1911's and so far that SA loaded with out the ambi safety is the only one that caused me any grief. It was the big one. May God bless, Dwight -
ksmith, . . . why go to the bother of trying to re-invent the wheel? Veg tanned leather has proven it's worth for decades as THE leather with which to create holsters that can be easily, realistically, and accurately molded to the specifics of most any hand gun. Using modern acrylic finishes, . . . on a time proven base material, . . . will give a superior product. I also had an email conversation with a well known national maker a couple years ago about the chrome tanned question. He told me he had wrapped a mild steel rod in a large piece of suede leather, . . . and stuck it in a safe. Months later he pulled out out to see what if any damage had occurred, . . . and if anything, . . . the suede leather kept the rod from being dinged by the other stuff that was taken in and out. Long and short: no damage, no rust, no problem. Additionally, . . . Galco for one is a prominent maker that uses suede in many of their applications, . . . they don't have problem. And yes, . . . suede is very much a chrome tanned leather. Personally, I would not use oil tanned leather for any holster that did not have a robust retention strap configuration on it. Remember the flap holsters the military used to hand out for their .45's, . . . many of them were oil tanned leather. You'ld get your pants literally greasy from using a new one. Anyway, . . . just some old codger thoughts. May God bless, Dwight
-
Jeremy, . . . the mix that I make, . . . I will use both inside and out. Since it is a "mix" it is not like pouring straight oil on the item. But then again, . . . it is one of those things you just have to get a feel for, . . . and I don't mean to sound snooty or anything by it, . . . but one of the main differences between a "maker" and a "craftsman", . . . is the craftsman puts thought into the project beyond just the mechanics. Think about it, . . . play with it, . . . make some mistakes it'll all come together as you go along. I got an Ebay message not long ago about a rig I sold on Ebay, . . . one I made for gun shows, . . . didn't need any more, . . . the customer was positively thrilled with it. Those are the things that will make your day for you, . . . and make you strive more for "craftsman" than for "maker". But again, . . . the mix can be used inside and out, . . . I use a wool dauber or a paper towel wrapped around a stick to put it down inside some of the pieces. May God bless, Dwight
-
Quite frankly, . . . I very seldom oil a newly made holster. IF I DO, . . . it is the hair side only. Oiling the flesh side gives me a holster that I don't like as it is floppy, spongy, and rubbery. I like mine to be stiff. AND I only oil a holster if I see the leather itself is especially dry. Otherwise, I don't. But in answer to your question, yes, I would think that this product is more than adequate for oiling your holster. May God bless, Dwight
-
Hey, Bluesman, . . . what kind of oil do you use? May God bless, Dwight
-
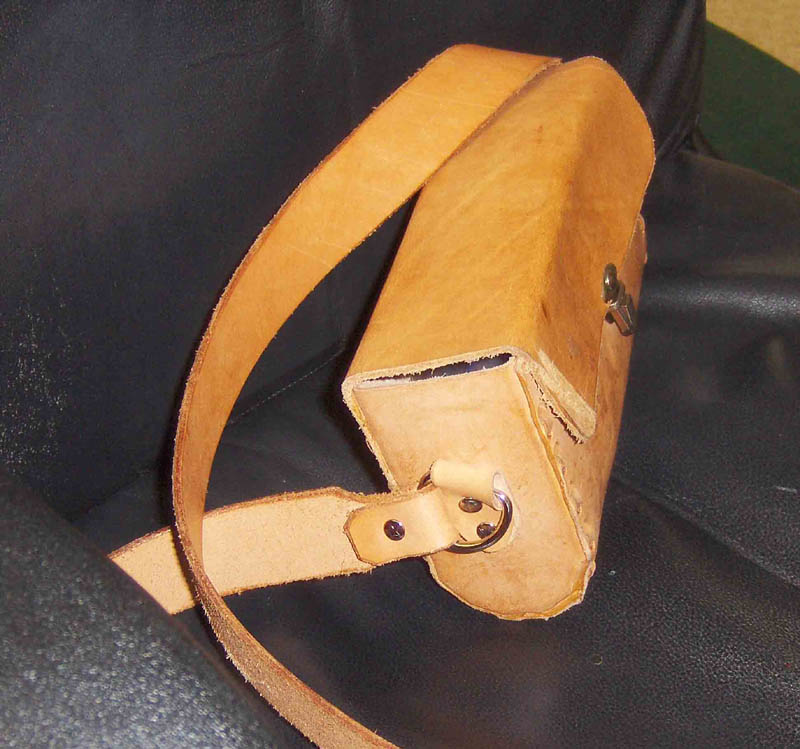
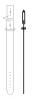
Otak, . . . This is NOT a traditional possible bag, . . . but it is what I carry powder, bullets, grease, patches, all the "stuff" needed to go black powder hunting. It is made of scrap leather, . . . 10 inches long, 5 inches high, 3 inches deep. Only 3 pieces of leather: the front, bottom, back, top, and flap are all the same piece of leather. The ends are the other 2 pieces needed. Cut it out, . . . punch the holes, . . . lace it up, . . . I think I took all of about a half hour on mine, . . . but I stopped for a doughnut and coffee half way through. May God bless, Dwight

-
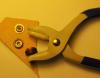
Because I am opening my big yap, . . . it'll happen, . . . but I've got holsters all over this country, . . . never have had one come back because of a pulled out snap or a broken snap. That tool puts them in tight. I just wish the throat was a bit deeper. There are times when I really struggle to get "that" snap done, . . . but I know if I get my tool squeezed on that snap, . . . it ain't comin' loose. I even used it to put a new male piece on an old WW2 or Korean "across the chest" 1911 holster that the old one had come loose and disappeared. My customer had that "look" on his face when I told him I would probably have to cut the stitches, . . . put in a new snap, . . . and re-sew it. You should have seen the relief on his face when the old Wally World tool was able to crimp enough of the old post to make it work. Anyway, . . . best wishes, . . . May God bless, Dwight
-
Small Wallet
Dwight replied to Schpacko's topic in Purses, Wallets, Belts and Miscellaneous Pocket Items
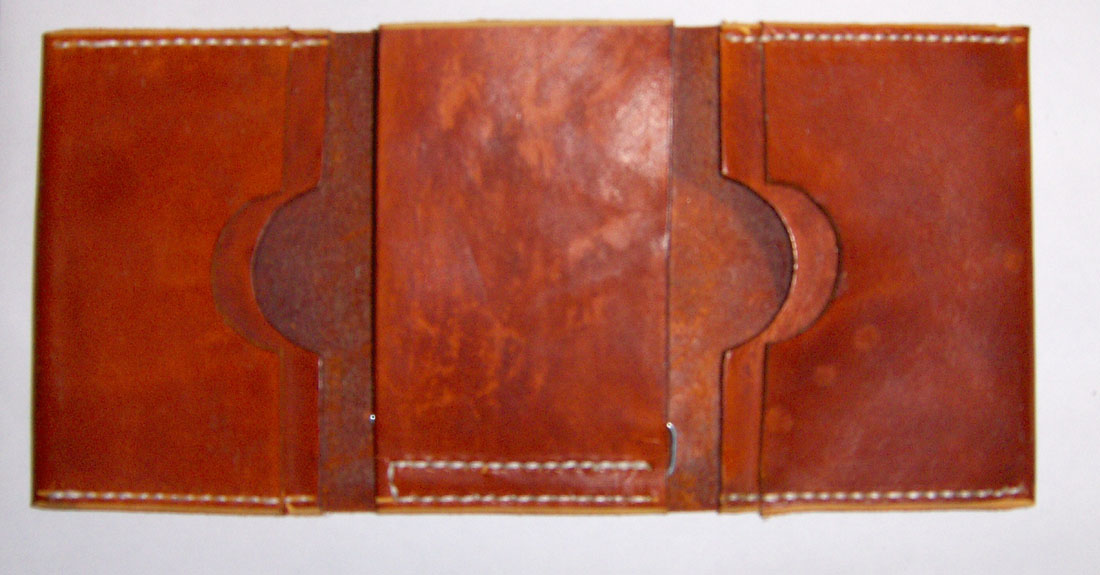
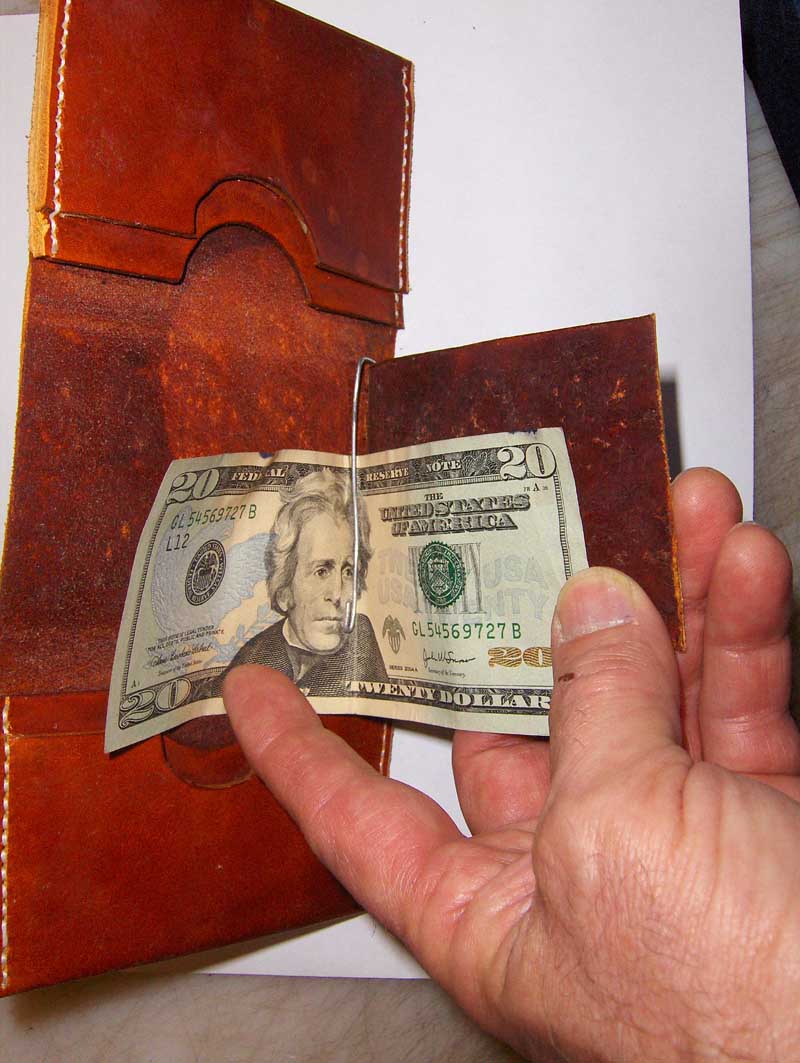
Good job, . . . I really like simplicity, . . . not just because it is much easier to make, . . . but I like clean lines, simplicity, etc. Here's a couple of pics of the sample wallet I made last month. Again, beautiful design (copied it from his old one he had for 35 years ), simple, easy to make. The real one looked a lot better than this one, . . . but this one shows the construction. I just may make one for me in the not too distant future. May God bless, Dwight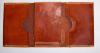

-
My Try At The Defender Style
Dwight replied to Abram's topic in Gun Holsters, Rifle Slings and Knife Sheathes
They look good frome here, . . . it may have just been the angle that the pictures were taken, . . . but the leather you used for the front piece that wraps: what weight of leather is that? Reason I asked, . . . it looks a bit on the hefty side, . . . but just may be the picture angle. Anyway, . . . good looking work. May God bless, Dwight -
Beltfandan, . . . I tried the Tandy tool, . . . never got comfortable with it, . . . it was just to "iffy" for me. Found the "Hobby Lobby" tool at Walmart some years back ($10 then), . . . bought it, . . . have never looked back. Here's a pic of two finished snap pieces, . . . and the head of the tool. May God bless, Dwight