Dwight
-
Posts
5,247 -
Joined
-
Last visited
Content Type
Profiles
Forums
Events
Blogs
Gallery
Store
Everything posted by Dwight
-
You can try Brenda at www.lasergiftcreations.com She made mine and I'm very happy with it. May God bless, Dwight
-
Thank you Ed (BearMan) for the insight. I knew what would happen, . . . but you opened the door to how to use a potentially "bad" outcome in such a way that it becomes good. I really appreciate it when someone shares those neat little tidbits. May God bless, Dwight
-

Ranger Belt Questions
Dwight replied to dmr400's topic in Gun Holsters, Rifle Slings and Knife Sheathes
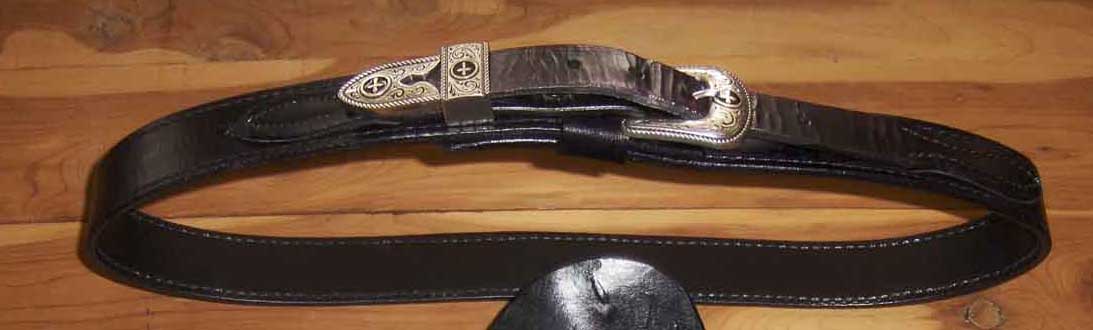
DMR, . . . here is a pic of the one I made for myself, especially to carry an all steel full size 1911, 24/7 or thereabouts, with 1 or 2 mags. It is two layers of thick 5/6 (much closer to 6 than 5), contact cemented together, neatsfoot oiled, dyed, sewn together, and the billets are 7/8 leather. The 7/8 is a bit overkill, . . . but my other one that I used for a pattern was only 38 years old, was a full 6 oz and it had stretched some I didn't want that happening again.. I used a Tandy buckle package, and love it. Since I started wearing double layer belts several years ago, . . . that is my standard now, . . . love em. If you are interested, there are a couple more tricks I use, . . . let me know, . . . I'll get em to you. May God bless, Dwight
-
Skyblast, . . . couple of things: 1) get on Tippmann's website, . . . grab the number, . . . call em up, . . . talk to Jim, . . . he'll walk you through almost any problem you can imagine. Don't have to ship it back there. 2) Just a few little things you can do that will help out (it did me anyway). The wire arm that the thread goes through off the spool, . . . bend the rascal down so that the thread comes off the spool at a 90 degree angle, instead of being pulled up and off the spool. Also make a wooden dowel to go inside the plastic spool your thread comes on, . . . fill that big void so your spool turns around freely. Get a solid metal ring for the thread to flow through instead of the hook in the end of the wire (again, first place the thread goes when it leaves the spool). Put 1/4 inch nuts on top of your top string tensioners, tighten em down with a small crescent to keep the adjustments from moving. The thread comes off the spool, through the wire thingy, then through a post with two holes at the right of your machine. Next it goes past a post and around the first tensioner. Bring it back and loop it around the little post it slides in front of, then allow it to go to the next tensioner. Start out with enough top tension to pull the string up through two layers of 8 oz veggie tan leather. Tighten the bobbin tension until you pull it back through. Re tighten the top tension to pull it to the top again. Re tighten the bobbin tension till it pulls to the bottom again. Your final tension adjustment should now pull the thread up halfway, . . . make that adjustment on the top thread tensioners. You will now have a machine that will work well for a pretty wide range of leather thicknesses as long as you are making fairly long stitches and using 346 thread. Anyway, . . . it works for mine. May God bless, Dwight
-
About the only thing I couldn't see was the S-1 stamp on the face, ID'ing you as the maker (just kidding of course, ............) good job ! But you should get a "maker's stamp" to put your "mark" on your work, . . . that would be my only honest suggestion. May God bless, Dwight (11B40)
-
Sewing Stitcher/machine For Holster Building
Dwight replied to Garange's topic in Leather Sewing Machines
FWIW, I own an aluminum Tippmann Boss, . . . had it now for several years, . . . had to have some personal time with Jim at Tippmann over the phone to correct some of my errors. Perhaps some day, I may move up to an electric machine, . . . but for now, . . . I take it with me to classes I teach, . . . will go to fairs, etc., and never have to worry about power, . . . just need a strong table to clamp it on. I just finished doing 9 belts with it (one was for a 54 inch waist), . . . and had virtually no trouble with it. They have a sale going now I believe, . . . brand new for $1195 or so, . . . Take a look on my website, . . . all the stitching you can see was either hand stitched (verrrrrrrry little of it) or the boss. May God bless, Dwight -
Hey, Hatcreek, welcome aboard, . . . this is a fun place to be, . . . lots of helpful folks here. Can you put a picture or two of your questionable "project" out there for us to look at? For burnishing, I prefer using a 5/8"dowel rod that has a 1/8 inch drill bit cemented into it's center, . . . kinda bowling pin shaped (sorta), . . . with a very little bit of moisture, . . . and REAL bees wax. It goes into a Dremel tool at about 1750 rpms. I usually do a cursory burnish before dyeing, . . . touch it up before finish coat, . . . and sometimes come back after the finish coat and use the finishing product with the Dremel, . . . love the effect. May God bless, Dwight
-
Question On Making A Holster
Dwight replied to russell's topic in Gun Holsters, Rifle Slings and Knife Sheathes
Lay your holster body leather so that it is hair side down. Coat the flesh side with Weldwood Contact Cement, using a 1 inch wide bristle paint brush. Lay your deer skin hide face down, . . . coat the back of it with the same product. Allow both to dry for about an hour and a half or two hours, . . . overnight if you can stand the wait. Gently roll the deer skin onto the holster body leather, . . . BE CAREFUL AND DO NOT STRETCH THE DEER SKIN !!!!!!! Roll the deer skin in place with a rolling pin. You now have a piece of bonded leather that will make a wonderful lined holster if you follow all the other accepted practices of making a proper holster from it. You will have to sew all the edges to make sure they are not inadvertently separated. This process will not give you wrinkles. You'll probably not like this comment, . . . but in your first post you said that you got bulges from thicker leather. Partner, . . . you were doing something wrong, . . . period. If you glue two pieces of leather together with Weldwood like it should be, . . . it won't bulge, . . . bubble, . . . wrinkle, . . . or any of that stuff. Leather is a product that takes well to gluing, . . . but it has to be done right in order to work right. May God bless, Dwight -
Anyone Give You The Look Of Horror...
Dwight replied to Shorts's topic in Gun Holsters, Rifle Slings and Knife Sheathes
Last count I heard was over 155,000 legal CHL's in Ohio, . . . which puts about 1761 in each of the 88 counties. C'mon Johanna, . . ................................... May God bless, Dwight -
And of course, . . . we are talking about two different patterns, . . . made at two different times, . . . by two different craftspersons. I seriously doubt that the holsters were Eye-Dee-dentical, . . . and just in the fact that they were different, . . . that makes for a different pattern. I'm no pro by any stretch of the imiagination, . . . but I make a good product, . . . and I'm amazed how sometimes I just don't look, . . . don't think, . . . don't measure or plan like I should, . . . But the result makes a good training aid. What did Edison say about his 1000th failed experiement concerning making a practical electric light bulb? I have not failed 1000 times, . . . I have made 1000 discoveries of how not to make it. Don't worry about little inconsistencies, . . . I know a successful holstersmith who makes a darn fine product, . . . does not use any press or jigs for cutting, . . . and his "secret" is to always cut em a little big, . . . you can always cut em down he says, . . . and he makes a good living with his holster business. May God bless, Dwight
-
Anyone Give You The Look Of Horror...
Dwight replied to Shorts's topic in Gun Holsters, Rifle Slings and Knife Sheathes
Hey, Shorts, . . . if they get real bad on you, . . . just tell em you know where there is a church that had at one time over 50% of the congregation that had their CHL's, . . . (a batch of new members diluted it down to about 33% or so now). At least one of the elders carrys every day including during services, dinners, business meetings, . . . the pastor very rarely goes anywhere without his handgun (except during services, then he leaves that chore to the rest of the CHL's), . . . and they even hosted a CHL licensing class in their fellowship hall a few years back. Yep, . . . that's the one I go to. Hmmm, . . . now if I could just get em all to buy holsters, ..................... May God bless, Dwight -
I would load the hide into a bag, . . . head out to the nearest Tandy Leather store. Most managers and folks there are pretty good people, and are interested in creating leather crafters (they sell more products that way). If you brought it to the Coumbus, Ohio store, . . . Jeff and Scott would be more than happy to help you decide what to do, . . . and even give you some pointers on how to do it, . . . and of course be willing to show you what tools you needed to buy to get it done corrrectly. May God bless, Dwight
-
Just wanted to say thanks, Will, . . . you are a credit to your craft and your craftsmanship. Not everyone is willing to share as you do, and I for one am very pleased you do. May God bless, Dwight
-
Yes. I use only oil stains for the most part, then use a finish coat of Resolene, . . . no stain moving, bleaching, running, staining from water. May God bless, Dwight
-
I let a guy buy my own personal rig off my shoulder about a year ago, . . . and just could not get myself all psyched up for a new one for me. I just looked at your tutorial, . . . that may have all changed, . . . I think I can see a 3:10 rig in my future. I have several of your pattern packs, Will, . . . never been disappointed in any of them (other than I can't make what I want to make fast enough to suit me). May God bless, Dwight
-
These Edges Are Driving Me Crazy!
Dwight replied to Sixer's topic in Gun Holsters, Rifle Slings and Knife Sheathes
I have tried several different methods, . . . and for different products, . . . use different methods. For holsters and belts, . . . the little burnishers you see in the pictures are oak dowels with a 1/8" drill bit inserted as a shaft (so it fits right into my Dremel tool). Lightly moisten the beveled and sanded edges with a paper towel folded and soaked in luke warm water, . . . use the long one with the single shoulder for belt edges, . . . the multi groove one for the holster edges, . . . in the Dremel tool, . . . about 1700 rpm's. Use light pressure on the edge with the tool, . . . going back and forth. A 36 inch belt, . . . doing both sides and the ends, . . . will normally take me about 6 to 10 minutes from beginning to done. The edge will glisten up and shine, . . . while it is still warm, . . . rub it with real honest to goodness 100% beeswax, . . . re-burnish, . . . and you will have an edge that actually glistens. If you want a harder edge, . . . gum trag will give it to you, . . . replace the water & paper towel with an acid brush and gum trag, . . . but be VERY sparing until you catch on with it. Gum trag on a non finished surface can ruin an otherwise really nice project. The grooves are made by chucking up the tool, . . . cutting it smooth all around, . . . sanding it, . . . and cutting the grooves with a file while it is spinning in a lathe or drill press. May God bless, Dwight
-
That is a McDaniel holster, . . . and the loop does NOT rotate. The snap makes the holster vere easy to take on and off (like going into a gun free zone or something), . . . and while McDaniel uses some sort of screw and nut arrangement (I think) you could accomplish the same thing by starting the loop at the bottom of the holster, . . . and riveting it to the holster in one place. You would have a solid loop, . . . and a snap, . . . having the best of both worlds. Take a look at my website, . . . you'll see I use snaps and loops on both ends of the holsters. I don't even offer a pass through loop like you made, and very few makers do. May God bless, Dwight
-
anubismp, . . . I left your question alone at first, . . . figuring someone with more knowledge might chime in. Since they didn't, . . . maybe I can help, . . . but from what you are asking, and the way you are asking, . . . quite honestly, I have not the faintest idea of how or what you are trying to accomplish. Can you post a drawing, . . . picture, . . . ???? May God bless, Dwight
-
For my holster loops, I use some of the "left over" leather from other projects. I cut it with a strap cutter into straps that sometimes are two feet long. To make a holster loop, . . . I get out my little holster loop template, . . . my "half circle" punch, . . . a strap I cut the proper width. Lay the template down, . . . mark it with a pencil, . . . cut it with the punch (made from a wayward piece of EMT conduit I might add), . . . knock holes in it for the snaps, . . . edge em, . . . done. Usually takes about 60 seconds each for total job unless I'm really tired. May God bless, Dwight
-
These folks http://www.letargets.com/ have always done me well in the Blue Guns. They can and will order what doesn't show on their web site. I am almost certain that on the Blue Gun parent web site, an EMP is offered. It should be about $36 through the http://www.letargets.com/ folks. May God bless, Dwight
-
Fine-Point Knife Sheeth Question
Dwight replied to JoelR's topic in Gun Holsters, Rifle Slings and Knife Sheathes
Real, honest to goodness rawhide, . . . used for the blade section only and properly fit so that the handle comes down on the rawhide inside the sheath, . . . it will stop the blade from going on and punching through. Look on my website, there is a fringed, single loop, suede sheath (I think it is on page 2), . . . that is what I had to do with that hog leg of a knife. The hilt of the knife stops on the rawhide if you make it slim enough to just accept the blade only. Hope this helps, may God bless, Dwight -
Resolene: mix 1 to 1 with tap water. Apply with a bristle (NOT NYLON) brush, . . . apply liberally, . . . brush up a froth, . . . quit applying when the froth appears good, . . . brush out the bubbles, . . . hang up to dry, . . . buff when dry (can take up to 24 hours, depending on temp and humidity). Take a look at some of the stuff on my website, . . . it is on most of the inventory there. May God bless, Dwight
-
Figuring Gun Belt Length
Dwight replied to justken's topic in Gun Holsters, Rifle Slings and Knife Sheathes
Actually, I really like your spacing theory, . . . that is how I do all my belts. It gives me a cushion in case he/she gained/lost a few pounds since the measurement, . . . and it gives them the opportunity to enjoy the belt a bit longer if they are in a gaining or losing frenzy. I also figure that they will be satisfied longer with my product, . . . and may call me again next time. May God bless, Dwight -
Lou Alessi, an old time professional holster maker who passed away not too awful long ago, gave anyone who asked, his proceedure. Cut the pattern. Dye the pieces. Edge the pieces that will not be sewn. Tool as necessary (optional). Glue em together. Sew. Wet and mold. Finish up left over edging. Apply final finish. Done. All glueing and sewing was done with DRY leather. I also make custom holsters, . . . and I prefer to to move my dyeing process most of the time to the slot after wet and mold, . . . just my way of doing things. Both ways work. May God bless, Dwight
-
Figuring Gun Belt Length
Dwight replied to justken's topic in Gun Holsters, Rifle Slings and Knife Sheathes
As a case in point, . . . I made myself a belt a couple of years back (first one in a long time, . . . too, . . . ) by just laying it beside my favorite belt. It fit, . . . no problems, . . . all is well. THEN, . . . I decided I wanted another belt, . . . a harness belt this time, . . . knowing it is a different process, . . . took off my new belt and laid the measuring tape on it. "UGH," I cried, . . . my tape has shrunk. It says I'm wearing a 39 in belt, . . . but my jeans are 36's, . . . something is surely wrong. Yeah, . . . it was, . . . and it was not the tape. Jeans had ballooned up with me, . . . tape sat quietly in the drawer awaiting its day of glory. Long and short, . . . use a measuring tape, . . . or a belt you know fits. No other way is really reliable. A "kinda, . . . mmmm, . . . sorta, . . . good" rule of thumb, . . . OWB holsters need no additional belt size, . . . IWB for a 1911, XD, Glock, most revolvers: add 2 inches, . . . cowboy gun belt: add 4 inches. May God bless, Dwight