Dwight
-
Posts
5,249 -
Joined
-
Last visited
Content Type
Profiles
Forums
Events
Blogs
Gallery
Store
Everything posted by Dwight
-

Iwb For Larger Folk
Dwight replied to vahillbilly's topic in Gun Holsters, Rifle Slings and Knife Sheathes
Sam, . . . can you post a picture of each? I make almost exclusively IWB, . . . have never had one come back for that reason, . . . perhaps we can see something collectively here that would make a difference. And, . . . yes, . . . I have a couple of, . . . uhh, . . . umm, . . . larger customers. They all like my holsters, and while the mouth is reinforced, I have never found a need for the steel addition. Anyway, . . . looking forward to seeing pics. May God bless, Dwight -
That's an easy one, . . . lay your vegetable tanned leather face down on the work table. Do the same with your pigskin lining. Now cover the back sides of each with Weldwood contact cement, available at any local lumber and most hardware stores. When it is dry, . . . about an hour or so, . . . can be done sooner if you are very careful in using a heat gun, . . . lay the veggie tan glued side on top of the pig skin glued side, . . . cover with a pillow case or something to protect the face of the veggie tan leather, . . . roll it with a rolling pin. You now have basically one thickness of leather to work with, . . . make your ipod case from it. We do this all the time making holsters. May God bless, Dwight
-
I'm taking a break right now from hand sewing the front back together. Most of it had cotton or linen thread and it had rotted and come apart, especially up front, . . . I had to replace the "D" rings for the breast band and the little "D" ring up by the saddle horn. All were rusted or the wrong gear. A board member invited me to his saddle shop a hundred miles away, . . . took the trip, . . . learned a lot, . . . It's a "bit of a piece" from being done, . . . will post pics when I finish. Thanks so much for all the encouragement and kind words. This is a great place!!! May God bless, Dwight
-
Laying Out Pattern On Leather?
Dwight replied to Deanimator's topic in Gun Holsters, Rifle Slings and Knife Sheathes
Works for me too, . . . except my lines are on the front. I don't have enough time left in my life to worry about a stray ink pen line here or there. I'll use that piece of leather with a stray line on something, some day, . . . meanwhile, . . . I don't see a pencil well enough, . . . stylus lines or scratch awl lines are as dangerous as are ink lines, . . . so why go to the effort? May God bless, Dwight -
Thanks for the information, hidepounder, . . . I had it thought out that way, . . . but not being a cowboy, . . . ya just gotta ask the question if you want the answer. May God bless, Dwight
-
Tim, thanks for the post & pics. They reminded me of a question I had. We watched our annual "Horse Parade" last Sunday, it is a lead in for our local county fair. There was a group of gals (apparently a riding club of some sort) and all but the rear most two were wearing chinks. So were a couple of guys in the parade. All of the chinks seemed to end right at the knees or maybe 2 inches below, with only the fringe hanging below that. Question: When, where, and why would a person wear chaps, . . . and why would they change to chinks? Anyway, just curious. May God bless, Dwight
-
Full Length Welt?
Dwight replied to Bronson's topic in Gun Holsters, Rifle Slings and Knife Sheathes
The quick one word answer is "No", . . . The welt is sewn as close to the weapon as I would sew if there were no welt. The danger of using a welt that I often see is the maker used too many layers of welt, and the holster edge looks like it could become a weapon itself. I only use a welt on my revolver holsters, and then mostly only if they are for SAS or CASS. May God bless, Dwight -
In John Bianchi's VHS video, . . . he said take the belt the guy wears now, . . . measure it buckle to most used hole, . . . add 4 inches. Make that measurement the gunbelt length from buckle to center hole on a 5 hole belt tongue. DO NOT ask him what size belt he wears, as most people do not know. Believe me, . . . measure em. May God bless, Dwight
-
1911 Holster-Ideas
Dwight replied to marine mp's topic in Gun Holsters, Rifle Slings and Knife Sheathes
Making a flat backed pancake is, . . . a piece of cake. To make it ride high, take the integral belt slots straight down in the design. A fleece backed holster would allow the weapon to flop back and forth far too much for my liking, and I would not make one for a customer. If it has to be more comfortable than my IWB or OWB, . . . then someone else will carry it for them. May God bless, Dwight -
To Mold Or Not?
Dwight replied to Deanimator's topic in Gun Holsters, Rifle Slings and Knife Sheathes
Opinion 101: The only thing I let out of my house to hold a handgun that is not molded, is a suede "possibilities" bag. Everything else gets molded. Otherwise it is just a generic bag, and those come free with groceries at WalMart. May God bless, Dwight -
Need A Blue Gun Asap! Help! Please!
Dwight replied to bigo5552000's topic in Gun Holsters, Rifle Slings and Knife Sheathes
Call Law Enforcement Targets, 1-888-489-7830. They are some of the greatest people to work with you will ever find. Nobody nad the SP101 that I needed a few months ago, . . . LET had it in my hand in 4 days. They even had their supplier drop ship it to me to save time. May God bless, Dwight -
Sometimes I am at a loss for the correct "terminology", . . . so I cannot tell you off hand what the difference is between the two types of needles I have for my Tippmann Boss stitcher. One is round, . . . as in circular, . . . the other type is more of a flat knife blade type. I am on my last one right now, . . . and I don't use anything but that type. It makes a slot type hole, . . . and is perfect for punching holes now, . . . and hand sewing later. Give the folks at Tippmann a holler, . . . they'll walk you right through it. May God bless, Dwight
-
If you want to do this whole sewing thing a whole lot easier, . . . look up a thread I authored, . . . Sewing with a drill press. At first it looks a bit klunky, . . . but it'll make quick work of a holster, . . . dog collar, . . . small things we sew, . . . if you don't have a machine. Now back to our regular programming: nice holster Big O, . . . May God bless, Dwight
-
Very gently, gentlemanly, humanely, and with all the tact you can muster, . . . tell your bootmaker to go polish a sole or something, . . . use contact cement. Rubber cement has a few uses, . . . 99% of which involve 1st, 2nd, 3rd graders and kindergarten type folk. May God bless, Dwight
-
Snap Cap Larger Than Anvil Cup......what Can I Do ?
Dwight replied to ToddB 68's topic in How Do I Do That?
Todd, . . . google "Hobby Lobby" and go to their product web page. [/url] Heavy Duty Snap Fastener Pliersku# 733006Nickel$22.79 This is the best snap setting tool you will find for any where this money. Problem: it only does line 24 snaps. May God bless, Dwight -
Contour Stitch Line
Dwight replied to cstephens's topic in Gun Holsters, Rifle Slings and Knife Sheathes
I was plagued early on making holsters with the same problem, . . . and still have it when I have a really unfamiliar handgun. My answer was to do the holster making a bit differently. First: I do the front stitch line, the one that will come down the barrel Second: I wet the holster, . . . and insert the hand gun, . . . and mold the leather with my thumbs and fingers (never use a press in this type) to the point that I am sure I have a good "shape" going. Third: remove the handgun, . . . close the holster up as close as possible to how it is supposed to work, . . . set it in the sun to dry. Once it dries, . . . open it up just enough to cement the edges, . . . glue it down, . . . mark it, . . . sew it, . . . finish it. THEN: MAKE A TEMPLATE FOR THAT STYLE HANDGUN SO YOU DON'T HAVE TO DO THIS AGAIIN AND LABEL & FILE THE THING. It has never failed me when I do it this way. May God bless, Dwight -
Well, . . . you just had to go and do it, Dirtclod, . . . now I have another project to add to the stack I already have. I had heard of them, . . . I'll own one before the first snowfall if all goes well. Seriously, . . . thanks for the pictures, . . . ummm, . . . I hear my metal shop calling, . . . gotta go. May God bless, Dwight
-
Let me add just one more suggestion, . . . I have found one of the best materials for making a really good knife strop is the grey, thick cardboard that is often on the backs of tablets, and sometimes is used in shipping containers for separators of different products. It is kind of porous, . . . will load up well with rouge, . . . and will sharpen a knife to a razor's edge super quick. I was taught this trick in a Tandy shop, . . . the teacher used it to keep his swivel knife blade sharp. Ummm, . . . yeah, . . . I use it for that too. May God bless, Dwight
-
Thanks, Bobby, . . . looks like I'm going to go get a piece of glass I struggle mostly with interruptions that cannot be avoided, . . . and that plate glass trick sounds just like my answer. I'm also struggling to get my "impressions" just the way I want them, . . . but it is coming along. Again, many thanks, . . . may God bless, Dwight
-
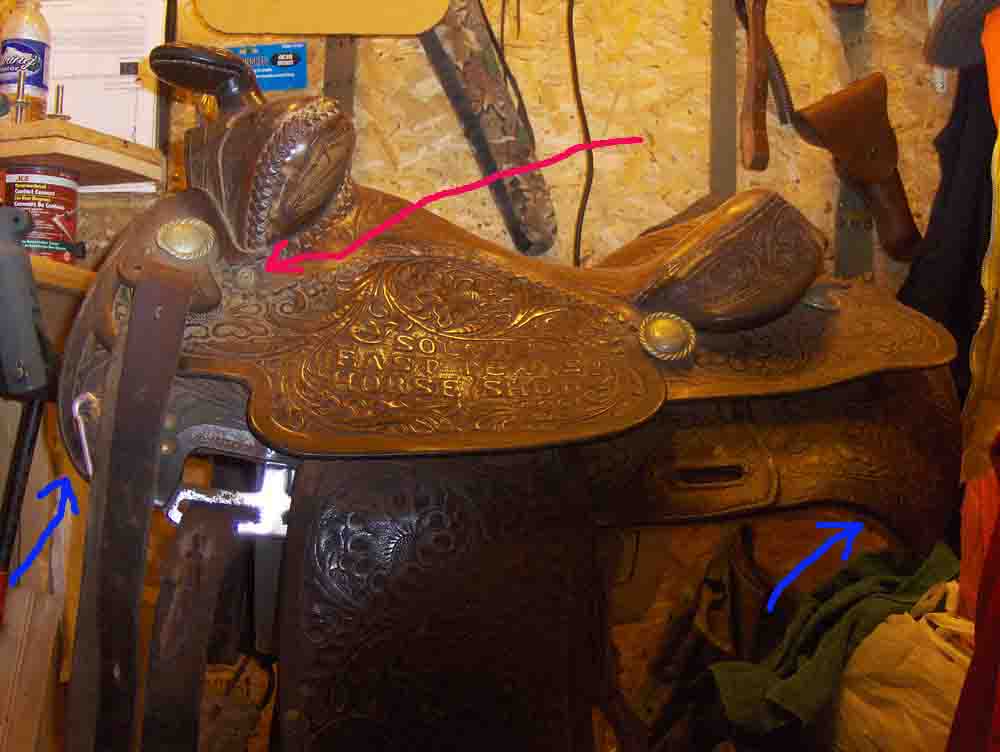
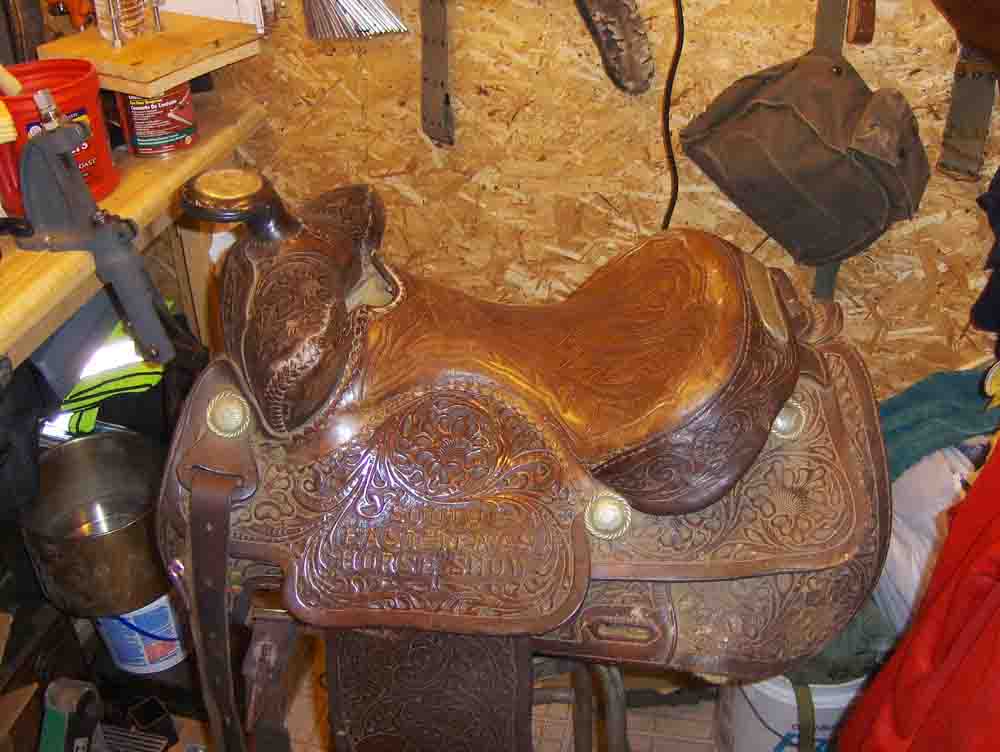
A friend of mine, one with limited financial resources, brought me a saddle and asked me if I could "repair" it for him. He showed me a couple of places where the thread had broken on the sewing, and the saddle was coming apart (see blue arrows). It is on the edges of the skirts, front and rearl I've never taken a saddle apart, . . . but I'm wondering if the screw at the end of the red arrow is the key to getting the seat off and the skirts also off so I can sew them back together on my stitcher. The conchos were on a screw like post, . . . went into the tree, and came out fairly easily. There are also nails in the "accessory" carriers in the front of the saddle. The other reason I wanted to get it down to parts and pieces, is that it has lain in an old dusty barn for a while, and needs a real good cleaning. I was going to saddle soap the whole thing while I had it apart, . . . and if I can squeeze enough out of my charity budget, . . . maybe put new wool under it. Holsters I understand, . . . belts are fun to do, . . . this is the second saddle I've ever had in my house, . . . and the first was just plain junk. This one looks like it has the potential to be cleaned up and used, . . . which my friend wants to do. Any suggestions, . . . help, . . . would be greatly appreciated. The leather also seems to be quite dry, . . . not cracking yet, . . . but really dry. May God bless, Dwight
-
Attaching Straps To An Iwb Holster
Dwight replied to Reaper's topic in Gun Holsters, Rifle Slings and Knife Sheathes
My design, similar to yours, is called a cactus, . . . and can be seen at www.dwightsgunleather.com No, the straps are not glued on, they are not sewn either. They rely on the male part of the snap to hold it to the holster. May God bless, Dwight -
Vikefan, . . . the best tool for the money I have found can be had at Hobby Lobby (catch em on line too) for about $25. It is a blue handled tool, looks like a pair of pliers sort of, . . . and they only set line 24 snaps. I bought my set a few years ago at Wally World, . . . but they don't carry them now. May God bless, Dwight
-
Holster Edge Seam?
Dwight replied to GrampaJoel's topic in Gun Holsters, Rifle Slings and Knife Sheathes
First, follow Katsass' lead, get the Weldwood contact cement and give that Tandy stuff to someone you don't really like. It stinks to high heaven, is a lousy product, and is far too costly. Second, . . . as far as I can see, you may have just quit too soon. It looked on my monitor as though the center line was indented, and the two outer layers were still rounded. I use a flat belt sander, . . . it's a $50 cheapie from Harbor Freight, . . . and I sand the edges until they are FLAT. But the other thing, . . . both holsters were looking good. Edges are something very few customers ever seem to care about. They want (in my experience): 1) fit, 2) function, 3) color, 4) decoration or esthetics, . . . and somewhere farther down the line, . . . a seasoned old timer may run his thumb up or down an edge or a seam. Now that is no excuse for poor workmanship, . . . but it puts the whole thing in it's proper perspective. May God bless, Dwight -
Redhawk Holster Pattern
Dwight replied to THein's topic in Gun Holsters, Rifle Slings and Knife Sheathes
Terry, . . . on the Ruger Redhawk, there is a little platform in front of the rear sight. You could cement and hand stitch an upside down "U"shaped piece of maybe 12 or 14 oz leather to the inside of the holster. It would rest against that little platform and force the top strap of the hand gun away from the holster fold, giving you what you desired. Make it long enough to go down about an inch and a half, . . . cut the "U" slot in it for the front sight to come out through the slot, . . . and make it just high enough that the rear sight does not touch it. It will keep the rear sight from gouging the holster, and will protect the rear sight as it is in the holster. I normally tape a wooden rod to the top of all my handguns and handgun models to get around your problem, but you figured out the problem in your post. You used one gun for the model, and put a different gun in the holster. There is enough size difference between the two models to allow what you experienced to happen. May God bless, Dwight -
Stitches Per Inch For Holsters Using 277/207 Thread
Dwight replied to Garange's topic in Sewing Leather
Out of the box, my machine sews 3 1/2 to 4 SPI depending on a few things. I've never had any issues with it, . . . though I only use 346 thread. A friend did a hand sewn pocket holster with something like 10 SPI, . . . and it just looked like the leather was waiting to be pulled apart at the perforation. I really think that the "norm" is what ever you are comfortable with. May God bless, Dwight