Dwight
-
Posts
5,261 -
Joined
-
Last visited
Content Type
Profiles
Forums
Events
Blogs
Gallery
Store
Everything posted by Dwight
-
I use Weldwood contact cement, . . . never, . . . never, . . . never needs thinning, . . . at least in my applications, . . . belts & holsters mostly. I try to only buy the "Gel" formula, . . . it works the best, . . . I leave it in it's original can, . . . pop up the paint can type lid with a metal opener, . . . use what I want with a disposable acid brush, . . . pitch the brush, . . . close the can, . . . no fuss, no muss, . . . May God bless, Dwight
-
JC, . . . from what I have read, many of them were a two layer belt, . . . folded, . . . stitched on the edge. I would use 4/5 oz, . . . veggie tan. May God bless, Dwight
-

Bullet Loop Help
Dwight replied to ShortBBL's topic in Gun Holsters, Rifle Slings and Knife Sheathes
If I remember correctly, John also made a line along the top of the loops, . . . one at the bottom of the loops, . . . and he used them to reference his stopping and starting. You don't have to worry about the line either, if you use a stylus to make it, . . . the area in question will all be covered or something when the project is in use. May God bless, Dwight -
I have a high density polyethylene cutting surface on my work bench, . . . 1/4 in thick, . . . $40 out the door and it is great. I punch on it, . . . cut on it, . . . no problems with my tools. It is not perfectly self healing, . . . but it comes fairly close. May God bless, Dwight
-
Tips/tricks For Cutting Straight Edge The Length Of Full Side?
Dwight replied to jeeperaz's topic in How Do I Do That?
It'll be hard to beat Frank's idea, . . . especially if you use a clamp on each end. You can then mosey down the full length at your leisure with a razor knife, pocket knive, round knife, or any other cutting instrument you desire to use. Clamping it down will make your edge straight. May God bless, Dwight -
Hot Waxing Sheaths And Holsters
Dwight replied to LuisPaulo's topic in Gun Holsters, Rifle Slings and Knife Sheathes
A lady on here some time back gave a tip on wax etc. that I have used and I like it's effect on certain items. Take an old crock pot you don't use for food, . . . fill it half way with water. Put a jar in it that you don't need, . . . put several ounces of pure, virgin bees wax in the jar, . . . and the exact same weight of pure virgin neatsfoot oil also in the jar. Turn on the crock pot, . . . and let them melt together (takes about an hour at my place), . . . remove the jar. Pour the liquid into some sort of mold, to harden. You can then use the cake of wax/oil to rub over your project, . . . then using a soft cloth, or just your fingers, . . . rub it in deep to the project. I won't use it on a holster, but on some of my other projects I have found it works really well, . . . I like the look and the feel of it. It can take several coats to get the effect you desire. She made a ver strong point about it, . . . if something happens, . . . it is real easy to restore the original. May God bless, Dwight -
Ann, I have to go to town today, will be gone most of the day, but if you will email me both pictures I'll take a look at it.
Usually when I have done this in the past, it helps to have several different ones to choose from, so keep that in mind.
Also, if the pictures themselves are bigger than 2.5 megs, send them one at a time.
Send them to ciminod@midohi...
-
Mike, . . . you didn't say what type tools you are using, . . . or at least I didn't see it. If you are using (what I call a sail needle) the needle kit that has a wooden handle and the little spool of thread, ........ that is the culprit was my experience. I pitched the spool, . . . use a cut piece of thread that I measure out at least 3 times the length of my stitching, . . . put it through my awl hole, . . . pull half to the other side, . . . and go from there. With the spool in place, I was keeping the working piece of thread short, . . . and it got dirty quick. I figured it out when the back side was really clean, . . . and the front looked groady and grubby. Anyway, . . . hope this helps. May God bless, Dwight
-
Thin Kit Leather Vs What I Have To Practice With
Dwight replied to bkingery's topic in How Do I Do That?
S-T has always been good to me too, . . . but since I found Weaver's in Ohio, . . . they are my source of leather I can't pick out myself. And of course, . . . sometimes I can pick it out as I drive there (over an hour away) twice a year or so. But the others are right, . . . most kit leather is truly less than optimal has been my experience too. May God bless, Dwight -
Most of the folks on here who have commented in the past about spraying Resolene, . . . first do the 50/50 mix with water. I do the 50/50, . . . but I brush it on. For the few times that I go back for a second coat, . . . I do it within a few hours at longest, . . . and have never had a problem with it. Thanks for the tip on the air brush, though, . . . I've been playing with that idea for a while, . . . just haven't "bit the bullet" so to speak. May God bless, Dwight
-
For an IWB, I don't use anything but a product called Resolene. I buy it at my local Tandy store. The way I apply it is really simple and works great for IWB holsters. Take a small container (I like an empty Skippy Peanut Butter jar best) and put about 4 oz of Resolene and 4 oz of cool water, . . . shake a bit to mix em up. Then, using a 1 inch natural bristle paint brush (it's the cheap $ .59 one at the hardware store) I start on the back side of my holsters, this is almost always a flesh side, . . . but I start there anyway. Dip the brush and cover the back side, . . . stroking back and forth, up and down, zig-zag, etc, . . . working up a little froth with the brush, . . . once you get a little froth, . . . quit adding liquid to the brush, . . . just brush until the bubbles are all gone. I then go to work in the inside of the holster, . . . using a wool dauber and/or bristle brush, . . . whichever works best on that holster. Do the same type of application as the back. I then use a rod, . . . my fingers in a rubber glove, . . . or some thing to hold the holster up by having something lodged where the gun goes. That allows me to do the finish on the front of the holster without touching it. After applying to the front, . . . I put a second coat on the back, . . . making it a thinner coat than the first one, . . . then add a second coat to the front. Hang it up by a wire in the gun belt slot or one of the belt loops, . . . touch up any place you handled it last, . . . let it dry a minimum of 24 hours before messing with it. That is the finish that is on my belt and holster in my avatar, . . . and on all the holsters and belts on my website. May God bless, Dwight
-
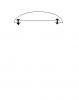
I normally use my sewing machine for everything I have to sew if it is at all possible, . . . but at time, I have to resort to hand stitching. My motto there is "Hands were made for hamburgers not for stitching", but be that as it may, . . . sometimes stitching needs a hand (no pun intended). If it is a new project, . . . I like to use a stitch gouger first, . . . then mark my holes, . . . then use an awl to punch the holes, . . . then use what I've always known as a sail needle (it has a wooden handle, a little spool of thread, and a needle out front), . . . and a standard sewing needle to finish the job. 1. Gouge out the stitch line 2. Mark where the stitches go 3. Awl punch the holes (I usually stand up to do this, punch absolutely 90 degrees straight down so all the holes line up on the other side correctly,........ this can also be done with a small drill press, . . . not running of course, . . . with a needle chucked up, . . . it makes really nice, straight, perfect holes for stitching) I cannot stress to greatly how important this step is to be done correctly. If it is not done right, the back side of the project will look like a drunk on meth with a side order smack did the stitching. 4. Go through the awl hole with the sail needle, . . . pull the cut end of the thread through the hole, . . . pull enough thread to go the length of your stitching and back to the starting point. 5. Thread the extra standard sewing needle with the cut end, tie a knot in it so it won't come out of the needle. 6. Pull the sail needle out, move it to the next hole, punch through the awl hole, pull back slightly, drop the extra needle through the loop on the grooved side of the sail needle, . . . pull the sail needle back through the hole, . . . grip both strings and pull the knot back and forth until both strings are taught, . . . center the knot between the pieces being sewn. 7. Finish up by doubling the drop of the second needle through the loop made by the sail needle for your last 4 or 5 stitches. (see the enclosed rough sketch) May God bless, Dwight

-
FWIW, . . . I saw one put together by a fellow for his father for a gift. I was not impressed, . . . period. If you have any mechanical or design ability, . . . you should be able to go on line, . . . look at some designs there, . . . and play around with it enough to get yourself a better idea than this thing. It's design is to mount a basic belt holster on the "arrow" part, . . . and for me leaves a lot to be desired. But, . . . I've only seen one, . . . YMMV/YOMV May God bless, Dwight
-
Adding just a little to Lobo's information: when you sandwich two pieces of leather together, flesh side to flesh side, it becomes much stronger as both faces (inside and outside) are now the hair side of the leather, . . . which is the strong side. I also personally detest a belt with a suede liner, . . . the darned thing will not slide like I want my belts to all do, . . . ugggghhhhhhhhhhhh!!!!!!!! I usually start out with a 8/9 piece of leather for the outside, . . . hit it with the calipers, . . . then find another one that will get me in the .210 to .240 area of thickness, . . . just under 1/4 inch. I also set my strap cutter to 1 7/16 inches for the reasons Lobo mentioned about width. May God bless, Dwight
-
A router will do your edges, . . . and will do a really good job, . . . but you have to have your work fence and the opening in the table set up so the leather does not flex at all. And under no circumstances, put anything in a router except a router bit. They turn far too many rpm's for sanding drums, discs, etc, . . . and will get you hurt if you try to use them. No, . . . if your router bits are sharp, . . . they will not burn your leather, . . . they will cut it so smooth that it will look like it is already partially burnished. The most important thing to remember here though, . . . you cannot "see" the piece as the blade touches it. You have to run it through, then turn it over and look at what was done. I've tried it with mixed success, . . . finally quit for now, . . . but I have to admit that the good pieces were good. The bad pieces just proved that the router blade is just absolutely unforgiving, . . . non merciful, . . . it just cuts. May God bless, Dwight
-
Nail the lid of a plastic peanut butter jar on the wall, . . . screw the lid into it, . . . you can hand a batch of straps or strings over it. Finishing nails in the wall, . . . 1/8 in hole in the corner of the leather, . . . it's hung, . . . can be hung by size, by type, by color, by ugliness if you want. Snip the edge of the hole with a razor knife or side cutters, . . . don't even have to unload the whole nail to get the piece you want. I also have a round pile on the floor by my cutting table. It is simply long pieces that are a foot or so wide, . . . that way they can sit on the floor in a circle on edge, . . . and I can look down into the circle to see if I have a piece of 5 oz 8 oz or whatever I'm looking for. Oh, . . . and yeah, . . . I've got the drawers too, . . . another topic for another day. May God bless, Dwight
-
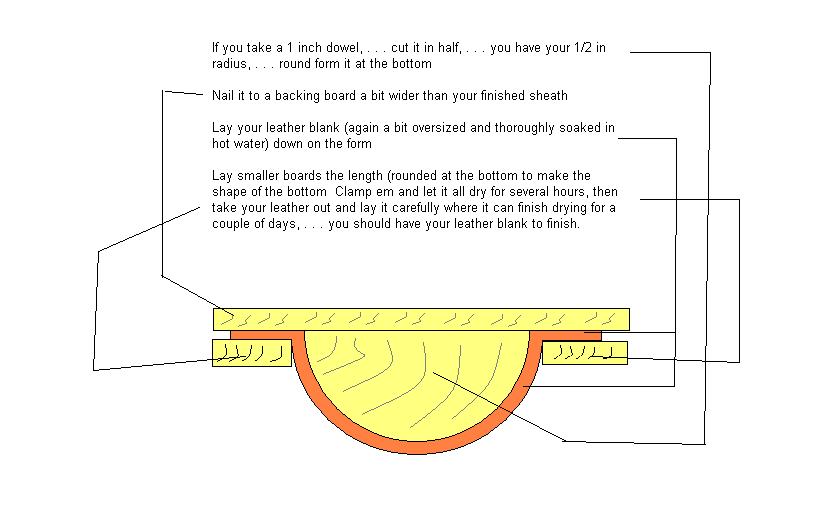
Tn, . . . I make all my molds out of southern yellow pine, . . . and I find it is just about as perfect as one can get for my projects (mostly magazines for weapons, . . . and boxes for other items). I'd make a magazine copy probably 1/2 inch wider and thicker than the original, . . . cut a piece of leather that was exactly the back side size plus a flap to go over the top and snap to the front, . . . then cut the front, bottom, both sides all in one piece, . . . wet it good, . . . wrap it around your dummy, tack it till it dries, . . . then simply contact cement and rivet the thing together. Rivets and contact cement are wonderful for such projects. If you need any help, . . . pm me, . . . I'll walk you through it, . . . As for velcro, . . . I contact cement it to my leather before I try to stitch it on, . . . and I use a machine, . . . hands are for holding hamburgers, . . . not stitching. May God bless, Dwight
-
I think you are well on your way to figuring it out, . . . just a little sketch as how I would do it if it were mine, . . . to get the front piece. It of course is the most critical. One thing to remember about forming leather this way, . . . always use vegetable tanned leather, . . . and don't be afraid to put some pressure on it. It stretches pretty good under most circumstances. I like the idea of the small clamps for sewing. I had a holster the other day I could surely have used one of them on. May God bless, Dwight
-
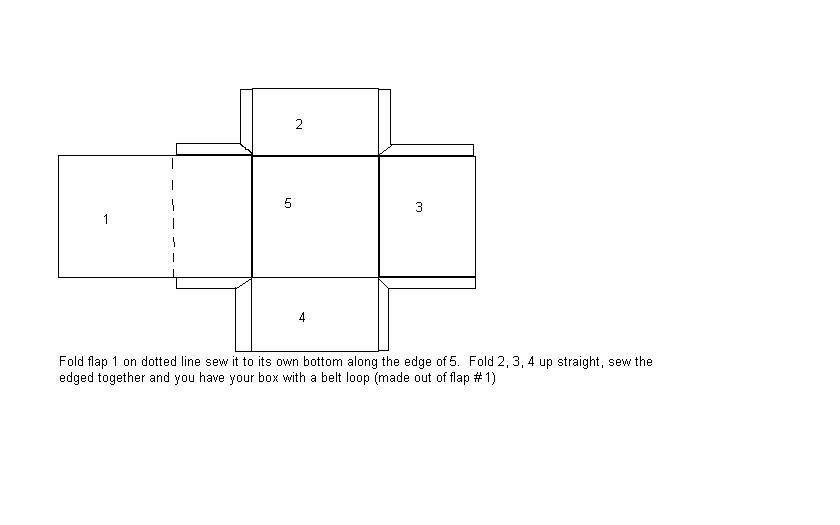
Clutey, I'm a deer hunter, . . . so I don't empathize well with you shotgunners, . . . but the leather part is a snap I think. Make your first one out of 4 or 5 oz vegetable tanned leather. It will carve, dye, stamp, . . . all that stuff easly, . . . and will work easily too. Use the little diagram I have here, . . . make one the size of a box of your shells there in Ireland. Make a wooden box first that is about 3mm longer, 3mm wider, and 3mm taller than the box of shells. Make your leather just like the pattern, . . . sew it up the sides and along the bottom for your belt box. Get it wet in hot water you can just barely stand your hands in, . . . stretch it over the box, . . . leave it for a couple of hours, . . . slip out the wooden box, . . . let it finish drying. If you want to carve or stamp, . . . lay out your design first, . . . then do the carving and stamping. THEN cut and make your box. Dye it last, . . . give it at least 2 good coats of 50/50 Resolene and water solution (3 or 4 would be good), . . . you'll have a strong, practically water proof leather box to carry your shells. After you have proofed your technique and style on the single box carrier, . . . get a piece of 8 or 9 oz leather, . . . make your 50 round box from that, . . . make it the same way. If you don't want to stitch it, . . . punch the edges and lace it. Just remember that if you sew it and leave the four seams sticking out away from the box, . . . it will be unique looking and at the same time, . . . very strong. May God bless, Dwight
-
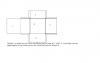
If I understand what you want to do, . . . I do a lot of this for boxes, magazine holders, etc. I've found that rivets and contact cement are your friends when it comes to a project like this. Make your wooden core in the shape you want the hole to become. Make it the proper thickness, minus the thickness of the piece of leather you want to use for the rear. Make two boards 1/2 in by 1 in, and pre drill nail holes about every 3 inches, and within 1 inch of each end. Cut the leather for the back, and tack it to the mold in the position you want it to finish up. Cut the leather for the front a bit oversized all the way around. The front piece will overlap around the back of the form by 1 inch on each side. Drown, . . . wet, . . . soak the leather until it is similar to a big floppy noodle. Nail the one edge to the back of the core using small nails. Stretch the leather around the front and nail it to the back on the other side. Set it up somewhere to dry for a couple of days. Pull the nails out, . . . let the two pieces and the mold completely dry for another day or so. Then get a piece of 1/16 in flat stock steel the length of your mold and 1 inch wide. Re tack your back to the mold, . . . place the front where it should go, . . . mark the back so you know where the front covers the back. Remove the front and coat both the front and back edges where they meet with Weldwood contact cement. Allow it to dry for about an hour. Put the front onto the back, being careful when you line up the edges, . . . where the contact cement edges touch, . . . they will immediately grab and go together. Roll those joints with a wall paper seam roller. Punch holes up & down for small capped rivets. Put rivets and caps in holes on one side, lay the piece of steel in the hole over the backs of the rivets, slide the core in and punch the rivets. Remove the core and do the same for the other side. If I understood you correctly, a cross section of your project when done will look like the attachment. May God bless, Dwight
-
Tentman, . . . I'm sitting at my computer looking at my 15+ year old boots that got so scruffy as brown boots that I just up and dyed them black. They don't look quite so bad that way. Anyway, . . . they're work boots, . . . steel toed, . . . original soles, . . . original heels, . . . and I still love the things. I'd say I've had em on probably no less than 300 days out of each of those years I've had em. They're from http://www.georgiaboot.com/products/ and are a Wellington design. They also make those that are not steel toed. May God bless, Dwight
-
Of the ones I could get to without a bunch of hassle: 26", 28", 38", and 22". I guess the average of that bunch would be something around 28 1/2. May God bless, Dwight
-
Like the others have said, beautiful job. What did you use for the finish on the scabbard, if you don't mind sharing. May God bless, Dwight