Dwight
-
Posts
5,265 -
Joined
-
Last visited
Content Type
Profiles
Forums
Events
Blogs
Gallery
Store
Everything posted by Dwight
-
Send me the details to ciminod@midohio.net, . . . perhaps we can work something out. May God bless, Dwight
-
I have a copy of an old Heiser catalog, . . . it dates from the turn of the century (maybe a bit later, . . . ???). Let me know roughly what kind of style you are looking for, . . . I'll see what is in there. Here are a couple of sample pages, though. May God bless, Dwight
-

Model 1911 Dummy Gun.
Dwight replied to shakygreg's topic in Gun Holsters, Rifle Slings and Knife Sheathes
Law Enforcement Targets, . . . somewhere in Minnesota, . . . you can Google them easily. Their guns are usually in the $35 range, plus shipping puts them in your mailbox in 3 - 5 days for $45 or so. They have been absolutely wonderful to deal with, . . . they just don't show all the models they can get on their website. Do the phone call thing, . . . if you get Kathy, . . . she'll fix you right up. So wil lthe others, . . . but she did my last order, . . . and I don't know what could have been done to make the transaction any better. May God bless, Dwight -
I cracked up when I read this, . . . figured at least a few other folks on here may enjoy a good laugh: http://glossynews.com/society/201001070305/activists-missing-after-declaring-war-on-leather-at-motorcycle-rally/ May God bless, Dwight
-
Google up Law Enforcement Targets, . . . someplace in Minnesota. Their guns generally are $36 plus shipping, . . . super people to deal with, . . . Kathy did my last order, . . . super job. May God bless, Dwight
-
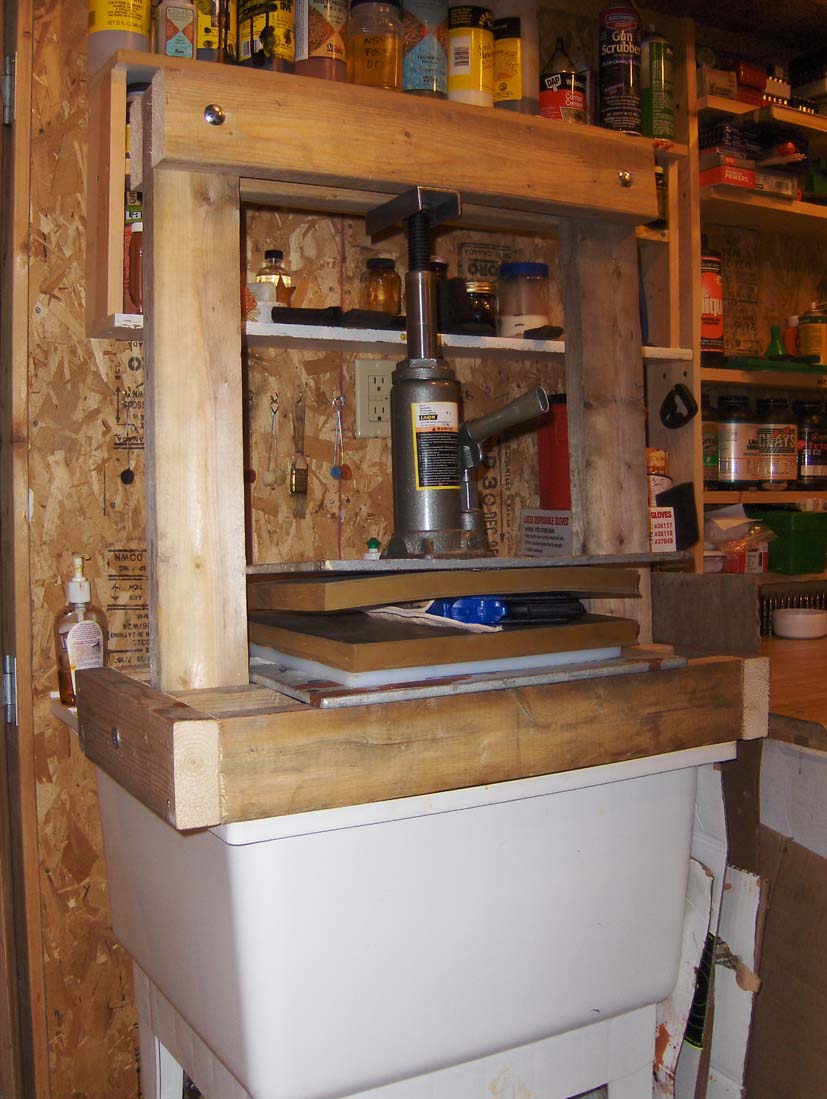
You want to call McMaster Carr, . . . and ask for gum rubber, . . . mine is 1 inch thick, . . . hardness is 40. It looks kinda funky, . . . lots of people I know wouldn't have it on their place, . . . works like a champ, . . . less than $125 in it. May God bless, Dwight

-
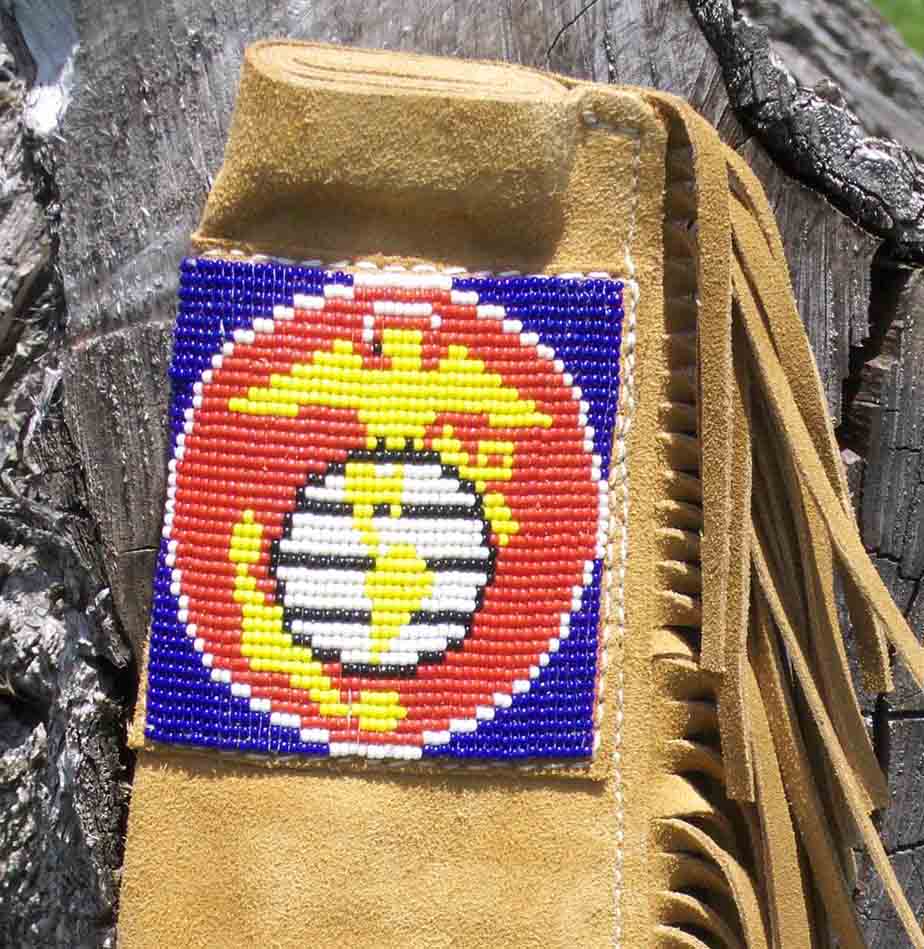
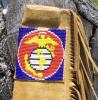
Good job, wolfeyes, . . . Like you, . . . I enjoy also doing pieces that are modeled after "old timey" things. This is the only rifle bag I have made, . . . did it for a young USMC guy to carry his rolling block 45/70 in. He has the heritage and the looks to carry it, . . . both as a Native American and a Marine. And, . . . yeah, . . . there are 2400 individual beads in that emblem. May God bless, Dwight

-
Pancake With Snap Strap
Dwight replied to Reaper's topic in Gun Holsters, Rifle Slings and Knife Sheathes
Those are both good looking holsters, . . . will probably last a long time. My only critical comment is the allowing of the head of the snap to lay against the wearer. Over time, the snap head will begin to discolor the wearer's clothing. I fix that by first using a male post for the male snap part and the female snap part. I affix it to a smaller piece of leather, . . . along with a small piece of aluminum similar to the piece on the black holster. That whole thing is sewn to the thumb strap in such a manner that the only thing that shows is the female portion of the snap. The stiffener is there, . . . it works, . . . and the metal is removed from contacting the wearer. May God bless, Dwight -
There is an old quote from an equally old movie: "Stupid is as stupid does". In the first place, . . . he had a Glock, . . . one of the singularly most dangerous firearms ever developed. Secondly, . . . he did not buy a holster, . . . he bought a generic piece of leather goods designed to carry anything the owner deigned to force into it. Thirdly, . . . he did not take care of his firearm or his "holster". I make holsters, . . . not junk like he was carrying, . . . I don't have a "profit" motive that would lure me into making inherently dangerous products. May God bless, Dwight
-
What Thread Size For Holsters
Dwight replied to NC Holster Maker's topic in Gun Holsters, Rifle Slings and Knife Sheathes
Personally, . . . I like the fuller look of the 346, . . . use it top and bottom, . . . belts too. YMMV May God bless, Dwight -
Getting An Even Finish Using Fiebings Dye
Dwight replied to wvcraftsman's topic in How Do I Do That?
I'll put another plug in there for the dip dyeing routine. I tried brushing, . . . swabbing, . . . foam brushing, . . . finally listened to an old pro who has made literally thousands of holsters, . . . his first step is to cut out the shapes, . . . step 2 was to dip dye the pieces in 5 gallon vats. I tried the dip dye routine, . . . it is "almost" exclusive for me now. I use two cake pans, . . . one for black, . . . one for browns, . . . don't do pink or blue May God bless, Dwight -
Thanks, AZ, . . . now that is neat!!! May God bless, Dwight
-
Kooky Question On Leather Pistol Grips
Dwight replied to Fredo's topic in Gun Holsters, Rifle Slings and Knife Sheathes
My situation is a bit different than what you want, . . . but just to let you know it can be done: My little Bersa Thunder has plastic grips, . . . and I was forever losing MY grip on the thing, . . . and afraid I might just drop it some day at the really wrong time. Kept looking for something other than rubber or skate tape, . . . hit on the idea of suede, . . . Front is laced with synthetic, . . . back is regular lacing, . . . whole thing was contact cemented in place first. It is not everyone's cup of tea, . . . but then it is my firearm, . . . May God bless, Dwight
-
Holster For Xd + Laser/light
Dwight replied to Shooter McGavin's topic in Gun Holsters, Rifle Slings and Knife Sheathes
I don't have a picture, . . . but we ran across this same problem in my last class. The student wanted a pancake for his Glock with a laser light, . . . looked a lot like this one. We wound up doing an Avenger style instead, . . . and he was delighted. It looked a lot like the Don Hume in the post above, . . . just without the retention strap. Since both are OWB style, . . . it worked out well for him. May God bless, Dwight -
You ARE a brave man Luke Hatley,................... May God bless, Dwight
-
Outfit Design (Rouge/ Highwayman/ranger/rover)
Dwight replied to DoktorPsych0's topic in Historical Reenactment
Head out to a Walmart of JoAnns Sewing place, . . . They have books and books of patterns, . . . each can be "adjusted" if you are willing and competent. AND, . . . they are fairly cheap May God bless, Dwight -
I don't do a lot of what you are asking, . . . but when I do, . . . I make a "half moon" shaped piece of manila folder and lay it on the blank, . . . lightly outline it, . . . sew over the outline and finish the job. May God bless, Dwight

-
I've used a number of different finishes, . . . I have 3 I really like. 50/50 by weight, . . . virgin bees wax and neetsfoot oil, . . . melted together in a crock pot of water (wax & oil in a jar), . . . applied like paste shoe polish, . . . takes a lot of work, . . . makes a very beautiful, soft, durable finish, . . . if scratched, . . . is easily repaired. Bagkote, . . . it is a good finish, . . . use it for a softer finish on holsters and sheaths. Applied with a brush, . . . watered down to the max, . . . I think it is 40% water. Resolene, . . . prime choice for a high gloss, hard finish. Applied with a bristle brush, . . . liberally brushed on, . . . 50/50 cut with tap water. Has a UV blocker, water repellent, scratch resistant, my favorite. May God bless, Dwight
-
Resoline Finish "cracking"
Dwight replied to CDMatherne's topic in Gun Holsters, Rifle Slings and Knife Sheathes
I am no expert on this stuff, for sure, . . . but I haven't yet found a holster that needed 3 coats of resolene. I use 1 coat, . . . hand brushed, . . . 50/50 cut with tap water, . . . never had a problem with any of them. I'm tempted to say you put in on too thick and too quickly. The stuff needs something in the neighborhood of 36 hours drying time before it is even close to being fully cured (unless you use some kind of drying oven, .............). May God bless, Dwight -
No real secret, . . . if I drop a stitch, . . . it is usually when I am daydreaming as I work, . . . plus my machine is run by hand, . . . and you kinda "feel" what you're doing, . . . Usually it is early in the belt, . . . but either way, . . . I have an old Tandy modeling tool, . . . small spoon on one end, . . . rat tail on the other, . . . I use the rat tail end, . . . pul up the top thread, . . . rat tail the bottom out of the loop, . . . do it again, . . . and again, . . . and again, . . . and again, . . . and again, . . . and again, . . . Course, . . . I just may have more experience on you in dropped stitches, . . . one of those things that you really wish you were not experienced in, . . . May God bless, Dwight
-
I use a Tippmann Boss for all my stitching. Losing a stitch on the above belt would probably cause me to be really unhappy for a few minutes, . . . then I would get a cup of coffee, . . . cut the thread, . . . and begin unthreading the belt. Yep, . . . the whole thing. It will take me 10 minutes to unthread the belt, . . . and another 15 to 20 to re-sew it completely, . . . and my customer will have a finished product he/she will hopefully wear for many happy years. My customers are my business, . . . If I did not do it that way, . . . I'd throw it in the scrap can and start over. But that is my process, . . . others probably do things in other ways. May God bless, Dwight
-
Use Weldwood contact cement (follow the directions on the can) to put the two pieces together, . . . then treat them as though it was just one piece of leather. Remember though, . . . after you have tooled the holster, . . . you need to be very careful about what ever molding you try to do. You can very easily ruin a whole afternoon of tooling by trying to mold it closely to the handgun. Tooling and closely defined molding for me are almost mutually disqualifying: in other words you can have a real good job of one, . . . but only without the other. May God bless, Dwight
-
Because each gun is thicker / thinner / wider / or something than all others, . . . each one needs a different "offset". I cured that conundrum with one simple step. After making the basic back (outline including wings and sweatshield), . . . I make a front panel that I know is extra long. The front wing is perfected, . . . the front wing is sewn together, . . . but no belt hole punched yet. I just douse that extra long front panel (keep the back panel dry), . . . fold it over about 120 degrees so I can lay my gun down on the back panel exactly where it will ride once the holster is finished, . . . and I begin to slowly but surely fold the front panel over the handgun, . . . molding it as I go, . . . about 1/4 to 3/8 of an inch at a time, . . . doing as much detail molding as I can using only my fingers and thumbs. That is my simple step. Once the handgun is molded, . . . I very gingerly remove the handgun from the "half wet" holster, . . . hang it over a string through the sight channel, . . . let it dry overnight, . . . glue the back wing, . . . trim, edge, burnish, sew, . . . and finish it up. I like it better only because for me, . . . it is more comfortable. A fully enveloped pancake is easier and quicker for me to make, . . . but again, . . . I'm an old guy, . . . and comfort means a lot to me . May God bless, Dwight
-
Tyree, . . . your question, . . . is similar to the one "Is the glass half full, . . . or half empty?" The pancake holster can and is made both ways, . . . by serious holster makers, . . . and beginners alike. Personally, . . . I make my back virtually flat, . . . it is more comfortable to me like that. If you PM me a regular email address, . . . I'll send you my "pattern", . . . it's about a meg, . . . can't get it through here. May God bless, Dwight
-
Many holster makers routinely make "rough out" holsters, . . . the two reasons are 1) as an In the Waist Band (IWB) holster, it will not move around as much as one that has the hair side out, . . . 2) it provides a smoother surface for the handgun, supposedly to cause less wearing on the blueing. If you do not want to do that, . . . cover the flesh side with a thin coat of contact cement, . . . do the same for a another piece of leather big enough to cover your first cut out piece, . . . when the pieces are dried (about an hour or so) stick em together, . . . roll it with a rolling pin, . . . then go ahead and make your holster out of the new piece of bonded leather. Treat it the same as you would if the bonded leather were just one piece, . . . FWIW, . . . the holster that Clint Eastwood made famous in his "Spaghetti Westerns" was a rough out holster, . . . I have one more or less just like it, . . . and I love it. May God bless, Dwight