Dwight
-
Posts
5,269 -
Joined
-
Last visited
Content Type
Profiles
Forums
Events
Blogs
Gallery
Store
Everything posted by Dwight
-
Katariina, . . . Greetings to you also from the other side of the Atlantic pond. Do a Google search, use this: "Double Loop Lacing" and don't take out the quotation marks. One of your choices will be a you tube video of the type lacing done on a billfold, . . . and while it will take a lot of lacing and a lot of time to do, . . . when it is done, it will look very good. For my guitar straps, . . . I just sew the two pieces together, . . . sand the edges, . . . and burnish them like I would do for a belt. May God bless, Dwight
-
I was in the TB factory one day, . . . getting my machine repaired, . . . and I watched one of their assembly people put one together. He used a grease that looked just exactly like clear Vaseline Pet. Jelly. He said it was a silicone grease, . . . and I watched him as he applied it with a small brush, . . . the type called an acid brush, . . . used a lot by plumbers. I had earlier tried the oil thing, . . . stay away from it, . . . as oil will collect on the bottom side of all those moving parts, . . . and at the most inopportune moment, . . . it will drip down on your piece of leather, . . . and you will be SOME KIND OF UNHAPPY. I have since gotten a similar grease, . . . and brushes, . . . and every now and then, . . . I take the plate off of mine, . . . pull out the guts, . . . wipe the old grease off them, . . . apply new grease, . . . put her back together, . . . and well................................... it works like a sewing machine. The trick is not to use a light weight lubricant, . . . it'll drip, . . . May God bless, Dwight
-

Where's The Quality In "custom" Gone
Dwight replied to Chief31794's topic in Leatherwork Conversation
There has always been the concept of "caveat emptor", . . . let the buyer beware, . . . at any time and any place there was retail sales going on. In my sales, . . . if I would not buy the product, at the price I offer it, . . . then I won't sell it to someone else. I have sold seconds, . . . but in every case there was a steep discount, . . . and full disclosure as to why I was selling it so cheap. If a person does that, . . . quality does not suffer, . . . I say that especially in leather work because one can find some kind of flaw in just about any hand made / custom made leather item produced. That is in my opinion, part of the beauty and attraction of leather work. If I wanted everything perfectly the same, . . . I'd just punch press out the Kydex and go on about life. I try to treat my customers as I would want to be treated I guess is my bottom line. But then again, . . . there are unscroupulous varmints out there who could not care less, . . . fleece the flock is their motto. May God bless, Dwight -
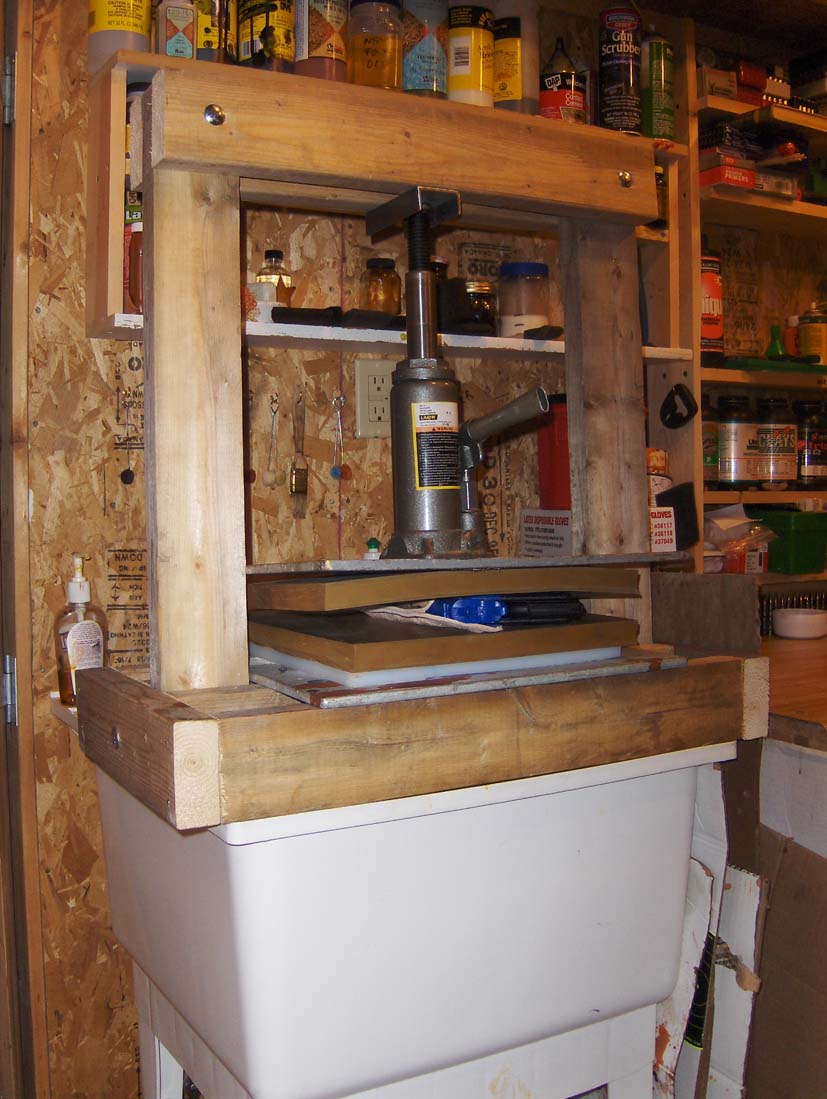
If you are handy with wood working tools, . . . and if you have a couple of 2 x 4's laying around, . . . you can make one like this. I use it for all kinds of stuff, . . . plus molding holsters. The 8 ton press from Harbor Freight at $19 was THE expensive part of the whole thing. May God bless, Dwight

-
Cartridge Loops With Sewing Machine?
Dwight replied to Jimbob's topic in Gun Holsters, Rifle Slings and Knife Sheathes
John Bianchi's videos showed sewing the loop down, then going off the loop leather, . . . diagonally, . . . to start the next loop. I also had a commercially produced belt a number of years ago, . . . it was done this way also. The foot doesn't make that big a difference as the loops will be lying flat anyway, . . . or at least that is my experience. After sewing, . . . come back and form the loops as they should be. May God bless, Dwight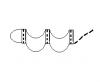
-
I did mine, . . . I took a flat board, . . . ran a small groove in it with a saw, . . . glued a small wooden dowel into the groove, . . . coated the dowel with valve grinding compound, . . . and commenced to back stroke that edger on the dowel until it became round. About a half hour. I love it now, . . . it started life as a # 4, . . . now it is a # 4 round. I keep it sharp with a rounded piece of leather stuck between two boards, . . . coated with jeweler's rouge. May God bless, Dwight
-
The Second 'new Holster'
Dwight replied to katsass's topic in Gun Holsters, Rifle Slings and Knife Sheathes
Your are an artist, my friend, . . . I could copy that, . . . but would never come up with it myself as an original. I consider myself good at just getting the mechanical stuff together, . . . much less the esthetics. May God bless, Dwight -
$14.95 plus tax will get you a good starter gun at Harbor Freight. I bought two of them, figuring I'd break one quickly (kinda klutzy if you know what I mean), . . . about a year ago, . . . haven't opened the second one yet. I like it, . . . but i am not as good with it as I would some day like to be. May God bless, Dwight
-
First Holster, Tips?
Dwight replied to matthew91188's topic in Gun Holsters, Rifle Slings and Knife Sheathes
I have a lot of trouble with making stuff if there are parts that are supposed to be the same, . . . as in rounded corners. I get some kind of aggravated when three rounded corners look like each other, . . . and their illegitimate 4th brother looks different. That's why I built this little device, . . . it may not make em all perfect, . . . but at least they are uniformly imperfect. I said 1 inch in the post, . . . but they can be of any size you need, . . . my smallest is made from 1/2 inch conduit, . . . and is the most used. And if my guess is correct, . . . the owner of that holslter said it is very comfortable to wear even for extended periods of time. That is the benefit of the extra leather that spreads the intrusion over a greater area. May God bless, Dwight corner cutter.bmp -
Thank you, Capgun, . . . that is a really good idea. Matter of fact, . . . might even do one of those in the near future, . . . just to see how it is received by the guys here. Most folks I know in my age group seem to trade pounds, . . . one loses 15 while the other gains 15, . . . May God bless, Dwight
-
Mine is a 2007 (?), . . . is aluminum, . . . and has the HS designator. If you want to be certain, . . . get their number off the WWW, . . . call and ask for Ben, . . . he'll tell you. The whole bunch is super to work with. May God bless, Dwight
-
Extreme Crossdraw Almost Sideways?
Dwight replied to George B's topic in Gun Holsters, Rifle Slings and Knife Sheathes
If he wants something to go on, . . . go off, . . . look up the Carjacker holster. I've made a similar type a couple of times, . . . and it lays very close to parallel to the belt. May God bless, Dwight -
Rueben, . . . you can still make him a laminated belt, . . . and it WILL be a better product for him. Start your bullet loops back around in the left side, . . . leaving just enough open leather for his cross draw rig if he uses one. As he loses weight, . . . you only move the tongue billet on the other end , . . . and re-sew and burnish the right end of the belt, . . .should take all of about 15 minutes. I won't do a single layer belt for any of my customers, . . . unless the bullet loops are sewn on, . . . and so far I have talked every one of them out of that. Line it with some 3/4 or 4/5 leather, . . . May God bless, Dwight
-
I'm going to go out on a limb, . . . saying that you probably have garment leather in that strap, . . . not veggie tanned, . . . and the tooling will not come out the way you want it to. Having said that, . . . if you have a Tandy store nearby, . . . you can go in there and ask them, . . . barring that, . . . just go for it. I've thrown away lots of these "experiments" that I had hoped better for, . . . but just every now and then, . . . one of them turns out really right, . . . and everything is so much better. The dye should be color fast, . . . so you should not have a "mess". Probably though, . . . they dye is only on the surface, . . . and if you do any real heavy tooling, . . . you will have to re-dye some of it. For that reason, . . . do as much of the designas you can by stamping rather than tooling. Have at it, . . . and have fun. May God bless, Dwight
-
Need Help Making A Viking Skirt For My Daughter
Dwight replied to McClaxton's topic in How Do I Do That?
Measure her waist, . . . make the "belt" portion out of suede, . . . doubled over, . . . so that the top of the belt is the folded edge. Overlap the ends and put them together in the back with hook and loop material. I'd probably make the belt about 4 inches wide, . . . which makes your blank have to be 8 inches wide to start. Looking at the "lady" with the ax, . . . her skirt seems to be made of 12 exterior plates and 12 interior plates, . . . laid out so that the openings in one is covered by the body of the other. I would use rivets hidden under the elephant tooth protrusions to hold the whole thing together, . . . with the interior skirt plates also sewn to a dark "A" line skirt (ask your wife, she'll show you what one of those looks like) just for modesty sake. The skirt zipper goes in the back. As for the taper, . . . remember you are using 12 plates. Measure the waist, . . . divide by 12 for the width of the top of the plates, . . . measure the hem of the A line skirt and divide it by 12 for the bottom width. The exterior would either be garment chrome tan, . . . or suede, . . . and I would probably opt for the suede. Make a tab at the top of each of the interior plates, . . . the ends of the interior plates go up in the belt to be sewn in, . . . the ends of the exterior plates overlap the belt and hide the stitches. As for the metal elephant teeth on the outside of the skirt, . . . they will have to be really light weight, . . . or will have to be bonded to a metal piece running the length of the skirt plate. I'd probably opt for turning them on a wood lathe, . . . painting them silver, . . . and putting them on the skirt with wood screws from the back side through the aforementioned metal plate. If there is nothing behind them, . . . they will just flop down, . . . pointing at the ground, . . . and will not look like the lady in the picture. Best wishes, . . . may God bless, Dwight -
Finished A Couple Of Bbq Holsters
Dwight replied to RiverRat's topic in Gun Holsters, Rifle Slings and Knife Sheathes
The really nice thing about wearing one of these, . . . once you get there, . . . the holster mechanics (retention, . . . molding, . . . etc.) take second place to the oooohh's and ahhhhhhh's, . . . Plus, . . . with all the others that will also be there, . . . even if you did have a problem with retention, . . . the bad guys would be so out gunned that you could just sip on your iced tea and be cool. Every time I start to make one for me, . . . I change my mind on the design I want, . . . so I don't have one, ......................................... yet. That is one good looking piece of art though, . . . and a credit to it's craftsman. May God bless, Dwight -
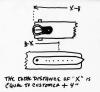
If I were making it for him, . . . the blanks (I only do lined belts) would both be heavy 7/8 leather. I only made one like this for a guy who was a 52 inch waist, . . . so I am not quite up into your league Anyway, . . . the blanks for your guy would be 66 inches long, . . . and no less than 3 inches wide. I always place my buckle billet so that the finished buckle inside lip is dead even with the leading edge of the belt. Look through the buckle, . . . make sure it is even. The tongue billet should be fixed and placed on the end of the belt so that the center hole (I always use 7 holes spaced 1 inch apart) measures exactly the same as your customer's belt, . . . PLUS 4 INCHES. ...................... DON'T FORGET THE 4 INCHES. My overlap from the first hole to the end of the billet is about 3 1/2 inches, . . . it all depends on how it is going to be done to finish it. Take a look at the diagram, . . . holler if you have any questions. May God bless, Dwight
-
Well, . . . whoever had your name, . . . had mine first. That was a couple of years ago. That is one good looking holster, my friend, . . . but then what would we have expected from you? May God bless, Dwight
-
Mine uses a 8 ton jack from Harbor Freight. Total investment: +/- $125 May God bless, Dwight

-
I would be very tempted to take the easy way out on this, . . . Take a pair of her crocks that fit, . . . make a pair of suede booties that will attach to a pair of light brown crocks, . . . contact cement the very nicely done and painstakenly decorated booties to the crocks, . . . and wish them the best. After all, . . . this is a wedding, . . . she's not planning on hiking to Denver in them. May God bless, Dwight
-
I have dyed the leather first, . . . I have dyed the leather last, . . . and I don't find any real difference either way. I finally settled on making it first, then dying. No real reason, . . . just do it that way, . . . it works for me. Lou Alessi always advised that he dyed first, . . . drum dying was his technique. If it works for you, . . . do it, . . . Kinda like the old gunfight thingy: 10 years from now no one will remember the tactics, stance, particular ammo, . . . only who survived. Doing leatherwork is similar: 10 years from now no one will care if it was dyed first, last, or if at all, . . . just so long as it is still working. May God bless, Dwight
-
Yep, . . . 40 is the correct number. Mine came from McMaster Carr, . . . natural gum rubber, . . . works like a champ. May God bless, Dwight
-
Reinforced Throat Iwb
Dwight replied to Steven Kelley's topic in Gun Holsters, Rifle Slings and Knife Sheathes
Just a quick couple of comments, . . . Steve, . . . and we'll start with the color. I love it !!!!! It looks like a holster that is a holster, . . . that is used by someone other than the Governator or Bradd Pitt. On the construction, though, . . . I'd make a couple of changes if it was mine. 1. Take the reinforceing band all the way up the sweat sheild 2. Cut some off both ends of the reinforceing band, . . . get it out of the trigger guard area, . . . stop it while it is still on the frame. 3. Consider reversing the back side so that the back is "rough out". That helps a little bit in keeping it from sliding around on you, even if you have two straps, they kinda like to move. I made one of these holsters a few years back, . . . it is a copy of Spark's VM2, . . . and it is a great holster, . . . but they're just too much of a pain for me to mess with, I do simpler designs. May God bless, Dwight -
I know some folks have a dislike for Weaver's, . . . I am not one of them. In Ohio, you have to get a "Vendor's License" which allows you to collect sales tax on your sales, . . . then send it to the state twice a year. With that, . . . Weaver's is more than happy to do business with you. Other states probably call it differently by name, . . . but that is what you need. I have their catalog, . . . pick out the things I want, . . . pick up the phone, . . . call it in, . . . watch for the truck in the drive way, . . . simple as that. I have also been there, . . . if you go, they take you out back where you pick your hides you want, . . . and absolutely every one there was really nice to work with. True, . . . they have their rules, . . . but that is their business model, . . . get inside it, . . . you'll find they are good people to work with, . . . or at least that has been my experience. May God bless, Dwight
-
I don't do small lettering like that, . . . but I used to own a sign shop a number of years ago. One of the greatest tools for what you are doing is called a pantograph (sp??). It amounts to a mechanical arm setup that transfers the movement of a stylus to the cutting action at the blade or knife. The neat thing is you also get a reduction from the "master" to the finished product. Most pantographs are adjustable, . . . but if you built one with a 2:1 ratio, . . . that would be the best for easy use and scale figuring. A 2:1 reduction will take a letter, . . . for instance an "M", . . . and will make 4 little ones that take up the space of the first one, the pattern. What is also great, . . . you can make your own patterns, letters, scenes, etc, . . . and they don't have to be absolutely perfect. Get "most" of the defects out of an original that is say 8 inches square, . . . use it to reproduce a pattern that would then be 4 inches square, . . . from it make a pattern 2 inches square, . . . which makes a 1 inch square pattern that has just about lost every possible defect, . . . and makes a beautiful 1/2 inch design in your leather. For my "blade", . . . I would use a Dremel with a 1/16 inch drill mounted, . . . I would cut the leather dry for all my patterning, . . . then dampen it and tool it to the final product. I actually still have one, . . . it was purchased from Sears about 5 or 6 years ago, . . . it ran about a hundred bucks, . . . I used it for some sign work for our church, . . . and it works great. May God bless, Dwight