Dwight
-
Posts
5,254 -
Joined
-
Last visited
Content Type
Profiles
Forums
Events
Blogs
Gallery
Store
Everything posted by Dwight
-
If I'm doing a stitching line such as the outside line on your holster, . . . I will always use a stitch groover, . . . because I want my stitches to lay down in the groove and be protected from abrasion,etc. If I'm just putting a second "decorative" line, . . . mostly I use a pair of dividers that I took to a piece of sand paper and permanently dulled the ends so I get a rounded groove instead of a pointed slash/groove that a sharp divider end will do. But in your case, . . . and please don't take offense, . . . from what I could see, . . . it just looked like you got in a hurry, . . . especially up over the top outside piece of the holster where the cylinder is. Whenever you are grooving or putting in decorative lines, . . . always, . . . always, . . . make sure your leather is fully flat, . . . and the surface under it is flat. Pull in only one direction, . . . pull with the same hand, . . . and take your time. Again, . . . take your time. Also, . . . I learned a long time ago that sometimes looking at the raw leather, . . . it looks kinda bad, . . . but after all the finishing touches are done, . . . and it is finished, . . . it looks a whole lot better. Those double lines at the holster mouth will disappear during sewing, molding, dyeing, and finishing. Another thing, though, . . . you should have put your holster together, . . . sanded the edges, . . . edged it, . . . before you grooved the seam side. Sometimes it doesn't quite line up perfectly, . . . when you sand it smooth, . . . if the groove lines are already there, . . . they can then be "off" because of removed material. Now!!! After all the criticism, . . . let me say good job on the carving. I envy you guys who have the dexterity and patience for that, . . . it just doesn't happen with me. Too old, . . . too shakey, . . . May God bless, Dwight
-
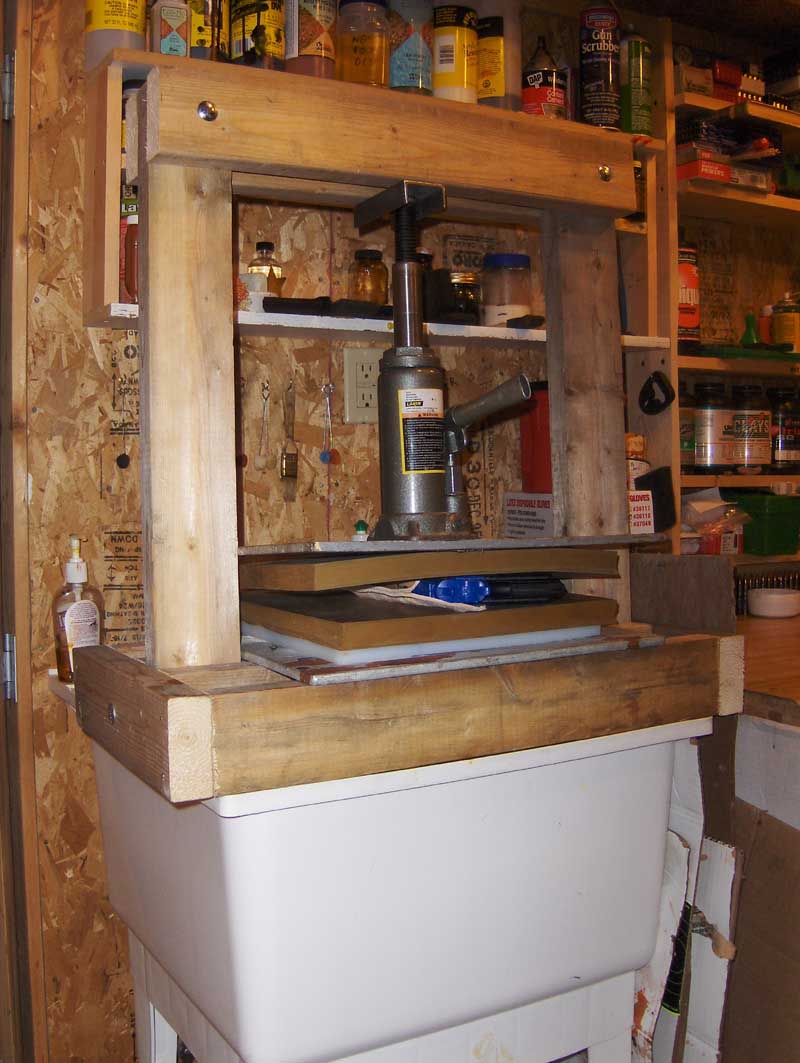
 Here is the one I made, . . . Needs a lot in the looks department, . . . but it is fully functional. (It actually is better than this picture, . . . I've since added springs to auto-return it when I release the jack) It also has one other layer of gum rummer not needed in this picture, . . . but sometimes used above the weapon. May God bless, Dwight
-
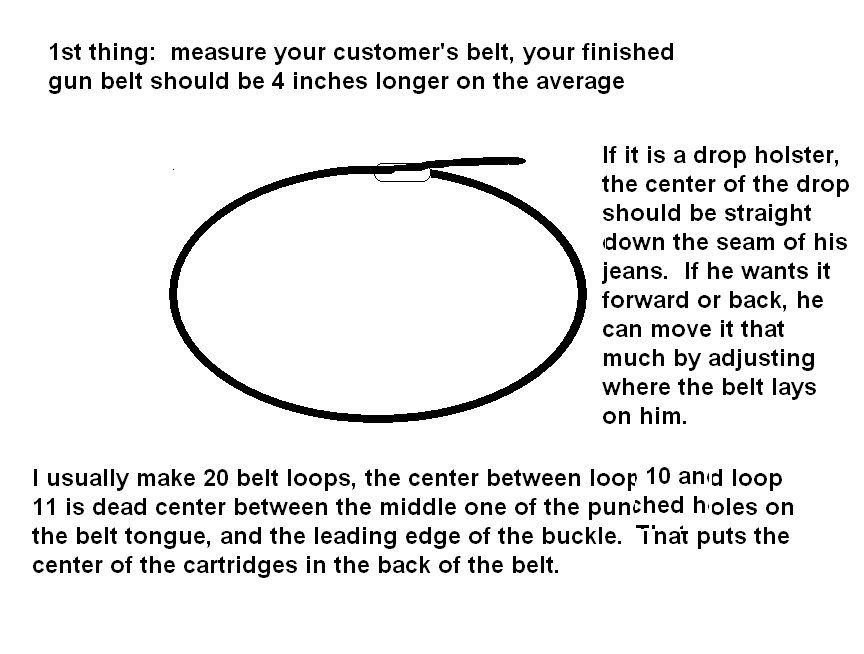
That is exactly the same way I make mine. I do always line the belt back, . . . and when the lining goes on, . . . I contact cement it to the other belt piece, including the cartridge straps. Here is a little drawing that may also help. May God bless, Dwight

-
Go down to the local Salvation Army store, . . . part with $10 for a used crock pot. Also get a wide mouth pint jar if they have one, . . . or something similar. Put your parrafin and beeswax into the pint jar, . . . put it into the crock pot, . . . add enough water to the crock pot to float the jar about 1/2 inch off the bottom, . . . put on the lid, . . . turn it on high, . . . go get a doughnut and a cup of coffee, . . . sit on the front porch and eat the doughnut, . . . drink the coffee, . . . comment on how lovely the birds are singing today. By then your beeswax and parrafin should be SAFELY melted, . . . just pour them into any container that is tapered out from the bottom, . . . after it cools, . . . you can usually shake it out. This also works for mixing wax and neatsfoot oil, . . . 50/50 by weight with beeswax, . . . makes a cake of some of the lovliest leather finishing product you have ever used. May God bless, Dwight
-
Matt, . . . for the most part, . . . tooling on holsters and molded holsters are kinda like the power vs speed thing with engines. You can always have either one, . . . but it is really hard to have both. The best way I have found for the few I have done, . . . take a pattern you KNOW IS CORRECT. Do all your tooling on the piece of leather you want tooled. Let it dry, . . . bone stinking dry. Put the holster together, . . . stitching, edging, all that sort of stuff, . . . Lightly dampen the inside of the holster with a wash rag or something like that, . . . DO NOT GET THE OUTSIDE WET. Force the gun down into the holster and very gently add some molding details with your fingers. This is about as good as it gets from my perspective. Others may have better advice. May God bless, Dwight
-
Machine Sewing A Holster
Dwight replied to rccolt45's topic in Gun Holsters, Rifle Slings and Knife Sheathes
I use a regular groover and a freehand groover, . . . just like I was going to hand sew the thing. I use the grooves to show me where to put the stitches. Without the groove, . . . the stitches tend to weave left and right , . . . but with the groove, . . . it stays nice and straight (most of the time anyway). May God bless, Dwight -
Can / will you share a sample, . . . it may be easier to visualize and/or suggest alternatives. I'd like to see what you are working on if you wouldn't mind. May God bless, Dwight
-
Weaver says it will work from 1/2 to 3 inch straps. How many belts are you doing these days? Is it something that is keeping you from production? May God bless, Dwight
-
First Attempt At Vacuum Forming
Dwight replied to Shaunny Rotten's topic in Gun Holsters, Rifle Slings and Knife Sheathes
Shaunny Rotten, . . . would you do us all a great big favor? Take a pair of calipers and gauge the thickness of the material used in the bag. I'm thinking that my bag is much thicker than yours, . . . would like to know for sure, . . . May God bless, Dwight -
I don't usually do different colors for edges, . . . but when I do, . . . pull off a piece of Bounty paper towel about 2 inches wide, . . . 4 inches long. Fold, re-fold, re-fold until it is about 1/2 wide and 2 inches long. Grab the "open" end of the fold with a spring clothes pin, . . . dip the folded over end down into the dye or edging, . . . use that folded paper towel to color the edge. Like I said, . . . don't do it much, . . . don't like to do it, . . . but this is the safest system I have developed. Hate having to do a project over because the edging didn't turn out right. May God bless, Dwight
-
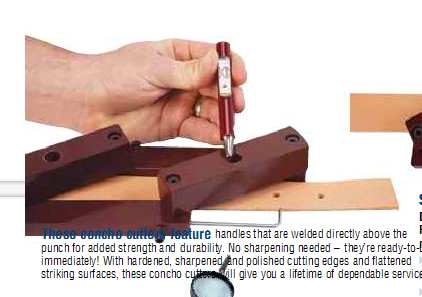
Sylvia, . . . this is the tool I told you about. Weaver's part number is a 65-6185 and my catalog says $35. As you can see, . . . it adjusts to whatever width the belt or strap is, . . . centers the hole, . . . and you can use the little steel length gauge to set the spacing on the holes too. I do all mine by hand, . . . but may have one of these in my future. May God bless, Dwight
-
I just googled "concealed carry purse pattern" and got this: http://www.thebagladyoftulsa.com/Gun-Purses.html Got some good lookin' stuff there. May God bless, Dwight
-
If you send an email to Weaver Leather Co, . . . explain it all to them, . . . they may still be marketing a little tool they had up there a year or so ago. It literally "centered" your punch for you on various widths of belts, straps, whatever. I looked at it, . . . decided that if my eyes ever got bad enough, . . . I'd make me one of them. May God bless, Dwight
-
Leather Consistency And Dye
Dwight replied to DoubleBarP's topic in Gun Holsters, Rifle Slings and Knife Sheathes
I have found that if I want a brown to be consistent, . . . even, . . . etc, . . . the ONLY way for me is to do the dye job first. Pour the dye into the 11 x 14 baking pan, . . . drop in the leather, . . . turn it over, . . . pull it out, . . . lay it flesh side down on newspaper for about a half hour, . . . then grab a corner with a clothes pin on a string over my wood stove or a register (hang in the window for sunlight in the summer), . . . let it dry for at least 24 hours. Lou Alessi told me before he passed on that he always dyed his holsters before he did any of the forming stuff, . . . and it was always dip dyed. I like dip dyeing better than anything else because you get a deep color, . . . tried the air brush and found out it is only a light surface color, . . . not what I personally wanted. YMMV. May God bless, Dwight -
Sanding Edges
Dwight replied to mncarpenter's topic in Gun Holsters, Rifle Slings and Knife Sheathes
This is exactly what I use, . . . I run my belt blanks from right to left, . . . letting the belt "finish" the work on the left edge of the sanding belt, . . . against the metal backing plate, . . . feeding it with my right hand, . . . and using my left hand as the guide for the belt blank. I get beautifully sanded edges, . . . very little work to burnish them smooth, . . . use a # 4 edger just before I burnish, . . . to me it makes a beautiful edge. Yes, . . . there usually is a little flap on the bottom side after the sanding, . . . but that is why I also use the edger, . . . it cleans that off right now. You might take your strap cutter, . . . make a 20 inch or so couple of pieces of leather 1 1/2 wide, . . . glue em together for a belt, . . . practice sanding em off. It won't take long to get the hang of it if your hands are steady at all. May God bless, Dwight -
I'd say the problem is here: and then applied a bunch of coats of NO until it was soft. If you wanted a soft belt, you should have used something other than Resolene, . . . BagKote comes to mind, . . . or a bees wax / NO combination. I NEVER do more than a very light coating of neatsfoot oil on any of my projects, . . . and that only to the hair side. ONE coat, . . . no more. May God bless, Dwight
-
Actually you can get just as good, . . . if not better results with a WOOD burnisher. There are many ways of getting them, . . . but if you use John's basic idea of an electric motor, you can add the wood part on a shaft, . . . on an arbor, . . . or on a ball bearing shaft, . . . The key is to use hard wood, . . . sand it smooth (and I mean SMOOTH, type SMOOTH), . . . dress it with some bee's wax to finish the smoothing process. It will do every bit as well as the wool type, . . . I've had both. But, . . . if you have to have the wool, . . . you can buy a small piece from McMaster-Carr, . . . just Google that name, . . . find it in their on line catalog, . . . call em up, . . . give em your credit card info, . . . you'll be in business in about 48 hours. May God bless, Dwight
-
Bob, . . . you might try a product called Bag Kote, . . . another Feibings product. It produces a much softer looking and feeling product without all the sheen. I use both Resolene and Bag Kote, . . . resolene 50/50 with water, . . . bag kote is 60/40, bag kote to water. I brush both on with a bristle brush, . . . that 1 inch wide, 49 cent, el cheapo, pure bristle brush, . . . then wash the brush out with soap and water. I lather it on fairly good, . . . making sure that each and every square inch is covered, . . . including the edges, . . . brush it , brush it, brush it, . . . back and forth, . . . up and down, . . . oblique left/down then right/down, . . . and keep brushing until all the bubbles are pretty well brushed out, . . . I then hit it VERY CAREFULLY with my heat gun to dry up any streaks that might try to form, . . . If I want a high gloss finish, . . . using this priocess, . . . I usually have to do multiple coats. I personally shy away from Bag Kote only because the ammonia (or something in it) aggravates my breathing, . . . but it is a good product. With either one, . . . I then hang em up for 24 hours before I get serious about handling them. May God bless, Dwight
-
hectron, . . . when in doubt, . . . refer to Radar's message. He has the subject well covered. Super sheen is sort of the bottom rung on the finishing ladder. Resolene takes you much further up, . . . gives you UV protection, . . . is almost water proof, . . . leaves a beautiful shine, . . . is easy to work with. It is not a "be all" or "do all" finish, . . . but it is hard to beat for holsters, belts, some purses, bags, boxes, knife sheaths, seats, etc. Mayy God bless, Dwight
-
Sanding Edges
Dwight replied to mncarpenter's topic in Gun Holsters, Rifle Slings and Knife Sheathes
Mine looks a bit different, . . . came from Harbor Freight, . . . cost half that price, . . . but it does a great job. Oh, . . . bearings are going out too, . . . musta used it too much. 1 inch by 30 belt, . . . I can edge a 40 inch belt with it in about 4 to 6 minutes. When I use a spindle sander, . . . I can't get the edge to stay straight, . . . gets all wavey and funky lookin, . . . much prefer the belt sander. After sanding, . . . I hit it with the edger, . . . sew it, . . . finish it. May God bless, Dwight -
Coffee Ground Dye
Dwight replied to rickeyfro's topic in Dyes, Antiques, Stains, Glues, Waxes, Finishes and Conditioners.
Hope you don't mind, Rick, . . . thought I'd just reserve a space in here too, . . . I'd like to know. I go through 3 each 12 cup pots every day, . . . and if I can turn those grounds into some profit, . . . or less expense, . . . that'd be great. May God bless, Dwight -
Sylvia's way works, . . . but if you make the front out of a little thinner leather, . . . line it with another piece of leather, . . . you'll end the problem much quicker, . . . and more permanently. The other thing of course, . . . use a better grade of leather, . . . and be careful where you cut it out of the hide. That is one of the reasons I use double shoulders almost exclusively. I don't REFUSE to make an unlined belt, . . . but I hate to do it, . . . knowing a lined belt is SOOOOOOOOOO much better. May God bless, Dwight
-
Trojan Rabbit, . . . do yourself a favor and throw that stuff out with Monday's left over fish. Get a bottle of Resolene, . . . like Radar said, . . . it works. I do the exact same thing he spoke of, . . . I have never had one project, . . . one piece bleed through Resolene, . . . May God bless, Dwight
-
Another Iwb Holster Question
Dwight replied to glockanator's topic in Gun Holsters, Rifle Slings and Knife Sheathes
If my customer can't be persuaded to choose my "Cactus" model for IWB, . . . my next choice for them is a pancake. IF I make them an IWB pancake, . . . it is always a "flat backed" pancake. I've found that will make it much harder for the holster to collapse inside the waistband without the hand gun in it. As LOBO pointed out, . . . a standard pancake can collapse like a pin pricked balloon. But then again, . . . almost all of my customers are looking for concealability and comfort, . . . and I make only a few OWB holsters. May God bless, Dwight -
When you get going well with that stuff, . . . remember that I also saved $45 on my "blue gun" Ruger LCP, . . . and another $45 on my little "blue gun" Keltec. They're both plywood, . . . and make perfect holsters. I'm making a Judge next. May God bless, Dwight