Dwight
-
Posts
5,254 -
Joined
-
Last visited
Content Type
Profiles
Forums
Events
Blogs
Gallery
Store
Everything posted by Dwight
-

Feedback On New-To-Me Design
Dwight replied to Shooter McGavin's topic in Gun Holsters, Rifle Slings and Knife Sheathes
As usual, . . . good looking work, Shooter, . . . If it was me, . . . because I have arthritis in my fingers, . . . and at times I get this urge to smack a brick wall and give them something to hurt about, . . . but so far have restrained myself. Again, . . . because of the arthritis, . . . there is a different clip that has a bigger lip in front, . . . and does not have the bottom fold in the inside of the clip, . . . that is the one I would use, . . . as it would be much easier to get on and off, . . . and believe me, . . . when your hands and fingers hurt, . . . anything that is easier helps. Just a suggestion, . . . not being critical,........... May God bless, Dwight -
If all you want is a line on the edge of a strap, . . . buy a cheap pair of dividers, . . . dull one point somewhat, . . . set the distance you want, . . . moisten the strap, . . . drag the dulled poing down the edge of the strap, . . . let it dry. Uhhh, . . . I think my dividers were about $8, . . . May God bless, Dwight
-
Pull-The-Dot Snap Question
Dwight replied to particle's topic in Gun Holsters, Rifle Slings and Knife Sheathes
Triage 1998, . . . there is a store called Hobby Lobby, . . . many are in Ohio. In those I have been to, . . . go to their sewing section where they sell scissors, tapes, and that sort of stuff. Look for a tool that looks vaguely like a pair of pliers with blue handles, . . . price will be in the $25 range, . . . there should also be a small assortment of snaps that is in the blister pack with it. Look for a small red circle of plastic on the crimp head, . . . it is for the line 24 size snaps. Don't waste your money on the tool that does all the different sizes, . . . you want the one that only does the 24 size. It is by far and away the very best tool for setting snaps on holsters, . . . straps, . . . etc. Mine is several years old, . . . will be replacing it in the near future, . . . only paid $10 at Wally world for mine, . . . but it has done a BUNCH of snaps. May God bless, Dwight -
In a lot of cases, I find it just as easy to take a pair of good pliers, . . . grab the male or female part and squeeze it together. It usually opens the hole up enough that it just slips off the post holding it. May God bless, Dwight
-
All of my smaller patterns follow John Bianchi's advice: manila folders. I have never had an issue with any of them, . . . not one. For larger patterns, . . . Tandy sells a product, . . . bag liner, . . . it's a kinda sorta cardboardy material, . . . but so far has held up really well in every test pattern I have used it for. It comes in a roll, . . . something like 40 inches wide, . . . and I love the stuff. Fact is, . . . when I get the new shop next spring, . . . one of my "tasks" is to take all my smaller patterns and create new ones with bag liner for the ones I use the most. May God bless, Dwight
-
Wild Bunch Rig
Dwight replied to Boothill Bob's topic in Gun Holsters, Rifle Slings and Knife Sheathes
Great job on the WB rig,....... BhB, . . . I also like your little press, . . . and was just wondering: is the top slanted, higher on the left than it is on the right? I could not tell for sure if that was a design or just the angle of the camera. Thanks, may God bless, Dwight -
Tobacco Pouch Liner?
Dwight replied to Shorts's topic in Purses, Wallets, Belts and Miscellaneous Pocket Items
The last two I made, . . . for the same guy, . . . first one had a piece of his grandmother's quilting pieces (cotton fabric) cemented in with contact cement. His wife gave it to him for a gift, . . . told him about the lining, . . . he got all teary eyed, . . . put it up, . . . refused to use it. I made him a second one, just like the first, but with just a scrap piece of my own quilt pieces (again a plain cotton fabric) cemented to the leather before I started doing all the other things to make the pouch. That was a number of years ago, . . . it must have worked out as I have never had any call backs, . . . and SHE would have called me if it had not worked out. May God bless, Dwight -
As an absolute, . . . always answer, . . . can't give you one. As an anecdotal experience, . . . several years ago I made a belt for myself, . . . wearing it right now as a matter of fact, . . . wound up with two layers of real good 8/9 oz leather, . . . cemented together and sewn with 346 thread (top and bottom) at about 5 stitches per inch, . . . gave it a real good coat of Resolene as the finish on the belt. I think I could carry 3 .45's, two .44's, 4 or 5 boxes of ammo, a knife, compass, and lunch pack and this thing would not sag. Truthfully, . . . it is a bit too much belt, . . . but it will never be put out to pasture, . . . as I have gotten used to it. It has not stretched, . . . it has taken a forward curve, . . . something to do with the "done lap" behind the buckle if you know what I mean, . . . but it is still the same length as it was when I made it several years ago, . . . and I have put it to bunches of use. May God bless, Dwight
-
I took two pieces of scrap pine, . . . several drywall screws, . . . a scrap piece of leather and made a beveler strop that works real well for me. The whole thing is about 10 inches long, . . . and sharpens my #4's real well, . . . real quick. May God bless, Dwight beveler strop.bmp
-
New To Leather, Holster Question
Dwight replied to Dieselman's topic in Gun Holsters, Rifle Slings and Knife Sheathes
James, . . . when you get a chance, . . . stop by Lowes or a local hardware store, . . . buy a can of Weld Wood Contact Cement. It makes doing leather work a whole lot simpler, . . . just remember to never use it near a fire or flame, . . . and where ever it is, . . . dye will not penetrate. Other than that (and my wife hates the smell of it), . . . it is a top of the line product for leather workers. May God bless, Dwight -
Looks like a winner from this angle,....... May God bless, Dwight
-
Rifle/pistol Hoster: First One
Dwight replied to Dwight's topic in Gun Holsters, Rifle Slings and Knife Sheathes
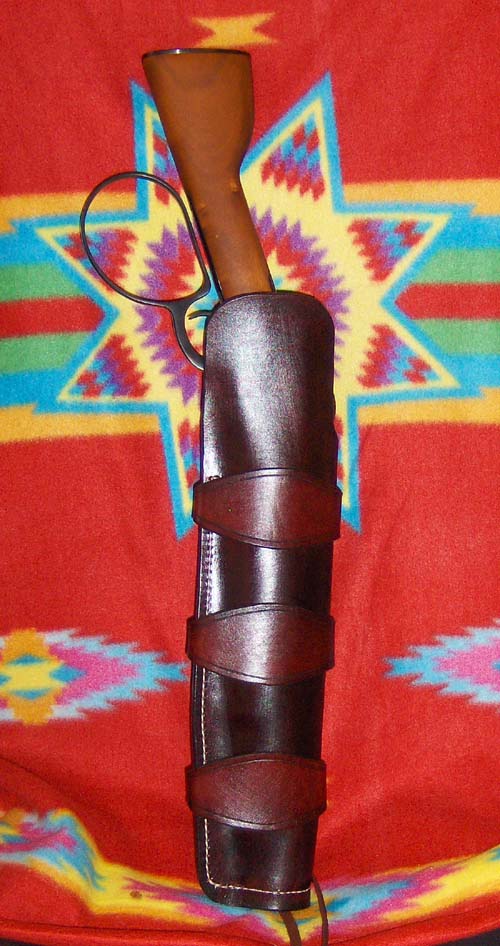
Thanks for all the good feedback, . . . Actually it is for a customer, . . . and in the picture, it is not threaded into the drop on his belt. I just stuck the belt through it to get a picture. That is why it looks so high. The main challenge is he is less than 6 ft tall, . . . wants to wear and shoot this in cowboy action shooting, . . . getting it to set at the right height was the biggest challenge of all. Both the trigger side and the hammer side have an open slot that goes down about 5 inches or so. My fingers are still sore from sewing in the toe piece, . . . it is what keeps the whole thing from falling down through the bottom. I used my battery drill and a large darning needle to make the holes, . . . but it was still a job, . . . and I will definitely be cautioning my customer not to brag to his friends that he can get them one for the same price. I missed my guess on that one. And, . . . yep, . . . it is a real live .44Magnum, . . . so far never been shot, . . . . Anyway, . . . just thought I'd share, . . . it was fun, . . . not sure though that I want to go into the Mare's Leg business if you know what I mean. May God bless, Dwight -
This is the first one like this that I have done, . . . uhhhh, . . . it was a challenge. It isn't the best one I ever did, . . . but it is the latest one, . . . just thought I'd share, . . . I haven't seen many of these done here. May God bless, Dwight

-
Basket Weaved Belt Rig
Dwight replied to Eaglestroker's topic in Gun Holsters, Rifle Slings and Knife Sheathes
I can cut, . . . glue, . . . sew, . . . mold, . . . dye, . . . finish, . . . burnish, . . . and don't feel at all undergunned doing those tasks. Basketweave stamping, . . . it just don't happen. But I surely do enjoy seeing someone having mastered it and liking to do it. I just flat do not have the patience, . . . Good job, Eaglestroker. May God bless, Dwight -
New To Leather, Holster Question
Dwight replied to Dieselman's topic in Gun Holsters, Rifle Slings and Knife Sheathes
James, . . . there can be many answers to "WHY?" what is happening, . . . is happening. Wet molding is far more than getting a hunk of leather wet and pushing it around an item. If it is too wet, . . . it'll lose the molding about as fast as you can blink. If it is not wet enough, . . . it won't mold tight. I usually take mine to the sink, . . . I dunk it in a full sink of water that I can just barely keep my hands in. Any hotter, . . . would be too hot. I bring it out to my forming table, . . . (sometimes to the hydraulic press), . . . and (sometimes to the vacuum bag), . . . and it doesn't make any difference, . . . press, bag, or fingers, . . . work it until you can look inside the holster and see good, sharp edged impressions. The next step is also very valuable, . . . be VERY careful of extracting the weapon. You can undo half your molding by yanking the gun out. EASE it out, gently. Next, . . . dry it with some heat. NOT A LOT, . . . ideally you should be looking for something in the 130 degree F range, . . . and err lower if you have to err. Next, . . . LET IT DRY, . . . I got in the habit early in my leather career of being too anxious, . . . messing with them while they were not fully dried, . . . and I had a pile of scrap for my effort. Could not figure what was wrong, . . . give it a good solid 24 hours, . . . more if you have a lot of humidity. Another thing is your stitch line and how you are putting them together. Are you cementing the pieces together? That is a for sure for me, . . . stitches on my holsters are really more of a decoration, . . . mine are cemented and you will tear the leather getting them apart. Your stitch line also needs to be CLOSE to the weapon. I cannot give you a formula, . . . but I can tell you when I sew a holster, . . . it is usually sewn very tight for the gun. I normally re-mold and re-bone my holsters if I do not have my "perfect" pattern for this weapon. That is because it is really tight when I get done with the sewing. Anyway, . . . try these, . . . they should help. May God bless, Dwight -
That's what Kroger store sells Pledge wax for,.........protecting valuable guitars from sweat shop people. At least that is what happened to mine since about 30 years ago when I got my Ibanez Concord. But if you gotta have that thing, . . . Johanna hit it, . . . do the velcro thing, . . . May God bless, Dwight
-
Take a slow cooker, . . . turn it on high, . . . put a glass jar with equal WEIGHT parts of beeswax and neatsfoot oil, . . . put enough water in the cooker to float the glass jar, . . . let the wax melt into the oil, which won't take over a half hour, . . . mine runs about 12 minutes, . . . you get one of the neatest finishes you will ever find, . . . if you like old fashioned finishes. It is OK for edging, . . . but I prefer straight beeswax & water. A wonderful lady whose name I disremember, . . . from this forum, . . . gave me the recipe, . . . and I love it. Did my personal "Old West" single action six rig in it, . . . and am thrilled with the results. May God bless, Dwight
-
Belt Blank Just A Little Too Large For Buckle
Dwight replied to TooManyHobbies's topic in How Do I Do That?
The best trick is a 1 inch by 20 belt sander. I use mine ($39.95 at Harbor Freight) to dress the edges of all my belts (all glued double layer). If for some reason one it a little wide, . . . that old sander puts them in their place in short order. THAT sander, . . . is a must have if you are doing holsters and/or belts, . . . in my humble opinion. May God bless, Dwight -
Blazin, . . . uhhhh, . . . yes to both questions. Yes, . . . I use blue guns, . . . and some hand crafted wooden ones too. My 1911's and my SAA and Cold Det Spec would all come out and enmasse attack me if I used a blue gun for them. They enjoy the squeeze I put on em when I'm forming a brand new holster around em, . . . at least I always thought they did anyway. Seriously, . . . the only real danger is in using a press, . . . you could hurt some firearms with a hydraulic holster press. If I'm using the press, . . . no real guns, . . . period. Othewise, . . . I just wipe em down when I'm done with my old trusty wash cloth that's been oiled. May God bless, Dwight
-
Then they have changed, . . . we used to pull em off the old britches, years ago, . . . used em for sling shot pouches, . . . and they were most certainly leather back then. May God bless, Dwight
-
Just a suggestion: if I am picking out leather, seeing it before I buy it, . . . I'll go to Tandy's. If I have to buy it sight unseen, . . . I go to Weaver's in Ohio. They have always, . . . ALWAYS, . . . sent me good stuff. May God bless, Dwight
-
Anyone Want To Build This Holster?
Dwight replied to Shooter McGavin's topic in Gun Holsters, Rifle Slings and Knife Sheathes
It is not very often that I send a customer to a gun shop for a pre made holster, . . . but this is one time I would most certainly do so. Last thing any custom maker needs is a customer looking for a reason to sue when the "custom" product doesn't deliver as he thought it should. Heck, . . . i might even print out Google directions for this guy, . . . May God bless, Dwight -
1st and most important, . . . thank you for your service, . . . from an old Viet Nam era squid. 2nd it seems others have stepped up to take on the work, . . . if it doesn't work out, . . . hit my website and get hold of me, . . . you can see some of my belt work on my web site. May God bless, Dwight
-
I certainly would not know how to go about it, . . . but whatever leather Levi's uses for it's patches on their britches, . . . I've seen the patches still be good, . . . but the jeans were not worth wearing. If you could find out what they are using, . . . you should be home free. May God bless, Dwight
-
Whenever I do a weapon for the first time, . . . it is never glued or sewn until I do a "trial"fitting. The holster is made, . . . with a little "extra" on the outside, . . . then wet down enough to do some molding, . . . and the gun is molded into the holster exactly where it will sit when the job is done. The weapon is then very gingerly extracted so the molding is not messed up, . . . and the holster is hung out to dry. After it dries, . . . I can clamshell the thing together with the weapon inside, . . . see where the glue line needs to be, . . . and determine the proper stitch line. This has never failed me yet, . . . when I have done it right. May God bless, Dwight