8thsinner
-
Posts
676 -
Joined
-
Last visited
Content Type
Profiles
Forums
Events
Blogs
Gallery
Store
Everything posted by 8thsinner
-
Here is about half of our bracelet / choker range, it's just what I could fit into one picture with half decent quality pic, At least for here it's enough to show the patterns. I need to do some serious work on ebay pictures yet, so expect to see me in the photography section soon. It's all genuine leather using lead free dyes. The balls are genuine hand drilled 316 steel original ball bearings, not seconds used for catapult ammo supplies.... They aren't exactly cheap the basic bracelet is expected at £10-15. EDIT: just noticed, its not on the picture but all of the wider bracelets use magnetic clasps, the slimmer ones we are sticking to the old fashioned tie method to keep costs down.

-
A reference to Ashley's book of knots, It's pretty much the knot work bible. When his knots are used on peoples projects they just use the ABOK# prefix because most of them didn't have names at the time.
-
Your right, well done on spotting that. How long did it take you? If anyone wants a paticular ABOK or similar knot done like this just ask me, I am doing a few of these myself at the moment so it shouldn't be too difficult.
-
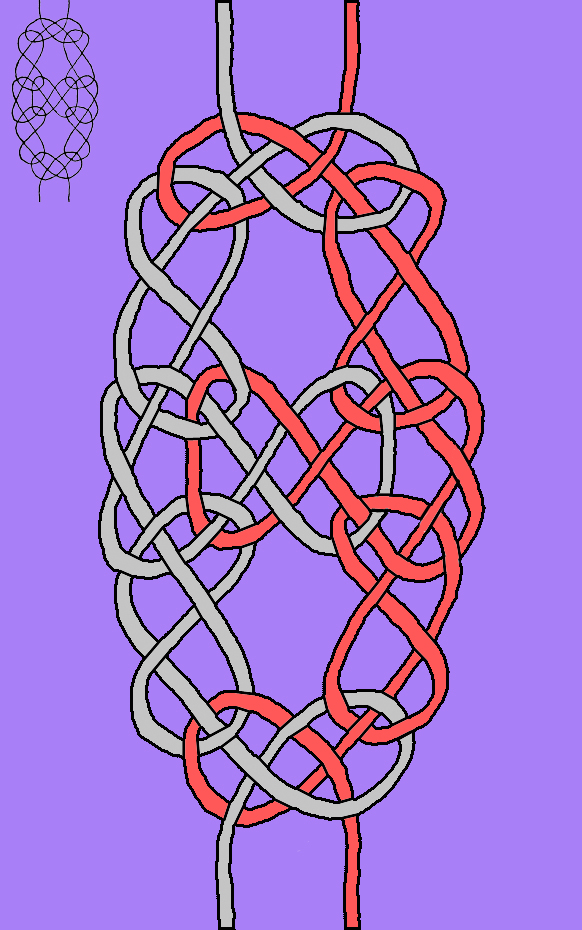
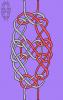
If any of you have wondered how to turn your ABOK lined knots such as that from page 382 #2397. Heres what I just did, and it only took 15-20 minutes. Assumming you have a scanned it or photo'd it or in some other way turned it digital.. I have the ABOK as a PDF so heres what I did... NOTE It might help to change your history states to 150 or so > EDIT > PREFERENCES > PERFORMANCE 1) Select page 382 in adobe pdf reader > RIGHT CLICK > COPY TO CLIP BOARD 2) Open photoshop (CS3) 3) Create new (clipboard size should be automatic) CTRL + V (to paste the image) 4) C > Crop image 5) W + CLICK all the gaps between the lines whilst holding SHIFT NOTE If you are used to using paths, this will save some time: WHILST all of the gaps are flashing selected > RIGHT CLICK > MAKE WORK PATH 6) Making sure all gaps are selected hit DEL 7) V 8) ALT + UP 9) ALT + UP 10) ALT + UP 11) ALT + UP 12) ALT + UP 13) ALT + DOWN 14) ALT + DOWN 15) ALT + DOWN 16) ALT + DOWN 17) ALT + DOWN 18) ALT + RIGHT 19) ALT + RIGHT 20) ALT + RIGHT 21) ALT + LEFT 22) ALT + LEFT 23) ALT + LEFT 24) ALT + LEFT 25) ALT + LEFT 26) SHIFT + CTRL + E Merges all visible layers You can see this has made multiple layers of the same image on top of each other so thickening the lines by a lot. Now to make the lines hollow 27) W again, all those gaps, Or On the layer menu scroll over to the right and select PATH MENU > CTRL + RIGHT CLICK 28) Go back to LAYER MENU 29) Hit U and adjust lines to be filled selection and about 3-4 pixels wide, Also make sure gradients are not selected 30) Starting anywhere you want, I choose the top left, start adding lines in order to bridge the lines over 1 under one. 31) FOLLOW ONE LINE, otherwise you might get lost and have to retrace your steps. Now at this point I was also using the FILL TOOL (G) and (SWITCH COLOURS (X) As I filled in one bridge I filled the colour inside that line a pale grey colour. The other cord, I used a red colour. You might also use the short cut keys E (eraser) I do this Because I have more of an interest in making the knot out of leather, there fore it makes it considerably easier to pin the strands into the correct shape before I begin weaving it. Thats pretty much it. Heres a sample of the one I just done...
-
Here something different
8thsinner replied to CedarCreek's topic in Gun Holsters, Rifle Slings and Knife Sheathes
A friend of mine wants to know if you can do star wars gauntlets? Nice work. -
I have always loved the monkey fist key rings and for some time I have ben trying develop the coolest version of it. This is a proto type to test the weight and use. The final will probably evolve a little. We are waiting on some stainless steel eyelet hoops, which should top off the black leather perfectly. The reason I like this so much is because of it's versatility. It's a 2oz fishing weight, so if you happen to need to throw the keys to someone else they will be well weighted. The ball can be slipped up through the belt and hang there without risk of falling. As a weapon it can be paired with a yawara stick. One of these on the end of a bit of para cord can be used as a traditional meteor. If you have two, they can make a performance/water meteor. If you have three, and three small para cords you have a hunting Boladeros for birds. There will be a 3oz and 4 oz available. (I could show you a pic of the four side by side but I have a cat on my lap and shes not budging) The four however is huge when it is finished and if used as a weapon would pack an illegal punch I am sure. Let me know what you think of this version, I might have to offer steel lined eyes seperately if the forum here likes this one enough. Also we are thinking of doing several different colours.Red, green, yellow, blue, white etc and maybe silver and gold.
-
vinegaroon experiment
8thsinner replied to badger's topic in Dyes, Antiques, Stains, Glues, Waxes, Finishes and Conditioners.
that turned out very nice, lovelt matt finish too by the look. -
The Knife's New Clothes
8thsinner replied to Elegant's topic in Gun Holsters, Rifle Slings and Knife Sheathes
Good story and great sheath. I don't even go for fantasy blades often but that is a particularly nice one. Good job -
vinegaroon experiment
8thsinner replied to badger's topic in Dyes, Antiques, Stains, Glues, Waxes, Finishes and Conditioners.
Can you share a picture of the finished colour, I am interested. Thanks -
Thank you for that, I will give this a test before I fine tune it then.
-
Literally. I am in the process right now of carving myself an edge burnisher, But don't know how to finish the surface. I am working with a small female antler Deer I assume, Should it be mirror polished, wet and dried at 800 grit or burnished itself with it's own material, stroked on knife strop or what? As I said this is for a non powered burnisher using good old elbow grease. If anyone can respond with what I need in about an hour it would be perfect timing. I haven't tried the forum search because my connection is dodgy as anything right now, on same note my apologies for any doubled threads.
-
Real name Hobbit: Bungo Chubb of Deephollow Elvish: Galdor Eluch l Online handle Hobbit: Posco Sandybanks Elvish: Maedhros Nénharma Cool stuff. Some great names coming out of this And thanks for the pleasant distraction
-
I use maily old fashoined measuring when I can, If I do need to be precise I use metric usually. Metric measurements are a great thing, science is considerably easier to calculate in almost every equation. We should however keep imperial and still teach it. It's a part of our history, humanities history. We should not abondon it simply for convenience, for it's not convenient at all it's pure laziness. just my opinion.
-
We just had a delivery today from leathercordusa, In order to help other people looking around I am writing a short review here. Delivery time was four days using UPS standard delivery. This unfortunately included a sur charge of £15 which is a little steep considering what we ordered, But not the companies fault. The materials ordered were 150mtr 1mm round natural dyed cord 10mtr 1.5mm round natural dyed cord 10mtr 2mm round cord 10 mtr 3mm/1/8" bolo cord We also asked for a sample of colours and thicknesses etc seperately to the order in an email. THey obviously spent a little time tracking that request and comparing to orders being handled, and sorted us out. What arrived was everything seperately wrapped with individual silica gel packs The cord was meant to be soaked in dye uniformly colouring and entirity of the leather, on some of the cords this is clearly not a true description. The dye however does not scrape of with a nail like other suppliers we have tried. We are happy anough with this stuff. The bolo cord braided from 4 strands is uniform throughout, appears rolled but probably not. It seems a little thicker than 3mm (based on touch...) Just measured it actually, it's about 3.3mm or so. Which is not bad at all. The sample display was abundent with the colours, leathers and widths etc we asked for and a lot more. In conclusion our immediate thoughts are entirely positive, the company obviously pays a lot of attention to detail and we will be dealing with them again. If anyone wants further opinions of the materials after we have worked with them a few days I would be happy to help.
-
Using glass on edges?
8thsinner replied to JohnD's topic in Dyes, Antiques, Stains, Glues, Waxes, Finishes and Conditioners.
I worked with glass for three years and I should have bad luck for the next 43 generations or so, however. Heres a guide on the glass cutting. pop down to your hardware place and pick up a single wheel tungsten bladed glass cutter. Use a soft plastic but thick 3/16-1/4 edge rule, it helps if it's a T shape. Go to the carpet place and ask thenm for scrap too, big enough to put the glass on. Line up the edge guide. With your index finger in the groove of the glass cutter, place it 1/8 from the top edge of the glass away from you and score backwards over the edge Replace the glass cutter right on top pf the 2mm score or so you just made and now work towards you. With a brand new cutter, if your cutting too hard, the glass will actually pop up from it in razor sharp fragments, Be warned, do not lean too hard, if anything allow yourself a few inches of practice cuts, minimum 2 inches from the last cut. Going down lower than an inch becomes difficult to break. But for a beginner make sure you have lots of leverage. Once the score is made, Take the scored line over the edge of the bench Using the left hand grip a corner sticking out, with the righthand from the underneath use the back of the glass cutter, it should be a smoothed ball shape, tap the score with the same force as a pencil dropping off the bench. Your best guess of this is exactly what it needs not the actuall force...it's a mind thing. Anyway, once the first bit of the crack is made, Place your right hand under the glass, thumb upwards line the hard part of the hand where the finger joins it, right under the crack, with your thumb you pull the edge of glass down. The motion is simply life up with the finger a centimetre or so then the thumb cracks it as the glass is moving down. the tempo for this is set about half a second apart. There is not really anything dangerous about this if you do not fear glass other than the first 50 cuts or so ( 200ft average )with the cutter. If you want to use gloves use the rubberised knitted ones, usually orange over here in the uk. Another easier way if your cutting larger bits off, place a pencil under the top double scored bit and press down on that corner, It doesn't work on bits thinner than 4 inches very well, especially as you work up the thickness range. And for something like the use you intend I suggest 5mm Minimum 6 inches long and 4 wide, this will have a lot of strength in it. As a glass worker I would never worry about this size breaking on me. And a few Do nots The square edges chipped out of the cutter are for holding and cracking glass (FOR PROFESSIONALS) Unless you want to be throwing shardes of glass into your eyes dont think of it. If you want to use them glass pliers are available, of this sort. http://65.118.245.21/product/fletcher-terr...iers-06-112.jpg But you really do not need to waste the money on them. Hope that all of that helps you out. -
Theres a lot of threads right now about pricing your work. Here are a few links and my opinions of the work shown to give you an idea. http://www.google.co.uk/products?q=tooled%...sa=N&tab=wf Aspinal of london, right your working in dollars. this company at the top is selling machine stamped patterns at roughly 160 us dollars....I don't think so.... http://search.ebay.com/tooled-leather-photo-albums Theres a few items here, some machine made, some tooled, not overly relevant. but some of the proper tooled stuff is going for 200+ dollars. I took a start your own business course about six months ago, and one of the things I learnt there, is this: It is 100 times easier to drop the cost of your products 10 percent but 100 times harder to increase the cost of products by 10 percent... or something like that. Start with higher costs than lower ones is the basis.
-
Big Stud
8thsinner replied to badLoveLeather's topic in Purses, Wallets, Belts and Miscellaneous Pocket Items
Does this mean you now have a license to thrill? -
Thats bloody fantastic.
-
My New Pocket Knife's Home
8thsinner replied to knockout's topic in Gun Holsters, Rifle Slings and Knife Sheathes
I think your carving came out really well. But you have got to get more practice with using an awl. I suggest using a template to start with, even if the holes are boared wonky, it won't show up as much as trying to go through more than one layer at a time. -
Nice little wallet there. The only thing I don't get is why use holes as large as you did for the edge and then use thread to stitch it?
-
Thanks rdb. I have been trying to do something since I saw tommy's version last month. But I wanted something smaller. Smilinjims version is perfect for what I need.
-
Nice work. I am looking forward to seeing what you come up with in the future.
-
Recently I haven't been up to much in leather work, I have about 10 skins here of various sorts all waiting for projects to become but I just haven't been into it as much. The mini braided whip was the last thing I did and it felt great to do some braiding again. But I have that many projects to do I became stuck. My backpack is now on hold after spending a week getting measurements right only to find I am short approx one square foot on two pieces of leather. I have intentions and now the leather to do the edge braided wallet I always wanted, Have no idea how to do so and have wasted so much paper trying to design it the earth is crying. I have a crop to do which I have actually been putting off for some time. Several other ideas related to my backpack, which are starting to take over the thought processes running down my tunneling synapses. A website to try and design. A belt design and first attempt at carving I have been itching to start ever since certain tooling jobs other people have done. Work out how to make a hell of a lot of bracelets, note books and necklaces for the upcoming seasonal boom in shopping without at this point having anything ready for it. Including a street license I assume I need to get right into the heart of town. New tool ideas which need tested which I could probably patent and sell if I wanted to. I am just ranting here and laying off a few burdens I am sure I will sort things out soon enough. I am sure more than one of you get stuck in ruts, How do you deal with things and get back to normal?
-
Has anyone devised a method / jig enabling a regular thin but sharp knife to be used as a splitter, I really only want to clean up some thick lace which is quite straggly. I had a try at a few ideas but they just don't seem to work for me, I think I am missing some principle or something in the construction of these. I have also tried using the tandy lace maker blades just because this would be handy as hell.
-
I just had a thought after reading Johanna's new topic. Of all the free and massive gallery options out there, I propose that we open a forum account on one of them, Personally I do not care where. But as space is taken up so quickly here that pics have to be removed, I think having one place to host pics of all sorts of leather work would give us all another link we can give to friends. To avoid robots using this against us, perhaps we can have a password change each month mailed to us or something instead of putting it on here directly. What think you all of this?