AmyK
Members-
Posts
52 -
Joined
-
Last visited
Content Type
Profiles
Forums
Events
Blogs
Gallery
Store
Everything posted by AmyK
-
Tested Cricut Maker new debossing tool (photos attached)
AmyK replied to AmyK's topic in Leatherwork Conversation
People get hung up on the fact that Cricut sells their own content. I’ve literally never used any of it- you don’t have to with the modern machines. With the old Cricut machines you had to buy proprietary cartridges and only use those. Every font, image, you name it. Now you can exclusively use your own if you wish. And unless you’re trying to make a bunch of “country chic” crap for Pinterest there’s little for sale in design space that will interest you.- 13 replies
-
- cricut
- cricut maker
-
(and 2 more)
Tagged with:
-
Tested Cricut Maker new debossing tool (photos attached)
AmyK replied to AmyK's topic in Leatherwork Conversation
Yep. SVG, PNG, JPG, DXF, GIF, and BMP- 13 replies
-
- cricut
- cricut maker
-
(and 2 more)
Tagged with:
-
Tested Cricut Maker new debossing tool (photos attached)
AmyK replied to AmyK's topic in Leatherwork Conversation
To do the actual cutting, you use Cricut Design Studio which isn’t too hard to use. It can also remove backgrounds and isolate parts of images you import. You can create a design completely from scratch complete with text etc. To actually create something from scratch I typically use Inkscape though (which is free).- 13 replies
-
- cricut
- cricut maker
-
(and 2 more)
Tagged with:
-
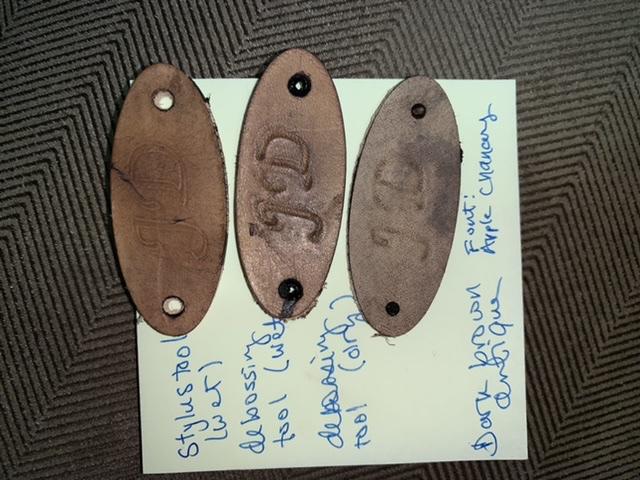
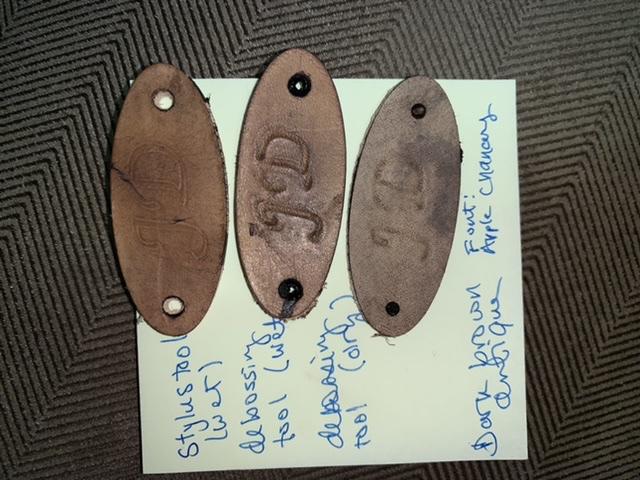
First off, read my earlier review which includes info and tips on cutting and saving your mat. Tests done: New Engraving tool on quick swap housing, wet (line type: engrave) Old scoring stylus tool, wet (line type: draw) New Debossing tool, wet (line type: deboss) New Debossing tool, dry (line type: deboss) Fiebings Dark Brown antique paste was then applied. All tests done with Apple Chancery Font. Results (see photos) The engraving tool did NOT disappoint. If I’d beveled this before applying antique I think it would look even better. I prefer this over the other options previously reviewed. I’ve attached all the photos, but you can read my remarks on my earlier review. The photo with no label is the one done with the engraving tool.
-
Tested Cricut Maker new debossing tool (photos attached)
AmyK replied to AmyK's topic in Leatherwork Conversation
I hope to be able to test some alcohol markers and sharpies in the Maker soon. I also asked for some Inktense pigments Christmas which could be very interesting.- 13 replies
-
- cricut
- cricut maker
-
(and 2 more)
Tagged with:
-
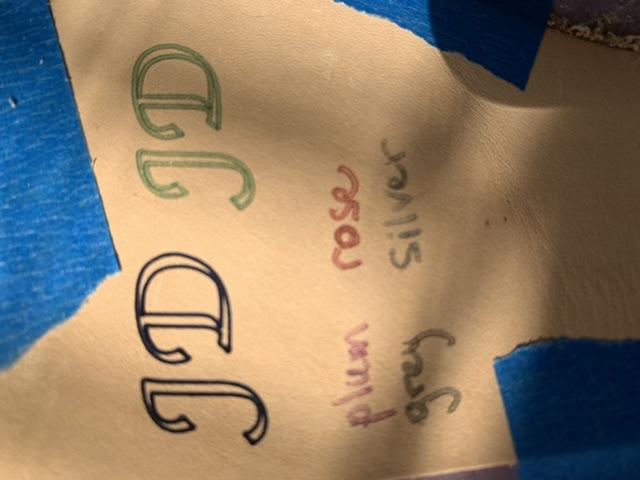
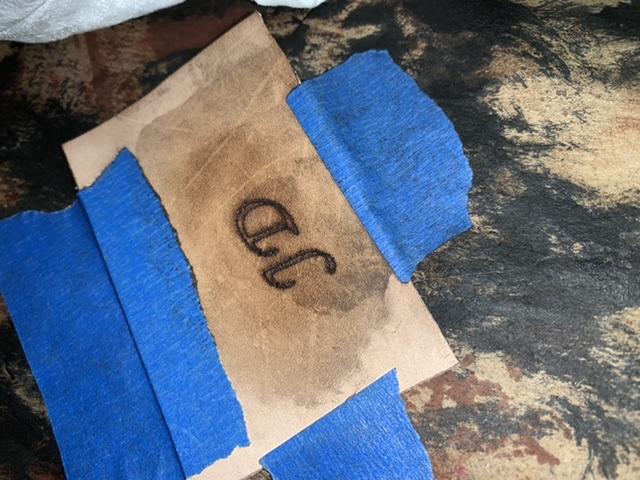
Working on a project for my kid’s school. Just got in the new Cricut debossing tool and decided to test it out. Cutting First off, all the cuts were made on the maker on the leather setting appropriate to the weight of the scrap used. I’ve had NO TROUBLE cutting leather up to 5oz. It will cut a hole small enough for rivets. Tip- put transfer tape on the back of your leather before applying to strong grip mat to keep the fuzzies off your mat and avoid compromising the stickiness of your mat. Use a piece small enough not to go under the black roller wheels as it CAN get stuck and bunch up. use masking tape around the edges and remember to move the white star wheels all the way to the right so they don’t damage your leather. Tests done: Old scoring stylus tool, wet (line type: draw) New Debossing tool, wet (line type: deboss) New Debossing tool, dry (line type: deboss) Fiebings Dark Brown antique paste was then applied. I also tested out Cricut pens on dry leather: 0.4 fine point black as well as 1.0 tip in green (metallic petal) All tests done with Apple Chancery Font. Results (see photos) The old style scoring stylus (pen shaped) gave the cleanest impression but wasn’t very visible. The debossing tool was disappointing in that it was messy looking and you could see the dimple where it had started. I think either of these tools might be fine for a larger piece, especially in the case of the stylus if you were looking for a subtle effect or wanting to subtly mark a pattern for painting or stamping. I think this is where it would really shine. For the project at hand, I’m going with the pens. Caveat: the petal metallics are water based and the black pen’s composition was not on the packaging I had- I have not tested putting finish on them. Also note there are third party adapter for using other pens. I’m curious to see how refillable dye pens or the colored dye pens from Real Leather perform. Hopefully I receive some for Christmas so I can let you all know how it works. Bottom Line I like the Maker, and plan to use it more. I think I’ll import my patterns and use it to cut out patterns, mark alignment and fold lines when I have lots of pieces or small pieces that need precision. I might experiment with using it when I’ve got SO MANY HOLES to do as I tend to use a micro punch 0.5-1mm for my sewing holes (I know, I’m a heretic with joint problems, sue me). The debossing tool is not ready for prime time when in comes to leather though I can see some applications for it. I look forward to trying the forthcoming engraving tool which fits in the same quick change housing. Will it replace the laser cutter in my heart? No. But the Maker was affordable, worked for my many crafts, and doesn’t require me to drive across town to the maker space to use! Additionally, the company has made good on their promise to continue to release new tools for the adaptive tool system they introduced with the Maker.
- 13 replies
-
- cricut
- cricut maker
-
(and 2 more)
Tagged with:
-
Anyone using Laser Cutters at home for pattern making?
AmyK replied to bermudahwin's topic in Leatherwork Conversation
I cut and engrave with a Glowforge and I also use a Cricut Maker. The Maker can cut very thin garment weight leather. The Glowforge can cut much more- most I’ve done is 5-6oz veg tan but you might get thicker out of it. I’ve done tiny filigree earrings with the Glowforge I use Inkscape to draw patterns or digitize the ones I already have. Inkscape is FREE. Check out Punished Props Academy for a great overview video of digitizing patterns. -
Can confirm this link still works and the lids work great. And I have an obscene number of lids in my cabinet now.
- 6 replies
-
- dye lids
- flip top lid
-
(and 1 more)
Tagged with:
-
Keeping workbench clean
AmyK replied to AmyK's topic in Dyes, Antiques, Stains, Glues, Waxes, Finishes and Conditioners.
IKEA has Christmas wrap printed on brown craft paper. Makes great patters SUPER cheap when you buy after the holidays. -
Keeping workbench clean
AmyK replied to AmyK's topic in Dyes, Antiques, Stains, Glues, Waxes, Finishes and Conditioners.
How about this? I dont use regular sponges for dishes. I have these sewn up microfiber ones that go in the washer. So I’ve had the same “sponges” for more than 5 yrs. I agree, I can’t wash dishes with something that smells gross, so my dish sponge is changed every few days. Having said that, regular sponges can also go in the clothes washer or dish washer so you don’t have to pitch them in the leather bin. -
Keeping workbench clean
AmyK replied to AmyK's topic in Dyes, Antiques, Stains, Glues, Waxes, Finishes and Conditioners.
You think you’re cheap? I don’t even use daubers. I buy a bunch of cheap sponges.... then cut them into fourths! Keep an old soup pot in the shop for sponges, rags, buffing cloths and wash them in the washer when I run low. They’re stained of course but the color doesn’t transfer. My new motto. I will wear it with pride. -
Keeping workbench clean
AmyK replied to AmyK's topic in Dyes, Antiques, Stains, Glues, Waxes, Finishes and Conditioners.
-
Keeping workbench clean
AmyK replied to AmyK's topic in Dyes, Antiques, Stains, Glues, Waxes, Finishes and Conditioners.
Wow guys! Thanks for all the great recommendations! I think I’ll look toward using glass in the long term, maybe picking up some puppy/chucks pads in the short term I’ve done projects as big as a breastplate and boy was that a mess. Part of my move away from consumables is that taking the trash out of my workshop is a pain. My murder dungeon/workshop is in the basement so I have to carry trash up the stairs (a precarious maneuver if my recent fall on the stairs is any indication) then through my living room, kitchen, and finally outside. I could pretend it’s environmental concerns but it truly is laziness. It’s easier to just wash my rags and sponges etc than dispose of paper. I’m super clumsy- so thinking of getting some flip top lids for my dye bottles. I’ve also upgraded to the second cheapest harbor frieght gloves after popping the cheap ones and winding up with black hands for a week. Any other tips for keeping in clean or organized is always appreciated! -
Keeping workbench clean
AmyK replied to AmyK's topic in Dyes, Antiques, Stains, Glues, Waxes, Finishes and Conditioners.
I’ve had trouble with this, because when my cardboard or brown paper gets wet again the next time I use it, that color is transferred to my new project. -
Wondering what you guys use to cover your workbenches when dyeing? I’ve been using brown paper bags but it’s a mess, still have to put down garbage bag below it etc. Is anyone using anything washable? Like a silicone mat? Or are there any surfaces you’d recommend, since I’m going to build my own workbench this summer? There’s some cast off granite countertop coming my way - it’s ugly already and I don’t care if I stain it. Need to find something that either doesn’t absorb the dye, or just doesn’t release it again onto future projects. Honestly, maybe glass? I could certainly set up a separate table with some glass on it for this. What do you think?
-
I'd like more information please. When you used the deep cut blade on the plastic, how did you get it to gouge the plastic but keep it from actually cutting? On the top photo, do you mean you used the stylus to make the impression on the plastic or the leather directly? If directly on the leather, did you wet it first?
-
That very well may be. I’ll keep that in mind too.
- 9 replies
-
- saddle stitch
- veg tan
-
(and 1 more)
Tagged with:
-
I have a sewing awl but have it up pretty quick. It just seemed to make such ugly stitching. But that was in the very beginning of my learning so I wasn’t prepunching holes. Maybe would be different. I also think it was ugly because I was using very thick thread. Using smaller thread might help. Thank you for the suggestions. Oh, and I’m not worried about stabbing myself with the awl if I poke as I go. I’m worried about dropping it in some unlikely Rube Goldberg kind of way that causes a chain reaction that breaks my leg somehow. REALLY clumsy LOL
- 9 replies
-
- saddle stitch
- veg tan
-
(and 1 more)
Tagged with:
-
Thank you very much for the replies! It’s so rare that my question hasn’t already been answered here, but when it hasn’t, the members never let me down! Not causing puckering and the back is hidden inside the bag. I know what you mean about using the diamond awl as you go @Dun. I’m WAY too clumsy for that. Though the benefit to doing it that way would be NOT stabbing myself in the freaking joint with a glover’s needle. 0/10. Not fun. Do not recommend. Bled for three days. I have experienced piercing the thread which is a pain. I guess I’ll just try to switch to harness needles and use the diamond awl very carefully so as not to bleed on my project.
- 9 replies
-
- saddle stitch
- veg tan
-
(and 1 more)
Tagged with:
-
I’ve been making some stirrup style dice bags recently which require me to sew chrome tanned garment leather or suede to the veg tan strip in the middle. I’ve been using diamond chisels to make my holes in the veg tan, but it doesn’t work well on the softer leathers so I’ve been saddle stitching them together with glover’s needles. I go through the diamond chiseled hole of the veg tan and use the sharp glover’s point to get through the suede etc. Is there a better or easier way to do this? Sewing machine is not an option. Thanks!
- 9 replies
-
- saddle stitch
- veg tan
-
(and 1 more)
Tagged with:
-
Head on over to the sewing machine portion of this forum. This has been discussed in great detail by Wiz and others. I actually have a file on my desktop of some of their tips (mostly Wiz), and I pasted a small sample here. I still highly recommend you go to the source. "First, I will address the machines seen on eBay, sold as Industrial Strength sewing machines. Most are all metal and proudly state that fact. The sellers talk about the "powerful" 1.2 or 1.5 amp motors that are attached. Some even have ribbed drive belts and gear reduction, to eliminate slippage when sewing thick material. No doubt these are strong machines. I have a few myself. I have 2 old iron body Singers and a metal body Kenmore, even an ancient White Rotary machine. Will they sew leather? Yes, two layers of 2 to 4 oz garment leather. Will they sew leather with nylon thread? Yes, but no bigger than #69 nylon. Will they smoothly feed garment leather as it is sewn? Yes, as long as it is fairly small in size and weight and not stitcky on the top grain. If the top is sticky, no way, Jose. Sticky vinyl and leather usually gets dragged back by the top pressor foot and the stitches are either too short, or filigree the material, or skip frequently." ---- "I have watched the take-up levers on cast iron home sewing machines bend or snap off, under the strain of using #138 thread, while trying to sew 5/16" of veg-tan leather. The slightest thread jam in the bobbin throws them totally out of time. Tensions are hard to balance and they don't hold much thread, once you go beyond size 69." --- Best of luck to you. I have a singer 15 in my workshop right now that I'm trying to get up and running just for thin garment weight leather. I've little motivation however, because saddle stitching by hand on the small items I'm usually making looks so nice and is meditative for me. For someone doing large or high volume leather sewing I'm sure its very different!
-
Tandy's Cova color is WAY over priced and isn't any better than other paints I've tried. Their white and gold were also way too transparent. Confession: I made a suit of black armor and I needed some gold detailing and the Cova color just wouldn't cover the black, running out of time.... so I used a gold oil based sharpie and it worked GREAT. I have a friend who used acrylic on some bracelets for Christmas. I'd advised him against it because he was painting the whole thing, and with flexing I was worried the paint would crack and look awful. What we worked out is diluting the paint with water, maybe 1:5 or more, and painting it on like a dye. Then using it 1:2-3 before laying down a final coat nearly full strength. Looked good, flexes well for now, I'm still not sure about long term. I like artist acrylics - Not craft paints like Plaid etc. Haven't tried the Angelus, but may when I run out.
-
-
-
The foam won’t work, but there’s nothing saying you have to mirror your actual shape. Once it’s started to form, use the side of your hand like a blade to define those contours. If needed, you can continue to shape it over another object when you take it off. I bet your knee would work


