


MtlBiker
-
Posts
850 -
Joined
-
Last visited
Content Type
Profiles
Forums
Events
Blogs
Gallery
Store
Everything posted by MtlBiker
-
 @kgg @Dwight and @bladegrinder - Thanks for your comments. I forgot to check last night when I got home, what the product is that I've been using for leather prep before applying dye, but it was some commercial product. Used to de-glaze the leather and remove contaminants. Until now, I never thought of using NFO before dyeing. I'm going to have to give it a try. Thank you all.
 -
I just saw the latest Sailrite how-to project... just a simple waxed canvas and cordura dopp bag, with leather accents. For all the leather accents they said to apply Neatsfoot oil BEFORE the Fiebings Dye. That surprised me as I'd always thought you apply the oil (if not using a different product) after dying the leather. Is doing it their way common?
-
It's just a hobby for me too, a passionate one mind you. Are you really doing the cut/tie together thing? For me, it would take just as long to do that as to actually thread the machine in the first place. Easy-peasy. The only time I ever do the cut/tie together routine is with my sergers, as I find threading those to be a real PITA! Your work area looks just like mine, except yours is neater.
-
I'm surprised you say you'd never buy two spools of thread... even if I only had one machine I'd want at least two spools. I wind my bobbins off the machine, using a home-made winder and I just don't want to unthread a machine and then rethread after winding a bobbin. And unless it's a color I rarely use, when I wind bobbins I always do half a dozen at a time. But having two and a half industrial machines (my Sailrite LSZ is the half) I actually always buy at least 3 spools at a time. And almost always the 1 lb spools.
-
@Greenwood - Even easier... if you look at the seller's post, click on his name in the left and that'll bring you to his profile. From there, at the top is a "Message" button. This saves you having to type his name.
-
The needle shape point and most secure stitch are two different things. The needle shape point is determined by the material you will be sewing and in your case with chrome tan leather, it should be a leather point needle. 135x16 needle system is leather point and 135x17 is for fabric.
-
I think that's a bit overkill. 2-2.5oz chrome tan leather is pretty thin and very soft and v138 thread will certainly work but I think I'd use v92 instead. Heck, even v69 should work. And I'd use a good brand like A&E Sunstop bonded poly thread. Stay away from the cheap import thread. v92 thread would let you use a #18 or #20 needle. On my 2750 I tend to use only v92 (and only very rarely v138). I also like Amann Serafil thread, but mostly use the A&E because it's high quality and easy to obtain locally for me.
-
Welcome! That's really nice work! (For anyone, but especially for someone who only started a few months ago!) All hand-stitched?
-
You didn't like the honest and experienced advice you were given here?
-
More sturdy? You mean rivets or something else? The solid copper rivets from Aaron Martin are probably as sturdy as you could ever get. And they're often used in horse tack. What kind of buckles are you looking for? JT's Outdoor Fabrics has all kinds and I've bought from them often.
-
@Margherita - Did you check out any of the suggestions I gave you in the private discussion? As far as rivets go, it really depends on what type you're looking for. For tubular double-cap rivets, I am really happy with Kamsnaps (from the US) and their service and support is really good and the shipping is quite reasonable. For solid copper rivets, I go with Aaron Martin as @jcuk suggested.
-
May I ask why you want/need that? I have an LSZ-1 with WorkerB motor and Monster wheel and the belt (short as it is) is a cogged belt unlike what's on my other industrial machines. I can't imagine a need to change the pulley size on these machines. Is that what you plan to do?
-
How To Choose the right sewing machine?
MtlBiker replied to Margherita's topic in Leather Sewing Machines
@Margherita - Not much to add to what's already been said. Yes, I think $195 installed for the servo motor is a good deal. And it eliminates any frustration you might have in changing the motor. Definitely go for the servo! Quieter and much better control. And if it's a standard table, I'd also say to keep it. Would 8" really make much difference in your space? And the cut certainly wouldn't be on the right side of the table but rather on the left and even with a full size table you will sometimes wish you had more flat space there. Sounds like the dealer is really going the extra mile to make the sale. Best of luck to you! -
How To Choose the right sewing machine?
MtlBiker replied to Margherita's topic in Leather Sewing Machines
@Margherita - After checking out some reviews of that machine and watching the video you linked to (thanks) I think this might be a really good machine for you. I don't understand how the stitch length works with a button and no dial or lever, but I guess it does. Nice things are that it's got triple (unison) feed, a safety clutch and those older Jukis are built like tanks. I'm pretty sure you'd be able to sell it in a year or two without losing much (if any) money. Juki machines probably hold their value better than any other brand. The six month warranty is good, but remember that the machine (even just the head without motor) is really heavy and you'd probably have to take the head off the table and bring it back to the dealer. But luckily there are lots of repair/maintenance videos around and parts are readily available. Besides, the experts here are always willing to offer helpful advice. I do agree with @kgg about trying to get a standard table with the machine even though you're limited in space. Make sure the machine is in good operating condition and that the dealer shows you how everything works. I'd say go for it. One more thing... if the dealer gives you a good price on a servo motor (in case it now has a clutch) and will install it, see if he could possibly install a smaller motor pulley, like maybe 45mm. You don't need a speed reducer and the smaller pulley really helps with slow speed sewing control. -
How To Choose the right sewing machine?
MtlBiker replied to Margherita's topic in Leather Sewing Machines
@Margherita - Have you seen this thread from about 3 years ago about that machine? -
How To Choose the right sewing machine?
MtlBiker replied to Margherita's topic in Leather Sewing Machines
@Margherita - No photo showing the motor area? Do you know if it has a clutch or servo motor? I'd be willing to bet it's a clutch motor. And if so, you'll definitely want to change to a servo. Is that some sort of machine dealer, or a sewing workshop? (Meaning if you can tell if the machine has been used in a high volume production setting.) I may be missing something but it looks like the machine has no way to adjust stitch length, which would be something I would absolutely want. -
How To Choose the right sewing machine?
MtlBiker replied to Margherita's topic in Leather Sewing Machines
@Margherita - I haven't heard of "Relsew" machines. It looks like it might have a servo motor - if so, good. But is it a compound walking foot? Maybe someone else will comment, but to me it looks like it might be a machine more suitable for high-speed fabric sewing than what you're looking for. (And I'm sure, and hope, that @kgg will see this soon and comment.) -
How To Choose the right sewing machine?
MtlBiker replied to Margherita's topic in Leather Sewing Machines
Hi Margherita, and welcome to the forum! I'm a fellow Montrealer by the way. You're going to be buying a used machine I guess (for what you need and considering your budget). Gonna be a bit challenging and tough. What is it that you're planning to make? That might help figure out what thread size you would need which would also mean which needle size. Also you need to know if a flatbed machine or a cylinder arm would be best. Maybe a cylinder arm with flatbed table attachment (making it maybe the best of both worlds). Dog collars and leashes can be made easily on a flatbed machine but you also have to consider how many layers (probably two at least!) of leather you'll be sewing. And basically the rule of thumb is that there is NO ONE machine that will do everything or that is right for you. That's why so many of us have more than one machine. I only started sewing during the first Covid lockdown and I'm terribly hooked now and I have SIX machines! If you want to chat send me a PM and I'll give you my number. My office (not where I do my sewing) is at Pare and Decarie. -
Duh, isn't that going up TWO sizes?
-
@toxo - Congratulations! Now the LONG wait starts! I'm sure it's going to be hard to stay patient. I hope others with a lot more experience than me jump in to comment about the automatic oiling system. It's been my understanding that automatic oiling systems are really for machines that will be operated at high speeds for extended periods. I've heard they work a lot less efficiently when/if a machine is run at low speeds as many/most leather workers are apt to do. You may have to add to the automatic oiling from time to time with some careful manual touch up. Cheers to the new machine being everything you wanted!
-
I see you've already fixed that photo. Thanks. All I did was find the image and copy, paste, it into my reply. I wasn't sure how to do it without first saving it onto my device (an iPhone when I did it).
-
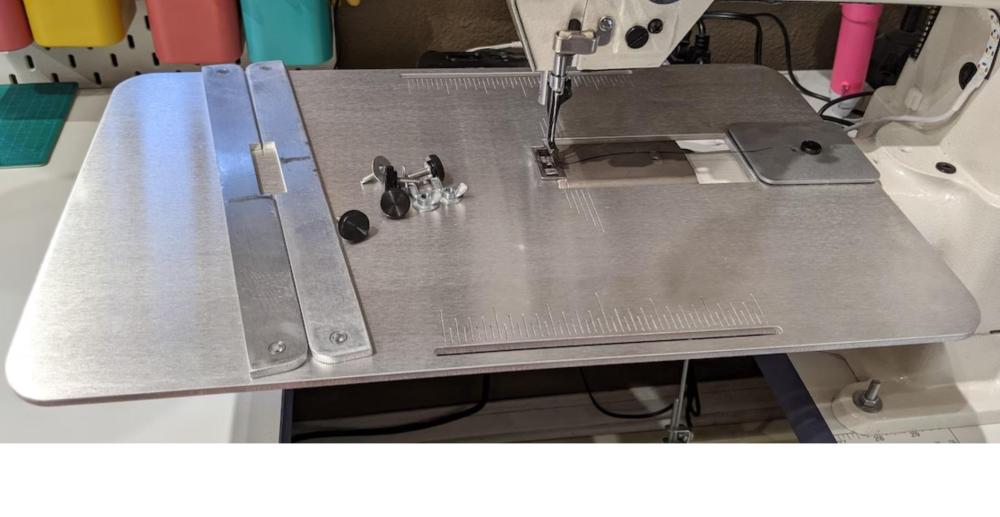
As far as that aluminum table attachment goes, if you look closely at the photo, you'll see there is a cutout on the right end of it. That fits over part of the machine's cylinder arm. Then another small plate goes on top which is used to secure the thing down. The hole in the machine can be quite varied as the plate can be positioned where the screw hole is. What would be of more concern is whether the cutout on the table actually fits the machine. For that I can't help you but I'm pretty sure if you contact the seller with the make and model of your machine they'd be able to tell you. Good luck!
-
If you'd looked at the URL for that image, you'd have seen it was from Etsy. I think the search was "aluminum table attachment".
-
@toxo - I can't see from that photo how the table attaches. Here's a photo of the table I got from Etsy: There's only one screw holding it (tightly) in place. That's at the right with the little top plate. I can't imagine an easier or faster to install or remove table attachment.
-
Just wanted to drop a comment about flatbed table attachments... When I got my Techsew 2750Pro, it came with a table attachment. It was AWFUL! It needed 2 (or was it 3?) threaded rods to be inserted in the table and adjusted in order to support the table. The process of installing and removing that attachment was a really unpleasant one and certainly not something you'd want to do every day, and certainly not several times a day. Then I found (on eBay) a really nice aluminum table attachment that installed with ONE screw! Easy Peasy! It goes on, no adjustment required, or off in easily less than a minute. It is wonderful. I hope that the attachment you're getting will be as good. A bonus on the table I got is that it included two flat guides which could be positioned left or right of the needle and tightened in place with wing nuts. For holding an assembly in the right position they're wonderful, and I often use the right side one (not the left). Many (most) aluminum table attachments I've seen don't have that.
