


MtlBiker
-
Posts
850 -
Joined
-
Last visited
Content Type
Profiles
Forums
Events
Blogs
Gallery
Store
Everything posted by MtlBiker
-
No, I'm not going to do the "toilet paper" type of stitching! As far as I can see, there must be stitching along the sides AS WELL AS maybe a line or two of the toilet paper stitching. To try to better explain how I "managed to do that"... imagine wearing the pouch on your belt, really on your hip and not right in front or in the small of your back. Now you walk by a table or something and the pouch itself snags on the item. The belt loop doesn't hit anything but the way the pouch twists, it puts pressure on the rivets (the way I had them). It's not the rivet shaft that gets the pressure but rather the head. And after doing this often enough, eventually the rivet head popped open. First one and then the other. So for handling just the stresses of a normal belt loop, rivets the way I did them, are fine. Or even toilet paper stitching would be fine. But to handle the sideways pressure of the pouch twisting away when it catches on something, you need stitches parallel with the long side of the loop, just for maybe an inch at the top and also at the bottom. That would give the strength to resist that sideways twisting. I'm making a pouch this weekend (my weekend is always Sunday and Monday) and I have some leather drying in my mould waiting for me to get home. I'm going to glue and stitch the loop. (Or as they say here in Canada, "the loop, eh!".) Cheers!
-
That photo is after the top rivets (top part of the belt loop) came apart. Thanks to you and others here, I now understand that the way I did this exposed the rivets to the wrong kind of stress. Imagine trying to pry up the top part of the belt loop from the side. That's what happened when the pouch on my belt kept catching on things in my workshop or even getting in and out of the car. So I won't make toilet paper type of stitches but rather along the side. Actually, a rectangular box of stitches to attach the loop to the pouch seems like it would be the best. I do not want to go the route of feeding the top and bottom of the belt loop through slits in the pouch and then riveting them. My little metal SECRID card holder would catch on the leather when I insert it.

-
Yeah, but the test (for stitching and for the rivet) really should be putting the stress on the attachment the same way that it was on my belt pouch, when catching the pouch against something while wearing it. Just hanging off the belt puts very little stress on the loop attachment. Any suggestion on what kind of stitching should be done on the belt loop? A box-x stitch? Just plain box? I don't think that a couple of lines of stitching perpendicular to the long side of the loop would be sufficient. I'm thinking just a box would be good.
-
That's exactly why the rivets failed on my little belt pouch loop. Getting in and out of the car, and sometimes in my shop, I'd snag the pouch on something so the rivet was being pulled in a way that put the load on the head. I'll be stitching those belt loops from now on.
-
You know... there is a dedicated items for sale section on this forum, which is where for sale posting should be uh, posted.
-
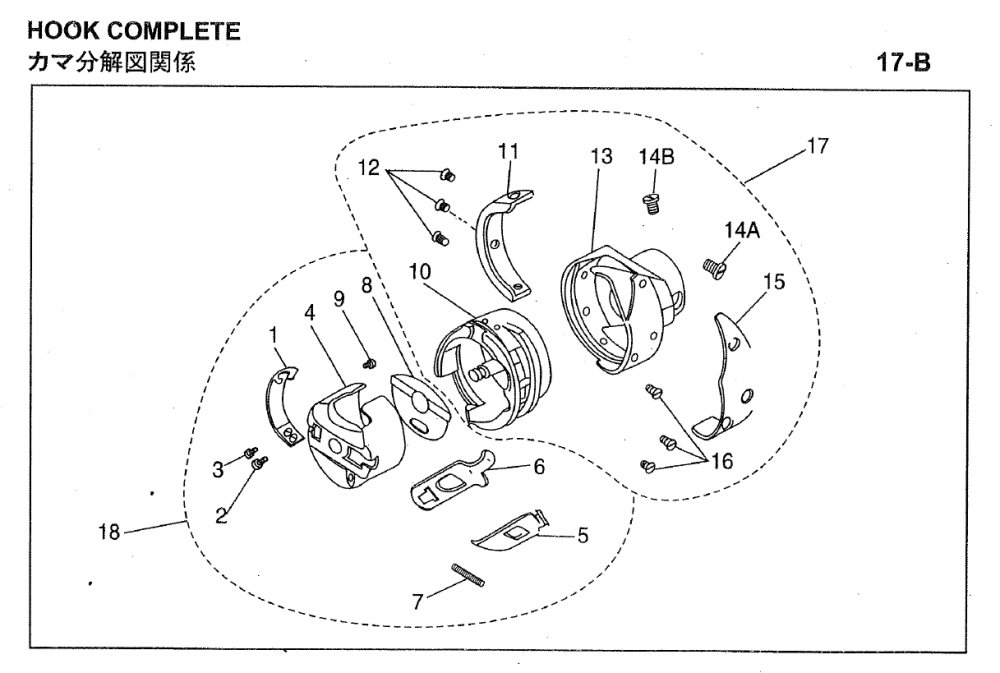
The little finger isn't in the way... I've removed it (after marking the position) and will reinstall it at the end. When you say largest part of the hook at the top, do you mean the point of the hook, or something else? Should it be in the position shown in the above parts diagram? And then part #10, should it also be in the position shown in the diagram? I can get it back in, but it never seems to be in the right orientation in regards to when the needle comes down. I wish I'd known your trick about removing the belt, etc. earlier. This is the second time it's happened to me and like last time, it took me days (I have limited time at home) to get it back correctly. And now again it's been frustrating the heck out of me. I'll try your trick the next time it happens (and hopefully it won't). I do know about holding the thread when I start, and did that. This problem actually occurred in the middle of stitching a long length of shoulder strap. Far from the beginning of the stitching. There was a noise, and then the machine was all jammed up and when I tried to turn the hand wheel the needle would hit part of #13. I don't know what might have caused this, but it wasn't from lack of holding the needle thread at the start. I really appreciate your jumping in with advice, Bob. Thanks very much!
-
Thanks for the help! I guess for me the problem is getting part #10 back into part #13 in the correct orientation. I'm still fiddling with it (in the evenings when I get home).
-
I'm stuck (again) with my 206RB-5... there was a noise and a jam up and I couldn't even turn the hand-wheel without the needle hitting the hook assembly. So I opened that up, cleaned it all and oiled it, and the part I now can't get back in place is #10 on the drawing. there must be a certain orientation that has to match as you put it back. Like what position the needle bar should be in, and where the notches align etc. I tried to find this information on the two maintenance videos, but didn't have much luck. Must be there somewhere. Or there must be simple instructions somewhere for putting that back in position correctly. Can any of you folks help me with this?
-
I've bought a few things from Ivan and have been pleased, but of note to fellow Canadians, two things: First they charge in US dollars, and we get dinged more than the official exchange rate by the credit card companies, and they use Dicom when shipping to Canada. Dicom always charges a brokerage fee (reasonable) and often there is also DUTY charged, and they also collect our two levels of sales taxes on the Canadian amount. When other Asian companies ship to Canada, often if they use the regular postal service (even with tracking) the items arrive here without any brokerage charges, duty or taxes. This needs to be figured into deciding if the price of Ivan products is worth it or not. I haven't found their leather prices to be worth buying. I've bought knives and punches from them and been satisfied.
-

Sewing machine help needed in western washington
MtlBiker replied to AdamDavis's topic in Leather Sewing Machines
Needles are cheap! Buy a bunch! If you don't know about Wawak.com, check them out. And sign up there so that you get emails of their specials. I always buy 20+ packs of needles at a time when they're on sale. And as @kgg suggested, you're probably using too small a needle for the 138 thread and leather you're using. Get some 135x16 needles (for leather) in sizes maybe 20 to 24. And some 135x17 needles for general (non leather) sewing. I once took a cooking course and the chef asked everyone how often we sharpen our knives. Someone answered about every week or two. The chef answered, oh, so you only cook once every week or two? I mention that because it's like how often do you change needles... I also change my needle for every project, and sometimes even several times. The slightest question about the needle... change it! Much cheaper to change the needle than ruin a project because of a bad needle. It's not only the point of the needle that could be blunt, the eye could also be causing thread to fray, and of course if you hit something a little harder, the needle might even be slightly bent. -
Sewing machine help needed in western washington
MtlBiker replied to AdamDavis's topic in Leather Sewing Machines
Thanks for catching that. I'd meant to say to hold both top and bottom threads as you start to sew, and I really didn't realize that it's only the top thread that really needs to be held. I've been making a real effort to hold onto both threads as I start ever since I got a bunch of birds nests and thread jammed around the shuttle. I just did some sewing an hour ago and only held the top thread and was surprised that it worked perfectly. That saves me a bit of worry and effort at the start. -
I think if I did that there would be the chance that when I try to insert the SECRID card holder into the pouch it would snag on the belt. You saw the photo of the SECRID? It's got pretty sharp edges and the inside of a pouch needs to be smooth and without anything it could catch on. Nah, I'm going to stick to hand stitching the belt loop (no rivets) on the outside of the pouch back. At least on the next one I'm trying to make. I guess I'd call it a work/design in progress. Also it's a chance for me to practice my stitching. Cheers!
-
Thank you Klara. I've actually been doing that where I need to attach a zipper to my leather. I'm getting better at it, but you're right, it probably doesn't look as good as if the slot was cut with a proper punch. At least with the zipper slot, it's easier (I think) because the whole slot is longer and wider. But since this slot doesn't get hidden, it's really got to look good. BTW, I did get that stitching "clamp" from DecoCuir we were talking about a couple of months back. It's quite well made and I'm getting the hang of using it and I like it much more than a stitching pony that clamps to a table. With this I can relax on my couch in front of the tv and use it much more easily than one that clamps to a table. I don't have a real "shop" for everything but use a guest room and part of the living room for my sewing "hobby". Best regards!
-
Sewing machine help needed in western washington
MtlBiker replied to AdamDavis's topic in Leather Sewing Machines
There have been lots of threads here about thread tension... maybe try a search and see what you find. I don't have a drawing handy, but the idea is that the top and bottom stitches need to meet in the middle of your material assembly... if you look at the result from the top side, you should not see the bottom thread coming up to the top (if it does, your top tension is too tight or your bottom too loose), and likewise if you look at the stitch from the bottom, you should not see the top thread coming through. If you do, the bottom tension is too tight or the top too loose. And remember that different threads and different types of material usually require different thread tension adjustments. Which is why you should always run a test piece of the SAME material and thread as you plan to use. In the beginning it helps with understanding this if you use different thread colors on the top and bottom... that makes it real easy to identify if the tension is correct. But bear in mind that adjusting thread tension for a white thread does NOT mean the tension will be the same with a black thread. Black (at least to me) is the most problematic thread because even for the same weight (v138 for example) it is usually stiffer than the other colors. And you really should know exactly what the needle is that you're using... both the size of the needle as well as the type, such as round point (general use) or diamond point (for leather). It's important to know that. Probably marked on your little package of needles. What's the thickness of the leather scraps you're using and how many layers? -
Sewing machine help needed in western washington
MtlBiker replied to AdamDavis's topic in Leather Sewing Machines
@AdamDavis - Okay, it sounds like you've got experience, but little if any with sewing machines. The "birds nest" is often caused by your not holding the bobbin thread tightly enough as you start your stitches. If it gets pulled in, that's what will happen. What thread are you using, and what needle? Do you know how to check/adjust bobbin tension? If you can clean up that birds nest and are sure there are not thread remnants caught around the bobbin, just try to do a straight stitch, making sure you are holding both top and bobbin threads tightly at the start. After a couple of stitches you can release them. Finish your line of stitching and then look at the result. See if the top and bobbin threads are meeting in the middle of your material assembly. If not, you will have to adjust the thread tension... probably top thread tension but maybe also bobbin tension. Do you know that you need to readjust thread tension when you change thread weights (sometimes even colors as black thread is stiffer) and even as your material assembly (thickness and layers) changes. What thread are you using? What needle? And what material are you sewing? Don't worry, we'll help you get going. -
Sewing machine help needed in western washington
MtlBiker replied to AdamDavis's topic in Leather Sewing Machines
@AdamDavis - If, as you say, you have absolutely no clue what you're doing, what made you buy a sewing machine and specifically that machine? What do you plan on sewing? Before Covid, I couldn't even sew a button on a shirt (I still have trouble with that) but I started sewing with a home sewing machine. I got hooked, and now have several different machines. I learned most of (the little) I know by watching YouTube videos ("on the Youtube" ) And this forum has been an incredible help as well. But with the combination of YouTube and this forum, all is possible! Do you have any sewing experience? Have you tried something and run into problems? What exactly do you feel you need help with? -
@Suncrest - Is that a photo you copied from some online site? If you took it, take some photos that show the serial number plate and more of the machine... what the table is like, is there a motor, what kind of motor, etc. If it's from an ad, why not ask the seller for the model number or at least some better photos?
-
Using my red chrome tan leather, I tested 6 finishes last night and this morning. I wanted to see two things... whether or not the finish changed the appearance of the leather and what it did for water resistance. I didn't want to end up with something more shiny than the leather was before applying the finish. I tried: Resolene diluted 1:1, Satin Sheen, Aussie Leather Conditioner, Leather Balm with Atom Wax and Bona Floor Polish both full strength and diluted 1:1. In terms of shine, the best product was Satin Sheen which didn't seem to change the natural shine of the leather. The worst were the two tests with Bona. Very shiny. Better than the Bona was Resolene, followed by Leather Balm and then the Aussie. I did buff all products with a microfiber cloth when they were dry. Then I used a medicine dropper to drop a bead of water on each piece and after 2 minutes I blotted the water off. The Aussie product was the worst, with little protection against the water. Followed by the Bona 1:1. The other 4 products ALL worked perfectly with no noticeable spot where the drop of water had been. So, based on my little test, my favorite product is going to be Satin Sheen unless I want a bit more shine to the leather.
-
Turns out that here it's called Polish and not Varnish but it's probably the same thing. But the instructions say nothing at all about removing it with ammonia. In fact, there is no mention of removing the product, only that the "Bona Microfiber Cleaning Pad" (recommended of course!) should be washed with water when finished. There's no mention either of diluting the product with water. In any case, I've got some. I'm going to have a martini and dinner, and then I'll do some tests with it full strength and diluted 1:1. I'm going to do the same with Resolene, just to see what it does with my chrome tan leather. And I'll also do a full-strength test of Leather Balm with Atom Wax. Results... tomorrow!
-
I found that product at Rona hardware (there are no Lowes in the Province of Quebec... probably due to our stupid language laws). You've used this stuff on leather just like Mop and Glo? I'll pick up a bottle on my way home tonight and if it doesn't work well on my leather, I guess the money's not lost as I can use it on my floors! You suggest diluting it 1:1?
-
Thanks for those links. The description says to use it where a "gloss finish is desired". Would be nice to have a small bit of it to make tests with. (I guess that's what you've always got to do anyway... always test a product with the leather you want to use.) Pricing for that in Canada, is way too high. I don't mind paying for something I want, but sure don't if I feel I'm being taken advantage of. Just FYI, the Canadian price (plus shipping which is $29.44) comes to $131.55. The US price for the same size is $62.15. So it's forty bucks more here in Canada, and you can buy a lot of finishes from Tandy Canada for that money. So I don't think I'm going to be ordering it. What I will do though is test the products I have with my leather tonight when I get home. I don't really want to change the shine of the leather, nor do I want to lose the leather smell (which people really love). It's just that I never realized I'd need to put something on my chrome tan leather. Live and learn. I just realized I'm wrong about the pricing... that US$62.15 converts to $79.13 Canadian, so it's not as big a rip off as I first thought. US$62.15 = $79.13 CDN $131.55 CDN = US$103.32
-
Thanks Fred. As I said in another thread awhile ago, it seems Mop and Glo isn't available here in Canada from any supplier other than Amazon (at crazy high cost). All other suppliers who list the product state it's out of stock. Would you consider using that Leather Balm with Atom Wax? Is there a commercial product that is already a beeswax/carnauba mix polish or is that something you make yourself? I guess the bottom line answer is that yes, you would need to put some kind of finish on chrome tan leather. Which I didn't realize.
-
I guess my assumption on when/how to protect leather was completely wrong and naive... I'd thought that Chrome Tan leather didn't need any protection, but I just ran from my car to my office in the rain with one of the last purses I made and the bag got rained on. Not a lot, but enough to instantly wet the leather and make it look spotty and ugly. It has since dried out and it's fine, but I guess I need to put some finish on it. I'd thought that veg tan, especially to protect the dye, needed protection and I've tried several products... Leather Balm with Atom Wax, Resolene (diluted), Satin Sheen, etc. I've also bought some Aussie Leather Conditioner which just arrived with my last order and I haven't tried it on anything yet. Is there a recommendation for what to use to protect chrome tan leather? I don't want to make it harder, or make it lose the wonderful leather smell. But I'd like it to be a little more resistant to getting water sprinkles making it look bad. I've got several bags already finished, so it's important that I be able to apply any kind of product to finished bags rather than only to a flat piece that hasn't been stitched. Thanks for your advice.
-
Thanks (again) very much, Fred! Your prior post with the photos clarified what you were doing with the loop and slots, and your drawing now confirmed it all. My intention with these pouches is certainly to hand stitch everything, saddle stitching. I save my machine stitching for bags and purses. As I said, this little belt pouch is only for me, one, because I can use it, and two, as something to practice my leather working with. I need practice with dyeing, protecting, molding, cutting and certainly hand stitching. This is a perfect little project for all of that. Thank you. I hadn't heard of "bit/burr" rivets. But in any case, my next attempt with this pouch will use saddle stitching on the belt loop. (And the rest of the pouch.)
-
Fred, once again you've given me terrific help! Thank you! Now it's clear what you were talking about and I'll also check out Al's information. So, in your case you used only a rivet and no stitching, right? Oh no! MORE stuff to buy! (Slot punches.)

