MtlBiker
-
Posts
850 -
Joined
-
Last visited
Content Type
Profiles
Forums
Events
Blogs
Gallery
Store
Everything posted by MtlBiker
-
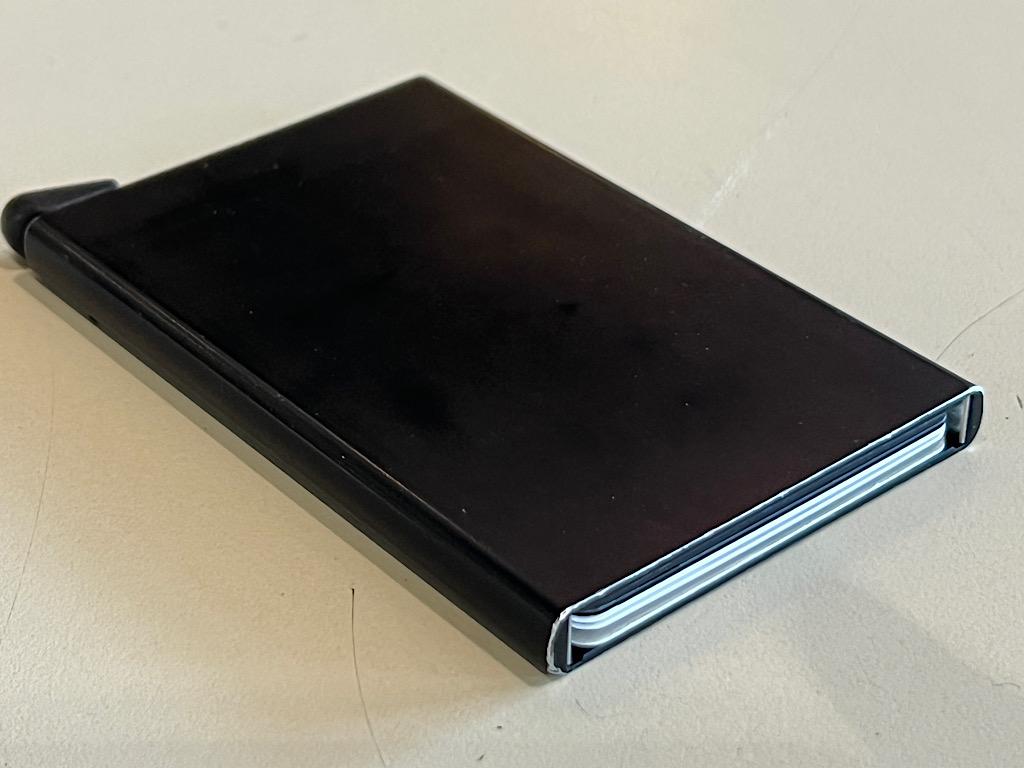
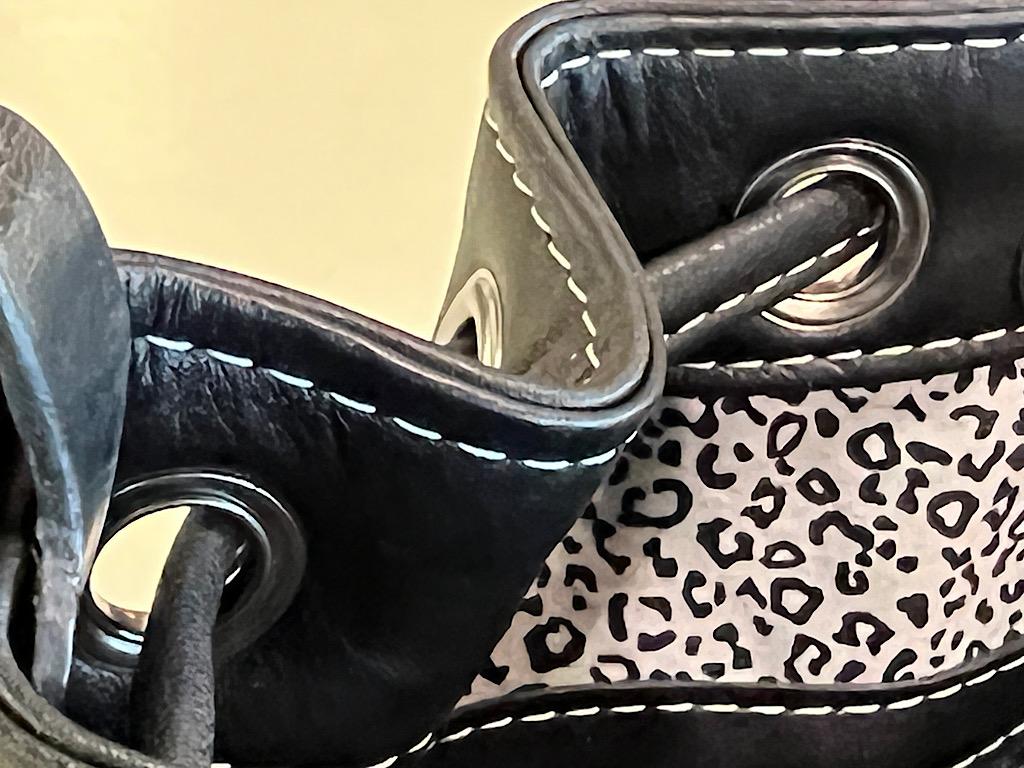
I'm sure you're right. That's it's my fault the rivets failed. I use a press from Kamsnaps and the proper dies for the size of rivet. They probably failed because I had hammered the heads flat after setting them, because I didn't want my SECRID card holder to snag on the rivet when I put it into the pouch. I probably flattened them too much and that weakened them. I'm switching to sewing the loop on my next pouch. Just in case someone doesn't know about the SECRID card holder, it's made of (probably) aluminum and is RFI shielded to protect the cards. There's a little lever at the top which pops out the cards in a way that it's easy to remove any one you need. But the bottom edge can easily snag on a rivet or any ridge when inserting it into a pouch. I've been using it for many years now and really like it. Just don't like it in my pants pocket.

-
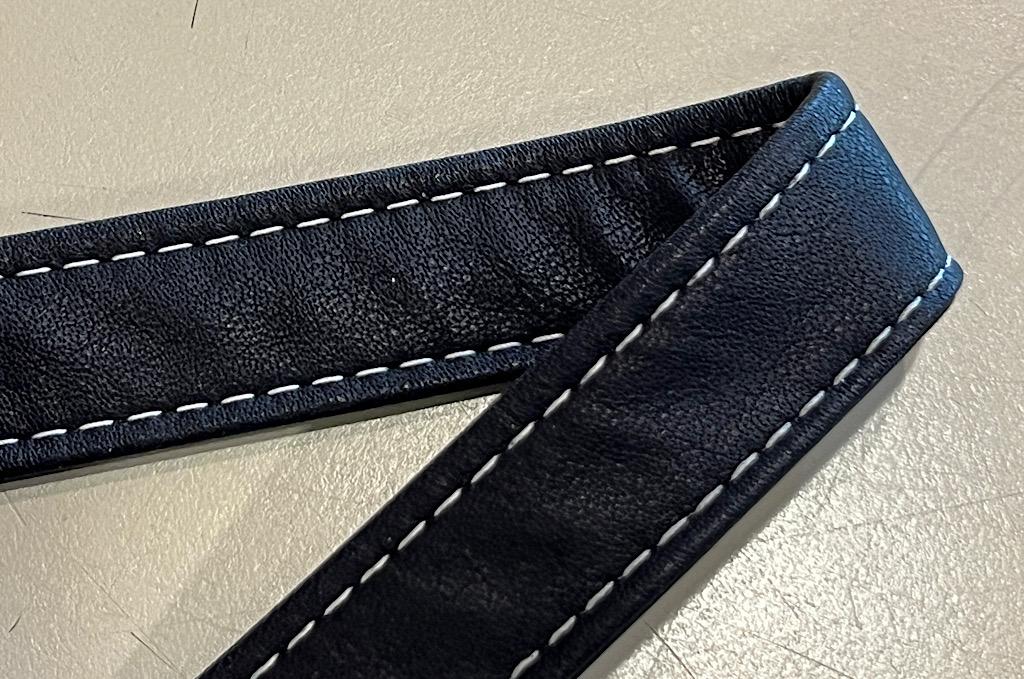
It's not rocket science? Then why is some of this stuff so difficult for a beginner? I will certainly change to stitching instead of rivets for my next pouch, but won't be (yet) doing the slot thing. With slots (especially the top one) I don't see how to prevent my metal SECRID card holder from snagging on the strap if it's inside the pouch. What do you suggest to prevent that? And after experimenting with different length and position of the loop, I'm actually going to move it higher up on the pouch (with the bottom attachment even further from the sewn pouch edge) because I found with the loop too long and/or too low on the pouch, the way it rides on my belt I don't like it. I'm going to size it for my largest belt size and keep it at the height I feel gives it the best balance and position on my hip. I'm not trying to make a pouch (yet) for sale or the masses, just a functional one for me with that SECRID holder. And using the whole thing as a practice and learning experience. But could you please clarify for me which direction the ends of the loop would go once inserted in slots. My understanding is that they remain in the same direction as the loop itself and aren't bent back towards the middle. Thank you (as always!) for your great help.
-
I'll have to look this up in Al's book (I have 4 of them). I'm hesitant because I don't really know how to cut neat slots in leather (haven't learned that yet). So the idea is to cut two slots into the back of the pouch and then feed the belt loop strip into the slots... then which way do you place the part of the loop that's inside? Do you leave them both in line with the loop or do you bend them back towards the middle? Putting the ends of the loop inside the pouch means there will be a ridge (from the loop) on the inside and when I slip my little metal SECRID in, it would probably bump up against the ridge making it harder to insert plus adding pressure on the end/edge of the loop. I think what I'm going to try this weekend on my next pouch is to first of all use some glue and then to stitch the loop (with the loop not going through any slots) in place. I might even add a rivet. Surely that would be stronger than just the rivets alone as I've been doing. With the pouch you were talking about, where the rivets would fail often, I guess you had used rivets only, without any stitching?
-
Looks like all the votes are for stitching the belt loop rather than using rivets. I'll give that a try on the next pouch I make this weekend. Thanks for all the comments. I'm not quite sure what you mean. And when you wear the pouch, the belt loop doesn't even show. I'll try adding glue on my next pouch. And for protecting the stitches on the inside, is it just a layer of contact cement you put on them? I haven't stitched my belt loops yet but I'd imagine that proper stitches, hammered down afterwards would be pretty much recessed and not prone to getting damaged. This idea doesn't sit well with me. (Of course, not having actually tried it.) If I understand correctly, you then end up having to stitch through 3 layers along the edge rather than just two, plus you seem to have the top edge of that extra piece kinda open and just sitting there. Looks wise I don't care for that too much. Maybe I should just give it a try though. I can see doing that with the top part of the loop, but not the bottom. There wouldn't be any room to get my press in there to close the bottom rivets unless they were exposed as in my photo. Putting the top part of the loop in through a slot and then riveting it would make it stronger?
-
I've made a little belt pouch for my SECRID metal credit card holder. I've made a couple of them actually, getting better and better at molding the leather, stitching, dyeing, etc. They have a leather belt loop that I've used double cap rivets to hold in place, and I've hammered them down (especially on the inside) so that when I insert the SECRID it doesn't catch on the rivets. I've been pretty pleased with what I've done, until.... I almost lost the whole pouch and SECRID with my credit cards! I wear the pouch on my belt (duh) and it often snags on something in my workshop or even getting in and out of the car. Today the top two rivets broke away so the belt loop was loose and just flapping. Good thing I noticed as I might have lost my drivers license and credit cards. So I'm looking for advice to make a stronger, better belt loop. What's the best way to attach a leather belt loop to a pouch so that it's super secure? I see three options: 1) Continue using the rivets as I've been doing and maybe not hammer them down quite as flat, and certainly pay more attention to avoid snagging it on something. 2) Stitch the top and bottom attachment of the belt loop (I'm getting better at stitching!). 3) Use both rivets AND stitching, which I see as being the most secure but the most effort/time to make. What are your thoughts?

-
WAY too much! That's for sure. But they're really nice and feel like solid quality tools. Buy once, cry once. I'm glad that it appears I'm doing it right. Now I just need lots of practice.
-
Gee, you'd think that they (JJ) would say that. I will give the 003 needles a try though. I just remembered that back in February as I placed my order for each of the sizes, I asked them this question: I got an answer back from Ben at John James: I guess the bottom line is that... Confusion reins supreme!
-
Thank you. I guess the tine tips are "somewhat" sharp. Certainly not sharp enough to cut your finger, even if you press quite hard. With enough mallet pressure they do make a very neat hole/slit though. And I'm sure that my stitching quality is going to improve with more practice. This is a test piece I stitched last night after using the new irons.
-
Thanks very much! I don't remember where I found the info but it did recommend a 001 needle for 0.8 Tiger thread. I will give it a try with a smaller needle. And thanks for letting me know that it's expected to need a little more force with these irons. The hole is certainly smaller and neater than what the Craftools Pro chisels produce. And less distortion of the leather. Interesting though about the needle sizes... you suggest using a #3 needle but according to the John James size guide, the 003 is exactly the same as the 001... Only the 004 is smaller. Doesn't make a lot of sense to me (that 1-3 needles are identical).
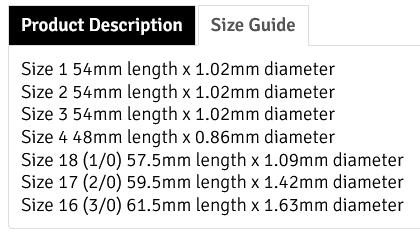
-
I tried the Sinobloks tonight and I found that they need a surprisingly harder hit with my mallet (than the Craftools Pro) to go through the leather. That could be because they're really not sharp or maybe that's just the way it is supposed to be. I was using two layers of 6oz veg tan that I'd dyed (which seems to make it harder). And then with 0.8 Tiger thread and a 001 John James harness needle, I found I really had to wiggle the first needle in the hole in order to slightly open it up so the other needle could get through. And then I also had to use a pair of pliers to pull the needle through on many/most of the holes. Probably just going to take more practice on my part but I really do like the resulting stitch line. The hole these irons make is certainly smaller and neater than the one made by the Craftools. (When I say I wiggled the first needle, I mean that I first take a needle from the right and put it in the hole, wiggle it a bit along the same axis as the hole, and remove the needle. This is done just to locate the hole and make it easier for the needle from the left to pass through. Then in the same hole, I take my first right needle and pull it through. I'm a beginner and I'm not sure that I'm doing it right or even that I'm explaining it correctly.)
-
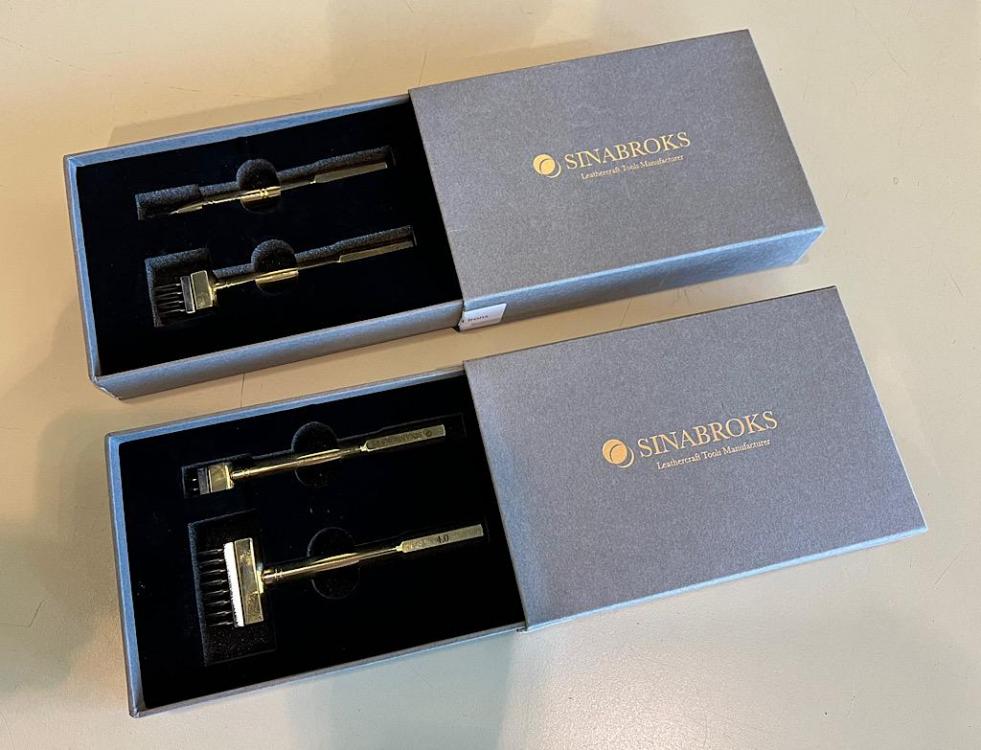
I just received the Sinabroks chisels I ordered 3 weeks ago... 4mm, 1-, 2-, 4- and 8-prong. They're certainly beautiful to look at and came in nice padded boxes. I don't have anything here at my work to try them on so will have to wait until I get home to some leather and a poundo pad. But my first impression (other than the great looks) is that they're really not very sharp. I'll have to see how they work when I hit them on leather using a mallet but they're certainly not as sharp as my Craftools Pro chisels. Maybe they're going to work just fine but I really expected them to be a lot sharper.
-

Start-up machines on a small business budget?
MtlBiker replied to Vermontleatherworks's topic in Getting Started
I think that if you plan on sewing 10-12 oz leather you should be looking at something considerably stronger (like a 441 class machine) than the 2750. I have one, and while it can sew 10-12 oz leather, it's very rare that you'd only have one thickness to go through. Two or three layers would really start to be challenging. And you're probably going to need at least v277 thread. Unlikely that the 2750 would be enough for your needs. Good luck! -
Start-up machines on a small business budget?
MtlBiker replied to Vermontleatherworks's topic in Getting Started
So, what is it you plan to make? Okay, you don't want to say. Are you sure though that a cylinder arm machine would be the right choice for your first machine? Yes, that 2750 comes with an add-on flatbed attachment but it's not something that you'd want to install and remove every day and certainly not many times a day. Have you considered a good quality used flatbed machine to start? Maybe something like the Consew 206RB-5 or Juki equivalent? In order for us to be able to help you choose you really would have to give us more information than you have. Such as how thick leather to you plan to work with? How many layers? What size thread do you plan to use? On the 2750 I really wouldn't use anything less than v92 thread and that's way overkill for your "racy lacy lingerie" materials. A good domestic machine might be a better choice for such things. Without giving away your top secret plans, you really need to tell us more so that we can help you. -
Singer 168W101. Reverse and table added added
MtlBiker replied to Marcremb's topic in Leather Sewing Machines
I have an art gallery and picture framing business. I only started sewing (of anything) during the first forced isolation period from Covid. Now I have several machines (not close to your 9 though!) and for me sewing was the only good thing that came out of Covid. I'm curious... what 441 clone did you get? How do you like it? Have you seen the mods that @RockyAussie designed and sells for such machines? Everyone is raving about them. Cheers! -
Pardon me for being a novice, but how is an eyelet different from a grommet?
-
Leather tote bag
MtlBiker replied to Chux's topic in Purses, Wallets, Belts and Miscellaneous Pocket Items
@Chux - Thanks for posting that. It's what I was pretty sure you had bought. It's not a "bell skiver" at all. I've seen those devices for sale online and at Tandy Leather and from what I've seen, some folks are really quite happy with them. So it is doable, but certainly challenging. And even a real bell skiver is pretty darn challenging, let me tell you! Very steep learning curve, at least for me. Cheers! -
Singer 168W101. Reverse and table added added
MtlBiker replied to Marcremb's topic in Leather Sewing Machines
@Marcremb - Bien fait Marc! Nice work and congrats on getting that machine working so nicely. I guess you do professional reupholstering. Very nice! -
Leather tote bag
MtlBiker replied to Chux's topic in Purses, Wallets, Belts and Miscellaneous Pocket Items
Chux, earlier on you mentioned that you'd bought a "bell skiver" through Amazon. Is it really a bell skiver, or just something called a skiver? Is it completely manual, using sharp blades that you pull the leather against? Or is it a machine, with motor, etc.? Skiving (successfully) is something that I'm having a really tough time with. SIGH -
Leather tote bag
MtlBiker replied to Chux's topic in Purses, Wallets, Belts and Miscellaneous Pocket Items
@RockyAussie - You do really fabulous work! A real craftsman! May I ask a couple of questions about your post? About the heavy fabric stiffener you say will help get a nice even top line fold... Is that stiffener permanently glued in place? Or is it used just to help make the fold? (Sorry, I'm still pretty much a newbie.) And what is the stiffener you use... the Texon you've mentioned? Then the tabs you used with the magnetic closure... are they just a single layer stitched onto the inner lining, or do they (don't know how to call it) wrap around the inner and outer part of the inner bag? (I see they don't show on the outer bag.) Finally, on the photo that shows the magnetic closure, it looks like there's a strip of blue (leather?) at the top and then brown further down? Would it be possible for you to show a little more detail of the inner construction of the bag? (Not looking to steal your design... only to learn techniques.) You've mentioned Texon before for use as a bag bottom, etc.... is there some other product that is similar? I haven't had any luck finding a source in Canada, other than through Etsy, where one 9" x 14" piece of 2mm (couldn't find 3mm) costs $10, PLUS $20 shipping! $30 for one small piece is not something I want to put my money on. I've actually fused some Decovil Light on the inside of a couple of my leather bags and (as a novice) I think it's not bad, but I don't really have anything to compare it to. And thank you again for your willingness to share your experience and help others. It's very much appreciated. -
cylinder arm machine - which is best for my needs
MtlBiker replied to Blanka's topic in Leather Sewing Machines
@Blanka - It looks like you haven't seen than I sent you a private message a day ago. (As a new member it's possible you missed it.) -
Leather tote bag
MtlBiker replied to Chux's topic in Purses, Wallets, Belts and Miscellaneous Pocket Items
@Chux - Glad you figured out the multiple photos thing. Tell me about your strap... from the photos it looks like it's just one layer of leather, and you've stitched the edges. Is that right? Or does the photo not show another layer? I don't think the strap looks finished as is. And I'd also like to make a suggestion about how you've attached the inner bag to the outer... it would look more finished if you folded both outer and inner towards the inside BEFORE stitching them together. I don't like seeing the unfinished edge of your outer bag on the inside. What I'm suggesting is what shows in my photo below. I hope you don't mind my being critical. The seams in the sides and bottom look very bulky... and not tight. I think it would be very hard to get it perfect without skiving the edges of the leather first. But with care it might be possible to get a tighter looking seam. You bought a bell skiver off Amazon? Really? I didn't know you could. Is it an unknown brand? I have a bell skiver and did very well with it when using certain chrome tan leather but then I changed leather (same thickness) and I still haven't gotten it properly adjusted again. It chews up leather like crazy. There are a ton of good videos on YouTube about adjusting and using a bell skiver and they're helpful but it still is going to take a lot of care, skill and experience to get the adjustments right.

-
Leather tote bag
MtlBiker replied to Chux's topic in Purses, Wallets, Belts and Miscellaneous Pocket Items
I think you've done darn well! What machine do you have by the way? The way you've stitched the top of the bag (to put the inner and outer together) looks like you might have a cylinder arm machine. The photo you posted is pretty small and it's hard to see but it looks like you've stitched that well. I'm really just a beginner myself so my comments might not be all that helpful, but what I've done with my straps is to take a thinner chrome tan leather than the body leather (if it's 4-5oz for the body, I'd use about 2oz for the strap) and fold it in twice (like starting with 4" wide, folding it in to make it 2" and then folding that to result in 1") and then top stitching both edges to finish it. That way all the raw edges are hidden. You mention that next time you might try skiving your leather down for the straps... unless you have a bell skiver it's pretty tough to skive chrome tan leather. Veg tan you can skive with a skiving knife. I'm really just learning. -
Leather tote bag
MtlBiker replied to Chux's topic in Purses, Wallets, Belts and Miscellaneous Pocket Items
@Chux - It looks good! But not seeing details makes it hard to comment more fully. Is there a gusset? What's the base look like? Is it lined? Is there a top closure? Inside pocket(s)? Is the strap edge raw (hard to see from the photo)? It's probably chrome tan leather, right? What weight? Sorry for all the questions but I'm curious and also trying to learn more about bag making. To upload multiple photos, just click on the "choose files" link at the bottom when you're writing a message. Cheers! -
cylinder arm machine - which is best for my needs
MtlBiker replied to Blanka's topic in Leather Sewing Machines
That's a cool looking bag! If you're thinking of tackling something like that, you're WAY more advanced than I am! You've been studying this for over 3 years? Well, I only started sewing (anything) during the first forced Covid isolation period here. Before that I couldn't even sew a button on my shirt (and still have trouble with that). I got hooked with sewing, first making masks, and then moving to pet leashes and harnesses, and then fabric bags and purses. I only recently got more serious about working with leather and without the helpful folks here on this forum (and YouTube videos), I doubt I would have gotten very far. But I am hooked, and now have two industrial machines, a half-industrial (Sailrite LSZ-1 portable walking foot) and still the home machine I started with. From the photo of the bag you posted, I don't really see the advantage of a cylinder arm machine over a flatbed. My most useful and favorite machine remains my flatbed Consew 206RB-5. I'd say that gets 90% of my use and my cylinder machine only 10% if that. So I think that if you're talking about your first serious machine, a flat bed would be best. With unison/compound/triple feed. I'm not selling my bags online.... I have a picture framing business and I display some of my bags there and I've been surprised that they sell. Sewing is a hobby for me (maybe even becoming a passion) and it's not my way to make a living. I do it for fun and to de-stress from my "real" business. But here's a photo of the most recent bag I've made...
-
Sailrite LZ1 Reverse Stitch too short
MtlBiker replied to cynthiab's topic in Leather Sewing Machines
@cynthiab - Not sure what your clone is... Sailrite has an LS-1 and an LSZ-1, but no LZ1. Does your machine have zig zag stitch or not? One of the reasons I bought the genuine Sailrite product instead of a clone is the absolutely outstanding customer support they offer, both before and after sale. And their tutorial videos are really great too. Have you searched YouTube for one of Sailrite's repair or adjustment videos? Maybe there's one that could help. Something that might be of help to you until you find a better solution is what people often do who have machines without reverse stitch capability. They stop sewing with the needle down in the material, lift the presser foot and turn the material 180 degrees around, lower the presser foot and then stitch a couple of stitches. I'd call that a poor man's reverse stitch. And then do that routine again to sew again in the forward direction. The stitches would then align. Good luck!