


MtlBiker
-
Posts
850 -
Joined
-
Last visited
Content Type
Profiles
Forums
Events
Blogs
Gallery
Store
Everything posted by MtlBiker
-

Dipping my toe into sewing; Advice requested
MtlBiker replied to Sam83's topic in Leather Sewing Machines
Funny you said that... I too started with a Janome 3000HD and quickly found I needed a different machine (machineS) to sew the kinds of things I wanted to make. But unlike you, I recently started using the Janome again. Before COVID, I had never sewn anything and couldn't even sew a button onto my shirt. I started by making masks, moved to pet harnesses and leashes, and then to tote bags, wallets and purses, and even started hand-stitching leather. My reason for using my HD3000 again was that I needed new dress shirts, and decided that I'd try to make them myself. After all, now I had *some* sewing experience. Anyway, I finished my first men's dress shirt using a McCall pattern and I'm thrilled with the result. The 3000HD is really quite a good (mechanical) machine, as long as it's kept doing the tasks it was designed for. I just got some really find Egyptian shirt cotton fabric for my next shirts. I'm stoked! Oh another thing... you mentioned that you found the Janome difficult to thread. Are you SURE you are thinking of the Janome? In my experience threading it is a piece of cake, and it's much much easier to thread than any of my other machines and the needle threader works perfectly too. -
Dipping my toe into sewing; Advice requested
MtlBiker replied to Sam83's topic in Leather Sewing Machines
Sam, you've gotten some great advice from the members here, and the real challenge for you is availability due to your location. I'm jumping in only to say that the first two options you were given, in my opinion are not right for you, and they're way overpriced as well. I have something similar (more high end) to those two, a Sailrite LSZ-1, but use it in combination with other machines I have. I also have a Janome HD3000 (which can be gotten here for $600 Canadian, meaning about US$460!!!!) and the price you are being quoted is again quite crazy. I really do like my Janome, but the thickest thread it can use would be a v69, and the machine would be great for your linings and to learn with, but really not the machine for leatherwork. I guess there's no used market where you are? -
The martini suggestion was for YOU and not your sister in law! I may not have much more experience than you, but I've learned (after "blotching" some dye jobs) that your leather really needs to be dampened before you apply dye. I bought some Fiebings product (can't remember what it's called and I'm at work now) which I've used, but I also found that water works well. But to rescue your project, how about dampening the leather and re-applying more dye? That would probably even things out but at the cost of making it darker. Good luck!
-
I too was going to suggest vodka, or my favorite, London Dry Gin. Preferably in a Martini. Have enough of those and you don't care if the dye job is blotchy.
-
Just FWIW, I've been VERY disappointed with the last few Osborne tools I've purchased. No way near their reputed quality and it's been suggested here that in the last few years their stuff has been real crappy. I've had to return a round knife, edge creasers and lastly one of their cobbler's hammers. Crap. Not even close to their quality of a few years ago. I won't be buying Osborne products again.
-
I'm Canadian... but I've never (and probably never will) been on Facebook. When you've got such a great forum as this one, who needs Facebook?
-
Flatbed Table Attachment for Techsew 2750
MtlBiker replied to MtlBiker's topic in Leather Sewing Machines
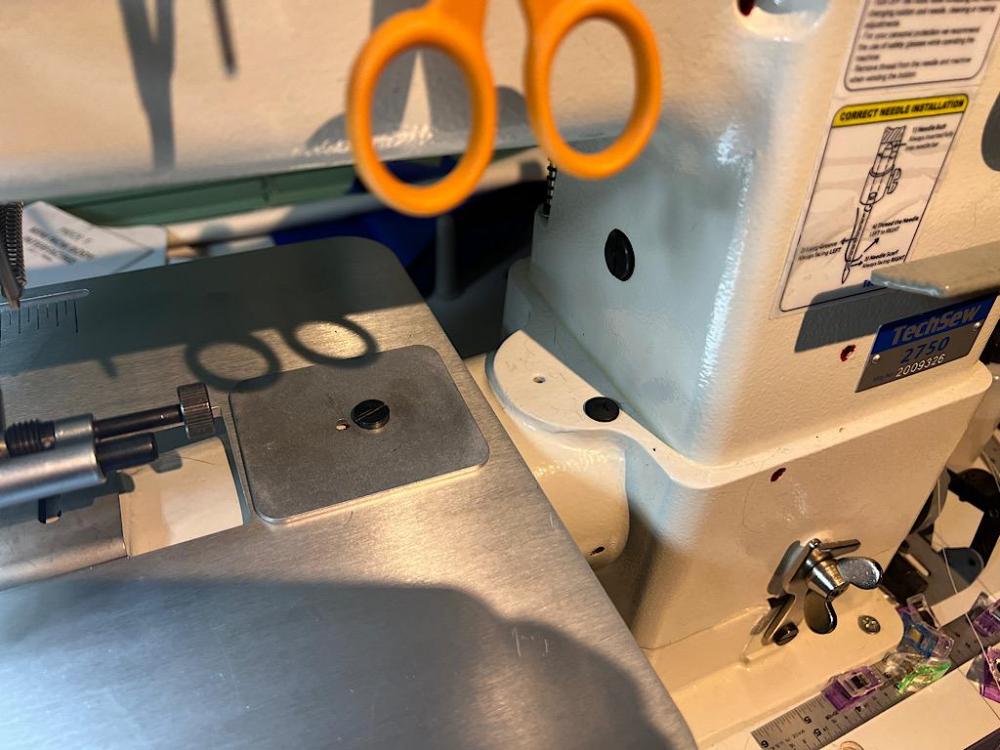
@Uwe - Here's a link to the aluminum flatbed table attachment. Thanks very much for the screw (information). But gee, what a strange screw that is! I was hoping to get some kind of thumbscrew replacement for the slotted screw I got with the machine. Who the heck ever thought up the idea of using such a non standard screw. Would you suggest I retap the thread to standard M5? Cheers! -
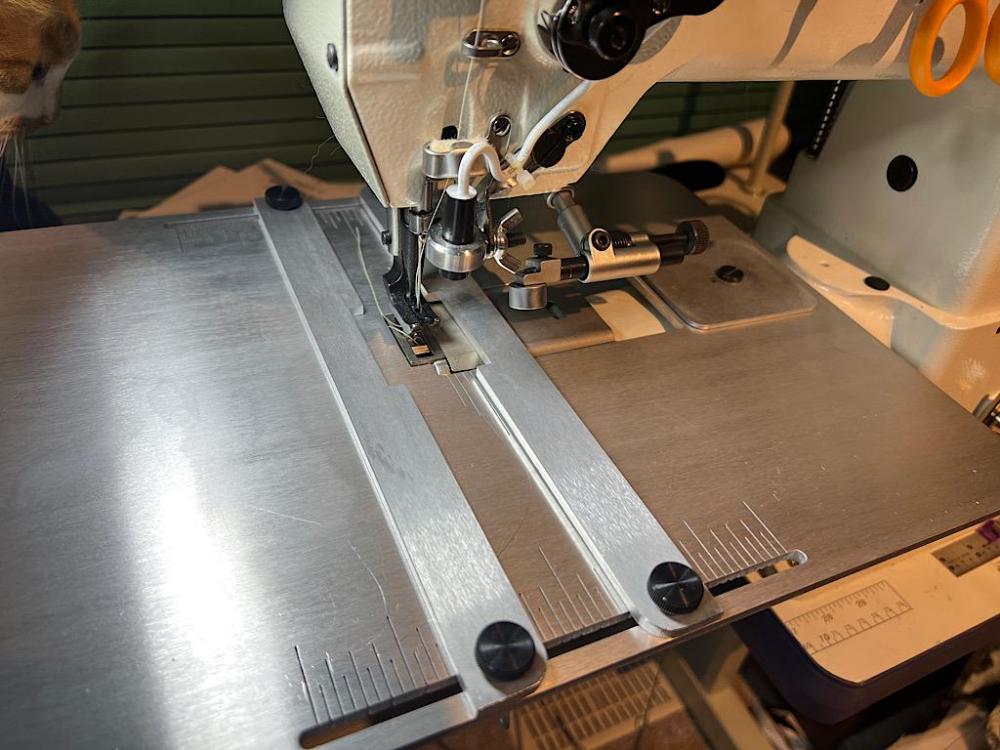
When I bought my Techsew 2750 Pro a year ago it came with a flatbed table attachment made of wood. And it required threaded support rods to be used, making the whole installation and removal process rather awkward and time-consuming. Not something you'd want to do every day, and certainly not several times a day. So other than for trying it one time, I've never used it. (Especially since I also have a flatbed machine.) A few months ago I came across an interesting variation of the table, made of aluminum. and didn't order one. But recently I've been seriously interested in getting one. (My flatbed machine was out of commission for awhile.) Anyway, Techsew now offers one, and the lady who I think originally designed the table, has moved on to the second revision of the table (the Techsew one is the first version). It looks much nicer, now having etched lines for seam allowances, plus an adjustable edge guide or "fence" that can be tightened in place, so I ordered one. The photo of the table on her website showed the table on her own 2750 and that's what I expected to receive, especially since there was no suggestion on her site that it would be different. When it arrived, I admit I was quite disappointed. Instead of having the half-round cutout on the right to fit nicely on the machine, it was rectangular. And my feeling was that the table was also smaller (than the one she showed on her 2750). I was quite sure the table wouldn't fit as securely without the cutout. I was wrong. When tightened down, it's really very solid. When I contacted her about the product not being what I expected from her site, she said that this was the new "universal" design to keep costs down. I'm bummed that she didn't state that on her site and that I didn't receive what I expected to receive. But it does work, and is very solid. I wish I'd have taken a screen shot of what she was showing, because after I complained she has now updated the photo of the product, showing the version that she's actually shipping. And the best news is that it really can be installed or removed in about a minute. Much much better than the original table. The only thing I need to find now is a better bolt to attach the table to the machine. I have one that came with the machine but it needs a flat blade screwdriver to tighten it. I'd rather have a bolt with an allen key head, or something I can tighten with a wrench. I believed it was a metric M5 thread and I picked up some bolts last night only to find the thread is different. Hard to imagine that the threaded hole on the 2750 isn't metric, but I'm going to take the screw I have back to the hardware store and try to find the right one. Overall I think the table was a good purchase, even though somewhat disappointing to me.

-
NO! Not you! I didn't make it clear in my post that I was referring to the other person's post.
-
I know you didn't! I was referring to the post above that. And pretty much agreeing with you.
-
I also have the Sailrite LSZ-1 portable walking foot, and I use pretty much exclusively v92 thread with it. The smallest thread I'd even consider using is v69 and certainly not the kind of thin thread that clothing needs. Yes, it *could* be done, but it's a real PITA to dumb the machine down so that it'll work with domestic threads. Why bother? Home machines are a couple of hundred bucks and up, so there's no reason to try making a heavyweight do the ballet. And vice-versa. If a domestic machine like the above mentioned Janome or Juki does what someone needs to sew, great. I guess what I take exception to is the above comment that the "Juki TI-2000qi is the best sewing machine". For what, is what I'd ask.
-
First, welcome to the forum! I see that was your first post here. Those machines are really (quite good) home/domestic machines. But you cannot compare them with the kinds of machines that are most common and popular here, for folks who are sewing leather, webbing, complicated and thick assemblies, etc. I wouldn't want to use my Janome HD3000 (as great a machine as it is) to sew 3 or more layers of webbing for pet collars, or even for 2-3 (or more) layers of 3oz leather. For such applications a walking foot (as a minimum) really is needed, and having a compound/triple feed machine is even better. What's that expression? Something about horses for courses? You need the right machine for what you are sewing and it's impossible to get one machine that will do everything from thin cotton shirts to heavy leather belts and pouches. I'm just starting a new project... men's dress shirts. And I wouldn't dream of using any of my industrial machines for that. I need a fine thread and small needle and for that I'm reaching for my Janome HD3000. You need the right machine for any job.
-
Good link... Thank you!
-
Thanks Fred. I'm finding this little wallet to be too soft (at least for me) so maybe now that I've made one, I might use veg tan that *I* dye instead of the pre-dyed stuff I used. I think that might be firmer. And maybe a thinner (2oz) veg tan for the interior parts. There is SO much to learn and it's so hard for a newbie to know what type of leather to use. And simply saying "soft" or "hard" isn't all that much help. I'm still at the stage where I follow along with a tutorial and when details are lacking it is a bit challenging. As (when) I gain more experience I'll know better about what to use, where and for. Cheers!
-
Thanks! But what does soft and hard leather mean to you? I really don't think I used what the author had in mind.
-
As you know, I'm still quite a beginner with leather working. I came across a YouTube video and PDF pattern for a very simple little wallet, and I just made one as a practice project. Cute and Easy Wallet for a Gift. But I'm really not sure what leather the author was suggesting we use... Nothing was mentioned in the video but the PDF pattern says to use 1.5mm "Hard" leather for two pieces and 1.5mm "Soft" leather for the third (interior). I used a pre-dyed veg tan leather (about 4oz) for the "hard" pieces and a chrome tan black leather (just under 4oz) for the interior. Is there a proper description of what "hard" and "soft" leather is? I'm not sure what this little wallet should feel like, but I'm finding both exterior and interior pieces to be perhaps too soft. Thanks for any comments.
-
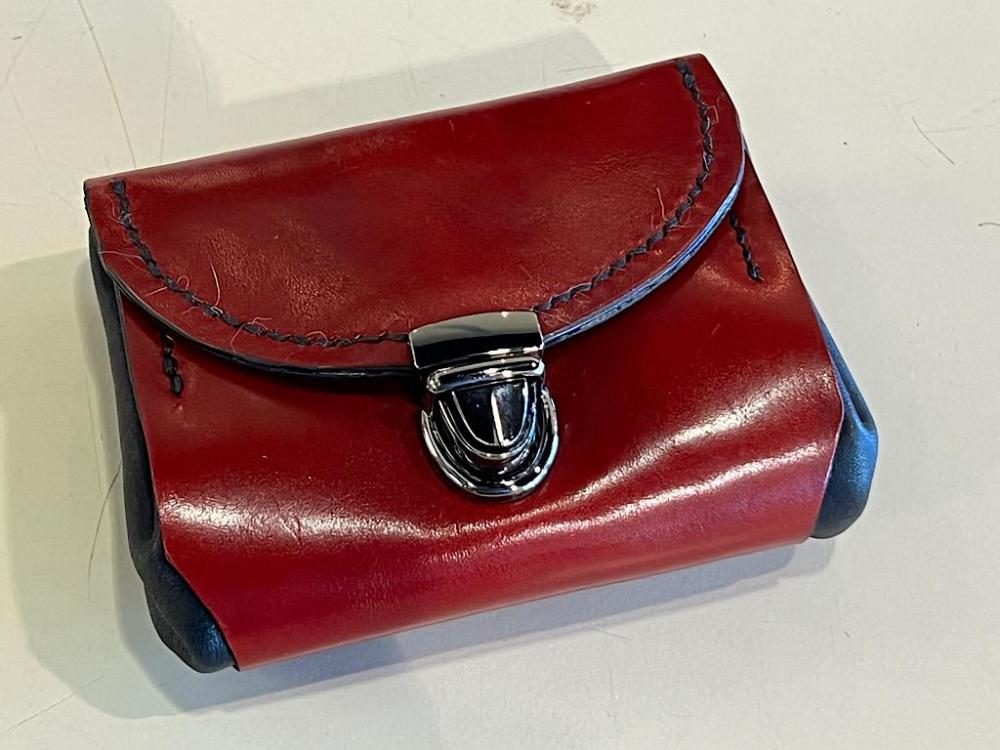
Just a little update... Thanks to the kind advice and suggestions from you folks, for the last two little belt pouches I made, I didn't use rivets. Instead, I hand stitched the belt loop in place. I also changed the size of the loop and the position on the back. By making the loop part a little smaller, the pouch doesn't move up and down on the smaller belts I tend to use and that way it stays more snug and less liable to catch on things. I also moved the loop a little higher up on the back side which helps keep the pouch in a more comfortable position. I've now been wearing these for over a week and they catch on things much less often and the belt loops seem to be super strong. Thank you everyone for your great help.

-
I have two Kamsnaps presses, and a whole bunch of their double cap rivets, grommets, utility line 24 snaps, fashion snaps, etc. I'm very pleased with both their products as well as their service.
-
Best diamond shaped awl for 3.85mm pricking iron
MtlBiker replied to jc22's topic in How Do I Do That?
Are you sure those are diamond shaped? Looking on their website, I don't see that they offer such irons. Only the French style (which I've bought), round, and round hole punches. I use Osborne stitching awls and as far as I know, you're going to have to spend a lot of time sharpening them before they're really useful. I use my Sinabroks and they usually punch right through the leather and I don't need to use an awl at all. But my Osborne awl doesn't really distort the hole if I sometimes need to use it. -
cylinder arm machine - which is best for my needs
MtlBiker replied to Blanka's topic in Leather Sewing Machines
Not only that... If she picks up the Cowboy machine in the States, she would more than likely have to pay the State sales tax. To avoid having to pay that, it would have to be shipped, resulting in more expense. But don't overlook the duty issue... With "free trade" anything actually made in the US can be brought into Canada without any duty. But if it was made elsewhere, duty would have to be paid. So something people often overlook when comparing buying something here in Canada versus in the States and bringing it in, is that if it entered the US from another country, the importer had to pay some duty. And then if it was brought into Canada, AGAIN duty would have to be paid. Double whammy. So for example, something made into Japan and brought directly into Canada with only one duty being paid, is often very competitive with something brought into the US, duty paid, and then duty again going into Canada. Without even considering the cost and hassle of either driving to the US and bringing it into Canada or having it shipped. -
cylinder arm machine - which is best for my needs
MtlBiker replied to Blanka's topic in Leather Sewing Machines
@Dwight - Toledo is an awfully long drive from Montreal! And crossing the border (especially on the way back) is still a fair hassle. (My foreman has a cottage in Vermont and he went down last weekend, and according to him the border coming back, and the required "ArriveCan" docs, made it so much of a hassle that he says he wouldn't try again until he was sure the crossing would be easier.) And as good as those Cowboy machines are, once you factor in DUTY and dollar exchange rate, they are a LOT of money. Since the machines are not actually made in the US, duty will have to be paid coming into Canada, and with the exchange, they're really not that attractive to us Canadians. And getting an industrial table and machine into most cars could also be a challenge. Besides, I think Blanka has been looking for a used machine that she could get right here in Montreal. If it wasn't for all that crap (especially the duty and exchange rate) I'd LOVE to have a Cowboy machine. SIGH (Hey @Blanka, if you are reading messages here, I sent you a private message on May 19th, which you haven't read yet. Perhaps as a new member you didn't know where to look... Upper right hand corner.) -
Congrats on the new machine! But geez, your message is really hard to read, at least for these old eyes. Paragraphs would make it much easier.
-
As you know, I'm quite new to hand-stitching leather and while I've been improving, all the items I've made so far have been quite small. Even so, it's been a bit awkward for me to manage the length of thread I need. (Two needle Saddle stitching.) How do you manage long stitching runs? Like when doing a belt for example? Do you break the stitching into small sections and lock the thread and then start again? Surely you don't pull enough thread to go around the whole belt, and probably not even enough to do just one side of the belt. I'm planning on making some bag straps where the entire stitching will be visible and the straps are each going to be close to 30" long. That's 60"+ to go all around and using the often stated guide of 4 to 6 times the length, I'd need my thread to be at least 20 FEET long! (That's 4 times.) If I used 6 times, it would be crazy long, not that 20 feet isn't crazy enough. (I'm almost tempted to use my sewing machine for this instead of hand-stitching. ) So what advice do you folks have?
-
Chuck, is the reason for rounding the ends of the belt loop for looks, or something else? I can't see that square ends or rounded would make any difference here. First it won't be seen, and second, there's nothing that the end of the belt loop could catch on if it had square corners. It was never the loop itself that was catching but the whole pouch.
-
I think in my case, the way I wear the pouch and how the belt loop attaches to it, is a lot closer to a tug of war than it would be for any other kind of bag. So far, in all my other uses of rivets, they have never failed me even once. But you know what most often catches my belt pouch? Getting out of my car. The seat belt often catches on the front edge of the pouch as I get out, and I don't notice it until I get to the end of the seatbelt slack and then pow! it hits me. That's something that really happens often.


