


DoogMeister
-
Posts
86 -
Joined
-
Last visited
Content Type
Profiles
Forums
Events
Blogs
Gallery
Store
Everything posted by DoogMeister
-
Thanks for the tip. I'll check them out.
-
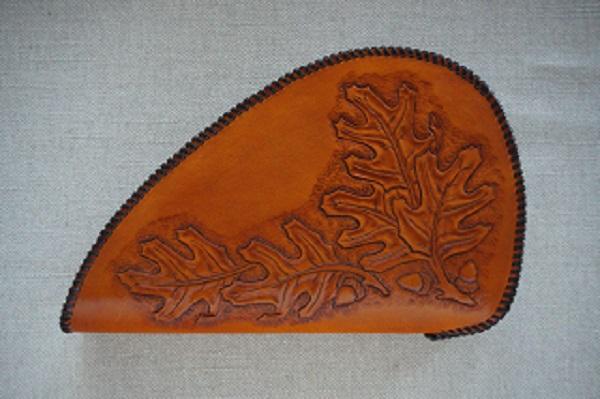
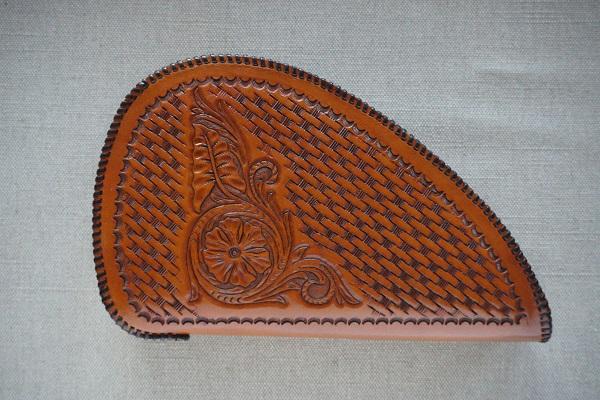
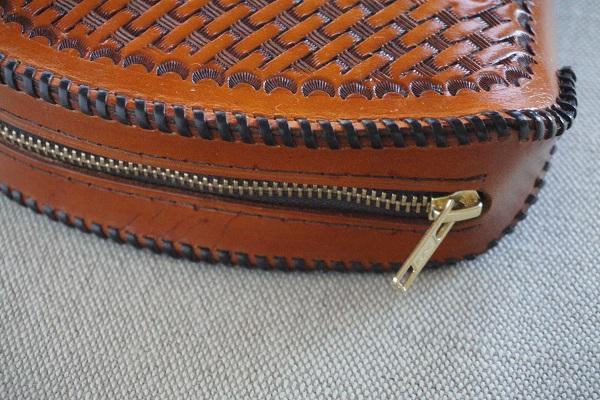
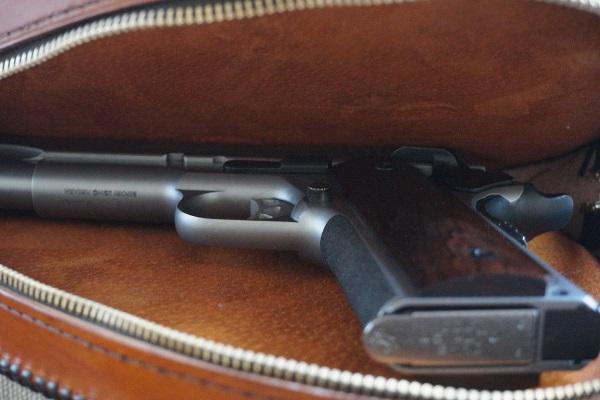
Made this as a project for myself. The Factory case is severely worn, and no longer provides adequate protection. I got he pattern in a Tandy holster pack, and had to adapt the shape for the 1911 (shorter and wider). First time using a gusset and a zipper, so that along with a pattern error cased some extra work. The pattern shows both ends of the gusset as a radius the same width as the gusset. However, the 'notch' in the body at the grip end is quite narrow, maybe 1/2". I did temp stitch the gusset in place (after installing the zipper) and found this out, so made a pattern that reflected the true shape and a 2nd gusset. Needed some practice doing zippers anyway. LOL Had some 1/2" hi-density foam that I used for padding, and some suede laying around from another project for the liner. Used some leather protector spray on the suede, so hopefully that will help. Drew a center line on the body, and another guide line for the side with the basket weave and stamped to that line. The visual that the basket weave is not straight puzzles me. It has its share of imperfections, but IMO is a pretty decent case.
-
Got a question about magnification
DoogMeister replied to DoubleKCustomLeathercraft's topic in Leatherwork Conversation
I have a light with a magnifying lens that mounts to my bench. It has a swivel arm so it can be moved around. Wouldn't be without it. Most on the market these days have an LED light. check out Hobby Lobby stores or Harbor freight. the big box stores - such as Lowe's, Home Depot, and Menards will have something similar as well. -
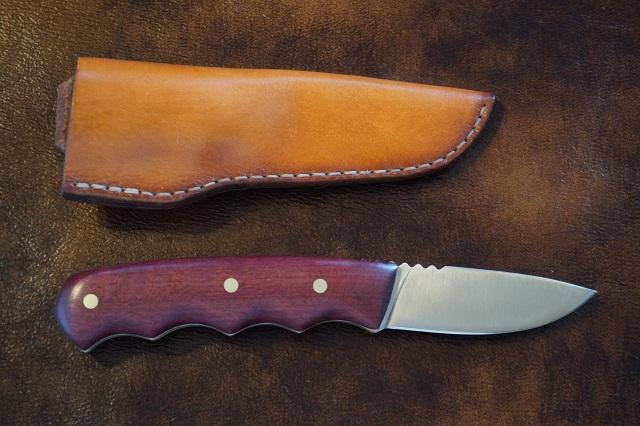
A successful event last night. The knife brought $120.00 for the local 4H. I was happy about that. Several other items did quite well. A hand made corn hole game decorated with a stars and stripes theme bought over $200.
-
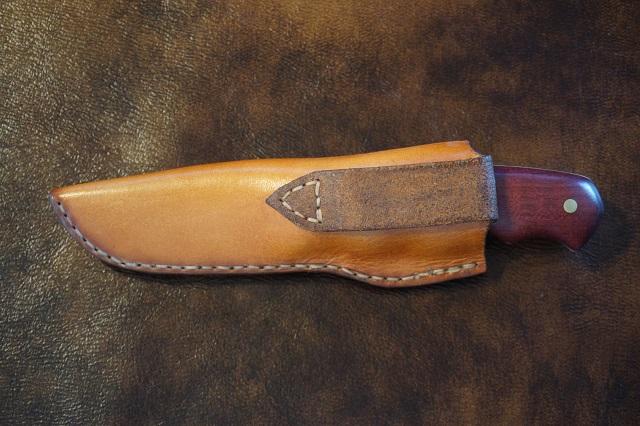
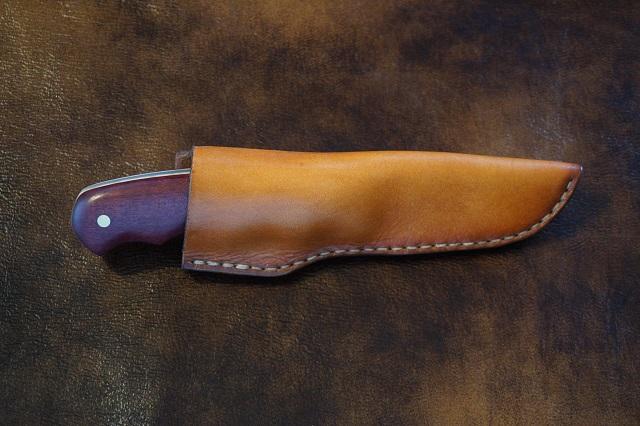
Thank you. Blade is 3", and the knife is 7 1/2" total. Fits my hand well.
-
Thank you. I made a knife/sheath for last year's event, and it sold far beyond what I had hoped.
-
The daughter of a friend of ours is involved in the local 4H. The hold a spaghetti dinner and silent auction fund raiser annually. I made this knife and sheath to donate for this year's event. I buy the blades - I have neither time, space, or funds to get into forging. The scales are purpleheart with curly maple liners, finished with several coats of hand-rubbed oil-base polyurethane. The sheath is 7 oz, lined with some deerskin that is left from a vest I had made many years ago. Feibing's Pro Saddle tan and Spanish Brown on the edges. Stitched with 0.8mm Ritza tiger thread. I wet molded the sheath and let it dry a couple of days before finishing with Feibing's Leather sheen. All applied with an airbrush.
-
Sheath for curved knife?
DoogMeister replied to DaleksInc's topic in Gun Holsters, Rifle Slings and Knife Sheathes
Tandy has a series of books on making knife sheaths. Vol II outlines a process for making a sheath with a top and bottom, with a welt. I've found the first two an invaluable asset and great source of knowledge. https://tandyleather.com/collections/books/products/making-leather-knife-sheaths -
very nice
-
on my computer in the red box it has white lettering that says "Get Pattern". Click that and proceed to the free download.
-
I've been using Feibing's Leather sheen applied with an air brush. Resolene thinned 50-50 with water and air brushed works well also, but the leather sheen has less gloss, which I prefer.
-
Looks nice. Mule deer antler shed?
-
I don't thin the dye for the airbrush, but to lighten the effect. You are correct, it is already thin enough to spray. It takes more coats to develop a darker finish, giving me more time to decide what I want the item to look like. One can always add another coat, but removing too much dye is another story. I like the fact that with the airbrush I can easily do multi-color finishes, fade the color to darker on the edges, and dye the tooling one color and the background another.
-
I've used Feibing's leathercraft cement. Looks like white glue. Apply to the filligree side and press together until set, let dry overnight before using.
-
I use Feibing's Pro dyes, usually thinned with 91% alcohol, almost always applied with an airbrush. Saddle soap to clean any hand oils, etc after tooling, and let dry overnight. Apply Feibing's leather care, and let dry overnight again. I've used Feibing's leather sheen, resolene, tan-kote, and occasionally neutral shoe polish as finishes. Leather shene and neutral shoe polish seem to be my favorites. I've seen some leather that didn't dye evenly. I resorted to a wipe with 91% alcohol after the usual above treatment to get an even dye job.
-
Very nice!
-
Handgun Holsters... how to?
DoogMeister replied to LMullins's topic in Gun Holsters, Rifle Slings and Knife Sheathes
To line or not is largely a matter of personal preference. I've done both. Lining does increase the complexity. I'd recommend making unlined first. There are several tutorials on You Tube for making both holsters and patterns. Watch a few of those before cutting any leather - you will learn much. Put "making a leather holster" into your search engine. I've found that wet molding and forming by hand (I don't own a vacuum machine) to work well for me. -
I use an airbrush, and thin Resolene 50/50 with water. Feibing's Leather sheen (get it at Hobby Lobby in a 4 oz bottle) has a bit less gloss. I air brush it straight. Use a light coat and let it at least partially dry before adding another coat. This avoids the issue with the finish dissolving the antiquing.
-
very nice. What color/brand dye?
-
Beginner here: What brand of thread should I buy?
DoogMeister replied to TestTube's topic in Sewing Leather
Tiger thread. Get from Rocky Mountain leather and don't look back. -
We have to have a sticker on the ATV, but they don't qualify for a plate - would have to be highway legal. ATVs don't qualify in Colorado.
-
We can have ammo in the magazine, but the loaded magazine must be removed from the gun if on an ATV or UTV. I was checked for that again this year. It has become a lucrative item for Game wardens and US Forest service from out-of-state hunters. Showing the rationale for laws, if you are in a vehicle that has a highway license plate, only the chamber must be empty.
-
beautiful work.
-
Here in Colorado, we have to have our guns in a case or scabbard while on an ATV/UTV. I use the cartridge loops so I don't have to dig around in a pocket for them when I stop and remove the gun from the scabbard. Otherwise, I agree - cartridge loops are a quick way to lose (expensive) ammo.
-
Have made several for my own rifles. All have cartridge loops. I mainly use a decorative border and some stamps like deer heads, etc. Did one with basket weave on a large magnum, that one tends to be a bit tough on the cheek. With cartridge loops, decorative carving would be on the inside - the shooter can see it and appreciate it that way. Just a thought.