.jpg.d60258221c476480a6e073a8805645bb.jpg)


Dale
-
Posts
103 -
Joined
-
Last visited
Content Type
Profiles
Forums
Events
Blogs
Gallery
Store
Everything posted by Dale
-
cleaning a glue pot
Dale replied to llasso's topic in Dyes, Antiques, Stains, Glues, Waxes, Finishes and Conditioners.
Do they really make a thinner for Leather Weld? -
What is it you want to do?
-
how do you decide prices for lessons?
Dale replied to Rod and Denise Nikkel's topic in Leatherwork Conversation
Somewhere around your current shop rate would be a good place to start. -
Ooohh. You stropped before using them? Don't do that. You probably made them dull. They're made for surgery...they're sharp. Dale
-
First, try cutting them with a scalpel at an angle -- gives you a thinner edge. The edge looks more natural for leaves and the scalpel probably gives you fewer fuzzies than a lot of little cuts with the chisels. The fuzzies can typically be burned off. Use a lighter or something with low flame...blow torch is too much! Dale
-
Tell the truth, Kathy. The only reason it won was because of that fabulous piece that just happened to be passing through your clutches during the time of the occasion!
-
Happy Birthday Clay.
-
Regis, I don't think there's any clear answer to your question(s). Different people buy them for different reasons. Speaking only for myself, I probably started laying out big bucks because of ego, the sales pitch, and ignorance. That's not to say I don't have some great tools, but I also have some expensive tools that I don't use. Today, I would have to say I go after the more expensive ones because of consistency (you can use like tools of different size the same way each time, and like face textures, such as cross-hatch, are consistent between tools) and ease of use (it's easier to get the look you want if the tool is shaped well to begin with). Dale
-
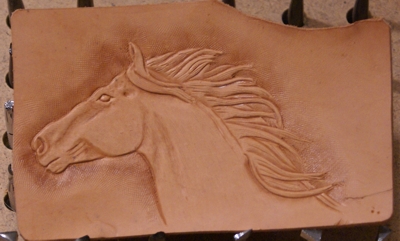
My local guild meets at the Tandy store in Colorado Springs. At our gathering tonight, I decided to tool a sample using the tools in the store. The result is the attached photo - it is low res, but it is representative of the actual piece. The leather size is 3" x 5". One of the reasons I did this was to dispel the myths that abound that you can't get a good carving with the entry level tools. Every tool used on the sample below came off the rack (except for the mallet and swivel knife which were previously used by students in the store). I would encourage newcomers not to be afraid of entry level tools. If you're unable to figure out how to get a tool off the rack to work the way you want or can't get a carving to look the way you want, ask a more experienced person to help figure it out (how else would you know you're not just using the tool wrong rather than having a poorly shaped tool?). I know there are challenges with some of the production runs these days. I also know they're being addressed. But I'd really hate to think we're running newcomers off by telling them they need a bunch of $75 tools when they can get the same result with a $10 tool. Incidentally, I would encourage those looking for modeling tools to check out TLFs new line. Some of them could use a little work coming right off the shelf (same as 20 years ago), but they are much improved over the most recent line. Dale

-
I've used several acrylics over oil dye (I don't think I ever used Cova). I've used Liquitex, but not Ceramcoat (these are what you two are using, right?). Kathy, I agree that acrylic doesn't wear well on the functional stuff, but it sounds like you've had a more discouraging experience than I've ever had. I'll try to take a comparison photo and post it later tonight.
-
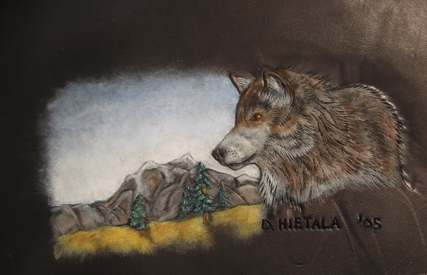
Kathy, I'd like to find some incredibly humorous way to say I disagree with you, but I got nothin'. Nevertheless, I still disagree with you. The photo below is acrylic over oil dye. Unfortunately, I also don't have a good idea as to the cause of the original problem identified. It sounds a bit like a thin paint trying to cover a waxed or sealed/polished surface. Something else seems to be amiss - have you had other difficulties with that piece of hide? I'm curious to see what everyone comes up with. Dale
-
Peter Main uses Crescent #215 hot-press illustration board for that purpose. Check art supply stores. I've also heard of using sealed posterboard/cardboard, linoleum squares, x-ray film (personal favorite), plexiglass, shelf-liner (though this may be too flexible if you're trying to use a piece larger than the leather you're working on), masking or packing tape described below (you'd need to tape the sticky side that's exposed beyond the leather, too), and plywood. Dale
-
making a light box to trace patterns
Dale replied to Dragons Pearl's topic in Patterns and Templates
Go frosted. Don't overdo the light. Like I said, I used a single fixture. For a 2' x 3' table, two fixtures may be ok. If it's too much, you can take the second one out. -
making a light box to trace patterns
Dale replied to Dragons Pearl's topic in Patterns and Templates
I've made one roughly 15" x 24" - probably based on the size of the plexiglass I got, maybe the light fixture. It's got a single fluorescent fixture, I suspect made for under cabinets. The box is pretty well enclosed, but there is no heat issue. Of course, you can leave one side open, too. There's no reason it has to be closed unless you want it to be more portable. Lumber has a tendency to twist, so use plywood instead (I ended up rebuilding mine). I tried to even out the light distribution with aluminum foil in different configurations, but I can confidently say it isn't worth the pain. I never did get it even and it really isn't a problem for what I need it for. Dale -
Yeah, it's definitely doing some goofy things. I'm sending you a screen print of the last time I tried to reply. When I selected "add reply", it sent me back to the login page and, apparently, lost the input. Dale
-
Firefox 2.0.0.6. No add-ons. Scripts are enabled. If it becomes more of an interest item for me, I'll play with some settings and see if I can find anything.
-
Looks like it is a problem with Firefox, Johanna. I do get the drop down in IE 6, but not Firefox.
-
The only time I have found anything resembling a grain is when trying to use certain stitching groovers. When trying to use it in one direction, it worked fine. Using it in the opposite direction, it hardly cut at all. My assumption was that it had something to do with the direction of the hair growth, but I never really investigated much. My solution was a different stitching groover. Clay has pretty much covered the strength of different areas of the hide. Other than that consideration, my experience is that there is no significant difference in the way patterns are laid out on the hide. Dale
-
Typically, the faces of backgrounders are flat and matters are more rounded. That makes the matters more useful for fading as Clay describes.
-
I just got a Hidecrafter flier (sale ends 30 Sep). Their Lancer is on sale for $40. If you're looking for a reasonable swivel knife before going high-end, I prefer this one to anything from Tandy.
-
Build a plug as though you were embossing it. Then mold the leather over the plug (instead of the traditional carve/tool some, stretch it, place it over the plug). After the leather dries a bit, you'll be able to tool it. Just don't glue the tooling leather on the plug. When the whole thing dries you can just lift it off the plug. Dale
-
Make a plug, but don't glue the molding/tooling leather to it.
-
Clay, Just drawing in the hair is exactly right. Took about 3 hours. I don't know about Gomer, but I first learned of using a glover's needle from a doodle page Doris Ferweda did. Schoonover told me he also uses a needle on occasion. This is the second piece where I've used it. It's been giving me some pretty good effect with color, too. We'll see how it finishes up. Dale
-
I have used cardboard (or illustration board), x-ray film, sheet metal (aluminum), plexiglass, and nothing at all. Each has its advantages and disadvantages. The most notable tradeoff is between rigidity and weight. The more rigid the notebook is, the more it weighs. The first thing to ask yourself is why you want it stiff in the first place. Dale
-
Duct tape