Brokenolmarine
-
Posts
592 -
Joined
-
Last visited
Content Type
Profiles
Forums
Events
Blogs
Gallery
Store
Everything posted by Brokenolmarine
-
I could say I don't care how things look, but I'm also a woodworker, have been for decades. My leather bench is in the corner of my woodshop. Miss Tina will tell me to "Just knock it together out of scrap, " knowing full well I can't do that.
-

Ren Faire Armor Set - holy cow it's a lot of work
Brokenolmarine replied to donohueleather's topic in Leather History
Looks like you need a codpiece, I bet your little 'uns would laugh at that. Hey, armor that doesn't protect the important things.... but seriously, impressive work. -
Mermaid strap
Brokenolmarine replied to DustinSmith's topic in Purses, Wallets, Belts and Miscellaneous Pocket Items
Very nice... Something for a family member? I used to draw cartoon characters for the kids. Charlie Brown, Calvin and Hobbes, Garfield, and the Muppets were always their favorites. -
They are cute. My daughter and granddaughter would like them.
-
My Second 22 Pouch
Brokenolmarine replied to Brokenolmarine's topic in Gun Holsters, Rifle Slings and Knife Sheathes
Out in the shop again. Worked on tooling the front panel section of the main panel Will come up with some accent for the corners later. The basket weave isn't perfect, but when is it. I also cut the stitch grooves down the sides for the main panel. This is always MY pucker factor. Slip here and you are starting over. Next I cut the stitch grooves in the side panels, couldn't use the grooving tool on that. I had to use the swivel knife. To insure I didn't make a mistake here I worked from lessons learned. I made sure the cutting hand was anchored to the bench and the knife was VERY sharp. Funny how that makes it LESS likely to get away from you. I used a new stamp to add accents to the side panels, and although not perfect, once I background them, the errors should blend. But, I keep telling myself to "Let it go, it's not a Bespoke Wallet." Then I knocked out the piece for the belt loop. I'll sew that on prior to beginning the assembly. We are coming along. There will be a delay in the completion, so watch for updates. My oldest daughter and family are flying in today from VA. Their first visit since we moved two years ago. They are staying four or five days and then flying back. My middle daughter will drive up from Southern Oklahoma for a couple days as well. The Brother's in law have never met, neither have the granddaughters.

-
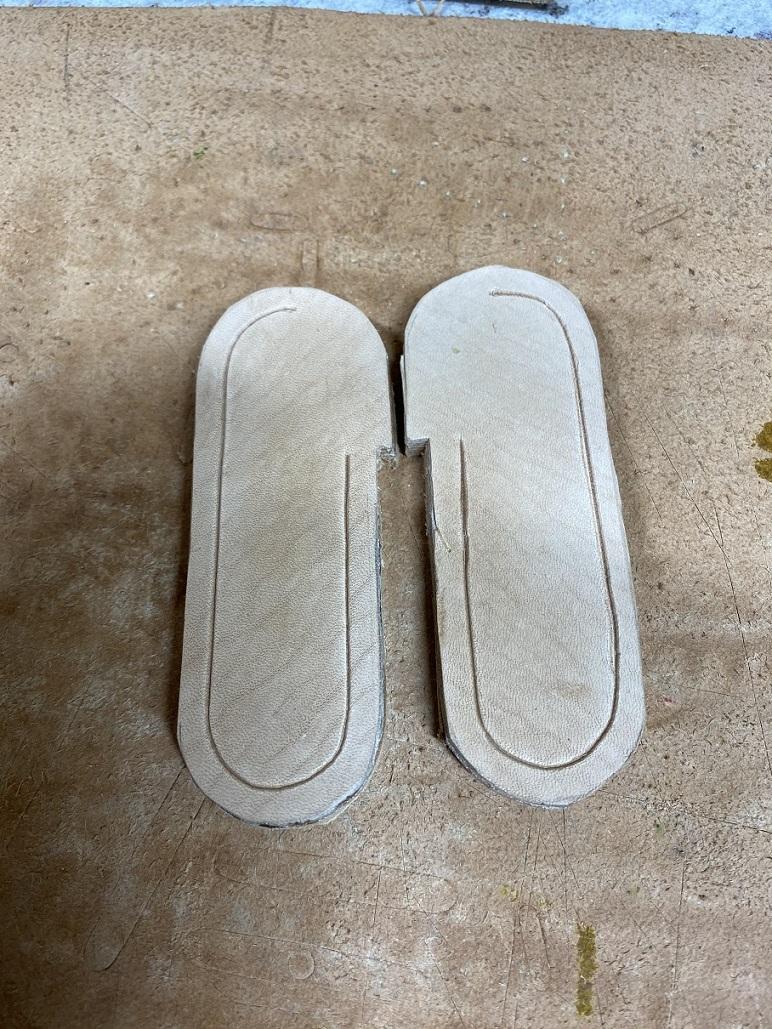
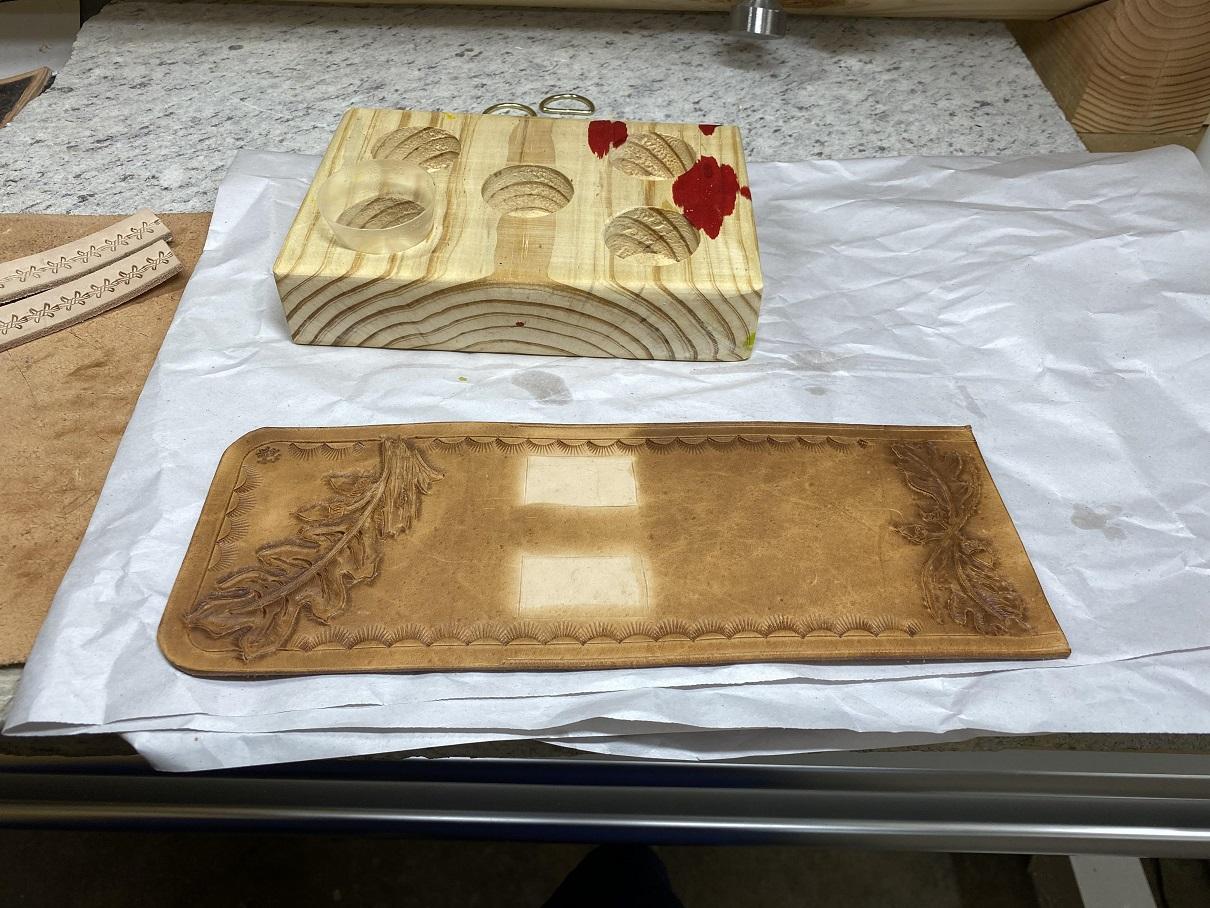
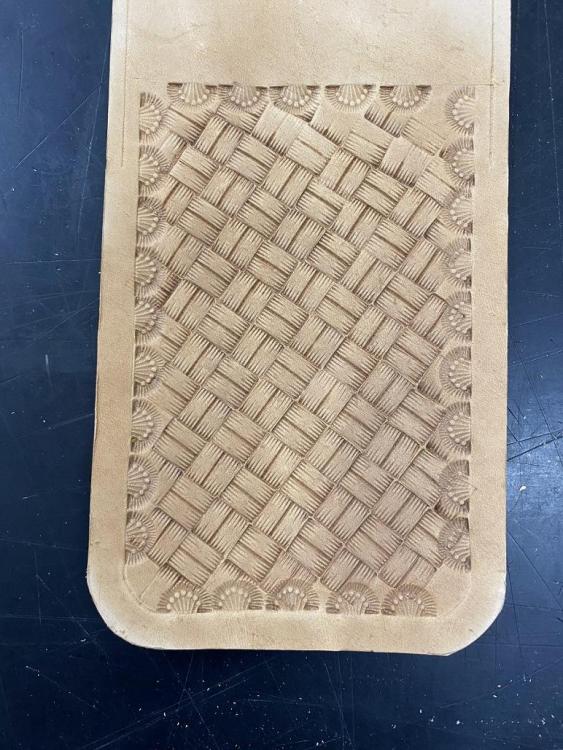
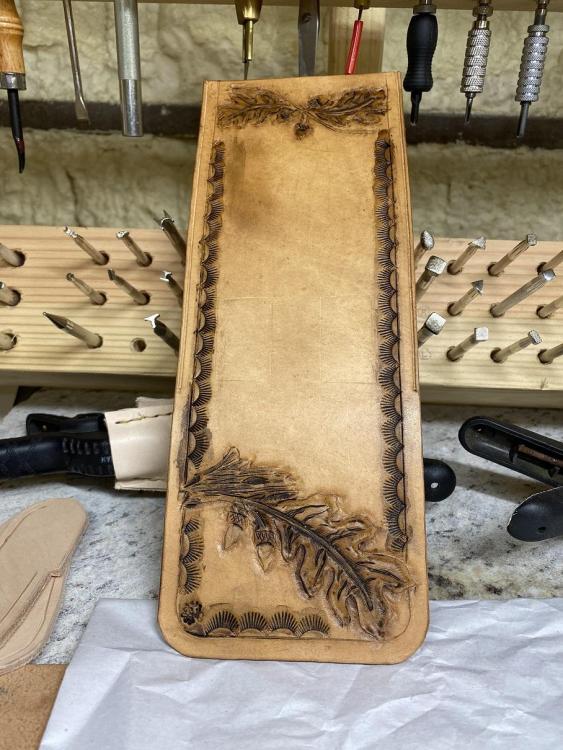
After a break, during which I mailed the first 22 pouch to the recipient, I have gotten started on the second pouch, which I will be keeping for Miss T and myself. The first step was to thicken the sides to make the sewing easier. (A lesson learned.) I carefully marked and cut another pair of side panels, then glued and clamped them to set up overnight. This will make the side panels double thickness. When I put the angled holes thru these, they will come out between the two pieces in a consistent line. Easy Peasy. :D The next morning, I took the side panels out of the clamps, and trimmed the edges to match. Then cut the notch about 3/8" higher. This will make the front panel higher. I will sand the edges smooth and make sure they are smoothly rounded before assembly. I used the side panels to measure the length needed for the main panel. Using a 12" carpenters square, I squared up all the edges on the panel then cut the main panel to 3-1/2" wide and to the length needed to fit the side panel. Using a circle template, I rounded the bottom corners of the front flap. and then marked the stitch lines. Then the borders for the tooling areas. I also marked the area on the back where the belt loop will go. When the prep work was done, I tooled the flap. I decided to go with a basket weave pattern on this one, and may add a concho on the flap at the end as an accent. I haven't decided yet. I may or may not use magnetic closures, but I know I'm going with a belt loop on the back rather than D-Rings. I might even buy a Ruger Wrangler specifically to go with the pouch and make a holster to go with this, and a belt, sized for Miss T, for her to wear around the Farm. Shhhh! Don't tell her. It would come in handy to put down varmints at the coop and around the west barn. She is a sniper with the CZ Rifle but can be deadly with the handguns as well. So far, so good. I like basket weave. Most of the duty gear I wore on patrol was the BW pattern. Both the Department Chief's were fond of it... So. ... like we had a choice. As a firearms instructor I tried to get them to go with Ballistic Nylon. It was much lighter, quieter, and washable. Nope.


-
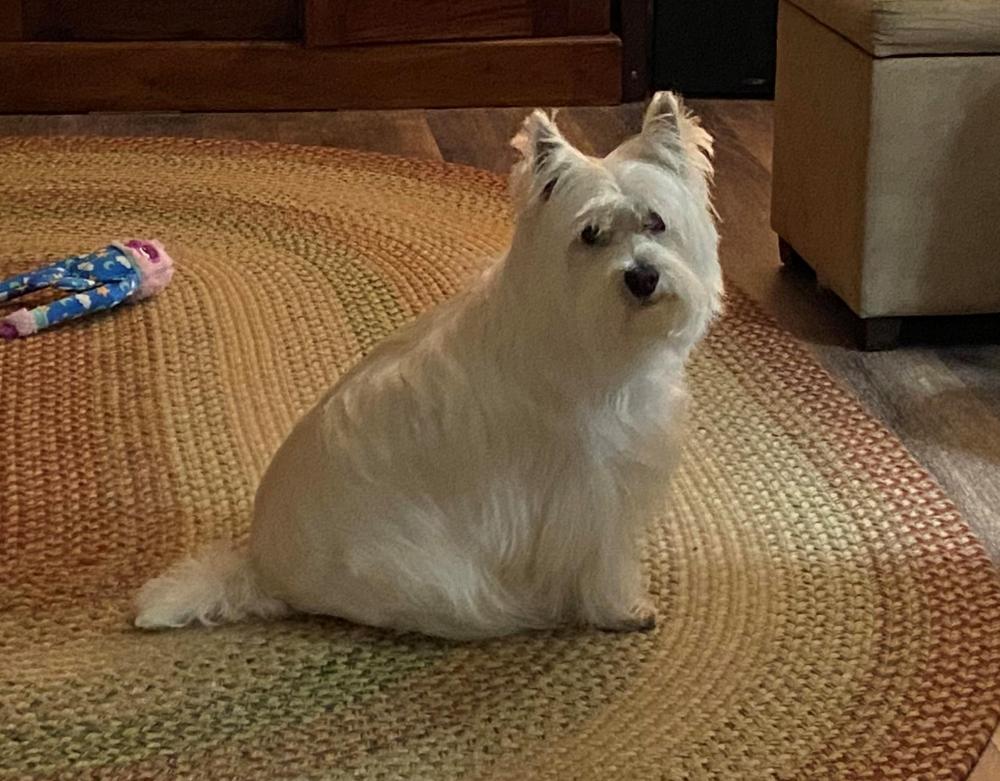
She is a sweetheart. Unless you are a snake, squirrel, rabbit, cricket, etc. She doesn't care for trespassers, who won't pet her and tell her she's beautiful.
-
I have a secret weapon for copperheads.... ... Princess Fiona is a West Highland Terrier and she LOVES to hunt Copperheads. She doesn't understand that they can bite her. She hunts them in the Mondo Grass around Mom's Sewing Shop and shakes them til they don't wiggle, then spits them on the hot concrete. Done. Did a little research on the Westies after we got her. She was a pup and saw a Possum in the yard, it didn't last long. The Westies were bred in Scotland to go into tunnels and hunt rats, fox, or badgers.
-
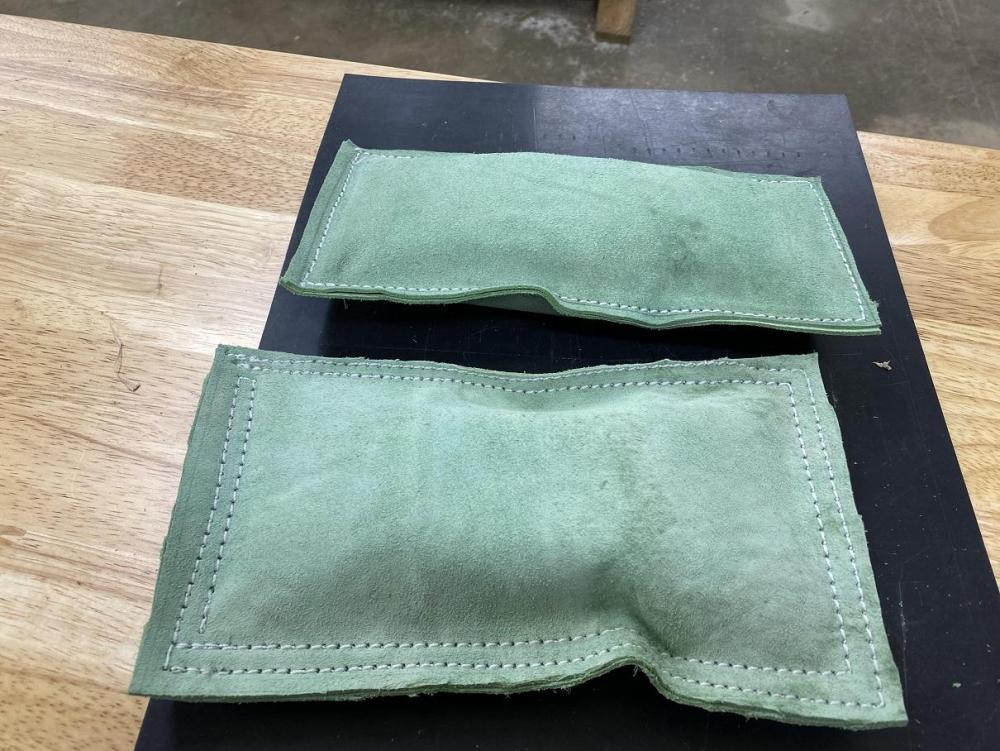
Someone posted up, Need a tool, Make a tool. I have been using an old five pound barbell weight in a sock as a leatherworking weight. I needed a weight or two more suited to the job. I saw the thread and decided, It was time. A couple factors influenced this decision. First: My daughter had picked up a couple hundred dollars worth of supplies for me from a Leather Shop in Southern Oklahoma. Miss T sent him a paypal payment. I got some Chrome Tan, Reptile skins, and other assorted pieces. One of the pieces was some Suede. Perfect... Traction. Second: The wife ordered thirteen tons of Limestone screenings for the cow stalls. She could spare a couple corners of quart ziplock bags of the stuff without missing it from thirteen tons. That gave me the weight I needed. I pulled the green (who cares about the color) suede from the bin, and began the process, then remembered I knew nothing (Okay, little of nothing) about how to sew the dang thing. Miss T has an entire sewing shop right next door to my Woodworking/leather shop. She added her experience by Ironing the suede and helping me square it up on her cutting table. Then she explained the process she recommended to use to sew them up. I brought the oversized pieces back out to the shop and rolled out the 3200 and sewed the three sides, inserted a taped quart ziplock with limestone inside, and sewed up the open end. Boom, nice weights to hold down the pieces as I work them. One less thing to buy. Not bad for a first shot. We went out later and spread the rest of the leftover limestone in front of the Range house to keep down the copperheads.
-
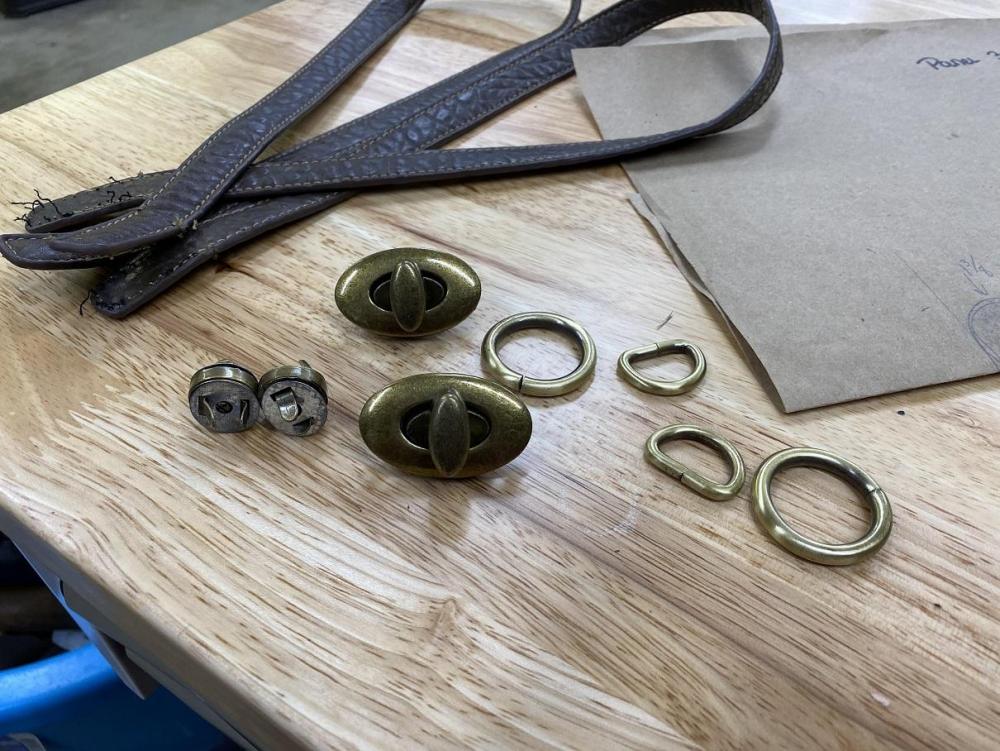
My wife was going thru the closet and was going to throw out or donate a couple of old (leather) purses and / or wallets. I told her to give them to me and I would look them over before she tossed them. It has always been our practice to "Double Check" such things for IDs or information. "I checked them twice." "Nope, I want to see what I can salvage for the leather bench." "Oh, okay, fine." I took them out to the shop, and went through them, every pocket and every slot, and found... Brass Rings to reuse Some cool latches to reuse and some magnetic closures I was going to order for my next project. ($10 each.) I didn't find any cards or IDs. (NOT that I was looking.) I don't know about the rest of the gang, but this is not the first time I have recovered hardware. Old Belts, holsters, and the like. I started checking that stuff as soon as I started doing leatherwork. Chicago Screws, adjustments for dog collars, and the snaps and D-rings are all things you normally buy. If they still look okay, or if you are making a working collar, or harness and aren't concerned with the looks or a d-ring, why not save them. Some items, like the magnets below, will be hidden from view.
-
22 Plinking Pouch
Brokenolmarine replied to Brokenolmarine's topic in Gun Holsters, Rifle Slings and Knife Sheathes
You guys are welcome. I remember other projects, in many other disciplines where hours of work were ruined (in my mind) by a small step at the end where a minor detail is just off. Later someone says, "Oh, all you do is... everyone knows that." But everyone doesn't. A lot of new people don't know the simple little things, and the veterans in hobbies often don't share. Either because they assume, or they feel everyone needs to earn thru experience. I share as much as I can, however, with all my surgery... There are memory issues. What were we talking about? -
22 Plinking Pouch
Brokenolmarine replied to Brokenolmarine's topic in Gun Holsters, Rifle Slings and Knife Sheathes
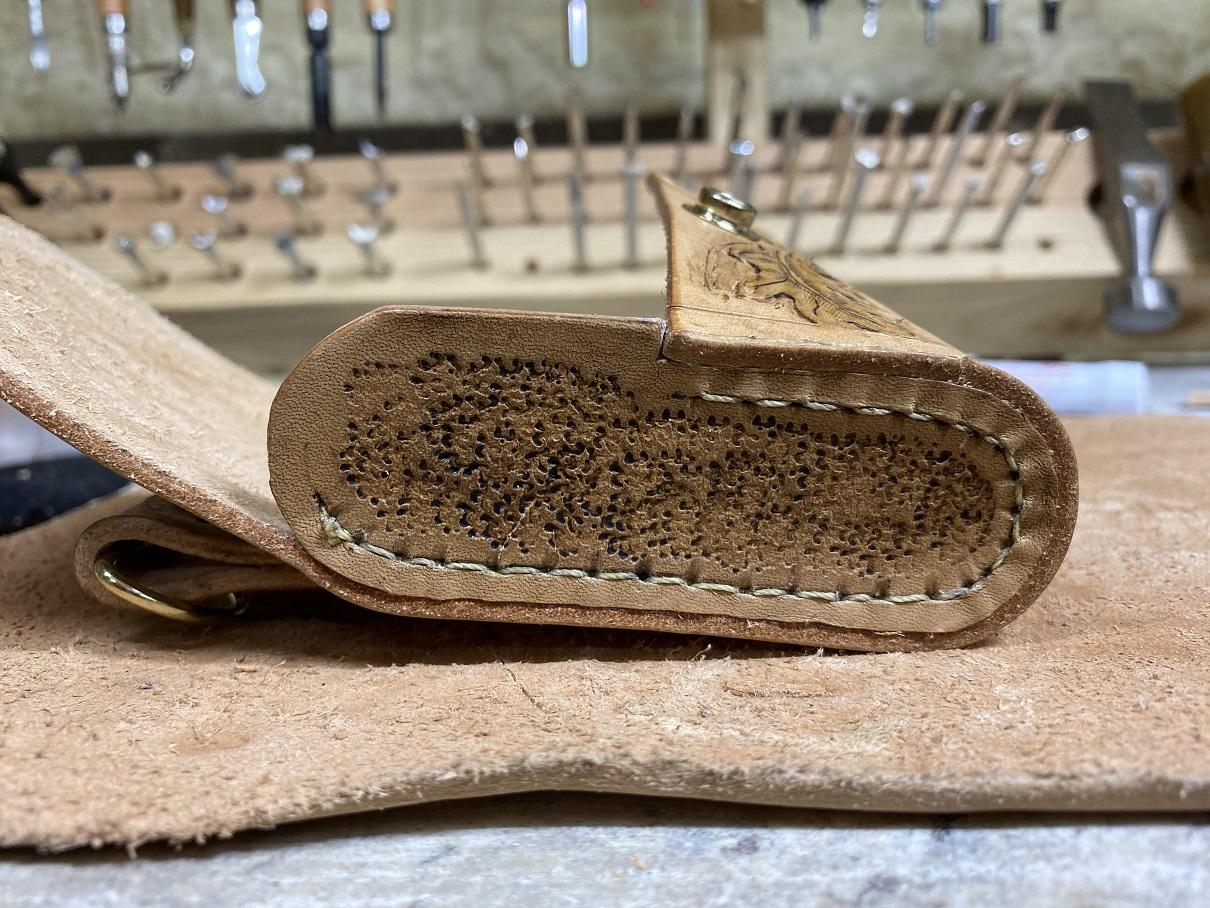
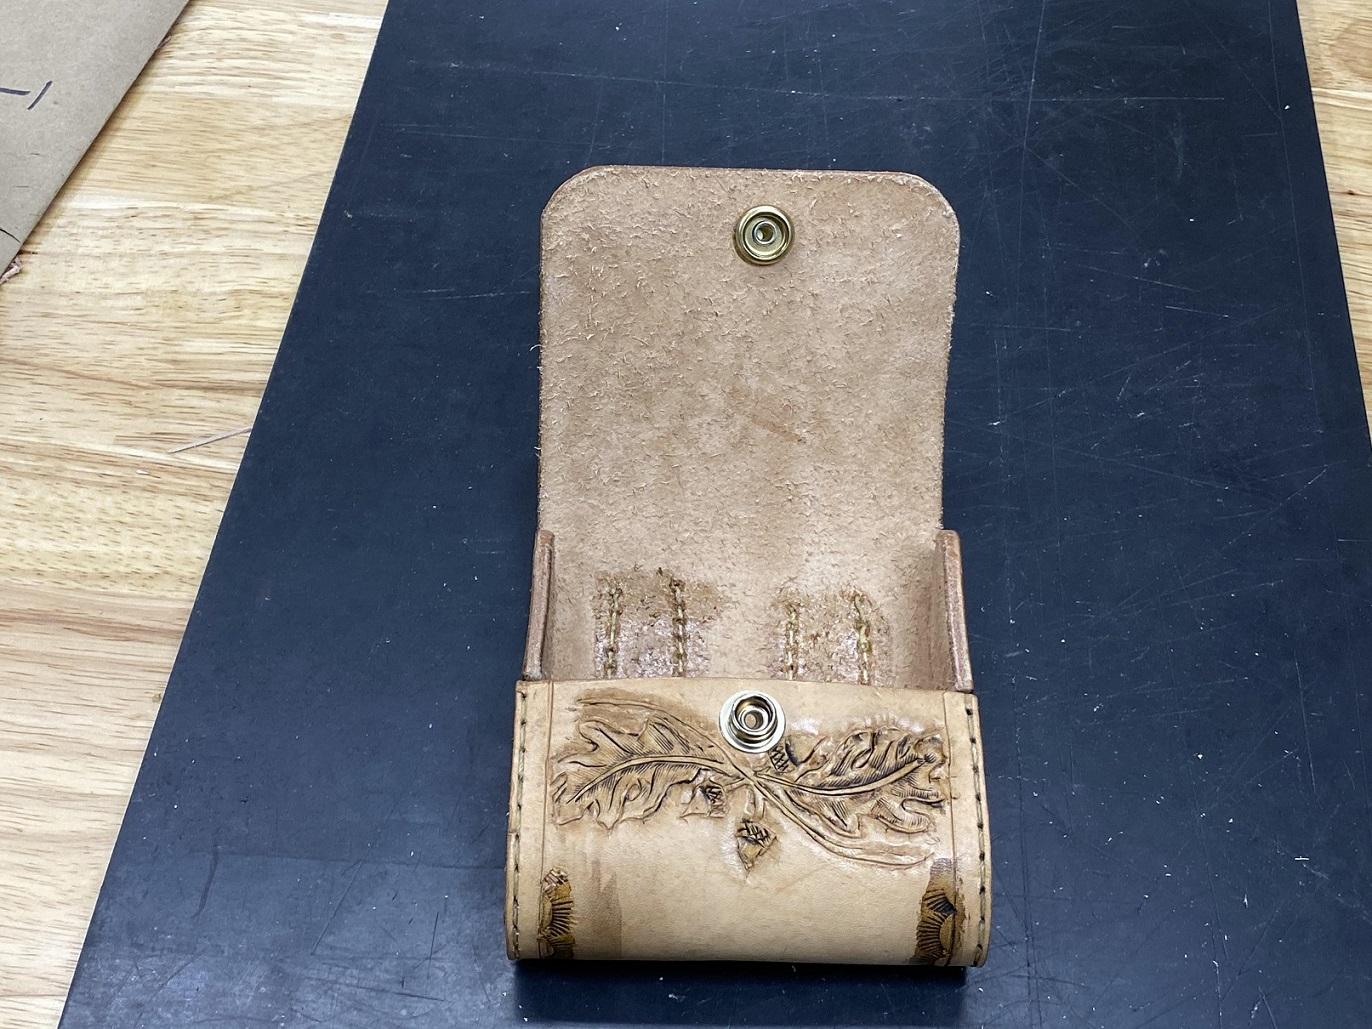
I went out after dinner and got busy sewing. All the prep work made the assembly easi(er) . I was very happy to find that once the first side was completed, it turned out exactly as I had hoped. I won't say it's easy, the box stitch is very floppy for the first few stitches but then as you tighten those it tightens up. You are always leaving the last stitch a bit loose to aid in locating the next pair of holes, then tighten both. Then the last one loosens a bit. At the end the back stitch holds tight and melting the thread locks it. Done... my original design turned out just as I had hoped. I made adjustments along the way, but it worked. Whoo Hoo. It's done except for waxing or a Leather Sheen. I'll let the person who'll receive it decide. Whatever she wants. Here is the view after the first side was done showing the box stitch. Now the view of the completed project. The last step was adding the top snap. Location was easy. I closed it almost all the way, reached in with a marker and coated the top of the bottom snap and then closed the flap, marking the inside of the flap marking the position. Punched the hole and attached the snap. Sweet. I'd use the same technique on woodworking for doors or box lids. The view from the side: and with the top open: Now, I get to start on number two.

-
22 Plinking Pouch
Brokenolmarine replied to Brokenolmarine's topic in Gun Holsters, Rifle Slings and Knife Sheathes
Once the hole is fully formed, use the pencil trick, inserting the pencil from the edge side and twist. You are rounding the hole and leaving the target bullseye for sewing. Working your way around, you will eventually end up with the finished product. I have found that this process takes at least two to three times longer than the main panel which is just a straight hole thru the leather. I would imagine with a lot of practice you can speed it up. With my challenges, I know when to stop, so I took a break again after the one side was completed. Working tired or in pain is a way to ruin a piece of a project and set yourself back. I learned the hard way. Most of the mistakes I make are caused by fatigue or forgetting a step. (Like not applying a sealant before antiquing.) I'll prep the other side in the next session, then we can SEW!
-
22 Plinking Pouch
Brokenolmarine replied to Brokenolmarine's topic in Gun Holsters, Rifle Slings and Knife Sheathes
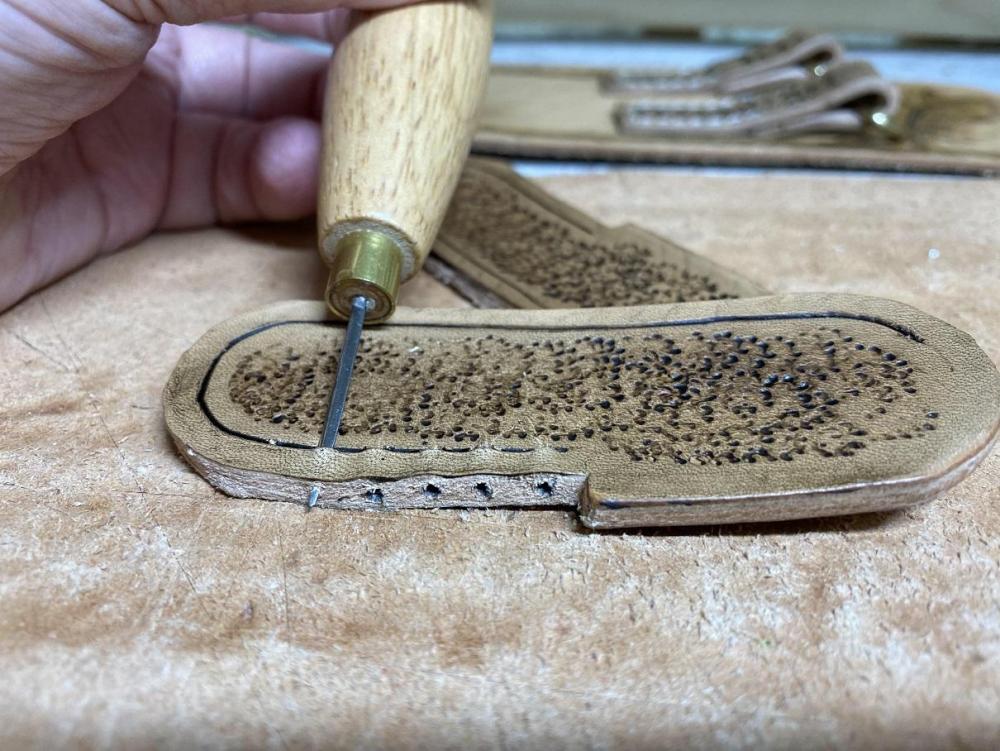
Back out to begin the process of prepping the side panel. Attention Pastor Bob. The first step here is to Align and mark the holes from the Main panel. I marked the first hole, then created it using the awl. I then pushed a leather needle thru the matched pair to anchor the main panel to the side panel to insure they stayed aligned and marked the first half dozen. I removed the main panel and formed the first marked half dozen holes. I reset the main panel and put a needle thru the first pair and the last matched pair and marked another half dozen. Repeated the process until all the holes were marked and created. For Pastor Bob, here is the process.... First, insert the awl straight down and push and twist to create a reference hole about 1/4 distance into the leather. Then push the awl toward the outside edge at an angle that will result in the tip exiting out in the center of the edge. Next, reverse the awl and come back thru the hole from the edge, up into the original hole until you clearly see the tip, and twist. I put my fingertip on top of the leather to prevent tearout. DON'T get aggressive at any point during this entire process.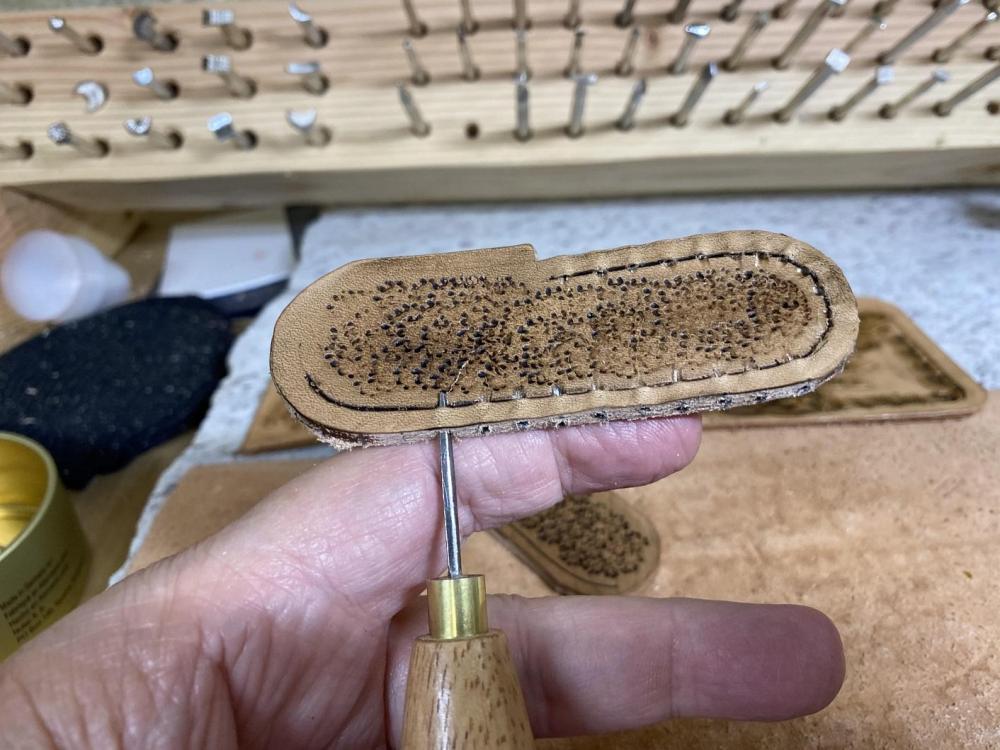
-
22 Plinking Pouch
Brokenolmarine replied to Brokenolmarine's topic in Gun Holsters, Rifle Slings and Knife Sheathes
Slow and steady again, the only way to fly. I worked my way around the panel and got all the holes done. I took a break to rest the aching hands. The main panel is ready. After lunch and a few episodes of Big Bang Theory, we just got the box set, I'll come back out and work my way around the side panels. THOSE holes suck. You have to match up the spacing to the main panel, then use the awl to create the holes. They must come thru the edge in the center. Get the angle wrong and you tear out the upper edge. Anywho, we are ready on this panel.
-
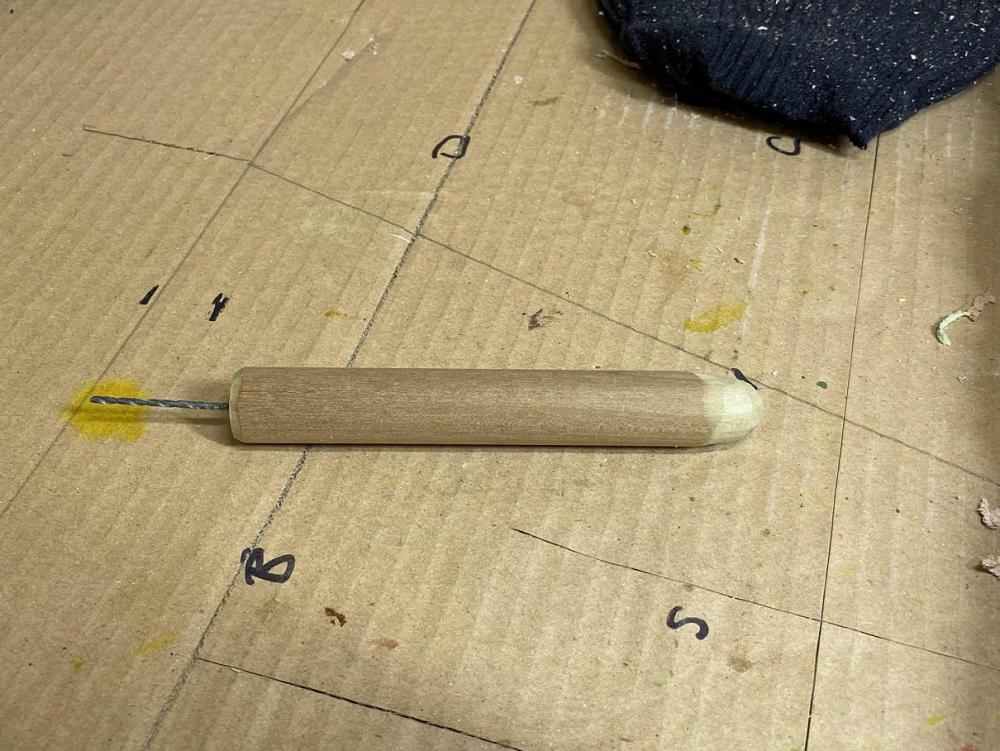
22 Plinking Pouch
Brokenolmarine replied to Brokenolmarine's topic in Gun Holsters, Rifle Slings and Knife Sheathes
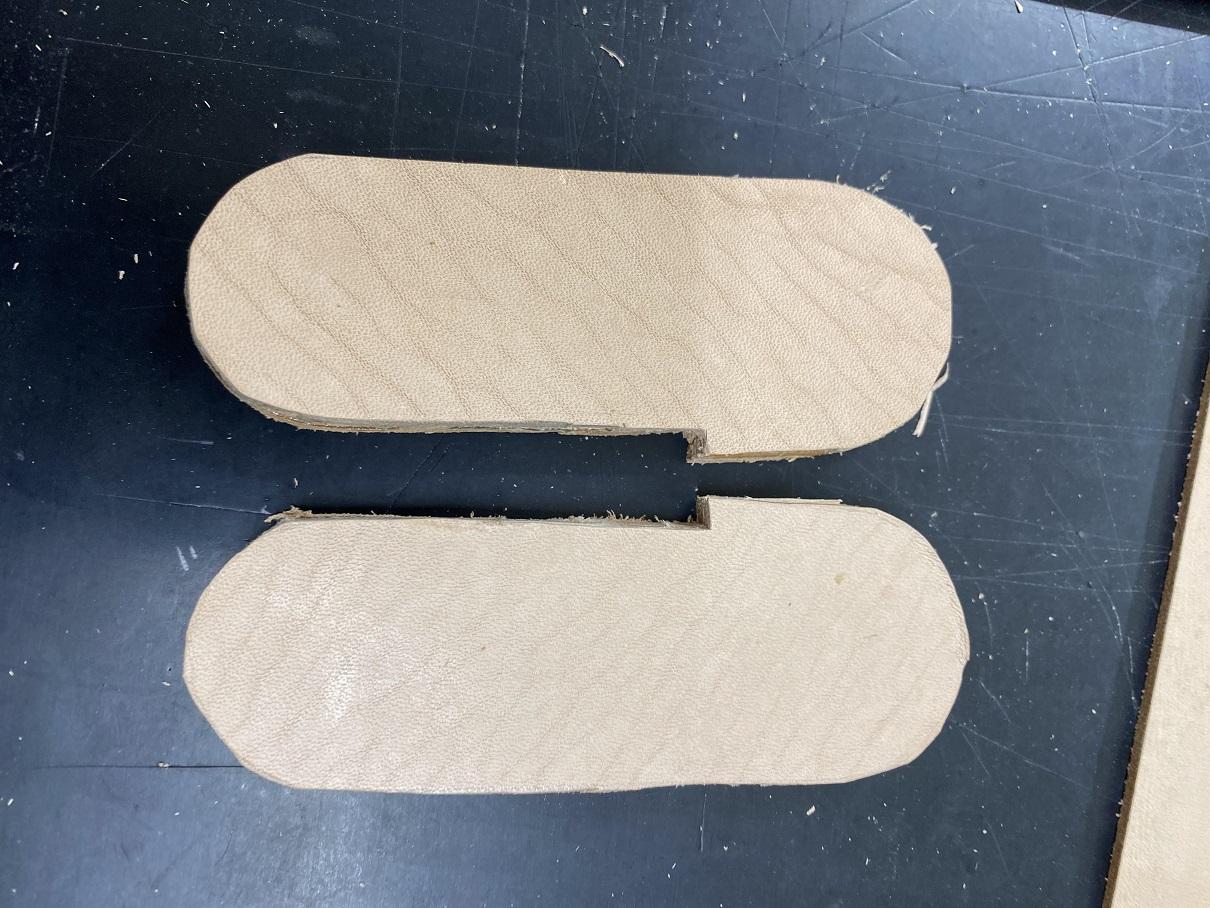
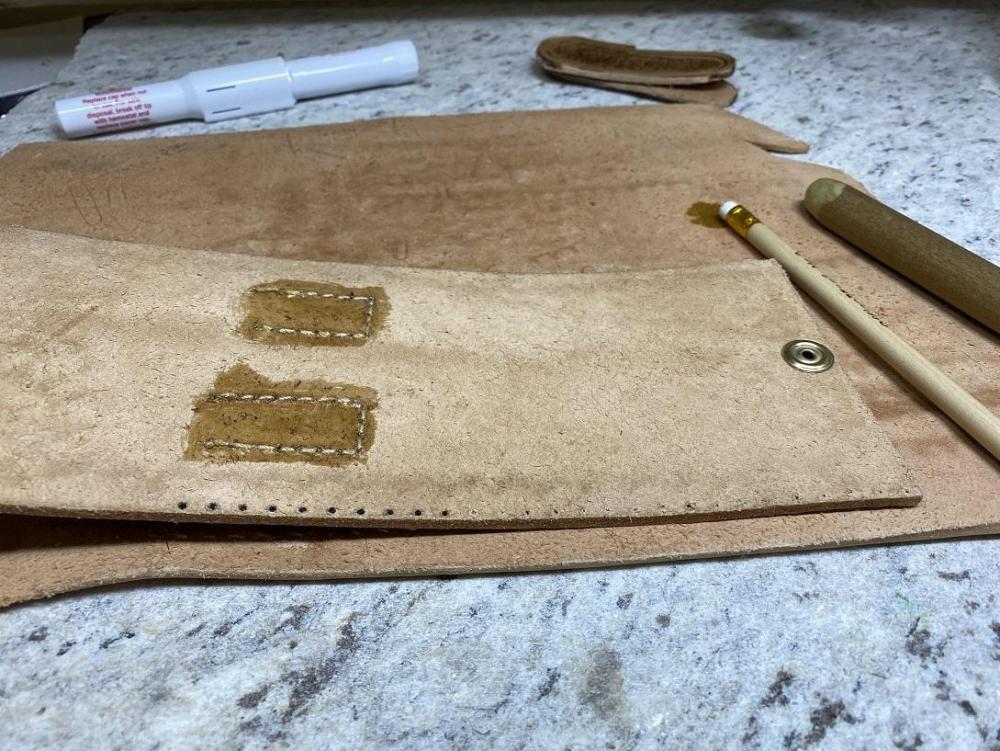
First step this morning was to carefully measure and mark, then punch a hole for the bottom snap for the pouch. Once that was done, I seated the snap. I didn't want to forget after the holes were created for sewing and have to try and seat a snap inside the pouch once it was all put together. It's NOT easy. Don't ask me how I know. Time to mark and create the holes for box stitching on the main panel. Using the pricking forks, I laid them out and normally I'd take the panel to the drill press, but sometimes it gets carried away and this close to the edge with the bit turning so fast can tear out. Too much time invested to take the chance, so hand work. No awl small enough. Need a tool, you can make a tool. Seen it often, so I ... made a tool. I used the tool to create all the holes I needed. Then, as I did on a previous project, I used a freshly sharpened pencil on the back side to slightly open the back side of the hole, then twisted the pencil to create a graphite bullseye to make the hole easier to find when I start sewing the piece together. You can easily see the difference in the next pic between the ones that are treated and the ones waiting their turn.
-
22 Plinking Pouch
Brokenolmarine replied to Brokenolmarine's topic in Gun Holsters, Rifle Slings and Knife Sheathes
I pulled out the big gun, MY Cowboy 3200. I don't have much time at the controls of this guy, so I had a high pucker factor here. Slow and Steady were the watch words. I was tense thru the whole evolution, but I was happy with the outcome. When it was done, I painted the back side of the stitching with a thin coat of contact cement to protect the stitches from the future pouch content and to insure they stay anchored. Tomorrow morning I will set the bottom snap, then began the process of box stitching the project together. The top snap on the flap will be the very last item on the agenda other than waxing.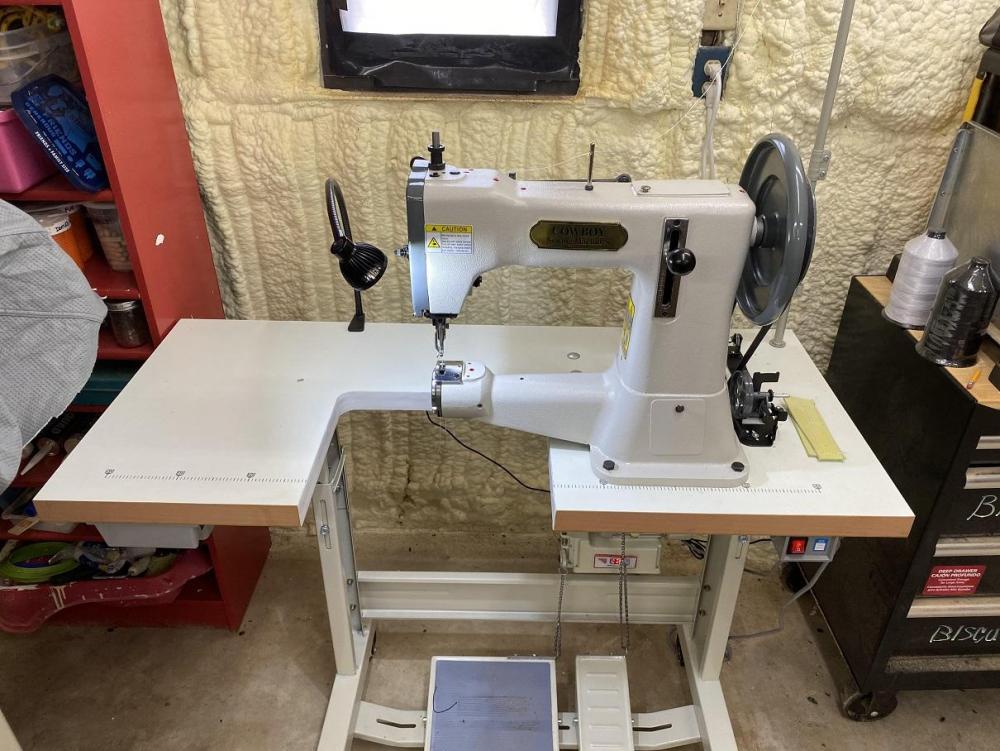
-
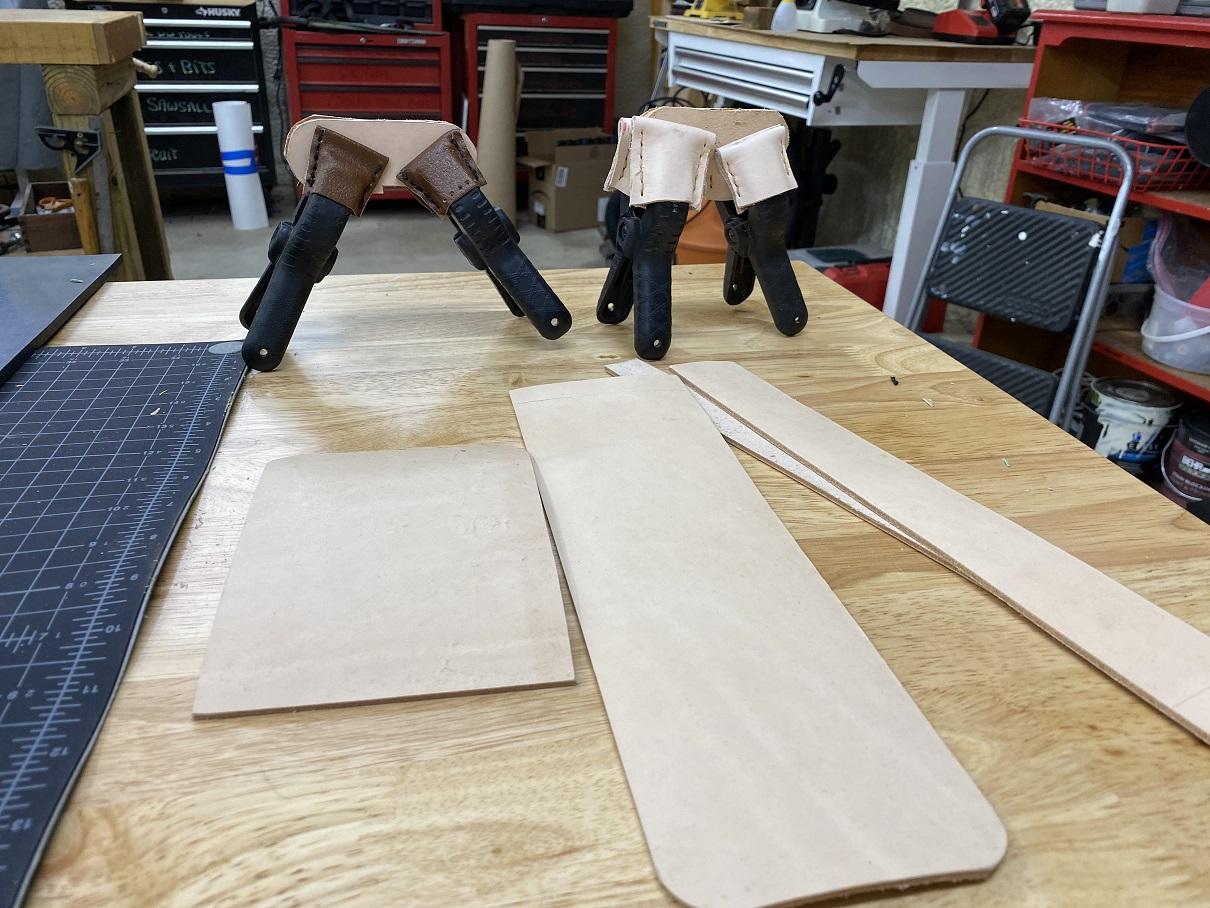
22 Plinking Pouch
Brokenolmarine replied to Brokenolmarine's topic in Gun Holsters, Rifle Slings and Knife Sheathes
While the straps are setting, I worked on the side panels. Oiled them, burnished the short section of the side panel that WOULDN'T be stitched, and then antiqued it. We are just about ready to start stitching, beginning with stitching the straps down to the main panel. Everything is good. Ready in the wings is a 2nd Pouch Kit. I'll start on it when this one is done. I have to decide which way to go. Make another similar kit to this one and let my friend decide which she likes better? Go with Basket Weave and still let her decide? Meh, whatever. We'll be good with the leftovers, Miss T likes both.
-
22 Plinking Pouch
Brokenolmarine replied to Brokenolmarine's topic in Gun Holsters, Rifle Slings and Knife Sheathes
Began this morning by prepping the main panel and the straps for glue up by scratching the surface with the sharp tips of the beveler. I know they make a tool for doing it, but it's like $30. This works. This insures good adhesion of the contact cement. Next, VERY carefully paint the prepped areas with the contact cement. A drip of cement sucks. Finishes don't penetrate the drip, nor do they cover it well. I learned this the hard way. After the cement is tacky, CAREFULLY place the straps in the areas defined for them. FACING the right direction. Placing them upside down would be VERY bad. Not that I would ever do this... This might ruin the project unless you could pry the strap off and get another one on in it's place that covered your error somehow by a thin stroke of luck.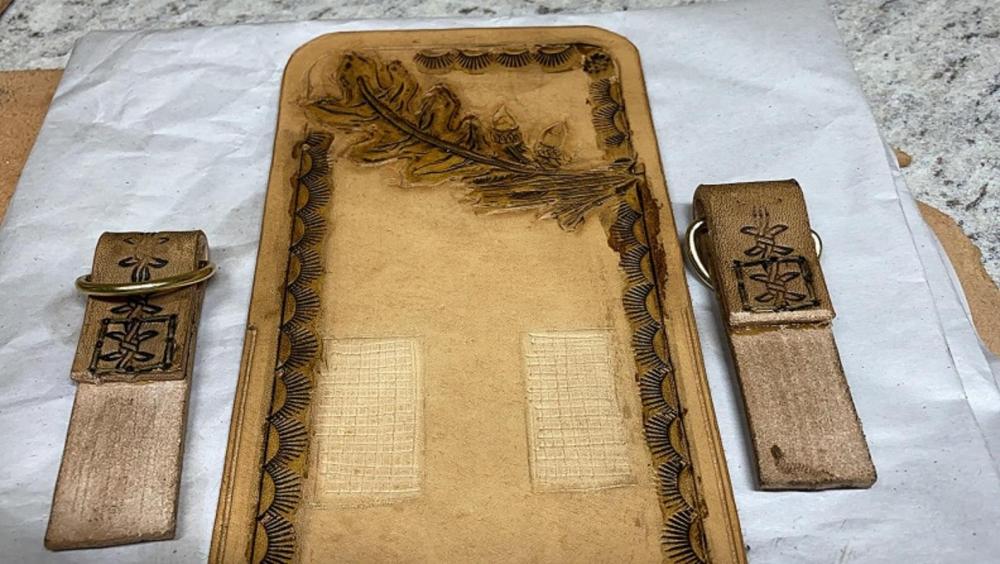
-
22 Plinking Pouch
Brokenolmarine replied to Brokenolmarine's topic in Gun Holsters, Rifle Slings and Knife Sheathes
PB, When you try the Box Stitch, the top flat thru line of stitches needs to be centered based on a measured width of the side panel. The angled holes in the side panel need to come thru in the center of that upper contact edge. These two points will insure your edges match when you tighten your stitches. The holes on both need to be carefully aligned. To help you see the holes when sewing, take a lead pencil, and insert it in the back side of each hole and twist. It slightly opens the hole, and leaves a graphite bullseye around the hole for a nice needle target. These tips were hard earned thru practice and much cursing. The latter is likely inappropriate for Pastor Bob. . Good Luck, learning the stitch opens up new projects... Anything built around a box. I.e. Tissue box cover. -
22 Plinking Pouch
Brokenolmarine replied to Brokenolmarine's topic in Gun Holsters, Rifle Slings and Knife Sheathes
I antiqued the straps, and oiled the side panels. Tomorrow, I will antique the side panels and while they cure I'll sew the straps on the main panel in the space alloted. I will prepare to begin assembly. This means marking and prepping the holes for Box stitching the main panel to the side panel. Pucker factor will be high. We might have a finished project tomorrow.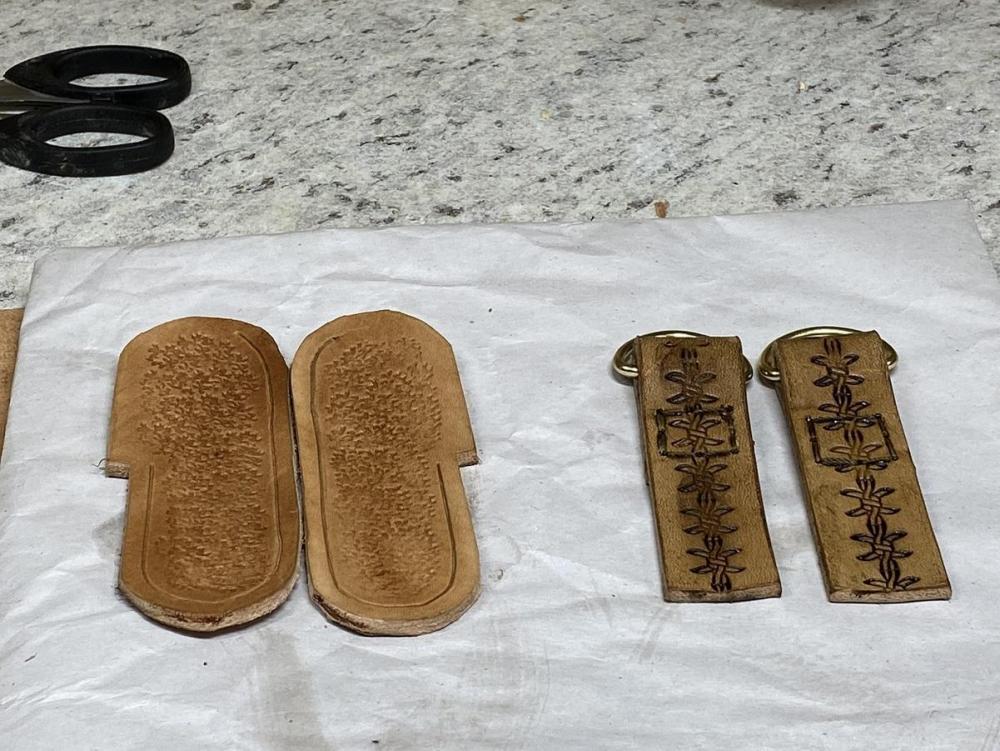
-
22 Plinking Pouch
Brokenolmarine replied to Brokenolmarine's topic in Gun Holsters, Rifle Slings and Knife Sheathes
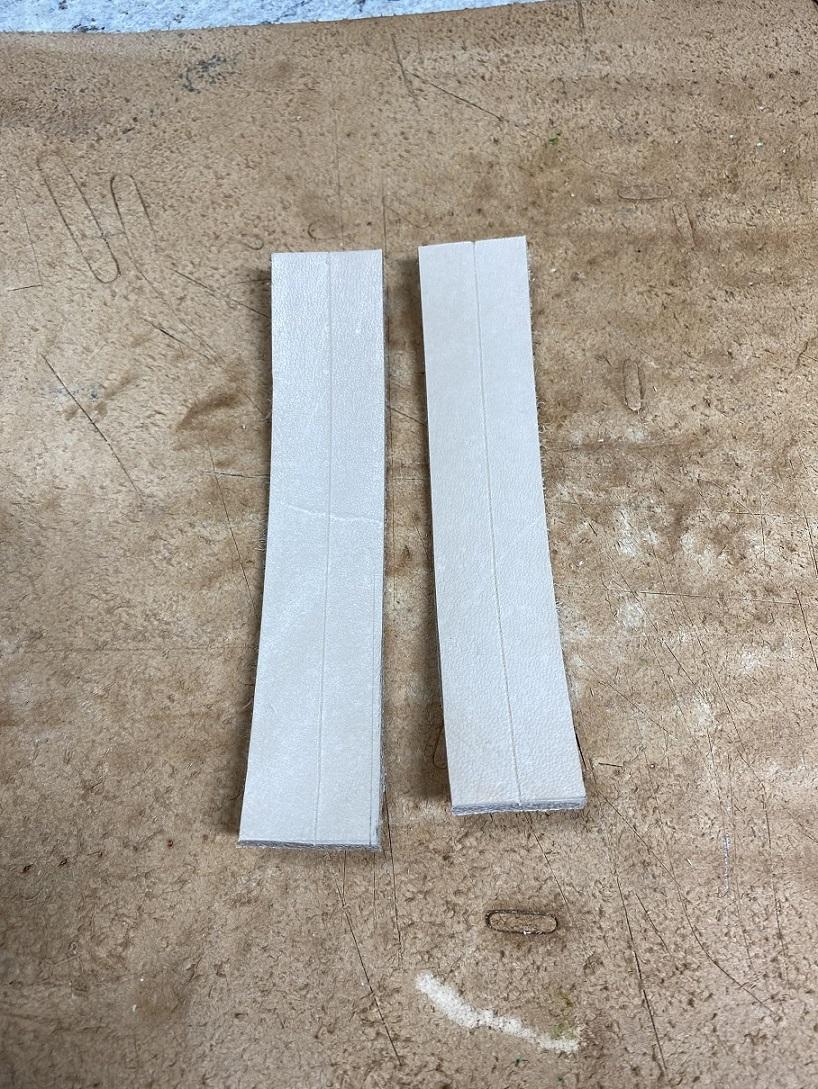
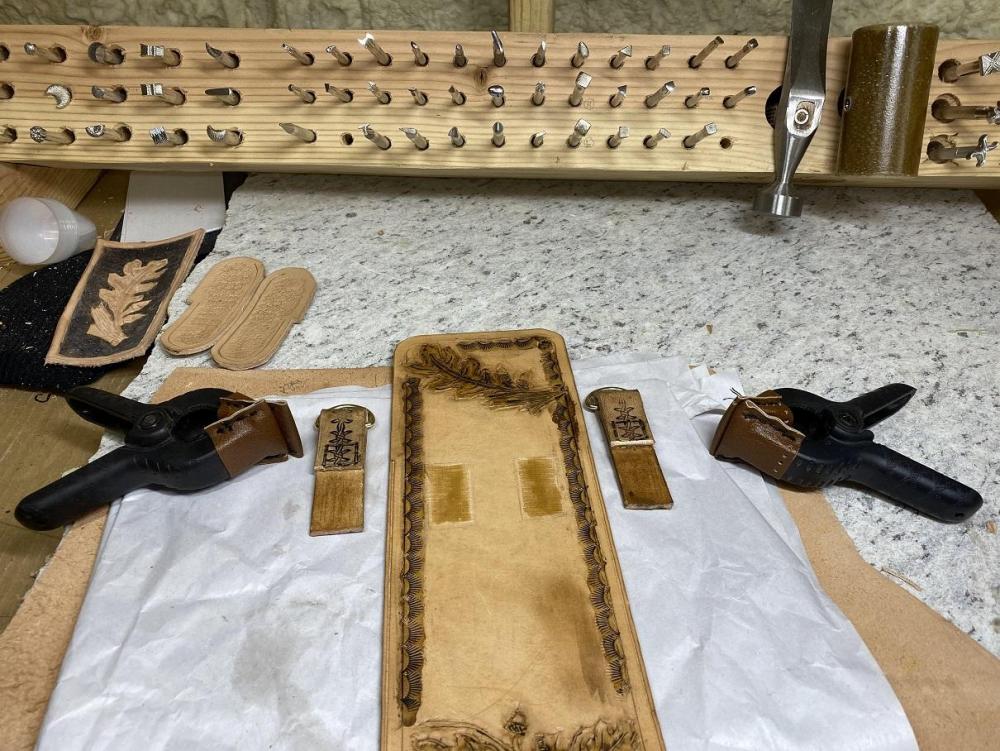
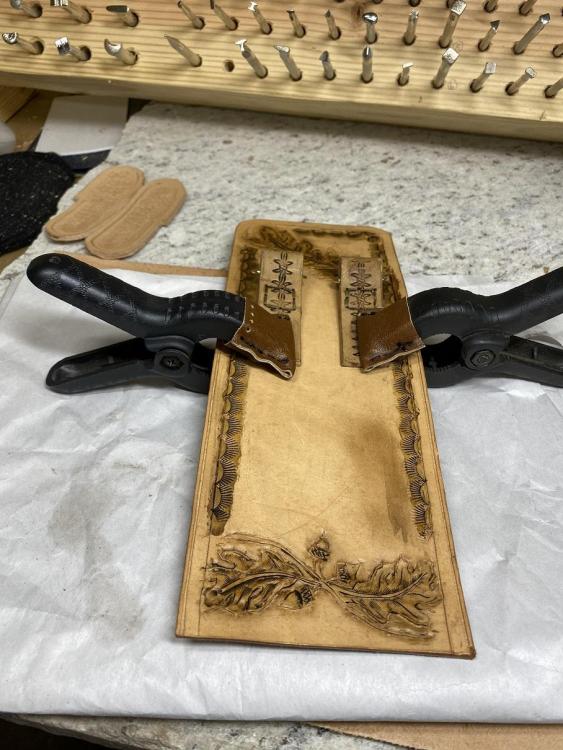
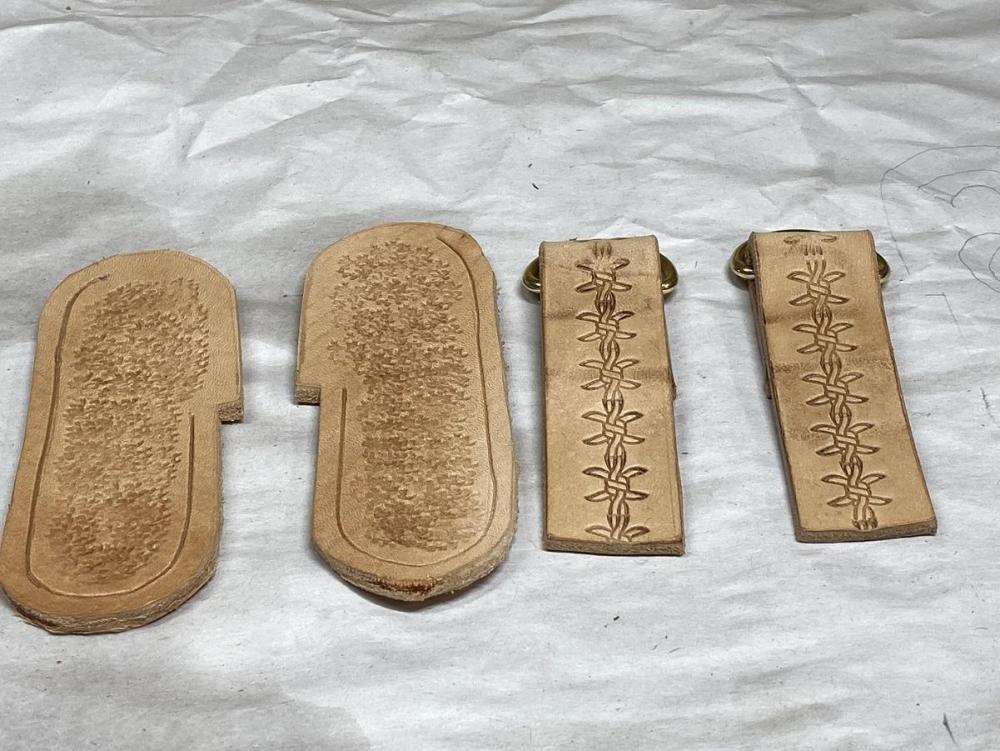
I oiled the straps and burnished the edges, preparing to build the D-Ring straps. While the oil dried, I worked on the main panel, antiquing and applying Mink Oil to keep the leather supple. The side pieces and D-rings got attention, I had glued and clamped the straps and they were ready to be sewn. I textured the side panels.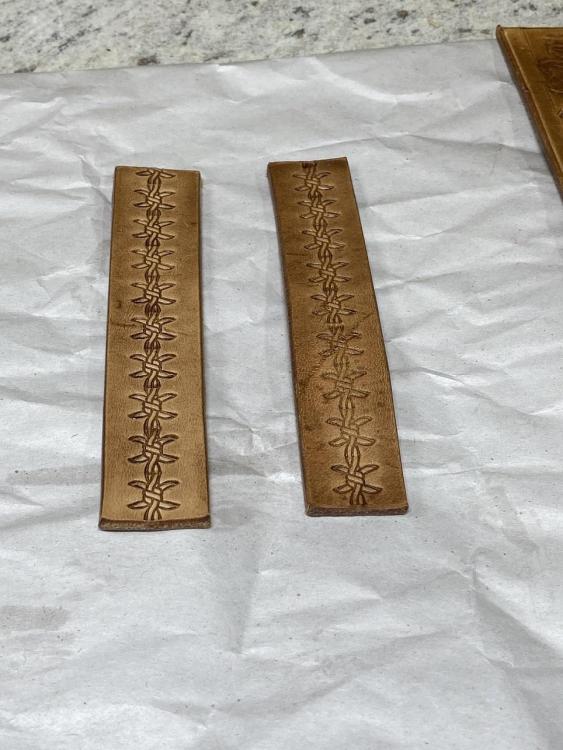
-
22 Plinking Pouch
Brokenolmarine replied to Brokenolmarine's topic in Gun Holsters, Rifle Slings and Knife Sheathes
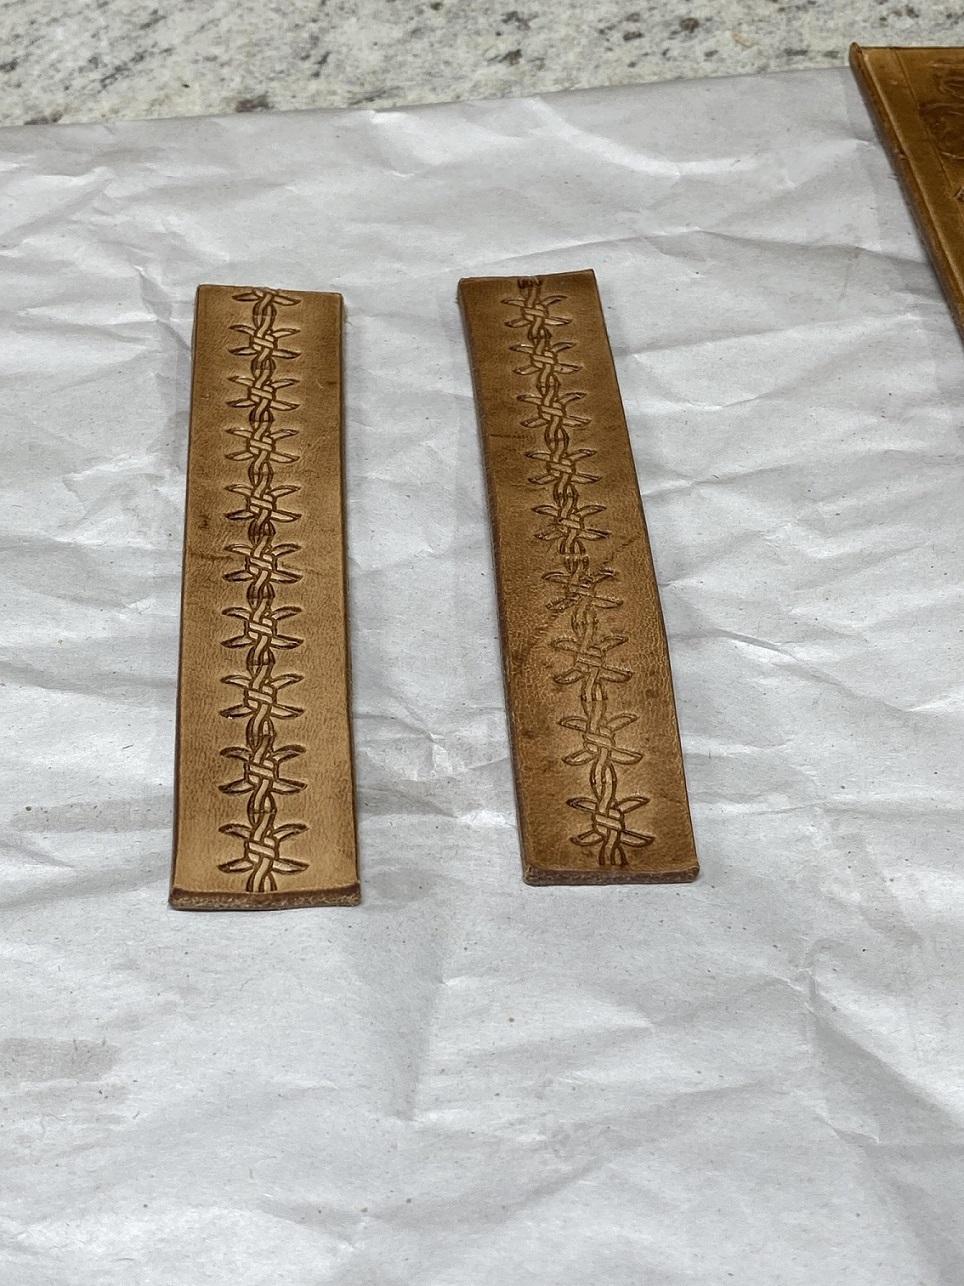
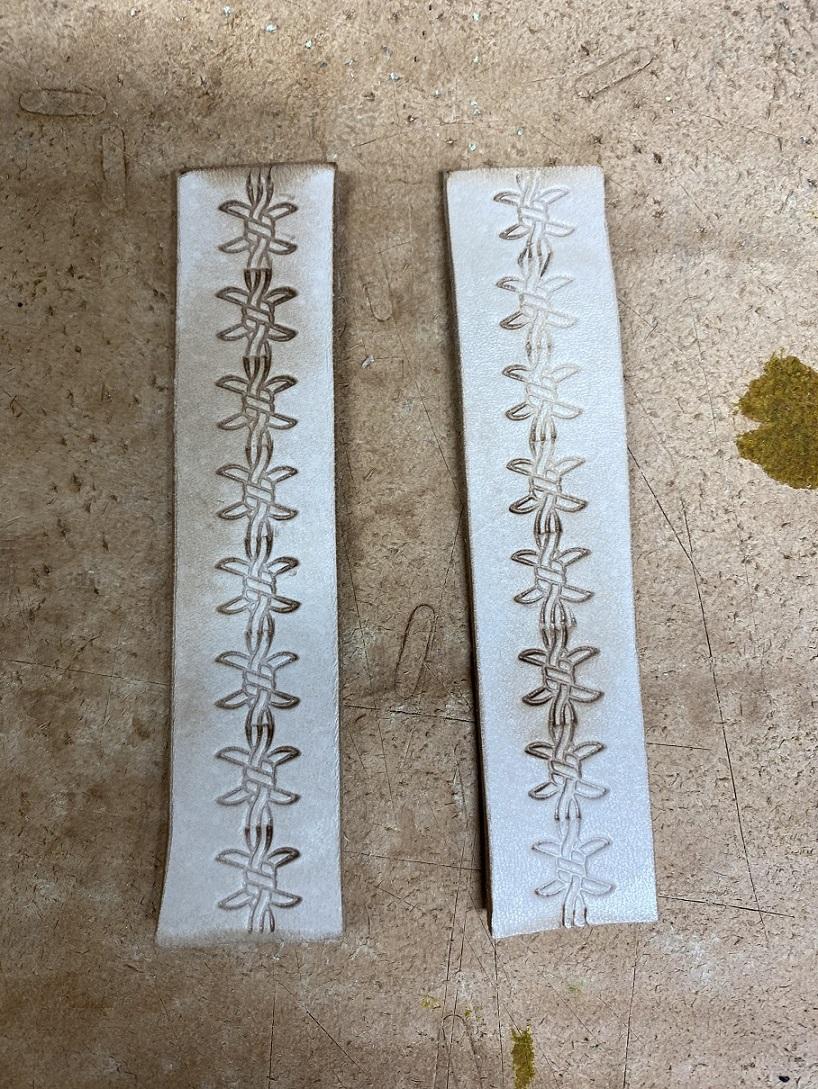
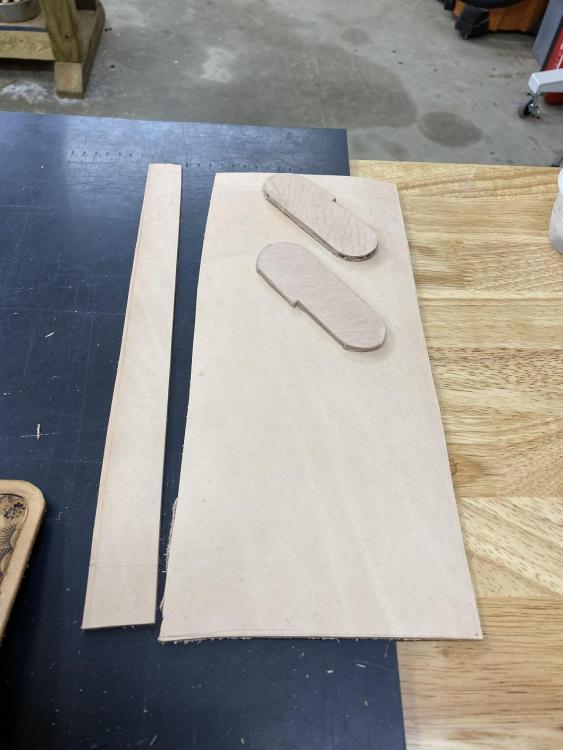
I went out this morning and cut new D-ring straps with the strap cutter. After I had the 9 x 7/8 inch piece, I cut it in half to give me the two 4/1/2 inch strap pieces. I cut a reference line down the middle using the compass. Carefully, I followed the line and stamped each barbed wire set with a firm solid strike. Each following strike was perfectly aligned, then a firm solid strike. Speed was NOT a consideration. When that was done I set the straps aside to dry so I could check them and oiled the main panel. Note the two clear areas, this is where the straps will get glued prior to sewing them down. You can see the stamped / tooled straps drying in the background.

-
22 Plinking Pouch
Brokenolmarine replied to Brokenolmarine's topic in Gun Holsters, Rifle Slings and Knife Sheathes
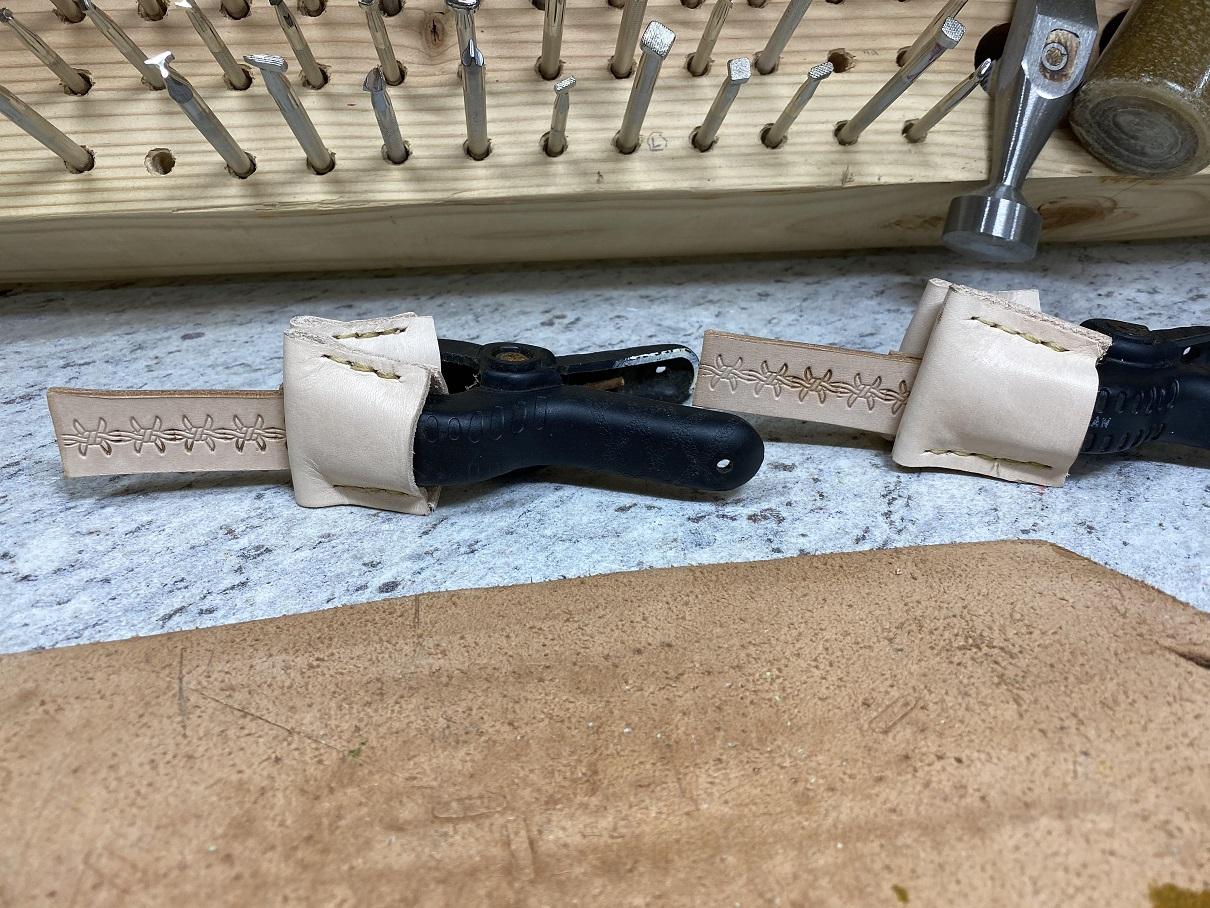
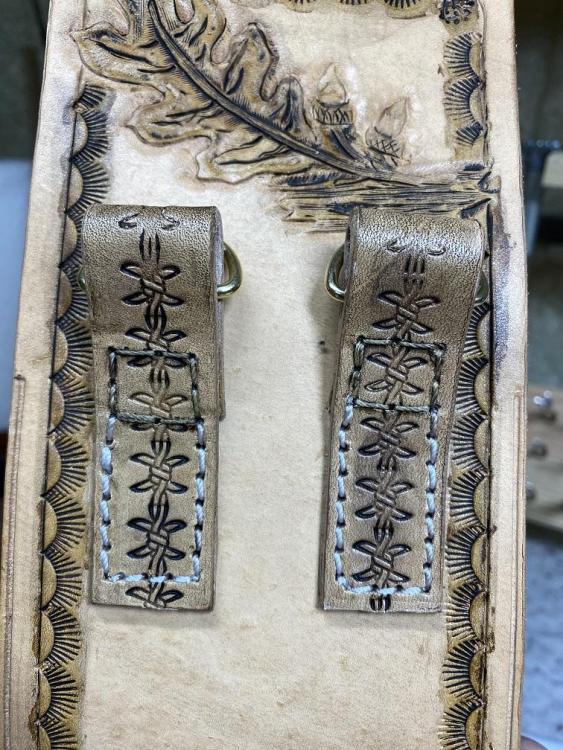
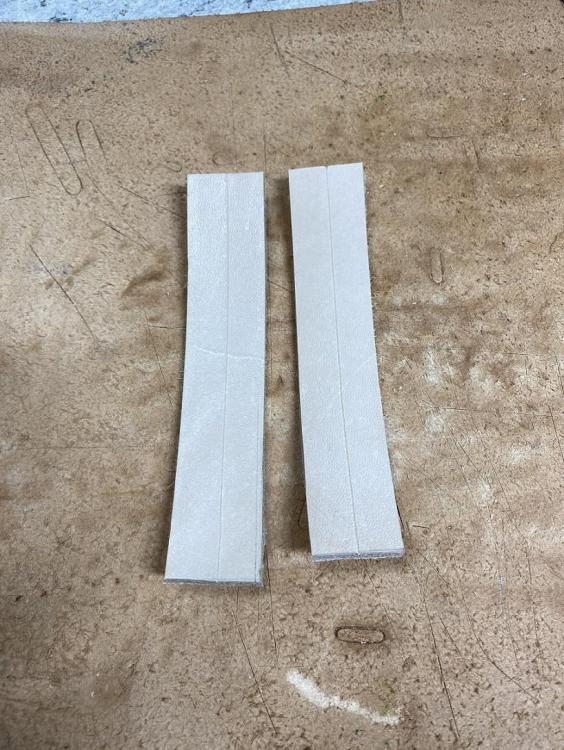
I haven't tried beveling around the barbed wire but when I have some practice time I'll give it a shot, trying various bevels. Good tip. I went out this morning to figure out where to attach the d ring assemblies, and found that folding and gluing had faded a couple of the "barbs" right over the d-rings. Hmmm? Then I marked the holes to sew down the fold and when I drilled them thru the bit wandered because someone didn't mark the holes deep enough. The d-ring straps are a minor feature in the project and would be unlikely to be seen or noticed by any casual observer of the project while it hangs on the hip of the user. Should be "Good Enough" but this was to be a gift. Not good enough for a gift. I took a razor and sliced down the center of the two folds, pulling the brass D-rings. We will redo the straps, pics to follow. Good enough isn't good enough. -
22 Plinking Pouch
Brokenolmarine replied to Brokenolmarine's topic in Gun Holsters, Rifle Slings and Knife Sheathes
I made the D-Ring straps, accenting with the Barbed Wire stamp. Appropriate for a pouch for a Single Action Revolver Fan I think. Go Cowgirl. I burnished all four edges on both straps. I measured and marked the back side, then painted on the Contact Cement, and after it was tacky, carefully slipped on the D-rings carefully avoiding Contact with the Cement. I folded over the strap and carefully, carefully matched up the end to the guideline marked on the backside to trap the D-Ring. I clamped them and set them aside to cure. I'll sew them tomorrow. Next step is to decide where to attach them. Upper edge of the back of the pouch, or on either side on the side panels. Decisions, decisions. I will also touch up the tooling where the barbed wire seems lighter. Lessons learned. Solid Strikes on EVERY strike. Duh.