Brokenolmarine
-
Posts
592 -
Joined
-
Last visited
Content Type
Profiles
Forums
Events
Blogs
Gallery
Store
Everything posted by Brokenolmarine
-

Outgrew my shelf unit, Build Along
Brokenolmarine replied to Brokenolmarine's topic in Leatherwork Conversation
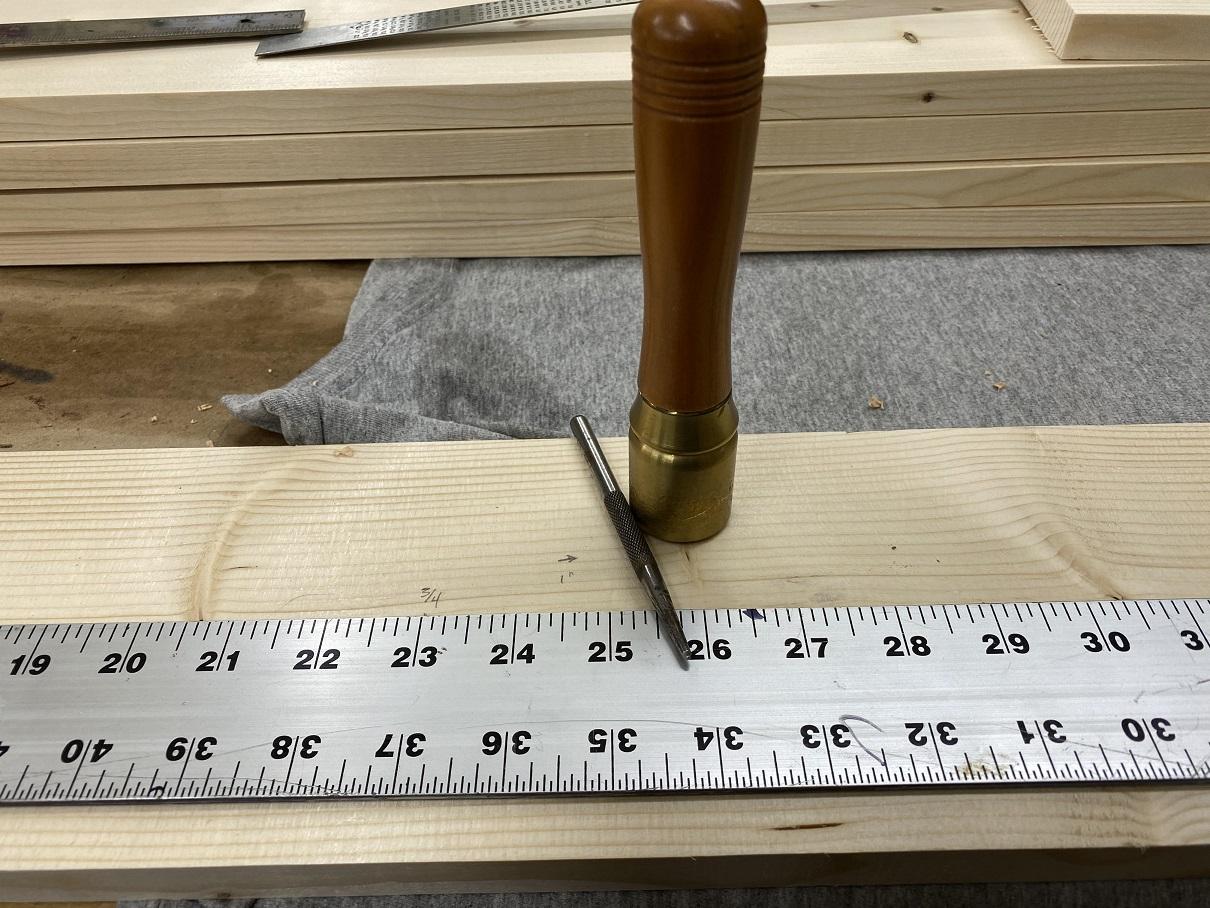
It's a woodworking mallet, I think it came from either Lee Valley or Woodcraft. When I go out to the shop this morning I'll check to see if the brand logo is still readable. It was purchased years ago just for setting center punches or seating nails on fine woodwork. -
Outgrew my shelf unit, Build Along
Brokenolmarine replied to Brokenolmarine's topic in Leatherwork Conversation
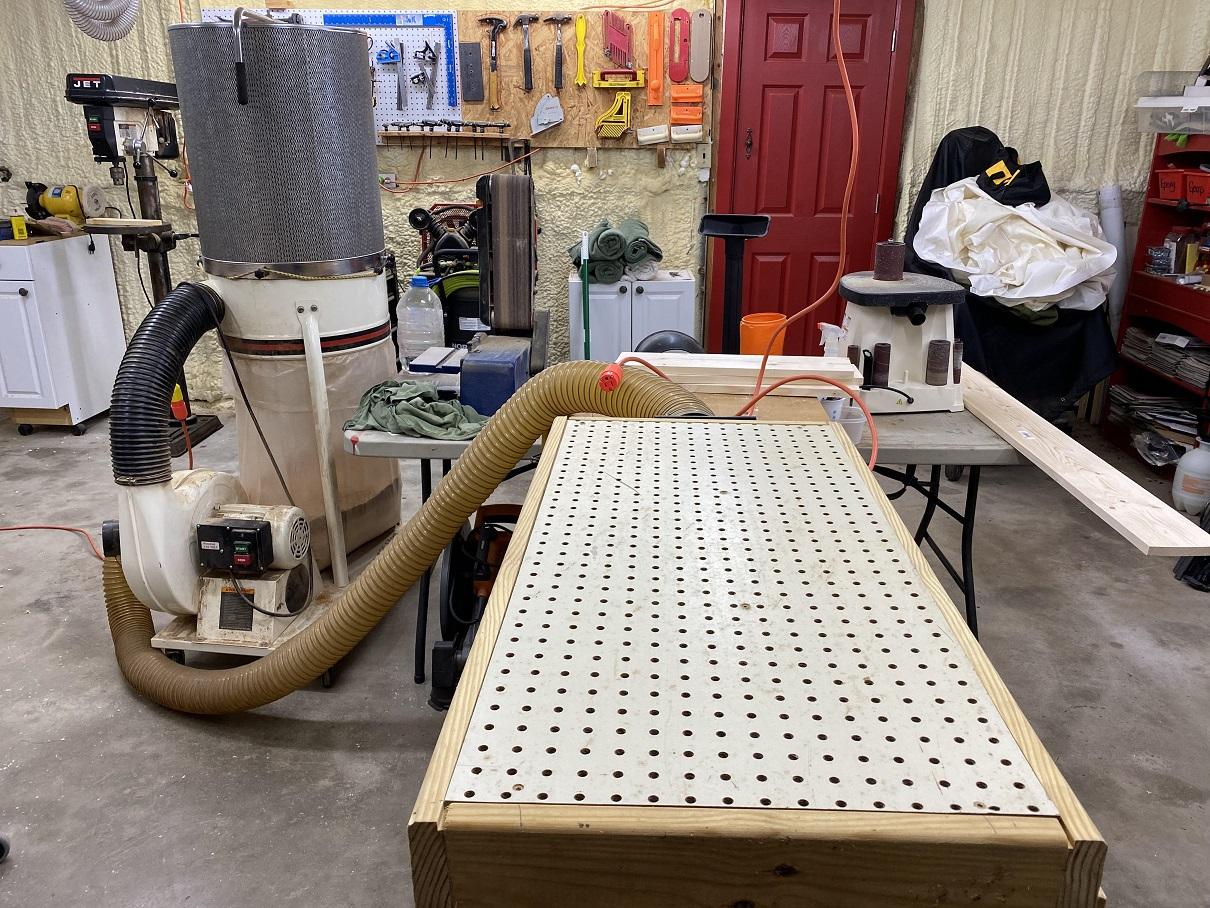
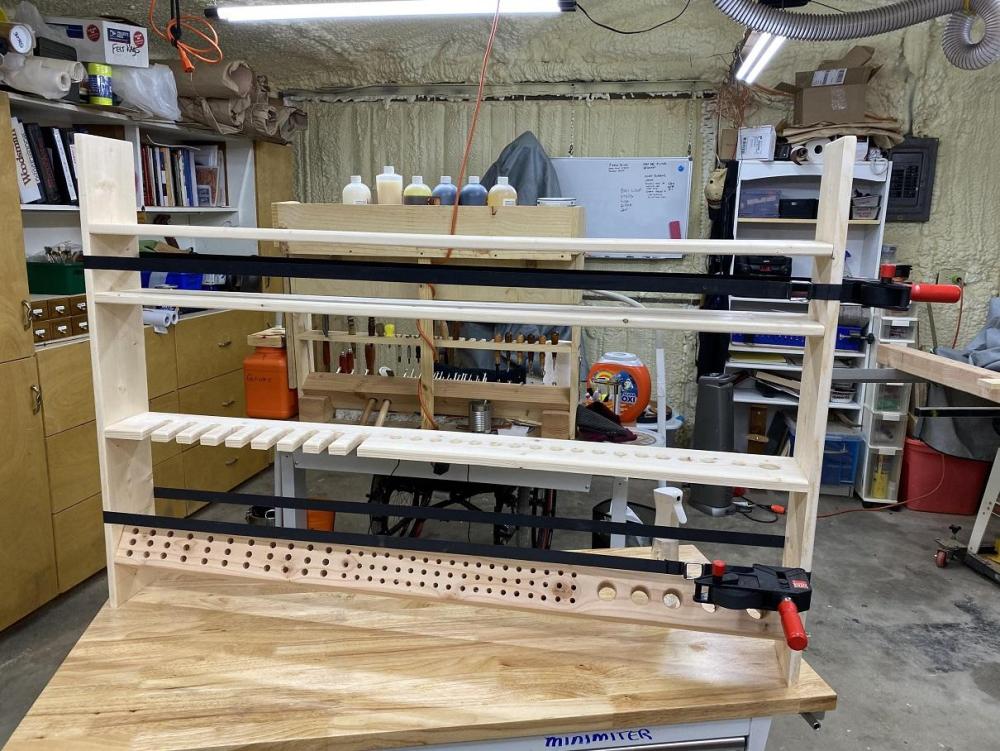
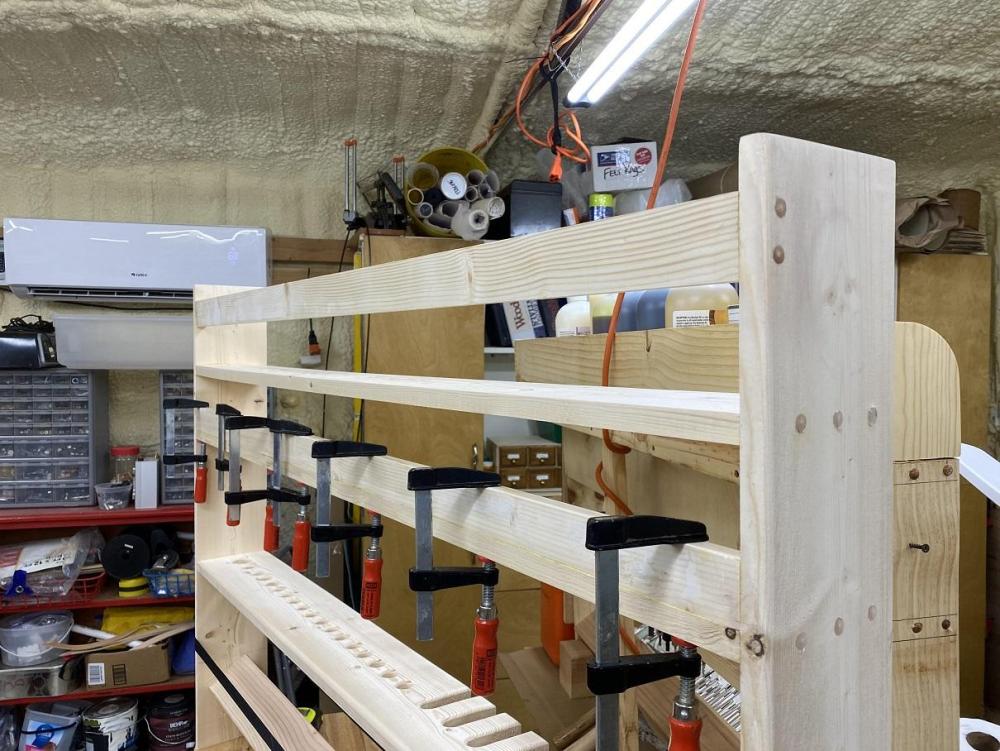
Careful assembly was begun. First glue was applied to the ends of the 4x4 block that IS the toolbar. Using 1,2,3 blocks to raise the angled 4x4 into position and the wife to help stabilize the sides, we slowly screwed the tool bar into place, then put a band clamp around that first assembly to help the screws pull it tight. Next, using a neat assembly cheat, I placed two wood bars at the next shelf level and clamped them in place, and glue was applied to the ends of that shelf. It was laid on the wooden bars, set flush with the front of the shelf and screwed into place. Repeating this process saw the shelf unit assembled. When it was assembled and left for the glue to set with band clamps in place, it was Nearly Done. What remained was to figure out how to put either back panels or rails on the back of the two upper shelves to keep supplies from falling out the back. I "Thought" I had a sheet of Luanne left. I took a break then came back out and ripped the replaced shelf down both sides... getting the lumber to make the shelf rails. Both rails were glued on the ends. The lower shelf was glued along the bottom and clamped The upper shelf is floating, and was pinned and glued. All that is left to do now is to sand the plugs that were installed to remove any glue and insure they are flush. It will also remove any stray pencil marks, basically the shelf is done. I'll post one more pic from the front empty, then with the tools and supplies in place.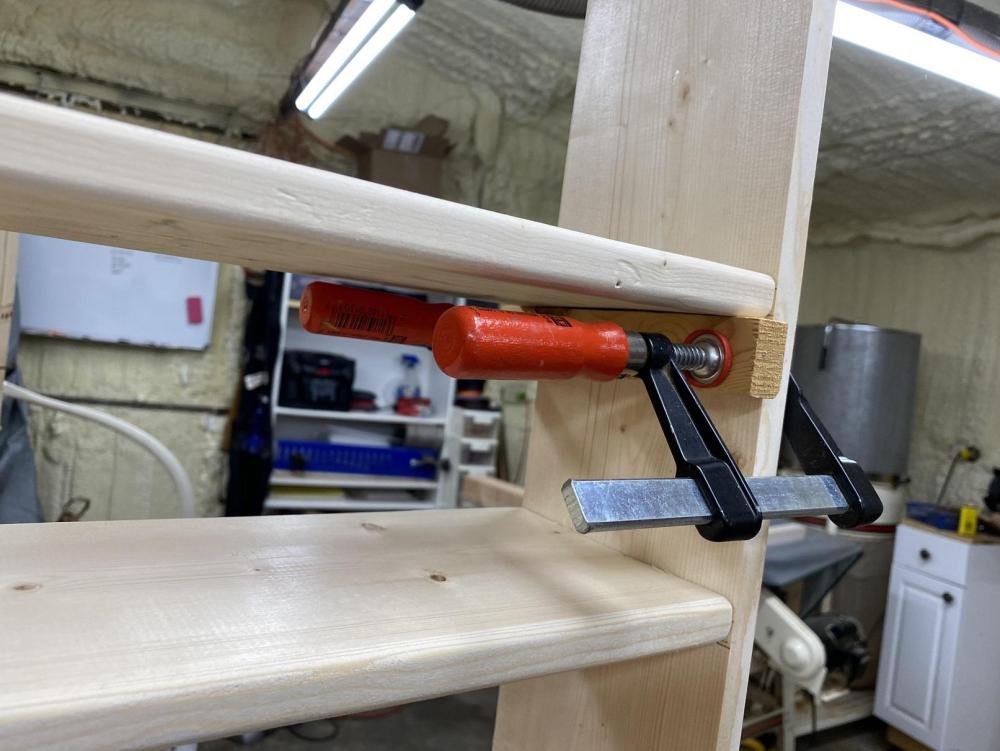
-
Outgrew my shelf unit, Build Along
Brokenolmarine replied to Brokenolmarine's topic in Leatherwork Conversation
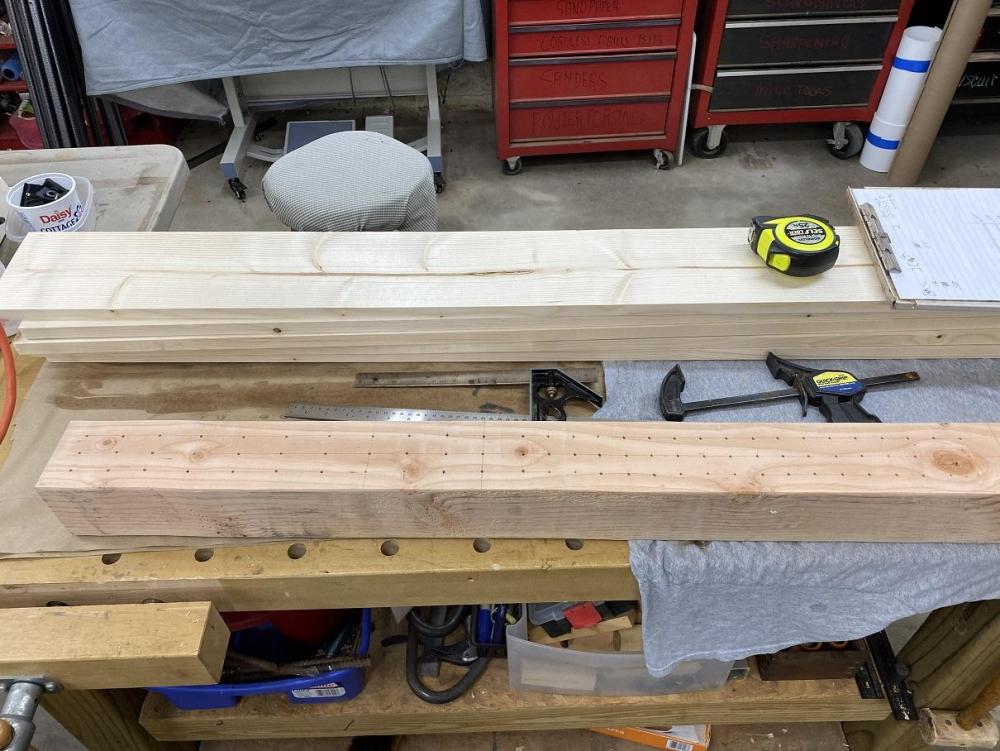
With the basic pieces done, I needed to drill the countersunk holes for the shelves in the sides of the unit. careful layout and a forstner bit for the countersink and that was knocked out. No step was rushed. The layout. Center punch the marks Next drilled the pilot hole for the screws and then the countersink for the plugs.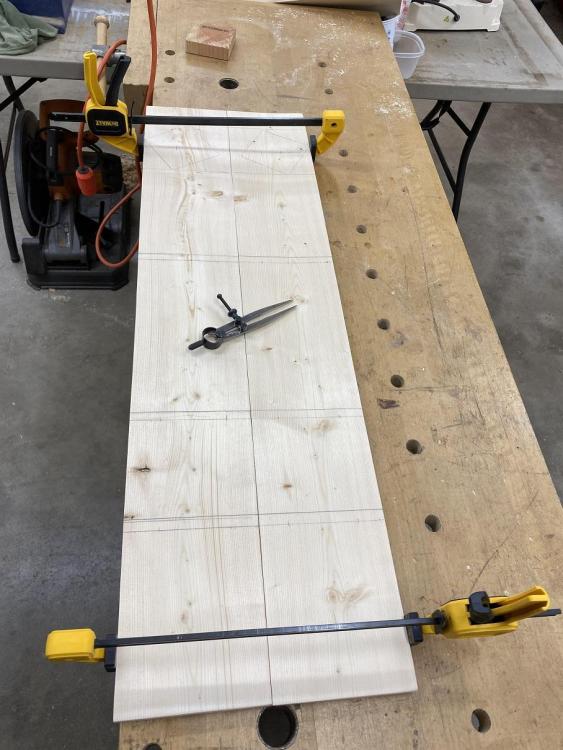
-
Outgrew my shelf unit, Build Along
Brokenolmarine replied to Brokenolmarine's topic in Leatherwork Conversation
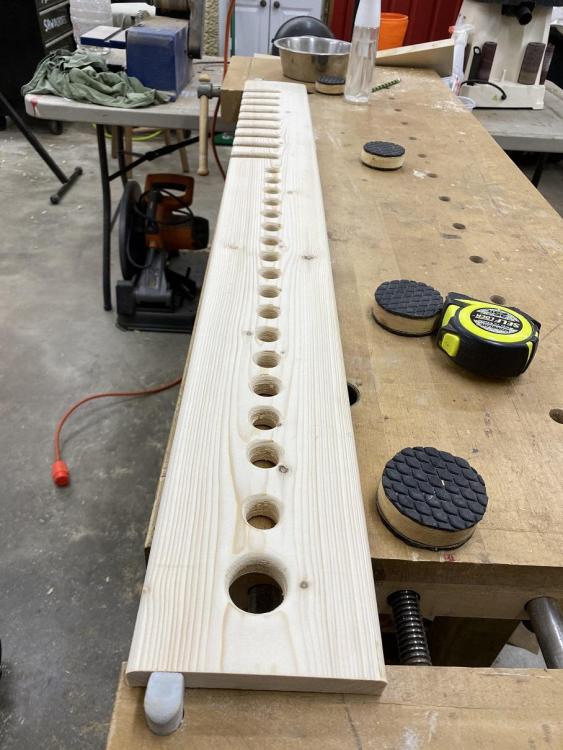
I went back out after all the work and decided I wasn't happy with the second shelf with the holes and hanging slots. Too much time and effort had gone in the build so far to settle, and when I was routing, I had already broken one of the "Teeth" of the slots off and had pinned and glued it back in place. The job was so well done you couldn't tell, but... I decided to redo that second shelf with some changes to the layout. To strengthen the teeth, I would widen the spacing from 1-1/2" between the centers to 2" I had also checked the usability of the original layout, and discovered I didn't need as many of the 7/8" holes. I marked more points for 3/4" holes, fewer 7/8" holes and only the one 1-1/4" hole. The layout was completed, and I centerpunched the holes. Next, I took to the drill press. I suspected that one of the reasons I had broken off a tooth, was that the forstner bits tended to break out wood on the back of these boards even with the backers, I first drilled pilot holes all the way thru, then set the press to drill slightly over halfway thru on the first passes on the front, then flipped the board and drilled the rest of the way thru. Worked perfectly, clean passes on all. The next step was to mark and cut the slots, route the edges and the interior of the slots and drop holes, and then sand the shelf. Looking good.
-
Outgrew my shelf unit, Build Along
Brokenolmarine replied to Brokenolmarine's topic in Leatherwork Conversation
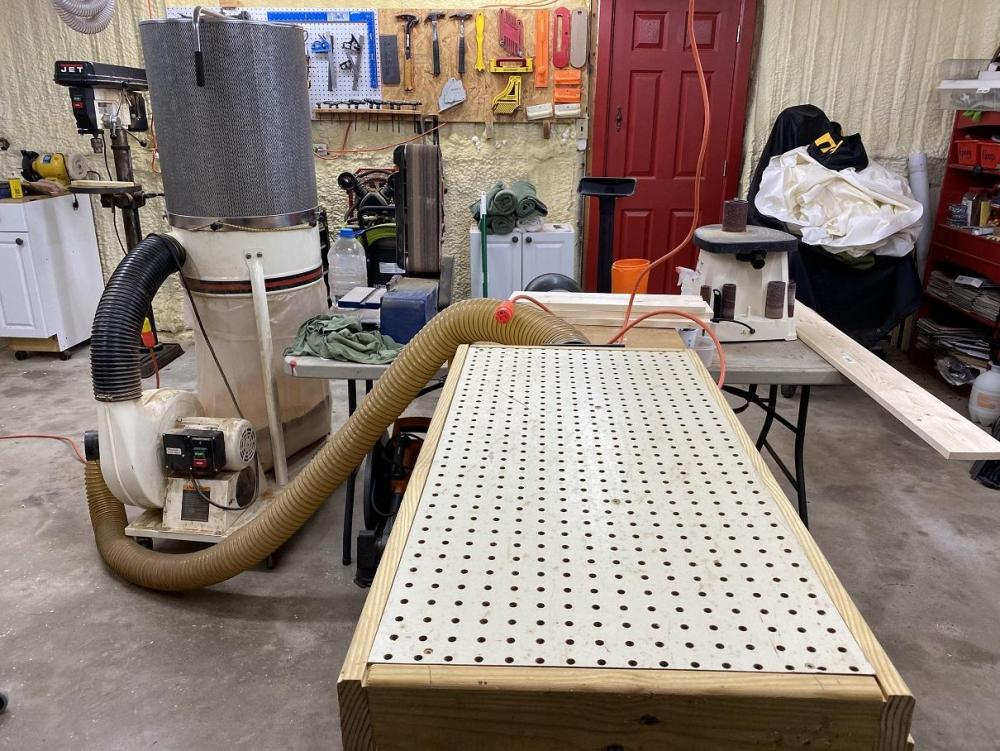
Got back at it and knocked out the extra shelves. Got all the edges routed and was ready to start on the sanding. First I matched up the edges on the two sides and marked the location of the shelves. Prior to beginning the sanding, I set up the homemade downdraft sanding table. I made this years ago, and I have used it often. I hook the dust collector to the end and sand ON the downdraft. It reduces the dust by 95%. I love this thing. Tomorrow morning I will check the various aspects of the shelves, make sure the tools fit the slots, the holes, etc. Then I will drill the pilot holes and countersinks for the screws... Boom, we'll be go for assembly.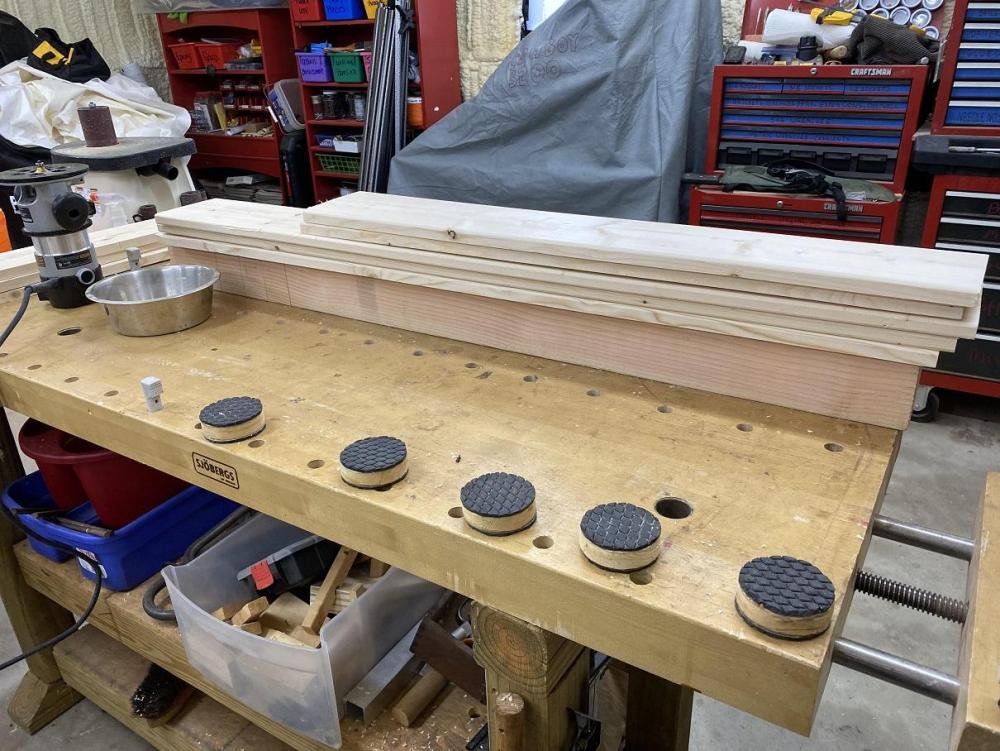

-
Outgrew my shelf unit, Build Along
Brokenolmarine replied to Brokenolmarine's topic in Leatherwork Conversation
Afternoon session let me route the sides and the inside of the holes of the shelf, and also knock out routing the edges of the tool bar while I was at it. I have NOT fine sanded the shelves and may not. A pass or two before assembly but this will be a working rack and I'm not planning on putting a finish on it. I routed the edges to knock the sharpness off them, and to ease the movement in with the tools. Next step on this one was to cut the slots and route those cuts. I cut all but THREE of the marked slots, deciding that I wouldn't use as many slots as I would the drops in the future. Next steps involve making the additional shelves for storage of dyes, paints and finishes; and the side panels. Then a couple passes with the sander to remove splinters. I will also ADD the rack for the letter and 3D stamps.
-
Outgrew my shelf unit, Build Along
Brokenolmarine replied to Brokenolmarine's topic in Leatherwork Conversation
Now that I have all the holes drilled, I'll mark the lines to open the 3/4" holes into hanging slots as the next step when I go back out. Once that is done, it will be time to move to router work. I'll route the edges of the slots, and the inside of each of these holes. I'll save that to the end, just before assembly, as I'll route all the edges of the shelves and the edges of the sides, for aesthetics Much more to come... hang with me if you are interested.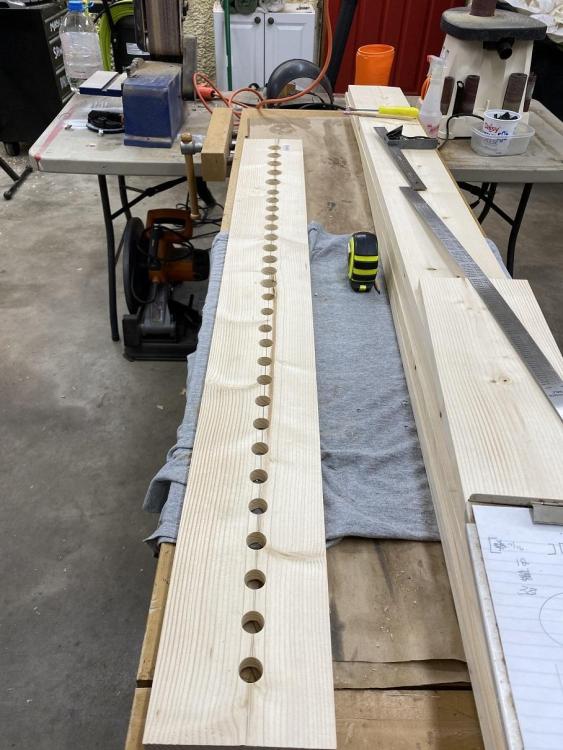
-
Outgrew my shelf unit, Build Along
Brokenolmarine replied to Brokenolmarine's topic in Leatherwork Conversation
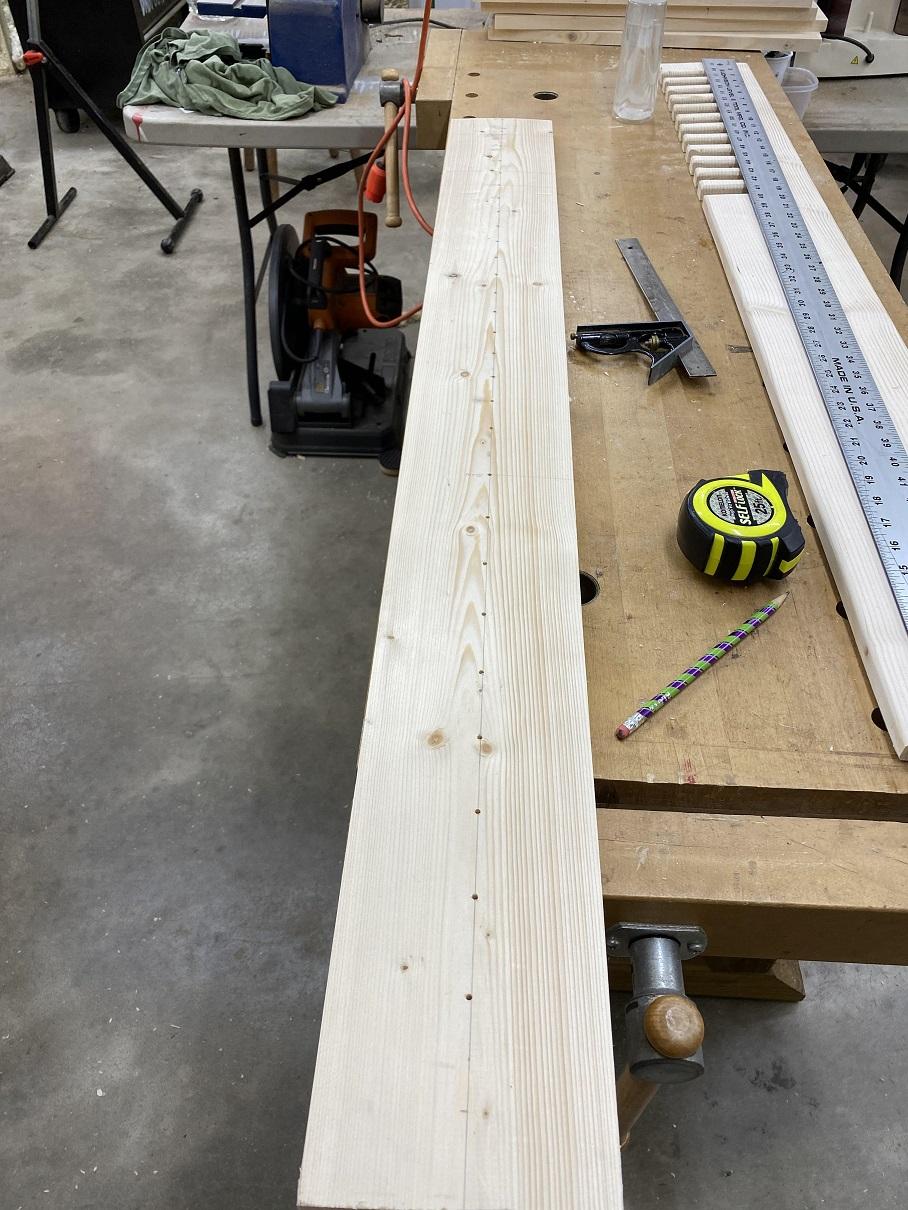
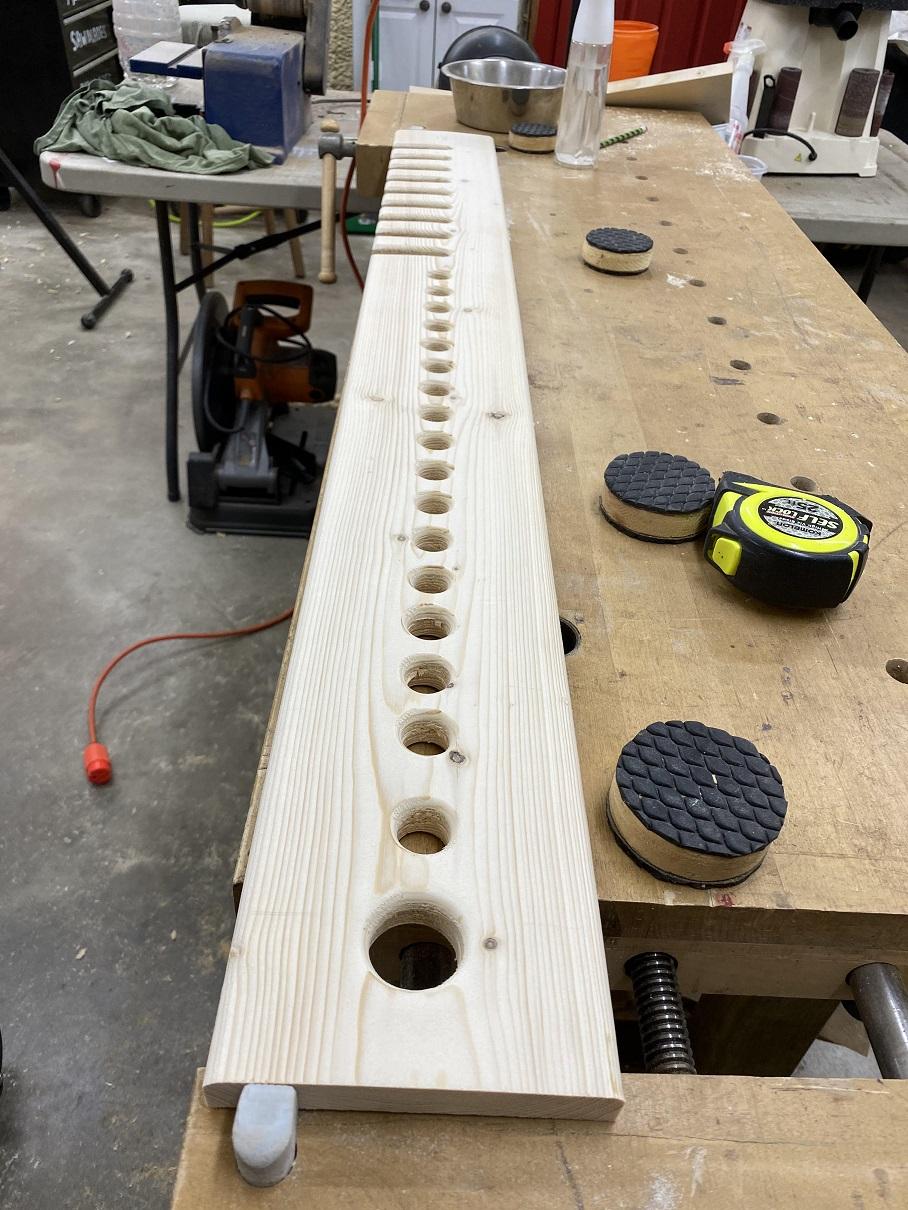
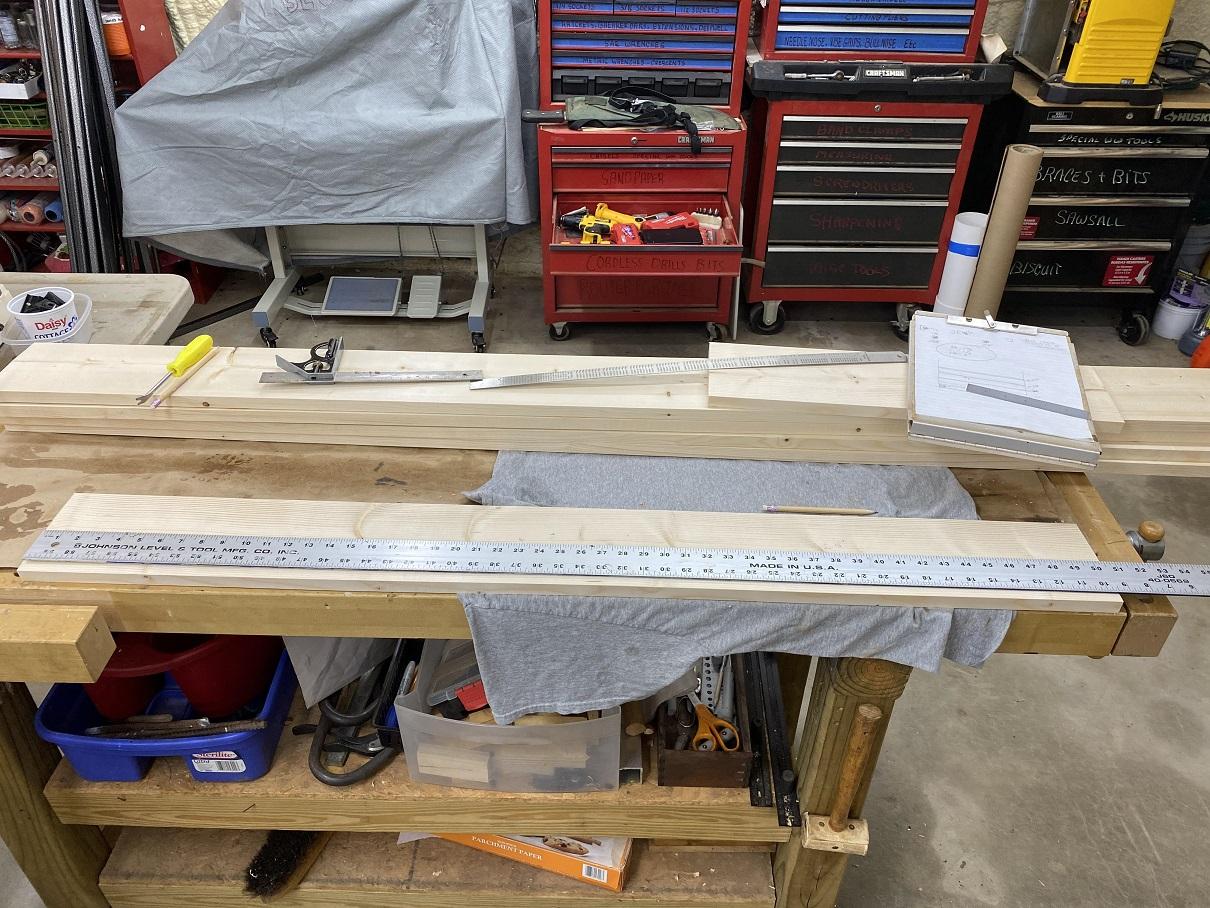
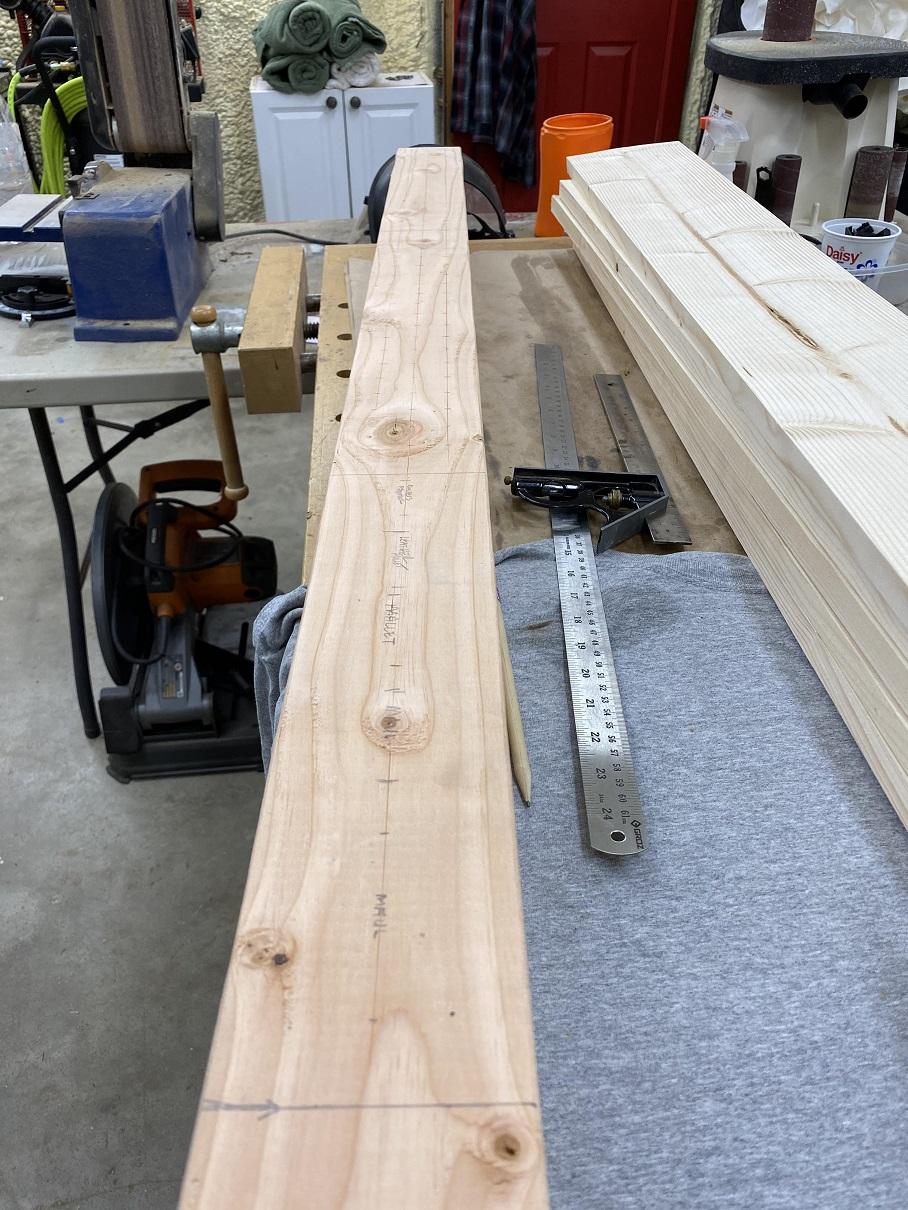
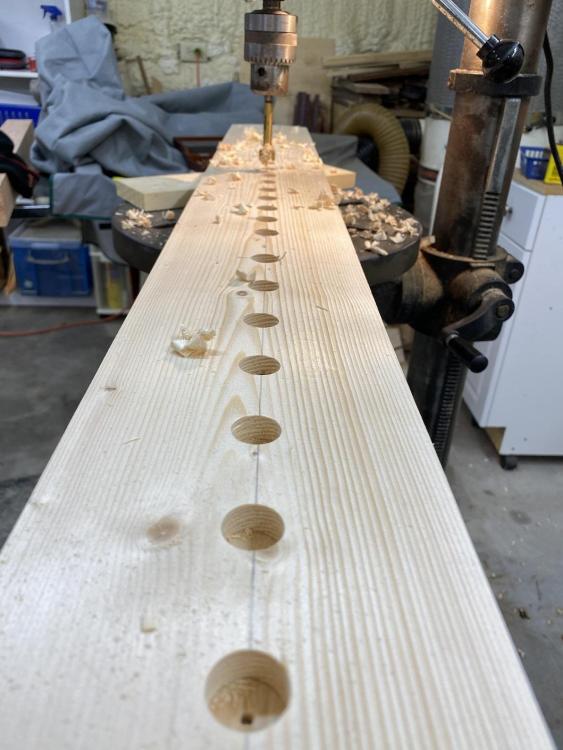
Got out this morning and started on the second shelf. This one, like the old one, will hold the tools that hang by the handles or drop in the holes, like the swivel knives, the bevels, and the stitch groovers, etc. I marked a center line first, then marked the spacing for the 3/4" holes, the 1" holes and the 1-1/4" holes. Once I had the spacing marked in pencil, once again I got busy with the centering punch and mallet. Careful punching of the holes insures that the forstner bits will cut in the correct location and give me a nice line when all the holes are drilled. I noted the location to change bit sizes ON the line, as the bit will cut away the notations. Once all the guide holes were punched, once again it was time to move to the press.


-
Outgrew my shelf unit, Build Along
Brokenolmarine replied to Brokenolmarine's topic in Leatherwork Conversation
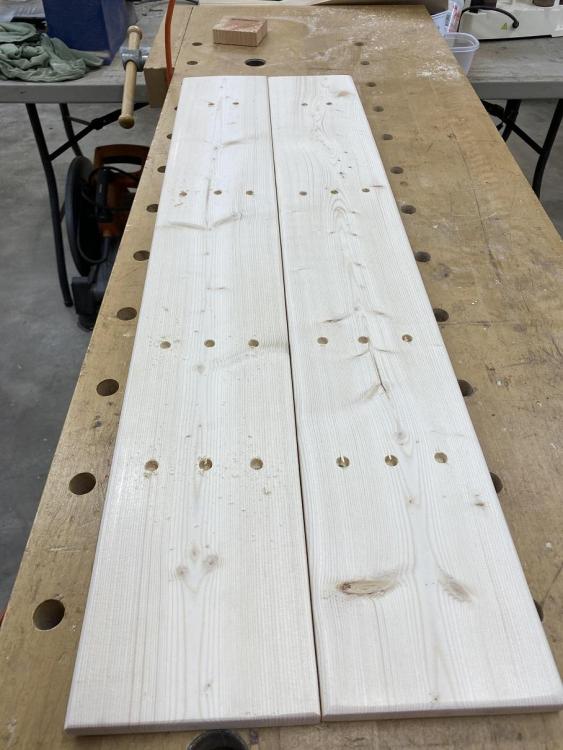
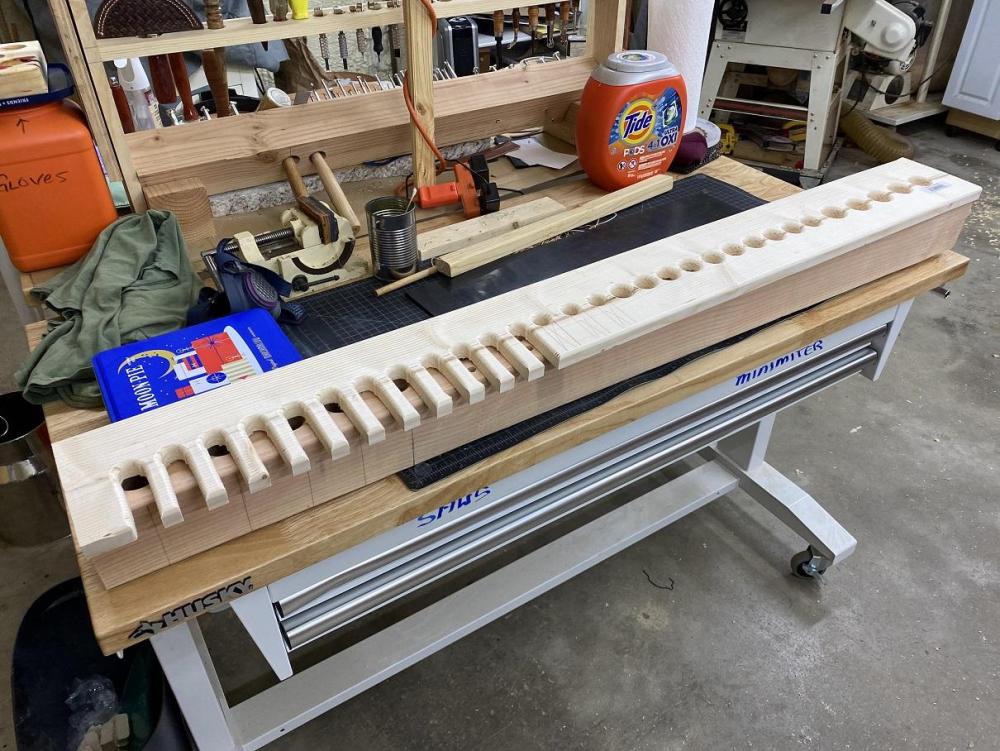
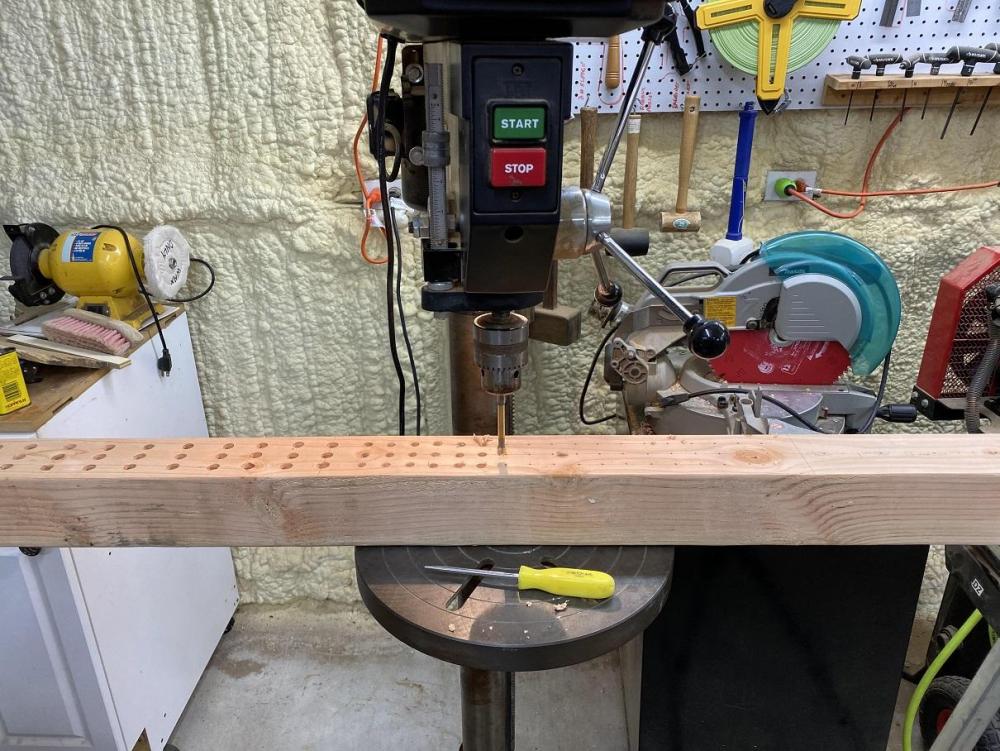
I had to spread the work on the tool bar out over the day. A man has to know his limitations. But, I got the holes drilled. I'll use a countersink to round the edges of the top of all the holes later. The next step will be to make the new second shelf, cutting the slots and drop holes for tools in the new wider shelf. The tool bar looks pretty good for an old man... Here is a look at the progress so far... more tomorrow if I'm not too beat up and have to rest for a day.
-
Outgrew my shelf unit, Build Along
Brokenolmarine replied to Brokenolmarine's topic in Leatherwork Conversation
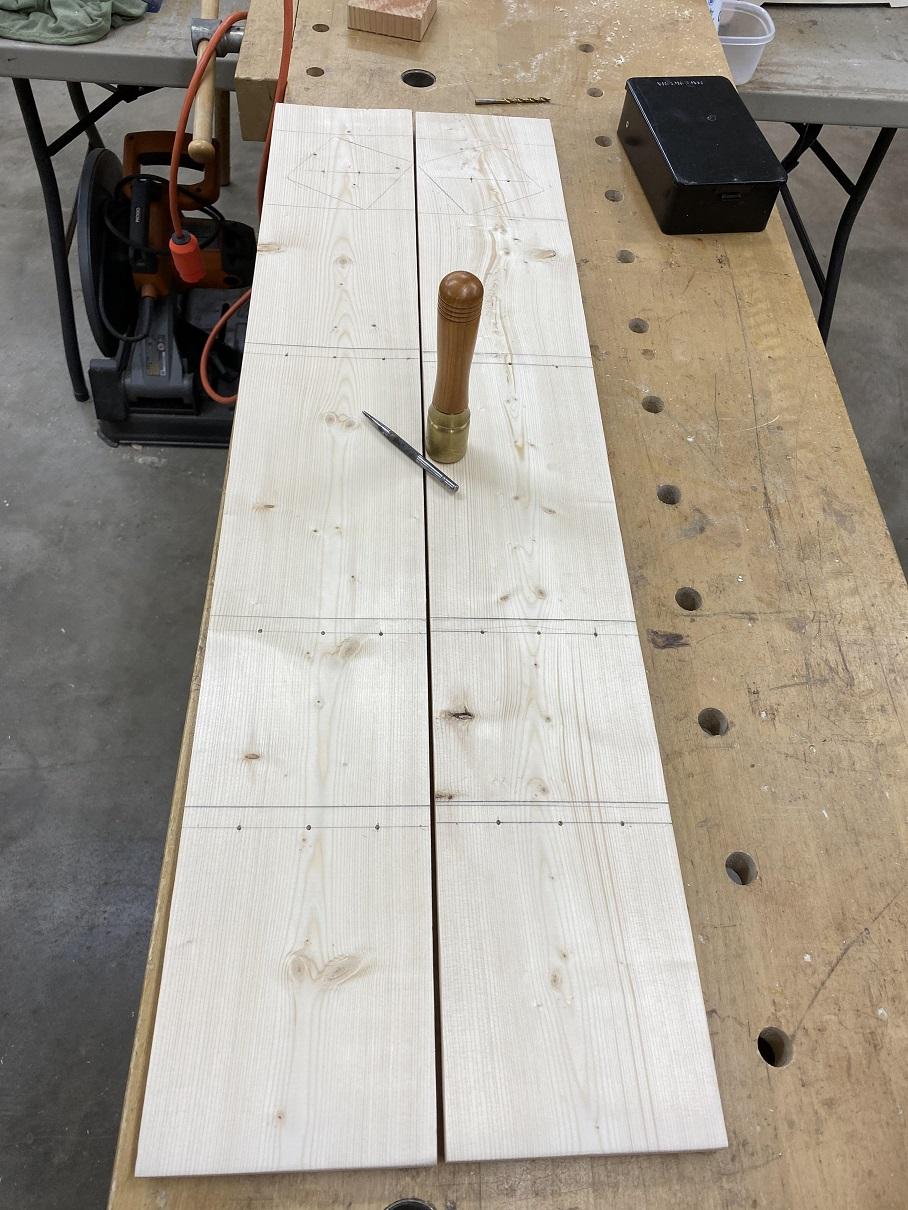
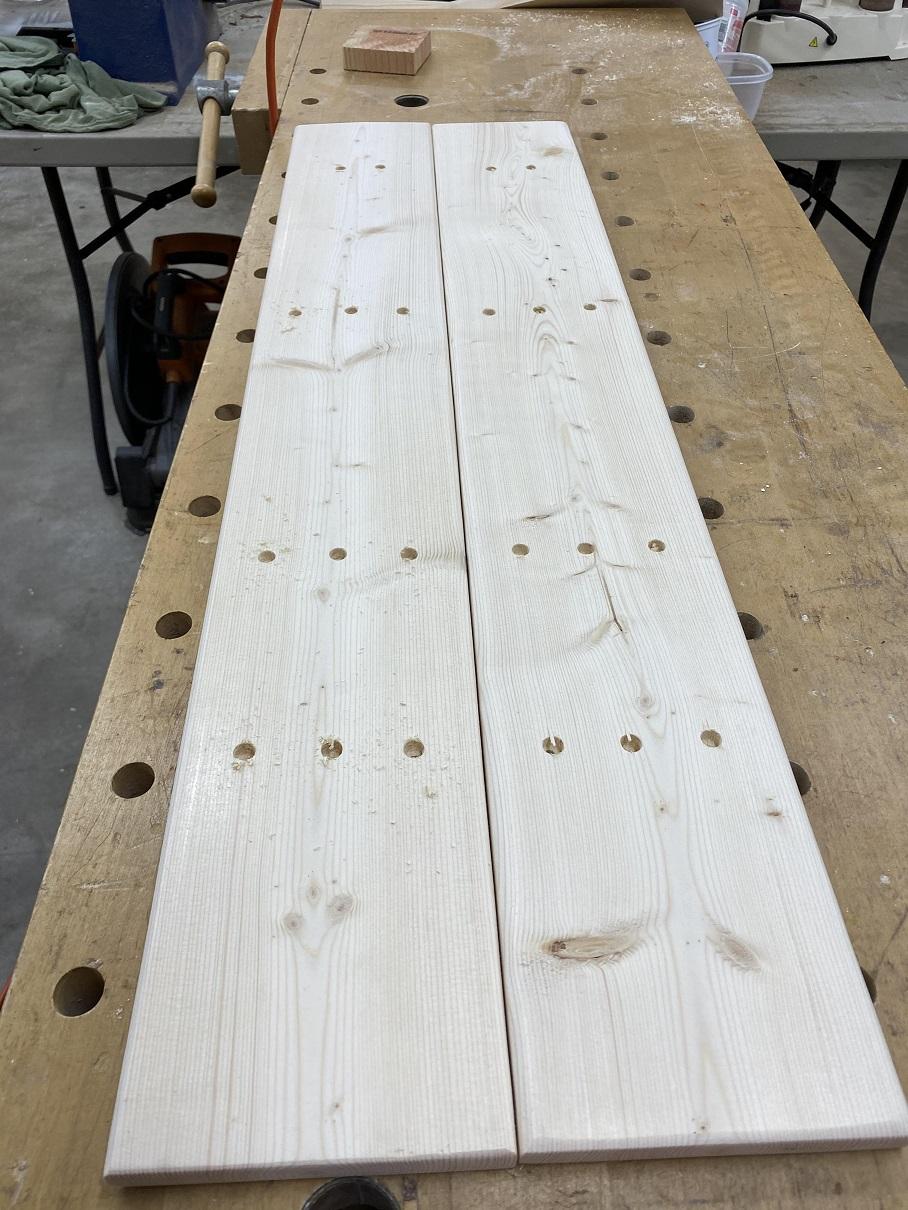
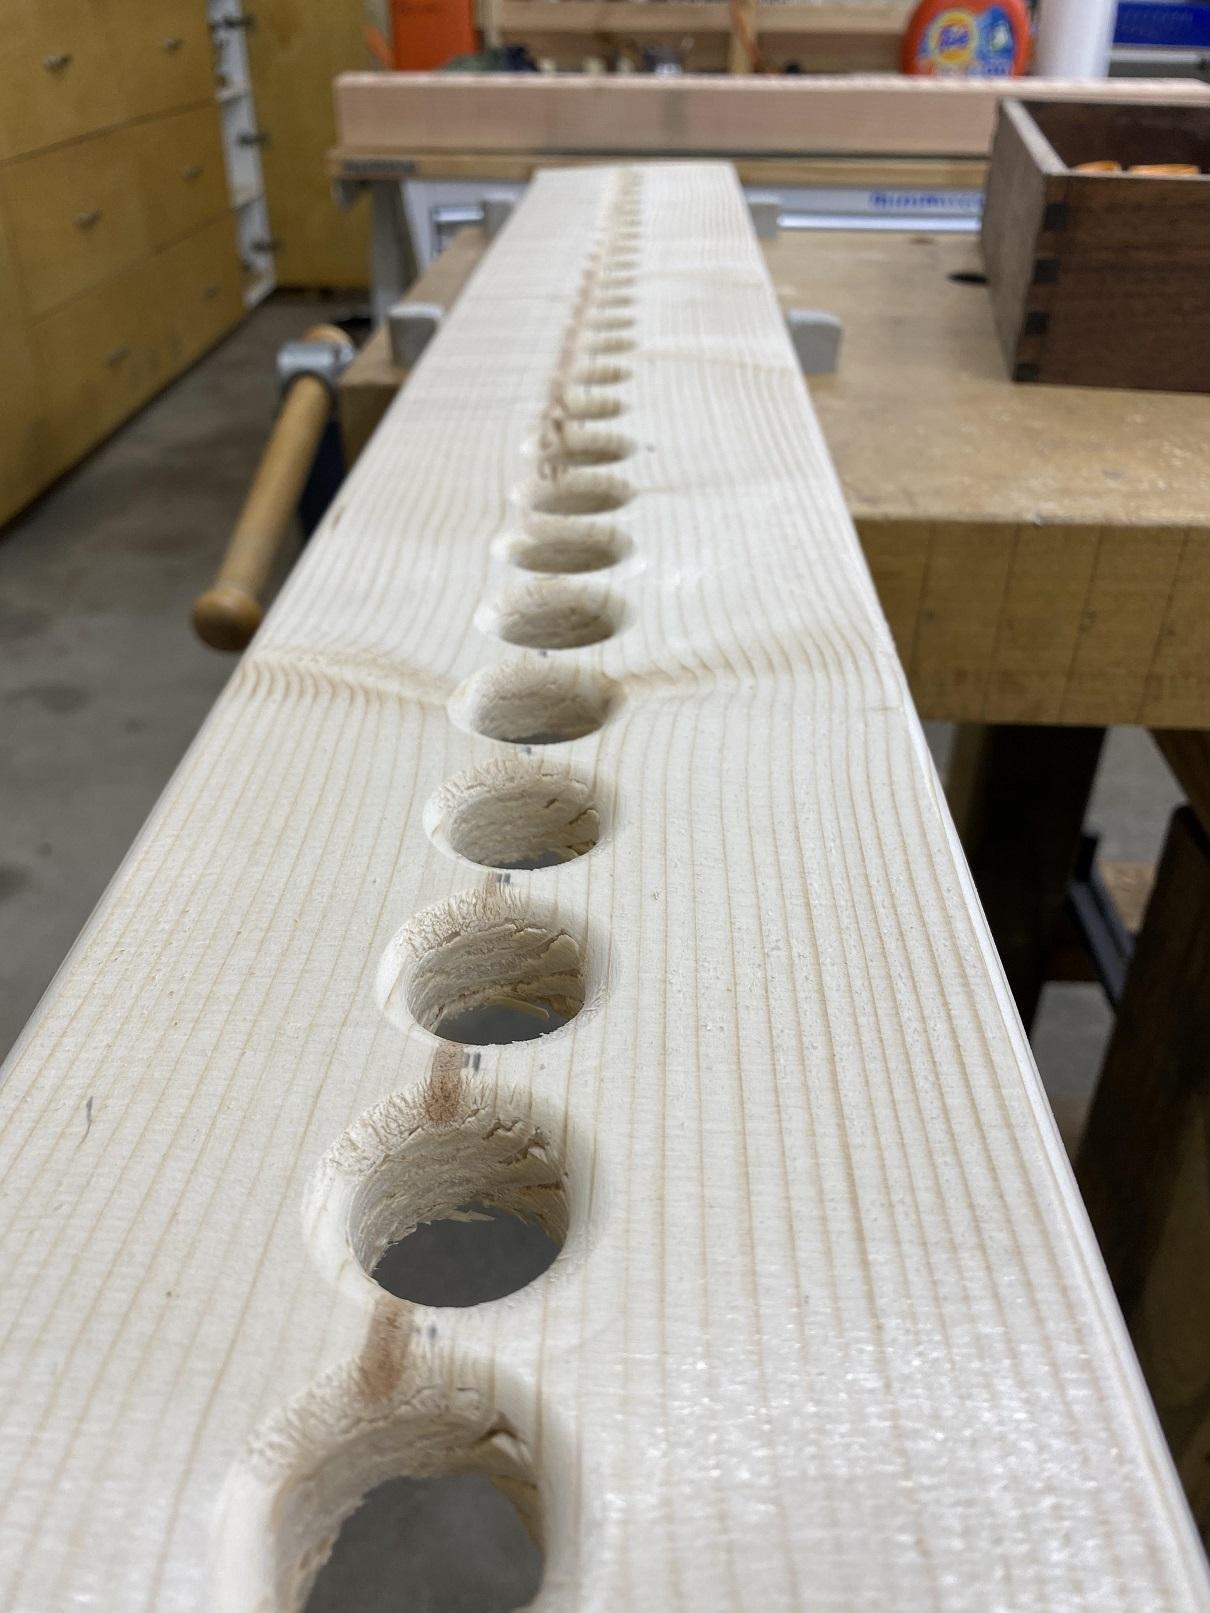
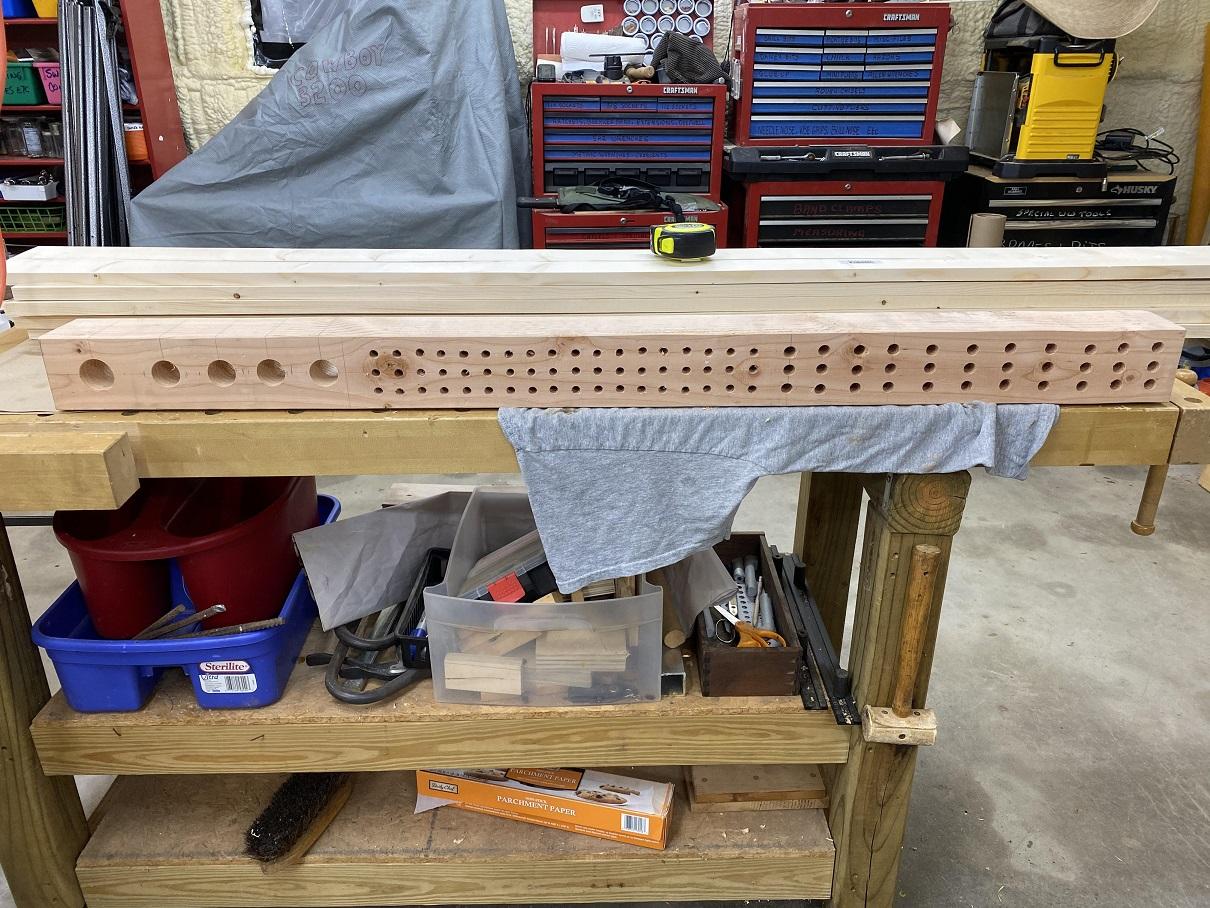
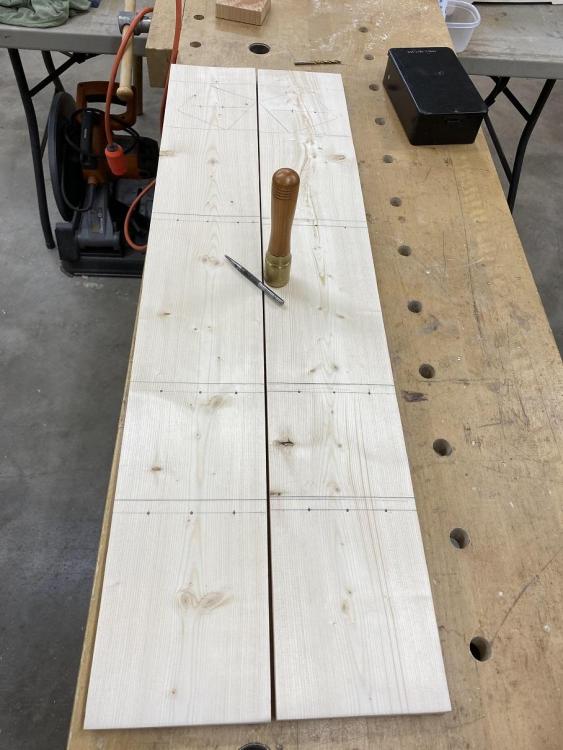
I spent several days playing with layouts, then finally went to Home Depot and bought the wood. Today, I cut the cedar 4x4 to length at 50-1/2 inches, allowing for the side panels which will make it 52" when assembled, the width of the table. Then I began to lay out the hole positions. Increasing the number of holes for both the thick shaft stamps and the thinner stamps. With the extra length I took my time and finally laid them all out in pencil. Once I got them all laid out in pencil and was satisfied with the positions, I used a center punch to set the positions. I was going to drill them with forstner bits on the drill press but didn't want to struggle once I started looking for pencil marks. The punch also made sure positioning easier. I drilled 33 holes on the left with a 1/2" bit, then dropped down to 3/8 for the remaining holes on the right. the last five single line holes were drilled with 1-1/4 (4) and 1-1/2 (1) to accommodate the handle sizes of the mallets and shoemaker's hammer.
-
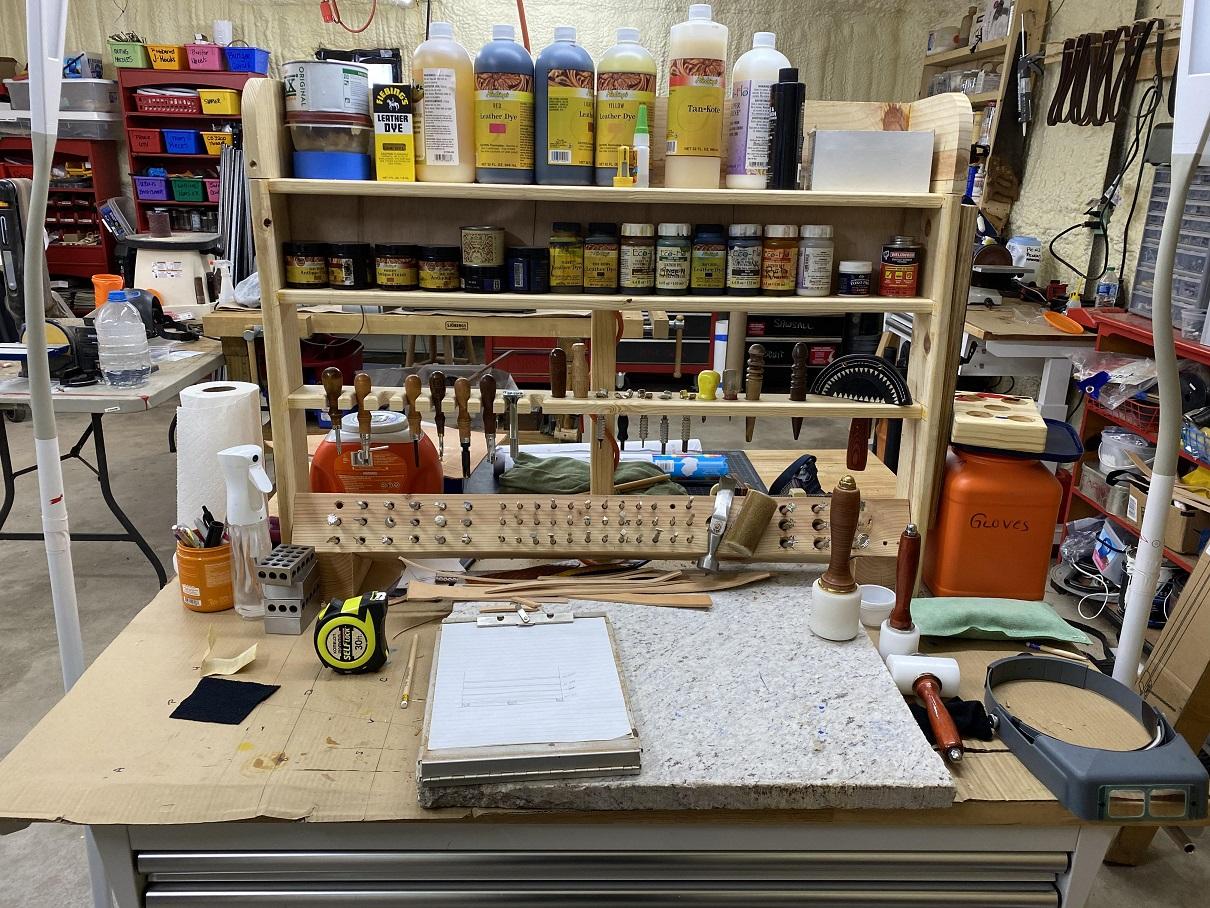
Some of you may remember the old shelf I built and expanded a year or so ago. I have begun to outgrow it. I also use a table that moves. UP and Down and rolls around the shop if needed. I want to anchor the next shelf to the table without damaging the table, so after some thought, I decided not to go a LOT higher, and wider was the choice. This gave me several advantages. Here is the old shelf unit. This unit is about 36" wide and 24" tall and currently accommodates my most used tools, but as I added tools I found that some wouldn't fit the slots I had, and some just didn't have slots available. I didn't have space for the mallets, and the drawers in the work table are full. I will go wider, to the full width of the table, and up to 36". I played around with various designs, and came back around to the same concept, just an extra shelf at the top for more storage. Being wider I could add space for the mallets and lots more stamps in the tool bar, then more slots for additional tools in the second shelf.

-
Looks pretty good to me.
-
I give it a closer look and see if I want to add it to the library next go round. You can never have too many references.
-
I'll try that, but I think I'm not getting it wet enough to start with, then letting it dry more. Sometimes the stamps, or beveling just don't go very deep. I think that just comes with experience.
-
Quick sheath for a buddy
Brokenolmarine replied to Garyak's topic in Gun Holsters, Rifle Slings and Knife Sheathes
The sheath looks almost like a surfboard to me. Hang ten bro.... Good job. -
Sling for the Ranch Rifle
Brokenolmarine replied to Brokenolmarine's topic in Gun Holsters, Rifle Slings and Knife Sheathes
Oops, sold. Thanks for thinking of me, but the funny thing, by the time the bidding ended, they paid as much as a new set, with shipping. Since I have a complete woodshop, and after looking at the prices... I think I'll make each one of my loop irons out of hardwood as I need each size from Walnut or oak. I have plenty of both and being retired, I also have plenty of time to get them right. -
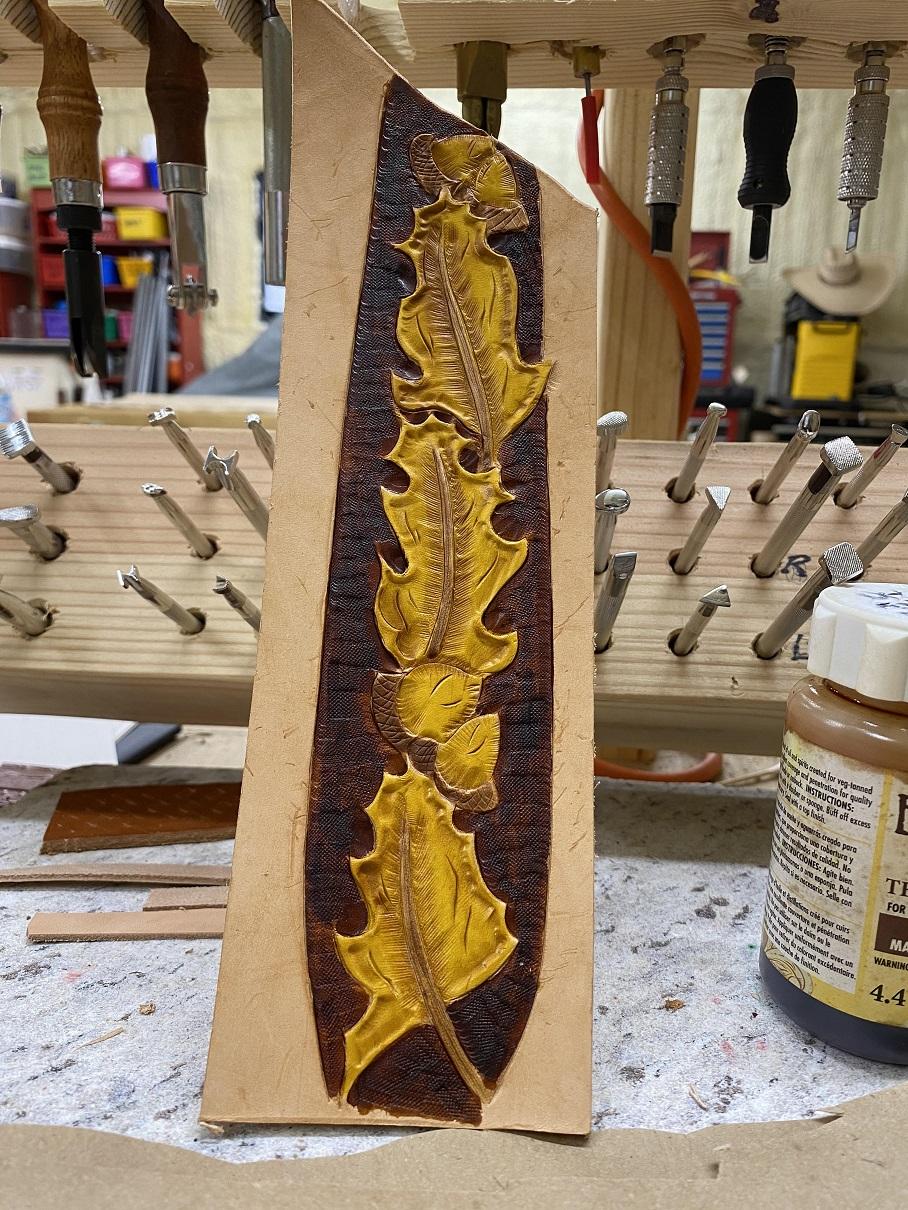
The dye in this pic is Dark Brown, but you'll note that at the bottom I don't have the edge properly defined and the dark brown bled as noted in the OPs initial post. The edge on the sides here were sharply defined by the cut and the bevel. I painted the dye up to the edge with a fine artist's brush, then up to the leaves the same way. Nice defined break in the colors. After first pass the dark brown was blotched and uneven, because I didn't try and overload the color forcing it to bleed. After the second pass it darkened it up nicely. This was just a practice panel for MY sling, but I try to do each practice piece as realistically as I can, and even when I make errors, or fail with colors I still try to complete them if possible, as there are still lessons to be learned. In this panel, I corrected errors I made, and took it to the end. Turned out fairly nice, and I was able to decide my design plan for the sling would work. For the edges on the practice panel I used black. I used three coats of dye, taking the black to the edges where the cut kept the black from bleeding. I was careful with the artist's fine brush to go TO the edge but no further. The first coat I took my time and defined the border and didn't worry about a dark black for the rest of the natural leather just got the first pass of black dye on the leather. The second and third coats I made sure I didn't dye the leaves that lay over the edge and didn't slip into the brown background. Three coats did it.. I hope this helps. I am still learning myself, but I use every trick I can come up with to help me make my work look better. I am always open to suggestions.


-
When I put a black border on things, I cut a line with my swivel knife and then a nice sharp bevel. This leaves a defined edge for the dye. I apply the dye with a detail paint brush and paint it to the edge. I might have to make two or three passes, allowing the dye to dry completely prior to making the next pass, before getting to the "Black" that I want, but it prevents the bleeding you've seen. Or it has for me. so far. You can skip the bevel if it would be obvious, but the cut line will make a huge difference. It can be very fine.
-
Sling for the Ranch Rifle
Brokenolmarine replied to Brokenolmarine's topic in Gun Holsters, Rifle Slings and Knife Sheathes
Thanks very much for the input, never seen that technique before. I have learned ALL my leatherworking from YouTube or a few books I have found on line or in secondhand shops. I appreciate the suggestion. I'll try the technique as practice. What is the metal bar called that you squared your loop on? I just made a form using scraps from the actual strap cutoffs from the sling. LOL. -
Sling for the Ranch Rifle
Brokenolmarine replied to Brokenolmarine's topic in Gun Holsters, Rifle Slings and Knife Sheathes
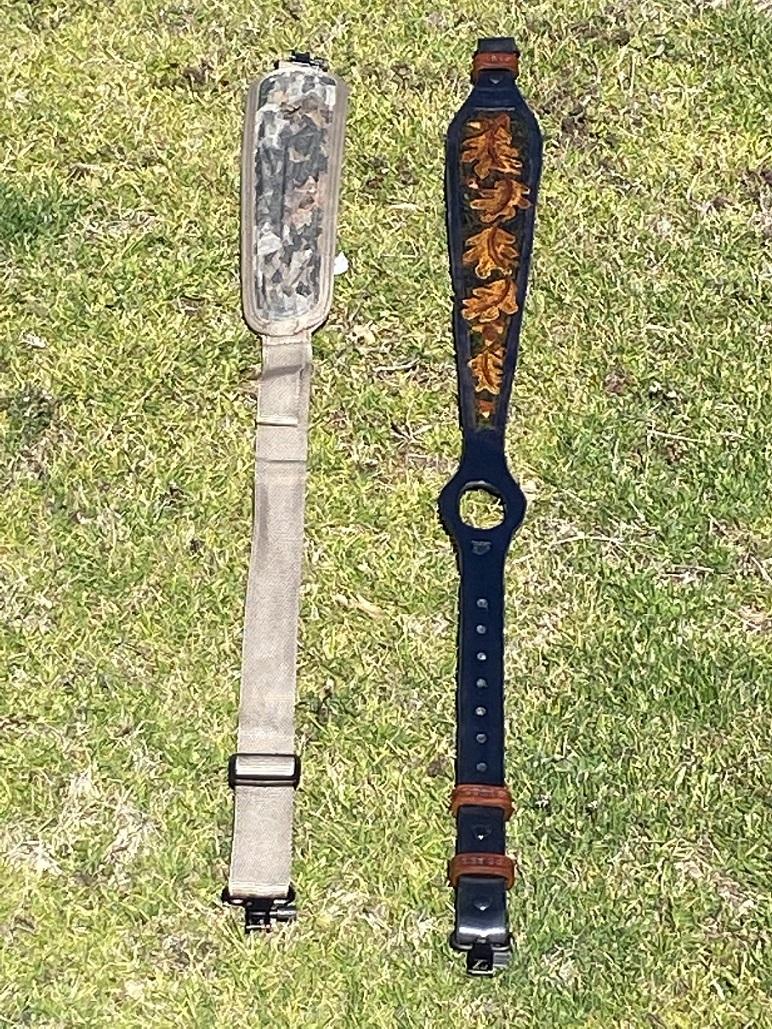
I mounted it on the Ruger American Ranch Rifle in 556. I chose this model and caliber for specific reasons. The Rifle will accept AR magazines, and the 556 caliber will also safely shoot 223 ammunition. Always a good idea to have versatility in the stable. The thumbhole in the sling allows you to rest your thumb thru the sling and control the rifle on your shoulder without gripping the strap of the sling. Your arm is "resting" on the sling and not straining or fighting the sling to keep the rifle in place. Anyone who has humped a rifle for any distance knows this is a Godsend. As a former Marine, I have spent some time with a rifle on a sling. Luckily, as a helo crewman, Avionics Technician, not nearly as much as many of my brothers in arms.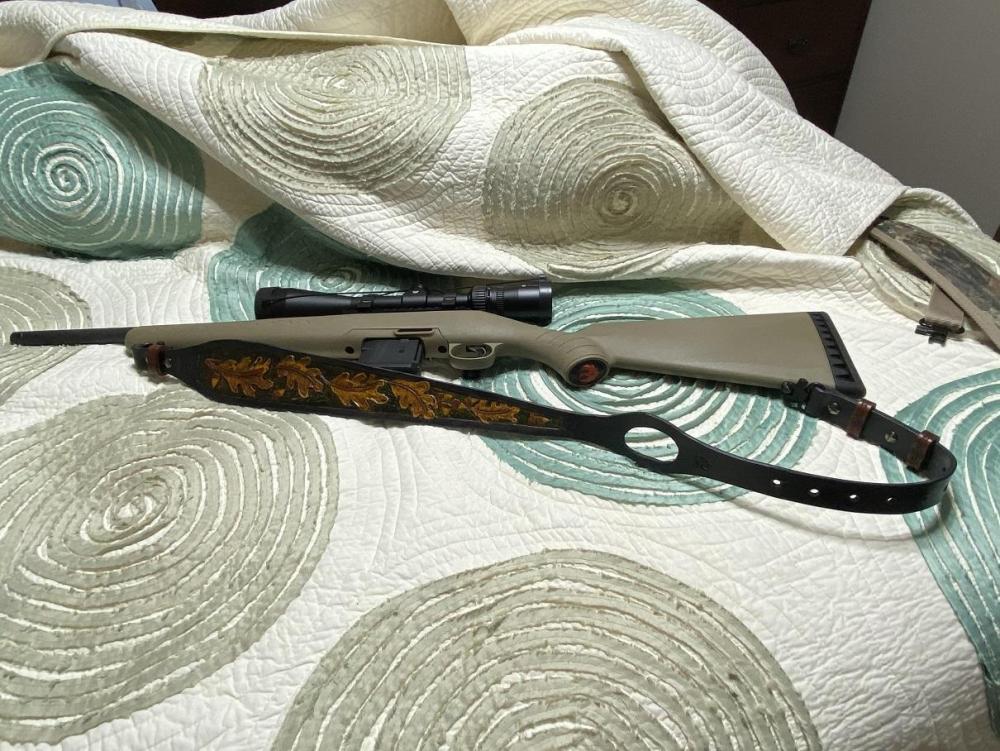
-
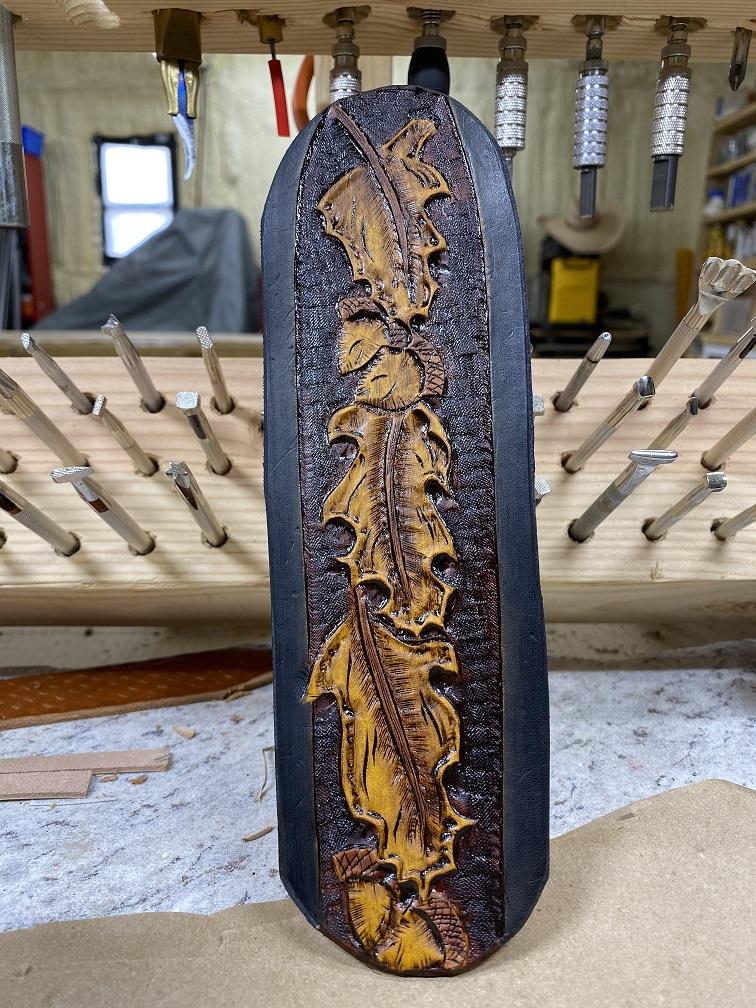
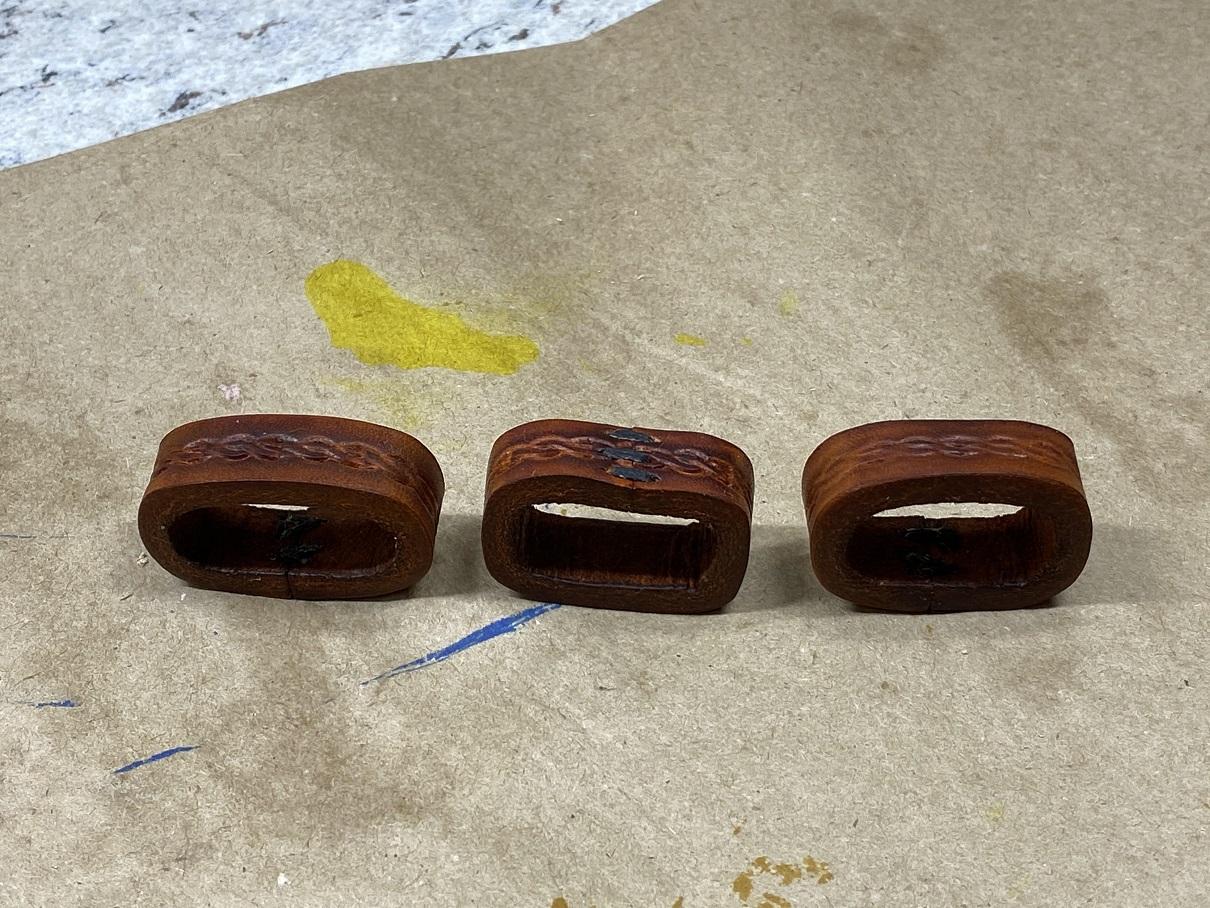
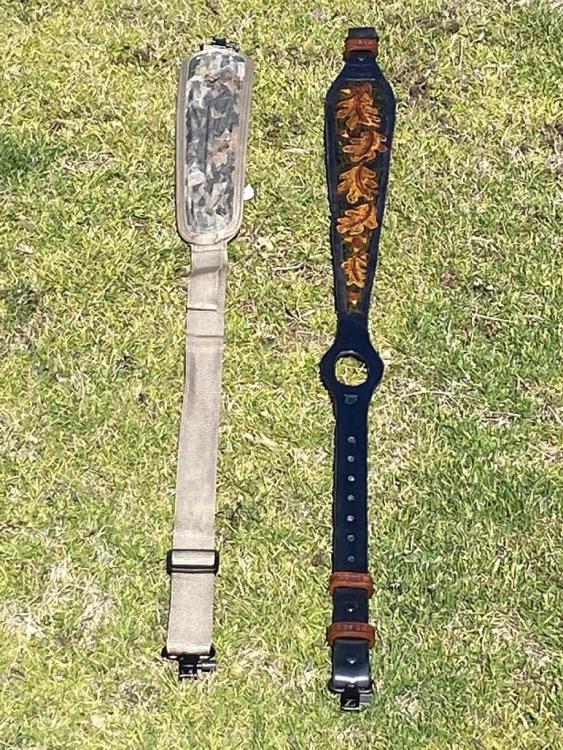
Using the Gonzales thumbhole pattern, just as I did for Miss Tina's Sling for the CZ455 Varmint 22, I made a sling for my Ruger Ranch 556 rifle. I carved the classic oak leaf and acorn pattern. First I carved several practice patterns. Rather than go with the natural color she wanted on the sling for her CZ, I chose to go with a black sling to compliment the light green factory stock on the Ruger, and used Autumn colors for the carving. I stained the keepers a light brown and antiqued them in dark brown to bring out the tooling. I am happy with the outcome, but like most of us, I certainly saw things that I know I could do better next time around. Don't we always. The keepers. The center keeper is upside down, you can see the stitching holding the loop in place. I burnished them around a form made from two scraps cut from the strap of the sling to form them to get the shape. I burnished the edges prior to cutting the three lengths, learned from the first time. The completed sling: I was happy with the outcome, but always room for improvement. I ordered a set of half round end cutters which I will use on not only the ends of the sling straps, but to cut the inner loop of the thumbhole on future projects. Should give me a much cleaner cut.

-
Great Job. I'm thinking of doing one to hang in front of the seats in the UTV to hold either a rifle or shotgun. That way when you bail out to take a shot at either the Coyotes or Feral Dogs harassing the livestock, the firearm is Right There. I have a handgun holster with a magnetic mount I made, but Miss T isn't as good with handguns as I am... up close, 15 to 20 yards, she's on target. Longer shots... not so much. Rifle or shotgun, she'll get 'er done.
-
Finished the practice piece. I'm happy with it. Will start on my sling.

-
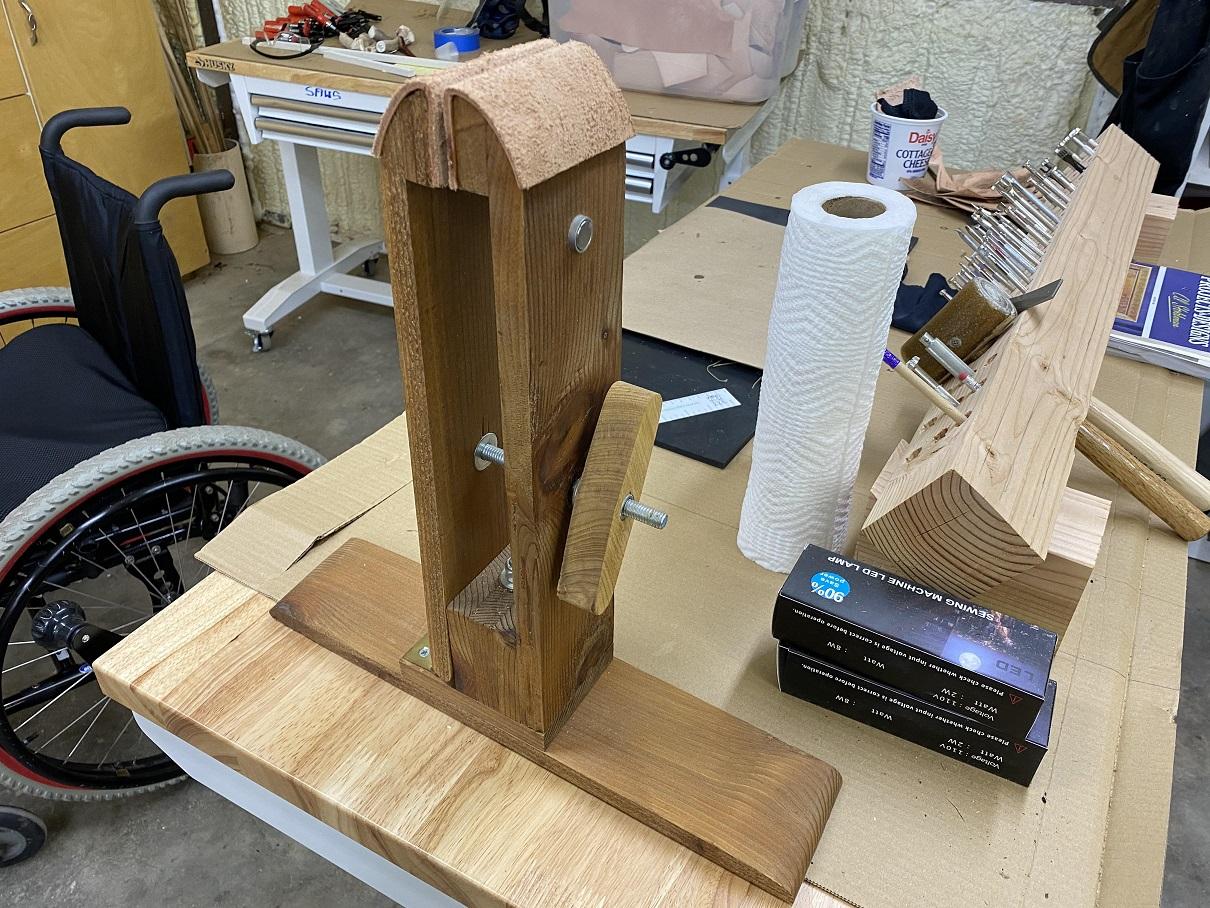
I made myself a stitching pony, makes all the difference. I saw various designs on the net and took what I liked and made various mods. Note that I put a swivel base on mine. I put the wings under my legs and can turn the vertical center to see both sides or turn the project completely around if need be. I didn't want to use just a wing nut, I cut the wooden oversize wing and just tapped the nut into it. tightening it just pulls the nut farther in. I did put wood glue around the edges of the nut after tapping it out and then pulling it back in to seat it. I put thick leather on the jaws to pad them, don't want to scar a project while sewing it. An late addition after the first few uses, were the magnets on either side to hold the threaded needles anytime I needed to put them down. I DIDN'T countersink them intentionally, so that the needles were easier to retrieve when I was ready. This works well. I may decide to make a base for it to allow it to sit on the floor, and I can put my feet on the base and hold it in position. A future project. I'll use clamps to attach it to the base so it can still be used watching TV on the sofa etc.

-
Dwight, I like the mod to my design of adding the rod for the lacing and thread for hand sewing. I'll have to add that to mine when I expand the design to cover the width of the workbench, great idea. I'll use a wooden dowel. I think I have several. Very Nice! I'm liable to add TWO 4x4 blocks to the bottom with an inch break between the groups of holes so I can cluster the types of stamps together. Shaders, Basketweaves, Camos, etc. Then slots for the cutters, bevels, etc on the next shelf, and the top few shelves for dyes, paints, etc. Probably summer.