Brokenolmarine
-
Posts
595 -
Joined
-
Last visited
Content Type
Profiles
Forums
Events
Blogs
Gallery
Store
Everything posted by Brokenolmarine
-
You'll find the basis for this in this Video, and I added to it along the way from other videos I watched. The two important acorn sections are around 33:00 and 43:00 minutes, but it's a great video for tooling Oak Leaves and Acorns. I used it's techniques when tooling my Thumbhole Sling.
-
For your acorns, try these tips I picked up along the way. * First, using your swivel knife, cut your outlines, just a bit deeper. * Bevel the nut portion toward the inside using a thumbprint, tilted up at about a 45 degree angle. This makes the nut, look rounded. * A couple lines cut across the nut at the bottom and one crossing those is more than enough stress cracking. * For the cap, bevel around the edges, again, toward the inside, at an upward angle, giving you the rounded edges to your cap. Your hatch lines should not be straight, but curve around the cap to reinforce the idea of the rounded edge. Equal spacing from one end to the other in an arc. Then cross hatch by curving the other direction. This really makes them pop.
-
My wife just lost her milker, to milk fever after dropping a calf. Vet was out several times over three days, couldn't save her. She was a Jersey, named Molly. Beautiful work on the collar.
-
 Looks Great. My grandfather was a huge wrestling fan in Tampa when I was a kid in the 60s. He would take me to the Armory to see the heroes and Villains of the day in person. Jack and Jerry Brisco, Boris Malinko, Pak Song, and the rest. The Championship Belts looked Priceless from the cheap seats when you're age is expressed in single digits. I agree with the previous poster, make quality copies and put them away, the grandkids and great grandkids would be impressed.
 -
Thanks Ferg, I missed the size when I read the original post. Old eyes or short memory, or both. As I said, I am impressed.
-
I could see all kinds of uses in my hobbies. Woodworking for leather inserts, knifemaking for lasered designs on the sheath. Would it burn the image in wood panels as well?
-
Really cool result. How big is that image, and long does the process take for that size? I'm interested, not thinking of buying a laser set up, my smart phone outwits me. Just curious about the process, and impressed.
-
The butcher block top looks really good. I need to refinish my woodworking bench top. Never take the time, and I have plenty.
-
I have a Glock 35 in 40 caliber and I would be proud to carry that holster. Good Job. I don't carry the 35 any longer, as it's the House Gun. But you did a good job on the design and execution. I use the drill press idea myself. Makes life easier.
-
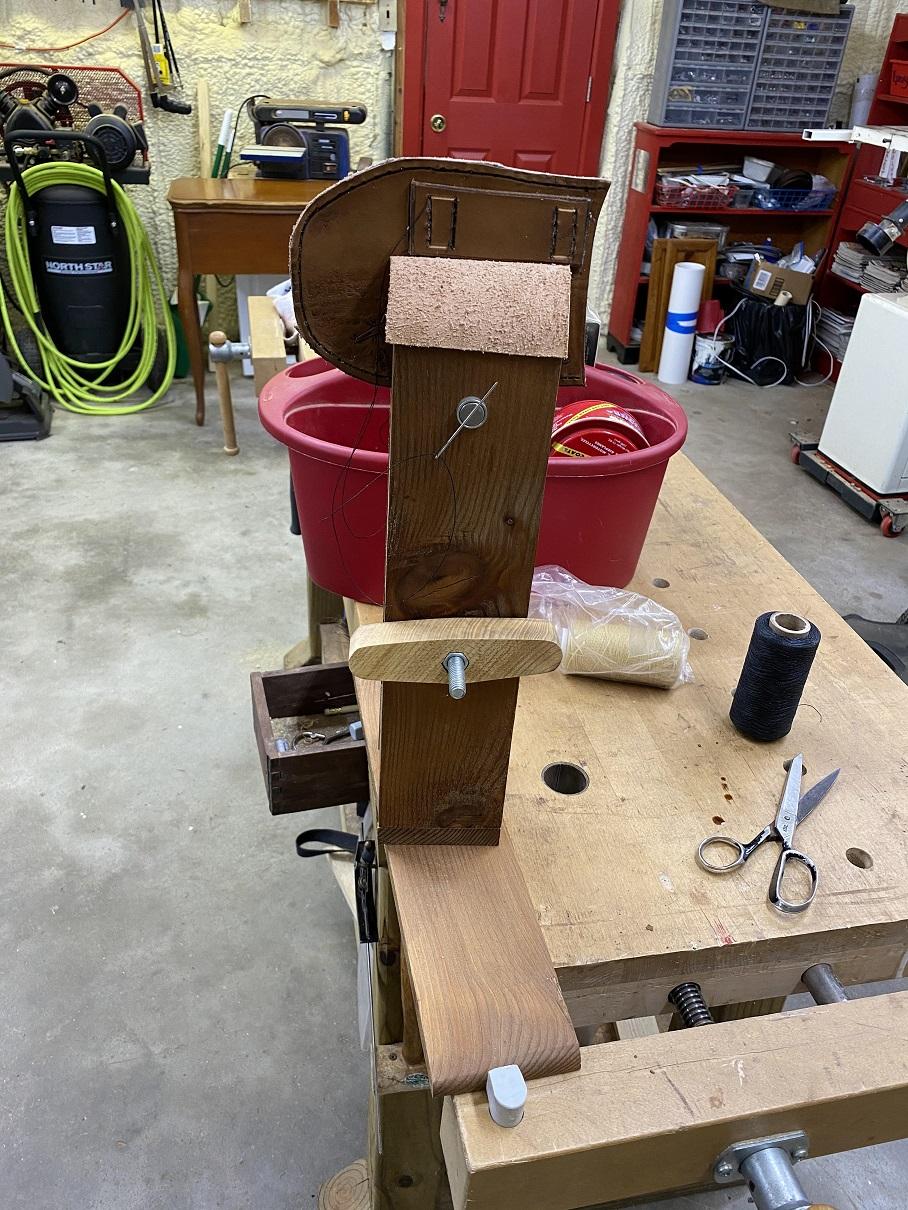
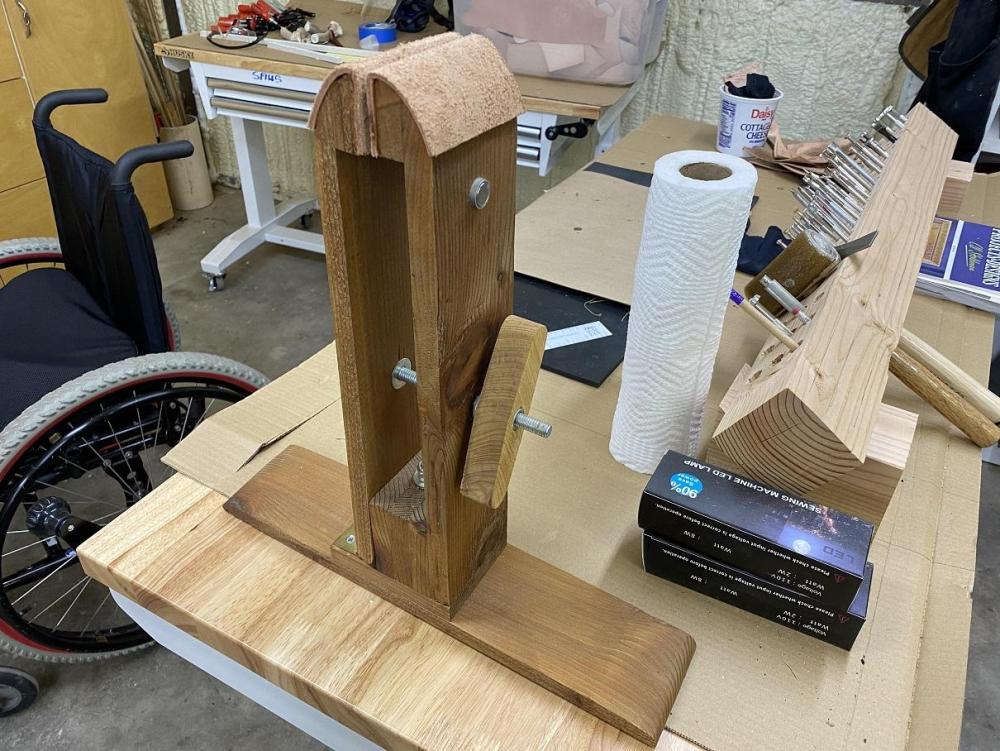
Great Job on the build. I believe I posted my pony on the forum a year or so ago, but here is a look. I too put magnets on mine and had intended to mount them flush on either side, but decided that would make it hard to retrieve the needles when the time came, so I mounted them proud. It works great. I didn't have an actual knob on hand when I built mine, so I made a knob to open and close the jaws by gluing the nut into the wooden oval formed by the bandsaw and the benchtop sander. Looks cool and easy to manipulate. (Cheap too, came from the scrap bin.) I recently mounted the pony on a base so that it doesn't have to be clamped on the bench or trapped under my thighs in a chair. Much easier to use. I need to take a pic of that. I can rotate the pony for a better angle, but I don't loosen and tighten that base bolt, it's snug but not VERY tight. It's stable enough.

-
Doc Holiday Shoulder Holster (movie Tombstone)
Brokenolmarine replied to Littlef's topic in Show Off!!
Very nice. I was thinking of making one of those for driving. I have a couple shoulder holsters for other guns, but I have a birdshead .357 and like it a lot, I thought the shoulder holster would be great for a driving rig. -
Awesome work by you both. I have an antique knife or two in my collection, I might have to try and make a sheath for them. I don't know if mine would be period correct... Just fun.
-
Very nice. Smooth and classy come to mind.
-
A Birthday Knife and Sheath For Miss T
Brokenolmarine replied to Brokenolmarine's topic in Show Off!!
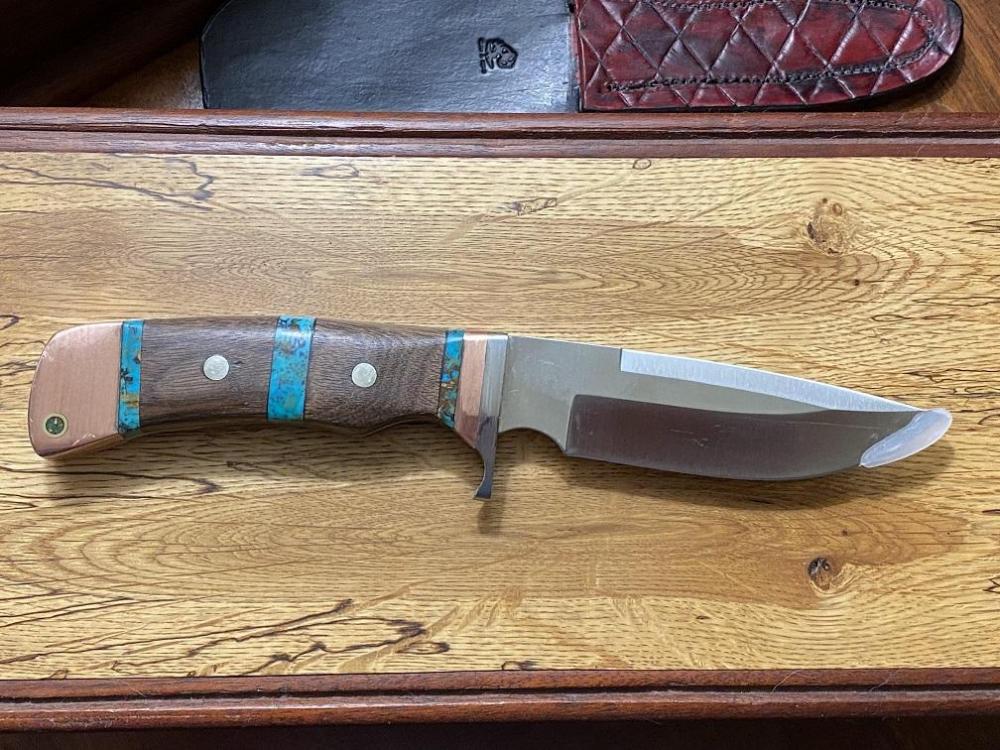
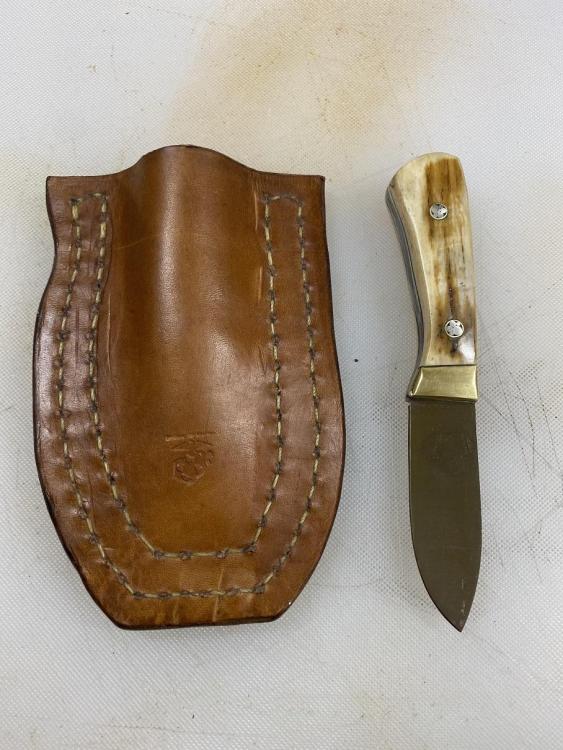
Lately I have tried to push myself to build my skill levels and have done a few knives where I had to fit multiple components together to form the handles. Bolsters, scales, inlays, pommels, or endcaps. I like the challenge and try and make them fit seamlessly. This was my first attempt at a major segmented build. The blade is a Damascus blade blank from Jantz. The Bolster and Pommel are both in Nickel Silver, formed from bar stock and much harder to work than I ever imagined. The turquoise came directly from a mine in AZ and is bordered by Burgundy G10. The Pins are Nickel Silver Corby Bolts. I was very happy when the knife came out almost exactly like the sketch, which I played with for days before starting. Mainly because the blade blank and the turquoise were not cheap. The latest was a much more complicated pattern, and the only change from the sketch was moving a pin hole in the blank to balance the design as I added the copper bolster and covered the extra pin hole in the blank as well as the lanyard hole. This one has a Stainless Blade blank and Guard, with nickel silver pins. The copper bolster and accents beside the blade guard also came from Bar Stock and were shaped to match the blank. The turquoise came from that same order from AZ. The wood for the scales is Black Walnut. I haven't made a sheath for this one yet as I doubt it will ever be carried.
-
A Birthday Knife and Sheath For Miss T
Brokenolmarine replied to Brokenolmarine's topic in Show Off!!
Thanks, I use a lot of wood in my scales as well, curly cherry, cocobolo, osage orange, spalted woods make great knives as well. -
A Birthday Knife and Sheath For Miss T
Brokenolmarine replied to Brokenolmarine's topic in Show Off!!
If you look closely at the Mammoth Ivory Knife, the Mosaic pins are dog paws. -
A Birthday Knife and Sheath For Miss T
Brokenolmarine replied to Brokenolmarine's topic in Show Off!!
Next, we would need a sheath for the birthday girl, something nice. Hobby Lobby had all their jewelry supplies 50% off and I had never done bead work, time to give it a try. Miss T isn't a pink girly girly, she is a farm wife. But, she doesn't mind a little bling... my Christmas gift one year was a Mammoth Ivory working blade. I bought several of the necklaces, and took them apart, chose the beads I wanted, including the dark jade tubular beads, some metallic accent beads with fake sparkle, and some end accent silver beads and stops. I sewed the sheath by hand, and then went back and sewed each pair of beads between the measured holes. It was my first attempt, and the one pair somehow didn't tighten completely. I told the Boss I could / would resew the line, but she liked it fine. It STILL bugs ME. What? The Mammoth Ivory Knife? Oh, okay, here it is....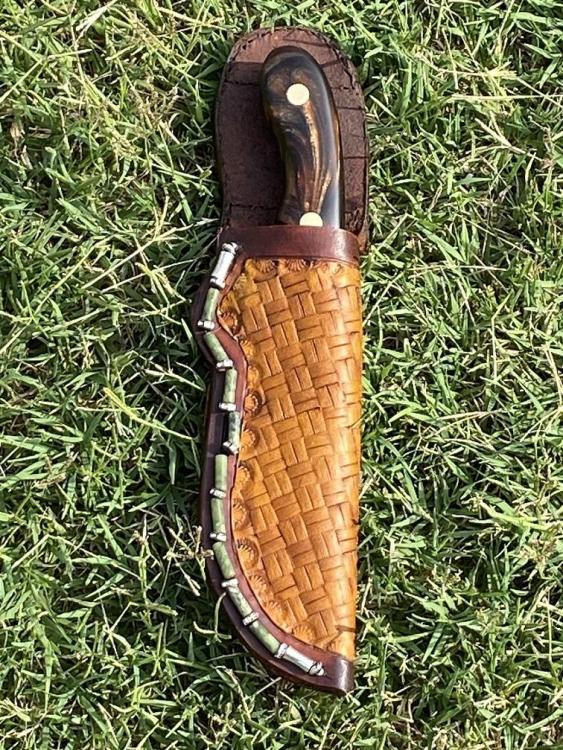
-
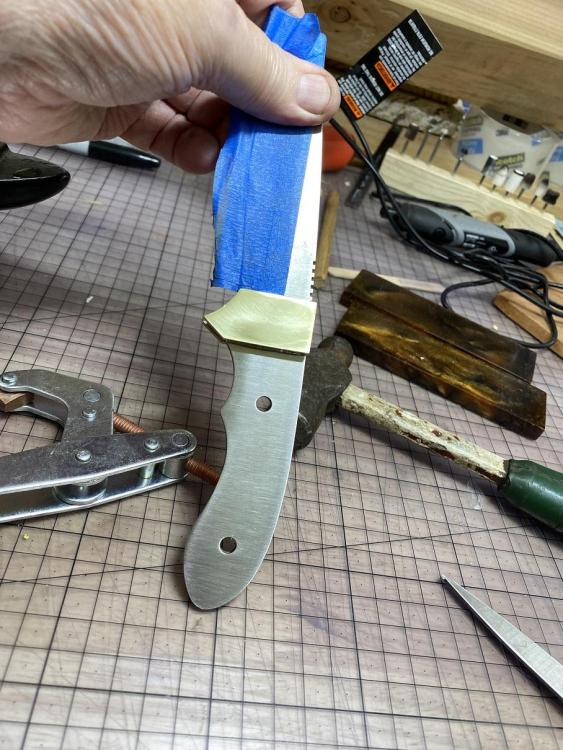
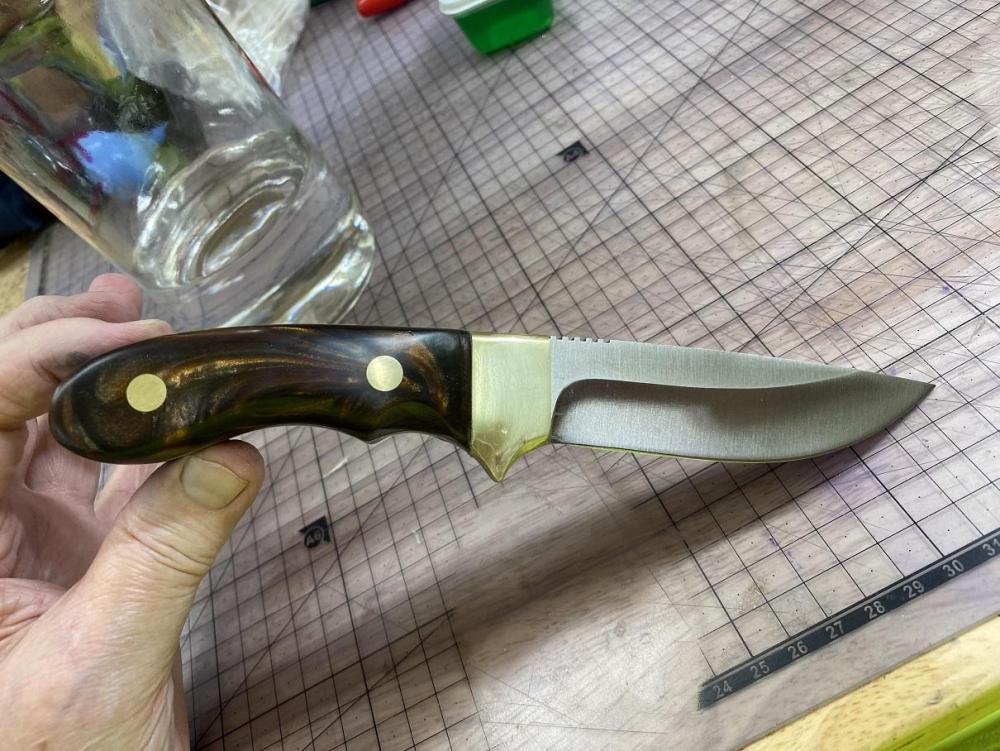
Health Issues have kept me away for a while, and mostly it has been our old enemy Arthur, you know, Mr. Itis? but, the Boss's birthday was coming up and I wanted to give her something special. My primary hobby these days is knifemaking, although I have to buy the blade blanks and get creative with the finishing. (See the evil Arthur above for the reason I don't forge the blades. ) On a recent trip to Jantz Supply in Davis, Miss T had picked out a Synthetic pair of blanks she liked and tossed them on the counter. They were dark chocolate with golden amber floating thru, nearly holographic. Looking awesome. I decided that would be the gift. I had a blank left, and a rough brass bolster that would fit the blank. We were in Business. I started off the project by polishing the bolster to about 600 grit and choosing the best side. Then I fitted it to the blank and peened it in place. Once in place I polished it to 1000 grit to start off. This is accomplished with a light spritz of water, a "touch" of dawn, and working up thru the grits to 1,000. If you look in the background of the picture, you can see the chocolate amber blade blanks on the bench. Move them in the light and the gold seems to move as well. Since this isn't a knife forum, I won't go into great detail on the build, but the knife came out very nice, taking about a week, since Arthur and I had an agreement. I'd work for no more than an hour and a half at a time. No more than three sessions per day. I finished the knife by sanding the wood to 1,500 grit and polishing the metal to 1,500, then using jeweler's rouge to bring it to a nice high luster. Everything got three coats of bee's wax.
-
I like them as well.
-
When working in a small space, a couple things will help a lot. I got these tips when I started in a 12x20 shop. I had shelves down one side, half the other, and two workbenches. Clutter is your worst enemy. Those blown molded cases the tools came in? Unless you will be hauling the tools around, donate them to your carpenter friends. Their cases are probably beat up and missing handles, they can use them, you can use the space. Scraps... I was guilty of hoarding scraps. I might need this. In most cases your space is more valuable than that 55 gallon trash can of scraps you held for a year and never used. Honestly evaluate off cuts and toss those you are likely to not use. Yes, materials are expensive, space is valuable. Organize. I was told to put one cabinet in the end of the shop, get rid of the other shelves. Opened up floor and wall space. Then, put stuff in it's place when you are done. You won't spend time looking for the last place you laid down a tool in the clutter.
-
I enjoyed the movie, but find it hard to link that actor to the lead in "Old Henry," an awesome movie. The strap turned out great . You did a fine job, something to be proud of.
-
Everything about the knife is impressive, I especially like the optical illusion of a depression the grain around the knot creates. When I make both knives and boxes the grain often choses the wood for me, and boxes are often built around their tops, chosen for the grain patterns. I'm just starting to get the hang of carving, vs. Tooling patterns. The Eagle looked great to me, though I would have added the extended talons for dramatic effect.
-
Dad was in the Blue Angels in the late 60s when they flew F4s. He left the Navy with 23 years active duty, and six months later started across the hanger as a civilian, managing tools and test equipment for the training squadron. Thirty two years later, retired again and went to work as a starter/maintenance guy at a private golf course there in Pensacola... He couldn't really retire. They bought the first house in a new subdivision a few miles off base in the late 60s, very nice neighborhood. The last time I visited, most of the homes were rentals... My folks had bars on the doors and windows and the alarm was ON 24/7. They could no longer sit on their porch in the evening, due to hearing gunshots in the area every night, but refused to move. This was in spite of their granddaughter, a career federal agent, begging them to. "We've lived here more than sixty years, we'll die here." Dad passed in December. One of my stepsisters moved in with my 87 year old stepmother. "You can sell it all when I join my husband," she told her. That generation doesn't scare easily.
-
I went to part of elementary, middle school and thru my sophomore year of high school in Tampa. Nice family neighborhood back then, and it was a pretty good period in my life. Then my mom packed it in and moved to VA. Used to hang out on the Hillsboro River, spend the day at Lowery Park, and at the rec center up from our house beside a huge church. Summer nights we'd go to fast pitch softball games and shag foul balls and trade them in at the snack bar for little debbie cakes. A lot of the streets in the neighborhood had indian names, and the main intersection near there was Sligh Ave and Florida. I hung with a group of kids and when Stephen King wrote Stand By Me, I thought he peeked into my childhood.
-
Nice looking set. I have made some holsters myself, but haven't tackled the belt yet, I have started slowly losing weight and want to level out before I make a belt that would end up (hopefully) too big. My plan is a strong side 7-1/2" Ruger 357 Blackhawk and a crossdraw 5-1/2" Uberti birdseye 357 on the weak side. Belt loops in the back. We'll see if I get there.