


Tastech
-
Posts
148 -
Joined
-
Last visited
Recent Profile Visitors
4,117 profile views


Tastech's Achievements
Member (2/4)
-
Pedersen 309 Bobbin case wires question
Tastech replied to Einherj's topic in Leather Sewing Machines
@Einherj I just love seeing an old machine rise from the ashes . Looks like you are all over it and thought things through . You are right in not pulling the whole thing apart and only cleaning the moving parts. If you do need to dive in them take plenty of photos because through my experience you will need them for reference. Keep us posted on your progress and keep the photos coming . I would also like to know of any unexpected problems you came across and how you solved them . In my experience ,when you come across a dilemma that you can't solve, just walk away and let it brew in your subconscious for a while . The solution will reveal itself when you least expect it. Just so you know and to avoid problems with the spouse . Kerosene will stink your shed out for about 2 weeks . Its a sacrifice worth making. -
Flatbed Table Attachment For Adler 69 Machines
Tastech replied to Uwe's topic in Leather Sewing Machines
Is the Bamboo top a repurposed cutting board from IKEA ? -
Pedersen 309 Bobbin case wires question
Tastech replied to Einherj's topic in Leather Sewing Machines
You are correct , Its a heater for the wax pot . Modern threads come wax impregnated which makes the wax pot pretty much redundant . You can still get un-waxed thread but the right wax is hard to get . If you only use the machine intermittently for the odd repair then use the pre-waxed thread. If you are doing a large production run then heated wax is more economical in the long run . If you are going to use the pre-waxed thread get the braided polyester type because it is much more durable than the linen/flax type . While you are at it give the machine a good clean using kerosene and a paint brush . old wax can clog up the machine and makes parts sticky and not move properly . The rapid is a very good machine when it's working smooth. -
I have never seen such a machine in the shoe industry . However i have seen similar machines in the sheet metal fabrication trade. Its basically a type of scissor or shear made for trimming and cutting external circles . How did it end up at a cobbler shop ? My guess is based on my experience as both a shoe maker and metal fabricator . All my machines are under the same roof although in different sections and corners so too someone not in the know they would assume they are all related to the same trade . I would assume the cobbler saw a machine for sale that looked handy and added it this collection only to find it isn't very handy to a cobbler after all . Still a cool machine and worth hanging on to .
-
@kgg, Thats $17 AUD if you are a member . I think its quite reasonable for a needle that needs to be specifically made to order and then bought in batches of 1000 only to sit on a shelf for 10 years or so. Landis goodyear welting machine needle cost me about the same and are prone to breaking more often . One of my supply reps once said to me after complaining about the cost of materials . Don't think of what it costs , think about the money it will make you . Fair point . My accountant said to me once after i complained about the amount of tax i have to pay . If you have to pay a lot of tax it means you made a lot of money That's good not bad . Compared to the time it takes to hand stitch as opposed to using the machine a $17 needle is fine by me .
-
@Einherj. The needle has no adjustment apart from the stitch length . Where the needle is fixed is solid and cant move therefore i conclude you have the wrong needle . The current wear marks could be as a result of deflection of the needle when re -stitching through existing holes like when doing a repair . However don't sweat it because new needles are available from here . https://www.leffler.com.au/pederson-needle-hvy-for-308-machine/ . This is the only source i know of . They are in Australia and they are reasonably priced . Become a member for a good discount . The needles are quite tough and last a while but i don't know for how much longer they will exist so get a few as spares . I occasionally sharpen mine with a small hand held diamond file . If stitching sole leather wet the leather beforehand.
-
I would use kerosene in a spray bottle and a paint brush to clean it and remove all the old brown oil it will also help remove any old gummed up oil Numerous applications will be required . For stubborn grime soak a cloth in kerosene and wrap the cloth around the particular part over night and wipe off or work it with a brush the next day . Start from the top down . Keep in mind that kerosene stinks to high heaven for at least a week so do it outside and under cover . As for oil,a sewing machine white oil will do the job .I use a synthetic motor oil 5W-30W on my outsole stitcher and it seems to love it . you will also have to replace all the rubber belts because they deteriorate over time but they are easy to find in an auto parts shop. Please keep us posted on progress . I love to see an old machine come back to life .
-
Here's a thought . If you buy it but don't have the shoe-making skills to use it to its potential why not make some sandles . They are very easy to make if you have some basic leather skills . The method is simple. Cut an upper pattern and using a last glue the straps in place using a leather innersole ,then glue on an outer sole in either rubber or leather with the straps sandwiched between the 2 layers then stitch the 2 layers together ,and there you have a pair of sandles . You could easily make 7-10 pairs a day and sell them for $70- $100 a pair . I am sure there would be videos online somewhere of the method and even patterns that you can modify to suit your personal taste.
-
The Machine is called a Blake stitcher or McKay stitcher . It is used for sewing the soles on a shoe from the inside . In my opinion its is an inferior way of making a shoe compared to a goodyear welt . It is however quicker than goodyear because it eliminates some material and and shortens the process . The Italians love them and some of the chinese shoes are made using the process. As for other uses i cant think of any but don't let that stop you buying it . At the very least it is a cool looking machine and will clean up nice . Get them to throw in the cobblers hammer sitting on it as part of the deal . If it was in Australia i would pick it up as a repair machine and share it with 3 other cobblers i know . Between 4 of us i can't see it being used more than once a fortnight .
-
can anybody please help me find this "sole trimmer"?
Tastech replied to TakashiOkada's topic in Leather Machinery
@TakashiOkada. Here is a photo of the guard. It is aluminium. it slides over the shaft and covers the blade it can be moved left or right using the allen key screw to only expose the amount of blade you use . It's not hard to make if you know a machinist . I get my blades from Leffler in Melbourne Australia . They are the Landis agent here . The link is an example of what they have . search on their site for Landis sole trimmer blades. They have many variations . They also have various size trimmer shields for when the blade loses its diameter because of sharpening https://www.leffler.com.au/trimmer-sole-5mm-/ There is also these guys in the UK . I am pretty sure that the british standard sole trimmer blades and the Landis blades are compatible with each other https://www.standardgroup.co.uk/shoe-repair-machines Keep in mind that i know for a fact that Chinese blades only fit Chinese machines . the internal diameter is different . The made in china machines are actually pretty good to use . The only drawback is the blades and brushes are only available direct from their factory and not interchangeable with British , American or Australian machines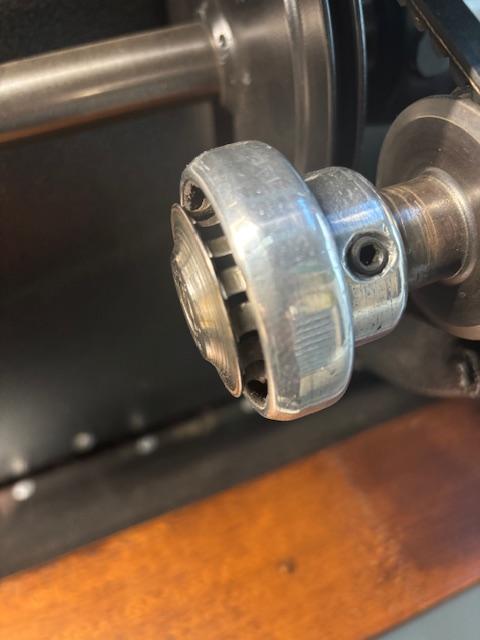
-
can anybody please help me find this "sole trimmer"?
Tastech replied to TakashiOkada's topic in Leather Machinery
@TakashiOkada Your internal measurements almost correspond to a Landis blade. I am getting the measurement of 19.4mm on the internal on my landis blade . Search for Landis or Sutton . They are interchangeable . I believe the British machines also take the same blade measurements . Now lets talk about saftey of your machine or lack there off .That blade needs a safety guard. You are one slip away from losing a finger and thumb . I saw it happen 30 Years ago to a co worker . His hand was a mess and he never worked again . Just looking at your machine gives me PSD and makes me feel weak in the stomach . Please do something about it .Please -
@Westaussie Yes we have our fair share of idiots in Canberra however they are generally not home grown . They are born and bred in other parts of the country then elected and sent to us . We tolerate them because we must . Canberrans have to wear the flack when its not of our doing. To the men of the country i say ,If you put half as much thought into electing a politician as you do analyzing a footy game post match we would be in a much better place.To the women i say put half as much thought into electing a candidate as you do buying shoes online and we are good . I asked a customer last election who she will vote for . She said the best looking candidate . I thought to myself typical . But then she elaborated . Whoever i vote for is going to screw me and if i am going to get screwed it may as well be the best looking one . LOL i can't flaw her logic . I make and repair shoes for some of our politicians and their advisers. Not all of them are dumb arses but some are world class idiots where i wonder to myself how these people even have jobs . I would not employ them to collect shopping trolleys in a car park let alone sit in parliament. I think democracy is a bit over rated .
-
@Westaussie. Although your problem may seen unsolvable, it is a reasonably easy fix . I own and have restored a few 308's and the problem you have is not uncommon for a machine of its age . If you know a welder take it to them and get them to first grind the teeth flat and then with a mig welder get them to weld some "meat " to the feet . It is then a matter of filing the shape and the required grooves . You can do the filing yourself . You will need 2 files .1 flat medium file to get the dimensions and 1 triangular file to make the grooves . The foot is case hardened from the factory which makes it hard . The welding will soften the steel to make the filing easy . After welding it is important to let the foot cool on its own , do not dip it in water or oil while hot as this will cool it quickly and harden the steel . Once the shaping and filing is done and you have done a test and you are happy with it . You can then get it red hot with a blow torch and drop it in oil while its hot to harden it
-
@kiltedkrafts As they don't have serial numbers i don't think you will ever know . All i can say is that it is pre world war 2 because the factory was bombed. Vihl perderson took over production after that and made them under their name . Both machines are identical and parts are interchangeable . Needles are still available from the link below but to get parts means to buy an old machine and cannibalise it. https://www.leffler.com.au/pederson-needle-ltr-for-309-machine/
-
Here is he previous post i was referring to . I am sure it is the same machine as this post mentions only a different brand name .