Tastech
-
Posts
148 -
Joined
-
Last visited
Content Type
Profiles
Forums
Events
Blogs
Gallery
Store
Everything posted by Tastech
-
Made in 1947. The first 2 numbers are the year of manufacture . If the serial number starts with the letters RF it means the machine has been refurbished .
-
FDC, I have a Landis K . Not as sexy as the 12 . I have to change the color of the threads from white to black and to brown regularly . I dread doing so . I have decided to buy another identical machine set up with a different color thread . The reason i want the same machine is simply for reference mainly . I want to Clean , restore and paint my original machine but it takes time . What i fear is that from the time i pull it all apart and put it back together i forget where and how things go . Its always the case That you forget to take the photo of a crucial placement and you have to work it out . With a second machine close to it i can always use it as a reference . The problems with these machines is that nobody really knows how to repair and service them anymore and the people that own them just don't know how to look after them . I remember about 40 years ago the people that owned and operated them were very possessive and temperamental about their machine . You would get abused if you stood to close to them and shanked if you ever touched them . LOL These days we call them the angry machine . You say a prayer and make sacrifice each time before you use them because one day they sew like a champion and the next it will chew you up and spit you out . It can be quite soul destroying . Ask any one who has one and they will either roll their eyes or you will notice an expression of shell shock on their face . No one who has ever operated one knows the feeling . One thing i have found with mine is that because i use waxed thread i don't have to heat up the pot . If i do everything goes to crap . I now use a 5W30W synthetic engine oil for lubrication and everything seems to run more smooth . For now at least . I have some Questions . How long did it take you .? Did you have to replace or make any parts for it ? Did you make any dumb mistakes and if so what were they so i can avoid them? What would you do differently ,knowing what you now know ? Any tips you might have from hindsight ? Keep us posted on your progress with it . No one really talks about this subject and i wish they did . For therapy reasons . LOL Tas
-
As a machine man i commend you . They are a complicated bitch to work on at the best of times and it appears you have done an excelled job . They take a bit of practice to learn how to use it well but i am sure you will sort it out . Congratulations on your new born .
-
Hey Steve. Because i spend so much time on the restorations i could never expect to sell them at i price that covers my time and expenses. I can spend between 10 and 20 hours on restoration plus the initial cost of the machine ,I am already about 2 grand in . They would reasonably sell for 1 grand but i am reluctant to take the hit . Send me a PM with your email and if i see one that i think is a bargain i well send you the details . There was one on EBAY from Tassie a few weeks ago that was going for $450 but i think its gone . It looked like it needed a new blade but the vilh perderson blade is no longer available . I can retro fit a Landis blade but need the machine in my possession to do it because i have to machine a new shaft and make some mods to the housing . Look for an ESTO or Landis because blades are available still . What specifically do you want the machine for ? This is the tassie one . It says ended not sold so he might still have it https://www.ebay.com.au/itm/204480802714 They can be hard to find in Australia but they do turn up . A lot of old cobblers have retired and died so these things are sitting in someones shed somewhere , you just have to find it . Sellers fall into 2 categories they are either asking a ridiculous price for a heap of crap or they go dirt cheap. I know of a RODI skiver ( not a cutter ) in Goulburn going for $50 but it needs a lot of work . It had a piece of fencing wire where a spring should be .lol. I didn't buy it a few weeks ago but i think i should have just in case i ever need parts . If its still there i might grab it and see what i can do . Regards Tas
-
I learned a long time ago that when it comes to sheds there is a fool proof formula to picking a size . what you think you will comfortably need and then double it
-
kinda of an opinion thing but asking anyway
Tastech replied to ToddW's topic in Leatherwork Conversation
Match the leather color to the handle of the gun .As per photo above -
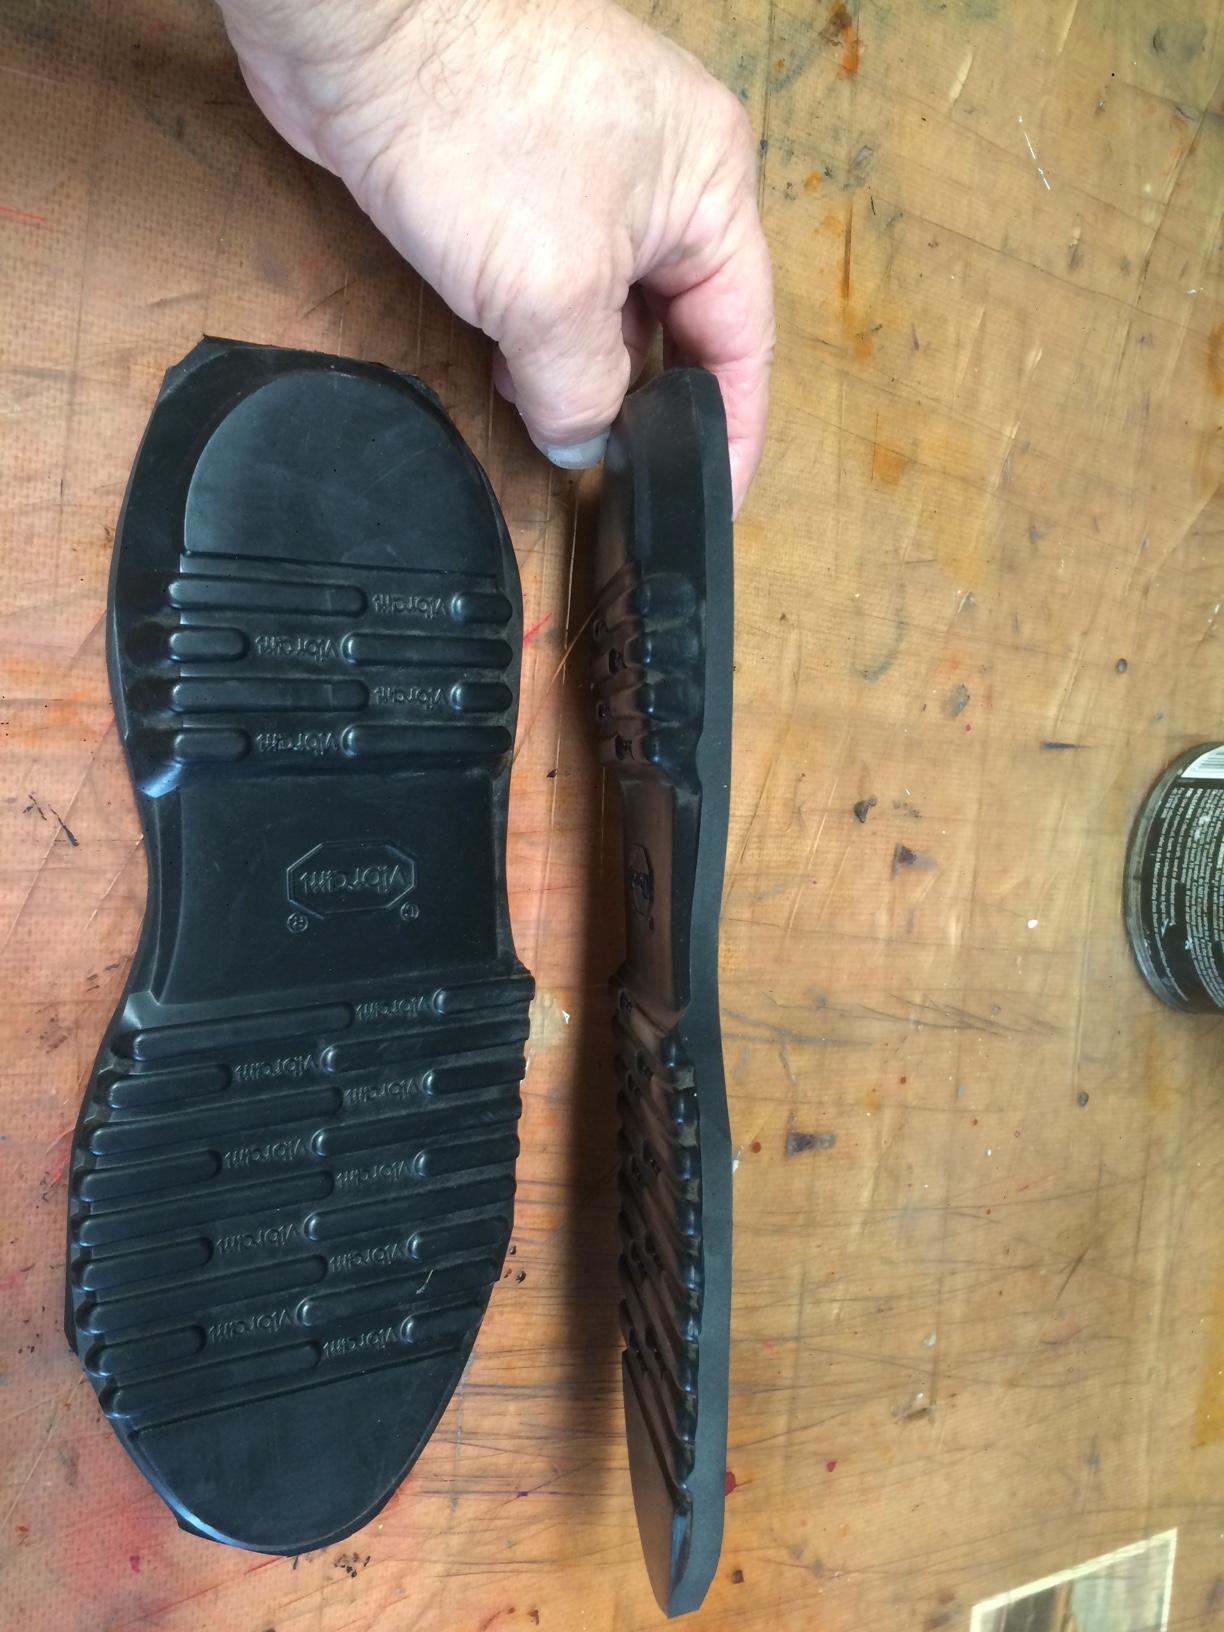
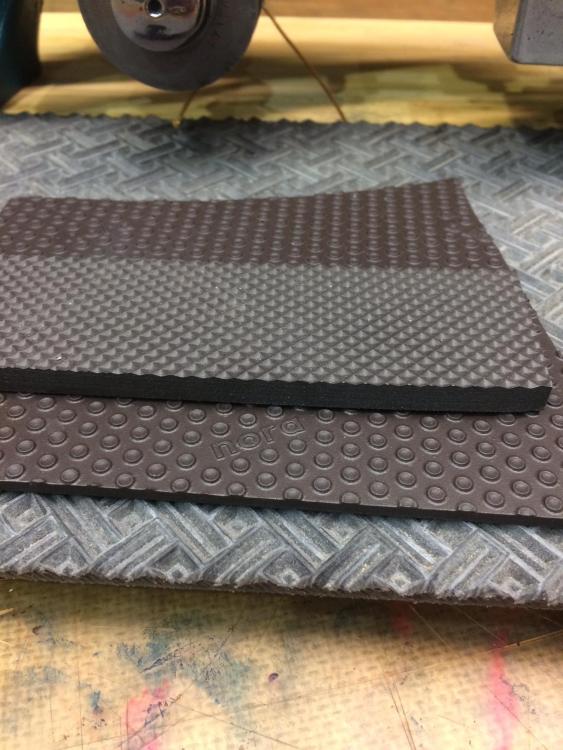
Deboardp. Here is a link to the material i would recommend. Its a consistent thickness material called microcell. It is soft, flexible , easy to cut and glue and is relatively tough. It comes in multiple colours , multiple thicknesses and multiple tread patterns . Not that expensive either https://www.leffler.com.au/shop/shoecare-repair-orthopaedic/shoe-bag-repair/rubber-heeling-soling/rubber-soling-sheets/ You must have a shoe repair cobbler close by . They don't have to be high end , Even a retarded one will be able to show you some options . Cobblers are notoriously cranky buggers so go in there on the premise of getting some soles on sandals ,but you want to think about options . They will show you some different types . Make sure you feel them to gauge the material for softness . Below is a vibram tapered sole with the heel ready to go .(recommended) The other photo is various microcell . Your options are too numerous to list or show . Its all about what you want the sandals to look and feel like . You can also incorporate a layer of cork below the top layer which over time will mold to the contours of the wearers feet . All decent shoes have a cork layer under the innersole . If you want a seperate heel cut one out and glue it on top of the sole . Your sandals should be thus . leather upper sole (innersole ) ,cork midsole , And rubber or microcell or EVA bottom sole . Don't over do the leather thickness as this makes them to hard and uncomfortable . Go to a few shops and study the anatomy of a sandal all are different but you will see some thing you like and you can incorporate that feature in your design . https://www.ancient-greek-sandals.com/en/eur/mens-sandals Note the different soles on some of these sandals . Only women can wear flat plain leather sandals , Men need some contour and some taper. Be prepared to experiment , and don't be discouraged by failures .You learn valuable lessons . The greatest glory in living is not never falling ,but rising when we fall . Sorry for my long winded answers but i don't do things half assed . Balls deep or nothing .

-
deboardp , I am in Australia and we use different name products so links to products from my supplier would be of no use to you . Find a wholesaler of shoe repair materials in your area and source your materials from there . They will have a few different brands of high strength contact adhesive and various types suitable sole material of various thickness and hardness . same goes for heel material . You may have to buy a full sheet of the material , but if you are making a few pairs then it is economical do do so . Go to your local cobbler and ask some question and get them to show you various materials that they use . That way you will become familiar with what best suits you and you can then contact a wholesaler . One product that may interest you is the birkenstock EVA sole . Its 8mm thick and relatively soft yet quite tough . Its a good sole for sandals . The brand Vibram is also worth looking at . EVA or microcell is probably the best material for sandals because it is light weight and shock absorbing . There is also another type of EVA material that tapers from heel to toe . The heel is about 15mm and it tapers down to 8mm one the ball and toe . You have seen this before but probably never noticed it . You will see it on UGG boots mainly . Using the tapered sole eliminates the need for a separate heel . Brand is not important because different brands use the same material formula . If you are not sure which material is better for you, experiment with different types. Keep in mind that you will need 2 coats of adhesive on the leather because the first coat absorbs into the leather . By all means stitch the 2 layers of leather together but only glue the sole material on so it is easy to remove when a resole is required . If you choose a separate heel of harder material then a few small nails for extra security is good . Allow me to confess my dirty little secret . I wear crocs . There i said it . LOL Australia gets damn hot in summer and you don't wear proper shoes if you can avoid it . I like crocs because they are anatomically correct therefore comfortable , However i wear out the sole in a couple of years . New ones take a while to settle in so i resoled my old ones with EVA . Specifically the birkenstock pattern sole . I also do the same thing for my wife . She has shown her friends and now i get asked to do it for others . Even though the cost of a" birkencroc" conversion cost more that a new pair of crocs people are loving it . Go Figure . Keep in mind that Crocs are not frowned upon in Australia like they are in the US . Flipflops are king and Crocs are legendary . Birkenstocks was the preferred foot footwear of lesbians 20 years ago but now they have mainstream acceptance and i resole them frequently . Fun Fact : Because Australians wear proper shoes only half of the time our feet are one size wider than the rest of the world .
-
the sole rubber from cobblers comes pre roughed on the glue side to make the glue stick to it . rubber that has not been roughed can come unstuck
-
May i offer my advice . As a shoe maker and repairer i glue rubber to leather all day every day . Its no big deal . Any contact rubber cement will do the job but some are much better than others . I use and recommend Renia Colle de colonge .Apply on both surfaces and let dry for about 30-60 mins . With a heat gun or even a blow dryer heat the rubber piece then apply to the leather . Cut the rubber larger than the sandal and trim the rubber with a knife . At some point you are going to have to replace the sole so you heat the rubber again and with pincers remove the rubber and replace . Using epoxy is not an option because it is brittle and will crack even the flexi stuff and will do damage when trying to replace the sole , Also you have to keep the sandal in a press for 12-24 hours . Another option is to use a product called shoe goo . It is flexible but needs to be pressed as it is not a contact adhesive . I use shoe goo mainly for hiking boots especially the toe piece that returns upwards . To keep it in place i wrap a cut down bicycle tube around the shoe for a day or so . Either way contact adhesive is the best option . Yeah its a bit wiffy but so what only smells for about 10 mins and it wont kill you . I would also recommend you get proper sole rubber from a cobbler as it has a different composition than regular rubber and comes in an assortment of treads .
-
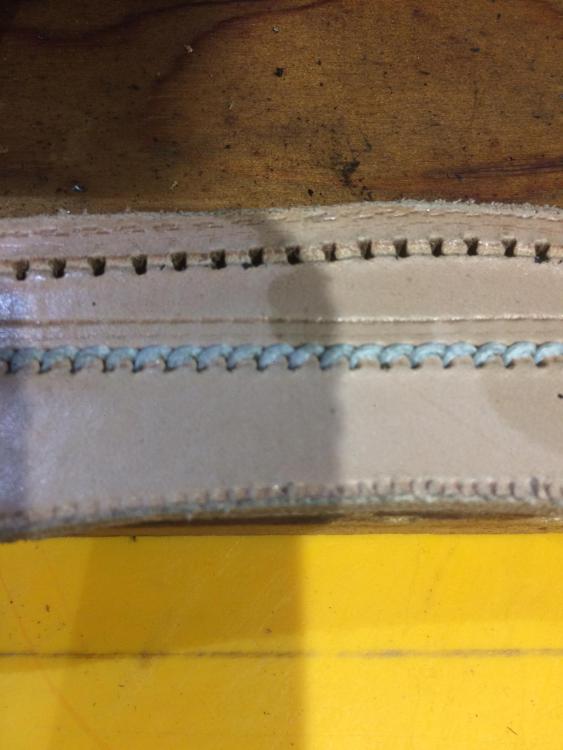
Unfortunately new parts are not available .However i can still buy new needles. You best way forward is to buy a "spare" machine and keep it for parts . I believe that Pederson and Junker parts are interchangeable . I recently found a Pederson machine and bought it without hesitation . I knew what it was but the seller either didn't or did not value it as much as i do . My intention was to restore it and put back to work in my shoe making trade . I love the simplicity of the Pederson ( about 40 parts ) compared to my Landis (500 ) parts . The missing parts i made to suit my needs and the machine started its first day on the job today . I am very impressed to say the least . I will still be on the look out for a spare machine with all the parts . attached are some photos .

-
Correct designation of pictured lasting pliers, where to purchase.
Tastech replied to cantman's topic in Leather Tools
I just bought A vintage George Barnsley bulldog pliers in excellent condition on E bay for $50 Australian dollars That's about 25 British pounds . I saw them on Etsy for $455 AUD , so it was a no brainer to fork out for them . I will most probably use them every day till i retire . My lucky day . On another site today i bought 17 George Barnsley edge irons in various patterns and a welt plough for $150 AUD . 2 super bargains in one day , that never happens, to me at least . Now i'm looking at you Joseph Dixon . -
Remote Pedal Modification For Enduro Pro Motor On An Adler 205
Tastech replied to Uwe's topic in Leather Sewing Machines
Uwe , I just love your think outside the box mentality (pun intended ) Now you have opened up a whole new can of worms for me . Can't wait till tomorrow morning so i can go down stairs and see what i got and what i can do . I'ts good timing too .I am just about to order 6 new servo motors for a shoemaker friend of mine to upgrade his machines and if compatible i might use the UWE method . -
Leather Sap 8.5" impact device, Slapjacks, sap, blackjack, Paper weight
Tastech replied to Adonis's topic in Show Off!!
An Update . After a bit if internet research i learned some interesting things Saps and black jacks are available for sale from Amazon , Etsy and Ebay . Patterns are also available . I found an article that gives a general rundown of different types from different makers .article below https://www.recoilweb.com/striking-distance-143325.html Upon searching the legality of such things in Australia i came across a list of illegal items but the blackjack is not specifically listed . this is the closest reference i could find Quote "Sap glove, or any other similar article, that consists of a glove (including a fingerless glove) that has a layer of powdered lead sewn under the outer covering and positioned over the knuckle area on the back of the glove. US members might find the web page where i got this quote very interesting . Some might die laughing and some might cry . Keep in mind in Australia we have nothing resembling the second amendment rights of the US. We have had to master the art of bare knuckle fighting instead . However i am still attracted to the idea of a black jack to even the odds . I would love to hear what the US members think of these laws The laws are in the link below https://www.criminaldefencelawyers.com.au/blog/weapons-licensing-laws-in-australia/ I did an image search for the cartoon /comic character with a striped shirt and black mask holding a black jack but nothing came up. -
Leather Sap 8.5" impact device, Slapjacks, sap, blackjack, Paper weight
Tastech replied to Adonis's topic in Show Off!!
I think i would be charged for it here in Canberra as well , But then again our cops are useless these days . Given that at any one time i have in my apron a couple of knives an awl and a cobblers hammer, Getting black jacked could be considered the lenient option . 45 years ago while working as a paper boy on a street corner i would carry my coins in a sock that i could swing around to deter anyone who thought i might be an easy mark .With the coins in the sock you could argue plausible deniability however with a black jack maybe not ,as it does not have a duel purpose. But having said that how much damage could a black jack actually do ? Apart from stunning someone i don't think you could kill someone with it unless you were a blackjack ninja. I am going to do a bit of research and ask some of my police customers what their thoughts are . BTW the same shoplifter/druggo stole the tip jar from the cafe next door earlier in the week . I have printed out a still photo of him from the security footage and turned it into a wanted poster and put in up in the arcade . I await his next move . -
Leather Sap 8.5" impact device, Slapjacks, sap, blackjack, Paper weight
Tastech replied to Adonis's topic in Show Off!!
I remember seeing them in cartoons 50 years ago ,i didn't realize they actually existed or what they were called . now i want one . I could have used it on a shop lifter yesterday .Instead i cracked him in the head with the heel of a boot i was repairing at the time . -
To give a bit of confidence in what you are about to do .Check out a youtube channel called "elegant oxford" . He has a few videos where he dyes old shoes .His work is very impressive . Just follow his process .
-
Here's my 10 cents worth . As a shoe maker i dye a lot of shoes . Both new and old . As a rule you can only go darker than the original color . Oiled leather can be done and is easier than most shoe leathers .The process is as follows . I use a leather stripper not thinners or acetone . Its available from a shoe repair wholesaler . Get about 1 litre and you might use about half . Use a clean cloth and keep replenishing the cloth regularly as it gets dirty . Allow about an hour between each stripping action . When you are satisfied that you have removed enough color and oil and the boots look lighter give it another strip for good luck . I use a strong dye called Raven oil Its more concentrated than your average spirit dye . Shoe repair wholesalers should have it . It will take about 3 coats using a cotton balls and allow 2 hours between coats . Check for any streaking but don't worry because you always do . Allow to dry for a day . Buff up the boots with a cloth or brush . You then need to moisturize. Put the boots outside in the sun to warm them and apply a leather conditioner . The warm leather will absorb the conditioner . Buff off with a cloth and repeat . You can then apply a navy blue polishing cream . Don't use a wax polish that comes in a tin , that is for a different leather . the cream polish contains color pigment , conditioner and a light wax . any streaking should be blended in and will not be noticeable . If it is we call it patina . I prefer to use a brand called Saphir for the conditioner . Its called renoveteur its a mink oiled based conditioner and is the best i have used ,Its a bit pricey but not in the big picture of things . Use a navy blue Saphir cream polish if you can get it because it is higher quality and contains more pigment . Having said that the US brand Angelus is also good . Post a before and after shot if you can . Or post a before photo so i can check it out and advise you from there .
-
looks like fish to me , what species ? i have no idea
-
Reading these comments and the dilemma of the start up speed makes me appreciate the machines i have on treadles . mind you treadles are not created equal .Not essentially true but you need the right size fly wheel to suit the machine and your purpose . My favorite combo is my Pfaff post bed with a 29K patcher treadle which has been modified into a flat bed . The secret is the smaller diameter flywheel . 12 inches .. Nice and slow for doing the curves of shoe uppers . Above all they are reliable , 100 years old and still going . You also need the right chair /stool to minimize ass and hip cramps .
-
Very informative video Uwe . Is that a 45mm pulley on the motor ? That Adler runs at a perfect speed for doing shoe repairs You say you have 4 motors . The next time you fit one of the motors could you please make a video of how you installed the needle positioner .
-
Webicons. I am a shoe maker as are you . Although i have various machines the one i use for just about all shoe uppers is a roller foot post bed machine . The advantages are to many to name but mainly accessibility it also does curves really well where as a walking foot does not . When it comes to desired features i would go for a modern one with a servo motor that may have to have a reduction wheel fitted , Must have reverse and knee lift not a foot lift . Must be compatible with the fitting of a side guide ( the drop down roller wheel type ). The size needle i use is a size 16 with a T70 (# 30) thread . As for models .well they all seem to be clones of older machines with a couple of extra features . Go for quality rather than price . Consider buying local from someone who knows the machine and has the skill to service it as well . You may get lucky and find a second hand machine with all the feature you need close by . The seiko model machine you mention is to me a bag machine not really a shoe upper machine . The compound walking foot tends to leave footprints on the leather where a roller foot leaves minimum track marks that can be ironed out anyway . Maybe watch a few YOUTUBE videos of people using a post bead machine and it will dawn on you that it will do those tricky closing maneuvers that can cause you grief some times . There is still technique involved and you have to follow an order of process as in you do certain things in a particular order . You soon enough work it out and. then it becomes a no brainer . Cowboy might be able to better recommend a machine to suit you as he is in the machine game and in your neck of the woods.
-
I have never seen a 31K47 however the walking foot is an attachment to the 31K basic body There are a few variations of the 31K main body .I have a 31K20 and 2 31K48's . The 31K20 is just a run of the mill dog feed straight stitcher . The 31K20 is a roller foot with a roller feed . Looking at the photos of your walking foot mechanism it looks familiar to me . I am pretty sure the walking foot mechanism is the same as the singer 132K6 . Its a beast of a machine that can sew some hardcore materials . As with a lot of singer industrial 's the parts are interchangeable with other models or in other words they share common parts . Find a manual to a 132K6 and compare the part numbers to your machine and see what they have in common . The 31K47 is was not a common machine but the 132K6 was and there are still plenty around . Spare New spare parts might be a problem so are second hand parts from a dead machine , The K6 was built so tough they just dont die . I have waited 10 years to source a part so be patient . I agree with Cowboy bob . A high step is not a bad thing . If its working then just leave it . It wont be the first machine or last machine you own . But will be a niche machine as what it was intended to be
-
Who did you order the 120 mm pulley from? Hey Kgg .I got the pulleys on Ebay here is the link https://www.ebay.com.au/itm/314035306394?var=612710007766 Now in hindsight i should have got a few more in various sizes just in case . I have been using poly belts instead of fixed size V belts . They are a red color ,they come in various diameters can can be cut and joined with a little insert able 2 way plug . Pretty cheap at $3-4 per meter . They stick well to the pulleys therefore no slip and have a fair bit of spring in them so things are always tight . I measure the length i need and deduct 10%.and cut it at that . So far so good . I don't do astronomical speeds or use the machines for a very long time .However if i was working a machine in a sweat shop i would go the best belt i could get .
-
That is so cool. I love it . Thanks KGG dikman . I ordered the parts for 1 reducer last night after reading this thread . I have 12 machines with 5 different table variations . I have a plan in mind to make a "universal" type but i might opt for maybe 3 different varieties . I want to make them aesthetically pleasing as well as functional. I will road test the first one to make sure i have the pulley combination correct to suit the machine and base the others on that I am starting off with a 45mm and a 120mm pulley combo with my motor at 100 rpm i would be somewhere in the less than one stitch per second range which is ideal for wingtips and brogue stitching on shoe uppers .