Tastech
-
Posts
148 -
Joined
-
Last visited
Content Type
Profiles
Forums
Events
Blogs
Gallery
Store
Everything posted by Tastech
-
Thanks for your questions and i will try and answer them tailored to what i think would be of interest to you . First of all I am Australian so i will answer you questions with my experience and how it relates to me ,but i am sure it applies to Europe and the Americas . About 40 years ago Australia dropped the 200% tariff on imported footwear and textiles ( UK and US were always exempt ) This lead to cheap inferior imports and people got used to the cheaper price which in turn destroyed the shoe manufacturing in Australia . Factories received less orders , needed less staff and eventually closed down or manufactured overseas . This also made redundant the tanneries , machine suppliers and service people , rubber manufacturers and component makers . Because shoes were cheaper people valued them less because they could buy a new pair for a little over the cost of repair . Yet there were enough good quality repairable shoes around to keep cobblers busy for the next 10-15 years . Because good shoes used to cost the equivalent of a weeks wages people had less but made them last by looking after them and getting them repaired . In the last 40 years a generation has grown up not having an appreciation of quality shoes and focus on brand names not quality . I call them the sneaker generation . Enter fast fashion and you have another generation who doesn't have time to wear out a pair of shoes before the next trend happens because of this manufactures make even crappier shoes . As a result these generation never had the need to know how to look after a pair of shoes or how to make them more presentable let alone how to polish . When it comes to cleaning and polishing shoes it is a simple step by step process however the process and the products used depends on the material . Full grain , nu buck , nappa , suede , reptile and canvas all have their nuances and methods . most grained leathers respond very well to a clean with a damp cloth and a good quality conditioner . Then either a cream or wax polish and a good buff . too easy. But most importantly is knowing when to polish or clean . Unfortunately most people leave it way to late and some avoidable damage is done . For some good quality advice and demonstrations on shoe polishing i recommend a YouTube channel called "Elegant Oxford " just watch his transformations and simple and relaxing narrative . Often some of my older customers will tell me how it was their job to polish the family shoes on a Sunday afternoon so the family can look respectable for the rest of the week . What times they were when a family's dignity balanced of the respectability of their shoes .LOL. To get started in shoe repairs you have to be familiar with the process and it is 100% process . Each process has its tool and technique . Most of the tools are multi functional so you really dont need that many . For repairs some essentials are needed , A cobblers hammer to your liking . For general work and a good all rounder is a German pattern cobblers hammer Made by Stahl , I also love my #2 London pattern George Barnsley for some heavier sole beating . (Bet you didn't know cobblers hammers came in patterns and size numbers) . A decent quality utility knife ( Stanley knife ) is very useful . Look for one with minimum blade movement . A pair of large and small pincers for removing heels and rubber soles and for cutting off nails . A curved awl and a pair of small bent nose pliers for picking out stitches . I use a series of knife blade shapes for different purposes and each cobbler shapes them to his preference . You start off with a big blade and it gets reshaped as it wears down and replaced and it gets smaller and reshaped as you get a new one . You have to find a good supplier of shoe repair materials because you cant really improvise , Sole butt leather , heel rubber , sole rubber and glues are all specific to the shoe repair trade . you will be overwhelmed by how many tread patterns and rubber densities and thicknesses there are , As a general rule we replace like for like . If it was soft we replace it with soft , same goes for hard . You can't stock everything so pick a few and use what you have . When it comes to machinery you really don't need much for home repairs . A sewing machine and a finishing machine are essential. Probably the best sewing machine for repairs is the Singer 29k71 . It is a legend of a machine and rightly deserves its reputation . You don't need a full blown finishing machine but can get away with a belt linishing attachment fitted to a large bench grinder . 36 and 100 grit belts for roughing and finishing sole and heel edges , the rest can be done by hand . Outsole stitchers are and can be a major headache if you don't know the machine and how to operate one . They can be frustrating at best and soul destroying at worse. they are referred to as the devils machine . Learn how to hand stitch soles efficiently and stay away from outsole stitchers . Hand stitching a pair of resoles takes between 60 -90 mins . My advise would be to befriend a cobbler and tell him you want to watch and learn . he may refuse at first but keep pestering . You cant beat the hands on experience . you have to touch feel and smell whats going on and familiarize yourself with the process and see the tools and how they are used . Chances are the cobbler will be a grumpy old bastard but hold your tongue and keep focused . You may even like it and you may even get offered a job . if so take it , the skills are valuable and transferable to other trades . I have a couple of favourite YouTube shoe makers , They are true masters yet just follow a process Terry Kim is similar to they way i like to do things --- Terry Kim's Shoemaking (2020) | Short Film @gnno (youtube.com) Siroeno Yosui is next level he is 2024 shoe make of the year ---- Making HANDMADE Classic Shoes in a Vintage Freudenberg Leather (youtube.com) you may also find this inspiring--- How It's Made:Handmade shoes with Norwegian stitching [asmr] (youtube.com) with these videos pay close attention to their tools and how they use them . All of them true masters . Its late as i write this . Tomorrow i will try and post some photos of some of the essential tools so you know what i mean . chances are you already have some . Sorry for the long winded answers but they were actually short .lol
-
I am the last Traditional cobbler in my city of 500,000 people . There are shoe repair kiosks in some of the malls but they know jack $hit . They can do some basic heels and not much else . An analogy would be . Kiosk shoe repairs are like a Mcdonalds and i am a qualified chef in a 5 star restaurant . I have always been suspect of a person who calls themselves a cobbler and cuts keys or does engraving . It means you do 3 things half a$$ed. I started as a cobbler then learnt shoe making and ended up as an engineer . After 20 years of engineering i went back to shoe making and being a cobbler simply because i love it . There is a big demand for it but no one wants to learn so i am pretty much the last man standing . Its not a hard job to learn but to learn and be good at it you have to have a passion for it . Therefore i think anyone here on the forum who wants to learn can easily do so by having the drive and just by watching a few videos on youtube to get the jist of how things are done and then practice . You do need a bit of a start up kit but that is easily obtained second hand on ebay because there are no more cobblers left and plenty of tools and machines to go around . One of the main contributors to the decline in cobblers is that shoes are not made they way they used to be and the quality of old is rarely seen anymore. One of the things that has changed in the 30 years is that 30 years ago people looked after their shoes and boots . I am disgusted in quite a few people and their complete lack of care . I can say with all honestly that 90% of people under 40 do not know how to polish their shoes . I only deal with high quality shoes and repair and charge accordingly . It is sad that the trade is on its death bed ,but i think there will always be some cobblers left simply because they love it as i do . Young people are just not interested in learning any trade so that only leaves immigrants . So if one opens shop in your town show some appreciation for the trade and give them some business . I could make a list of the country of origin of the immigrant cobblers and rate them but i know i would get into some sort of trouble but i will name 2 because i am impressed by their consistent work . Turks and Egyptians, i also hear Mexicans are born naturals . Ok thats 3 .
-
Do you want to oil them or condition them ? Personally i would condition them even if they are an oiled finish . Conditioning preserves the leather and keeps it soft ,Flexible and a good degree of moisture resistance . A neutral conditioner would be suitable . Conditioners are not created equal some are heavy and greasy some are light . In my opinion as a shoemaker a conditioner that contains Mink oil is probably the best because it easily absorbed by shoe leather and is a good base for polish . Mink oil will not darken the leather . When first applied the leather may have a darker wet look but in a few hours it goes back to normal . The good stuff is " renovatuer " By Saphir . If you want to maintain the color Saphir also have colored conditioner which also contains wax and it shines and protects very nice . Other conditioners that contain Jojoba oil , almond oil are also good If choosing a heavier greasy look then dubbin or a neatsfoot oil, or lanolin conditioner is the way to go . Probably the best oil for conditioning an preserving leather is Emu oil , but good luck getting that . I got a gallon of emu fat 20 years ago from a aboriginal hunter and was amazed by what it could do . I would joke that it would soften a brick . It's is mainly used in massage oils as a carrier oil because it draws the Eucalyptus oil ( for example ) deeper into the muscle . However it remains greasy . Having said that Goanna oil (Reptile fat) Has similar properties as a massage oil . Can you see where i am going with this ? Snake is a reptile and has similar properties to both emu and Goanna . So there is some truth to snake oil for therapeutic Purposes . In Australia it is illegal to kill goanna, emu and even snakes except if you are aboriginal and you are going to eat it and you are on your own tribal land. They tell me that they use the lighter emu oil to rub onto arthritic joints and the fat on their boots and harness leather . They also tell me that many a boot has been chewed up by a dog so they hang them up high on a hook when not being worn . I had never seen Elephant leather shoes ever . Until about a month ago where i resoled 3 pairs from 3 different customers in the one week . One of the pairs was a vintage pair and made from the elephants ears . Interesting . The other boots were only a couple of years old and if i wasn't told i would never have guessed elephant leather . I would have guessed soft buffalo . They were made in south Africa but i don't remember the brand . They were a lace up work boot style .
-
Looks like a Half sole will do the job With a knife cut the stitching between the welt and outersole Remove the outersole with pincers . Under that layer will be cork . Remove the cork the best way you can .Screwdriver will do the job . Remove stitches from the welt using an awl to pick at them and tweezers to remove them . Replace cork layer. Cork floor tile will work if the real stuff is unavailable. I use a clear overhead projector plastic sheet to make the template for the cork . You will work out what i mean . Use a strong contact cement to glue the cork in . With a sanding block of about 36 grit Sand the cork flush with the welt and roughen the welt and any other areas where the new sole will sit as well to give some tooth for the glue . Sole leather is not you average bark tan leather so you might have to source a pair of half soles from a cobbler You will have to skive the sole leather where it will overlap the original near the shank . ( i Use a 30 mm overlap ) Apply contact cement to both shoe and sole and let dry and repeat . with a heat gun get the sole warm and put it in position then hammer it down , you will have to use the back of the cobblers hammer to push the welt against the sole ( yes that's what the other end is used for, That and for starting short nails ) Once all is good trim the excess using a sharp knife and sand the sole edge flush . A channel must be made on the sole to correspond to the distance off the outside of the welt to the stitching hole .(usually about 4-5 mm ) Wet the cut channel with a wet sponge or spray bottle and commence stitching following the welt hole as a space guide . You will need a curved awl , 2 needles and some heavy waxed thread . (The choice is up to you ) You start your hole from the welt side pushing out through the sole . Tighten each stitch as you go . How you finish the edges or sole is up to you but i recommend something waxy What i wrote above is just a summary not a concise step by step . You can watch a few youtube videos to see what i describe demonstrated and make up you own mind if you are confident to proceed . Or just take the boots to a cobbler and let him do what he does best . I do between 10-15 resoles a week but use specialized tools and machinery because i have to make it pay . But when i make my own shoes i hand stitch the soles because of the precision and finish but my fingers and tendons in the elbow ache for a month afterwards . By all means i encourage you to have a go , You will find it satisfying for sure .
-
Nice work and excellent design .
-
Pedersen 309 and Pedersen 300 sewing machines
Tastech replied to Mulesaw's topic in Leather Sewing Machines
@Mulesaw. I found out what may parts are for . A victor outsole stitcher . The guys at shoe repair forum helped me out . Perhaps you should join the forum and ask for info . They have a few industry specialists on there . They have some uncanny info on there . They are a grumpy old bunch but helpful none the less https://shoerepairer.info/ -
Pedersen 309 and Pedersen 300 sewing machines
Tastech replied to Mulesaw's topic in Leather Sewing Machines
@ mulesaw Can you recommend any steampunk lamp makers that might be interested? LOL -
Pedersen 309 and Pedersen 300 sewing machines
Tastech replied to Mulesaw's topic in Leather Sewing Machines
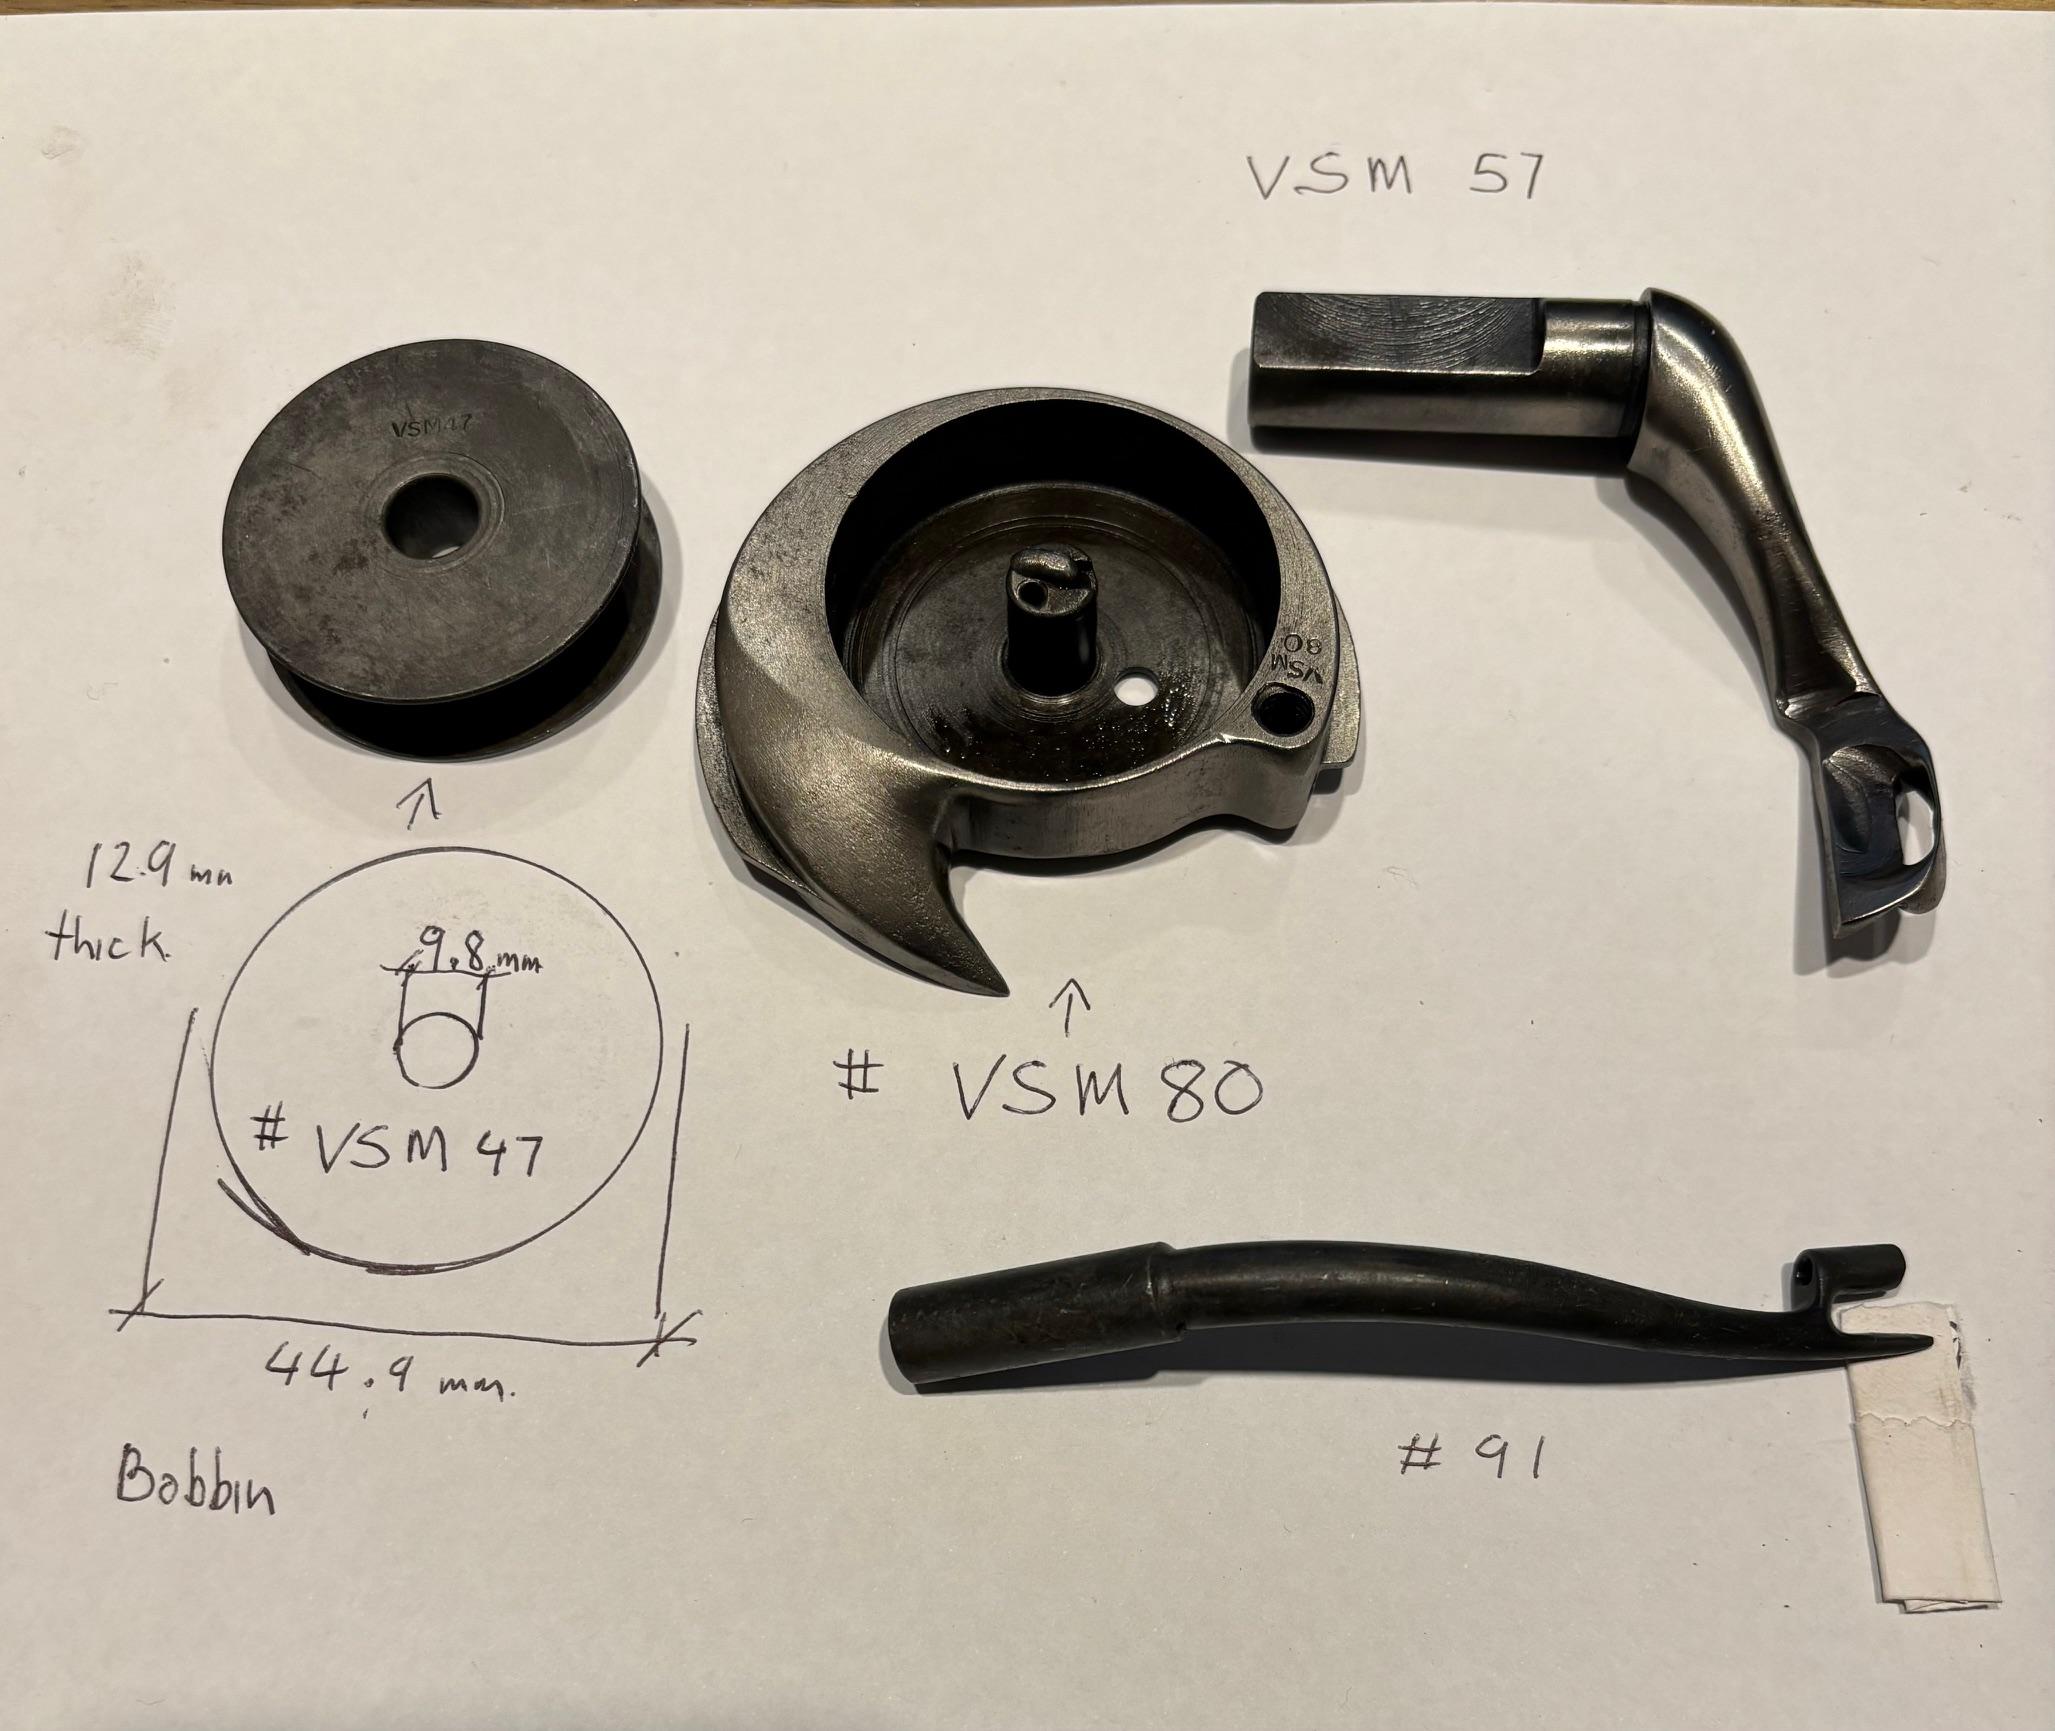
@Mulesaw. I checked my box of parts and took a photo of some easily identified parts . The parts seem to all start with the letters VSM then a number . I have no idea what VSM represents . I was hoping someone might know . I have taken some vernier caliper measurements in millimeters of the bobbin and listed the part numbers . The parts shown are definitely from an out sole stitcher but i have no idea what make. By looking at your photos and mine things look a little different .
-
@JAM It depends on the leather you use . veg tan and chrome tan have different requirements . You can soften up the leather using a mink oil base conditioner and polish over the top . Or before you do that and you need to get them to a right fit you can spray them with water in the tight spots and then wear them just a little damp and they will mold to your feet . Most people have slightly different shaped feet and lasts come in identical pairs so a little tweeking is necessary .Take note of where there are any problems with your existing shoes you have made and adjust the last in that area . For tight spots on shoes i do what i call "breaking" depending on where the tight spot is i will use anything from a broom handle to a steel cobblers last and use a pushing and rolling method to work the leather . Alot of people have problems with the heel area which causes blisters i use the breaking method and it softens things up . When it comes to polish i think a cream polish is best because it contains conditioner . Wax polishes contain a solvent that over time can dry out the leather and it begins to crack . Think of it like this . Conditioner is like a skin moisturizer. Polish is like make up. They do 2 different things . If the leather is well conditioned then it does not need polish . A cream polish is midway between the 2 . It contains conditioning oils , color pigment and some wax that polishes up quite well . I prefer mink oil base conditioners because they penetrate well and offer water resistance and allows the leather to breathe . The saphir brand does this . Collonil is good too. Avoid things like dubbin . that is more suited to oiled leathers and work boots . Neatsfoot oil is ok but can leave a greasy residue it is more suited for saddles and harness. When it comes to custom boots the are misnamed they are made to order not bespoke . The problem is the place selling them takes 2 measurements . Length and width them passes them on to a factory . 2 measurements are no way near enough I take at least 6 and make a note of any foot anomalies and 3 calf measurements at the very least . I make shoes but not riding boots . If a shoe doesn't fit right a little piece of me dies , because i have to re make it and that could be 20 - 30 hours of my life i will never get back . So its the person taking the measurements that screws up not necessarily the shoe maker. I don't care what any one says but you can't self measure , you just can't .
-
Pedersen 309 and Pedersen 300 sewing machines
Tastech replied to Mulesaw's topic in Leather Sewing Machines
Lol , Those pesky steam punk lamp makers , They have destroyed many a machine . I hope there is a special place in hell for them . @Mulesaw When your get a chance also post some photos of the bobbin and bobbin casing . I have some parts that might be for your sole stitcher . I got a random box of parts that are from an outsole stitcher but not sure what machine . Definitely not a landis or a british Victor so might be for a pederson -
Pedersen 309 and Pedersen 300 sewing machines
Tastech replied to Mulesaw's topic in Leather Sewing Machines
Good score ,i am envious . The 309 is a blake or mckay stitcher . Pretty reliable. The second is an out-sole stitcher . a predecessor of the rapid K. The rapid K was made by Pederson and branded as a Sutton in the US. I hope they don't need parts because they don't exist any more and the only source is to find an old machine . If you can show me a detailed photo of the outsole stitcher needles ,i think i have some . -
Which Post Beds do you recommend for under 3k?
Tastech replied to Jose4616's topic in Leather Sewing Machines
@Jose4616 16oz leather is very thick ,too thick for shoes and boots .If you choose to proceed there are 2 things you should consider . 1 is to skive your overlaps and do 3 runs of stitching . 2. Or wet the leather before stitching . If you don't skive the overlaps will be felt by the wearer and cause discomfort at the best or make the boots unwearable at worse . Then there is the lining to consider . As a shoe maker ,the thickest leather i would ever use is 8oz with the same thickness if reinforcing the the toe or heel. I have never seen or know of boots made with 16 oz . Nicks boots might come close but i doubt it . Having said that a roller foot post bed is my machine of choice for upper sewing . However a walking foot machine might be better suited to your needs You may also want to give some thought to post height There is a machine that i saw about a year ago that had a side mount motor with a digital screen read out where you make your adjustments. This particular machine had a feature for reverse where it will track into the same holes for locking off the ends of the stitch . From memory it was about 5 grand Australian dollars so might be just over 3 grand US . Take your time and learn about the nuances of different machines before spending the big bucks . -
Help -how can I stitch?
Tastech replied to rastanley's topic in Saddle Identification, Restoration & Repair
looks like a job for a curved shoe makers awl and 2.5 inch curved needle . I would use veg tan leather wet molded over where you want to put it trim it down to size . Pre awl the patch. Place it back on the saddle with some glue (temporary ) awl the saddle using the same holes as the patch using the patch as a template . very loosley stitch the patch About 2-3 inches loose .Once you have gone around once . you can pull the stitching tight and conceal most of it . I use a similar technique of loose stitch when making or repairing soccer and footballs . I saw a greek cobbler making soccer ball 40 years ago . and after inserting the bladder he loose stitch the last panel in . I am not sure if thats the way they are made around the world but it worked for him and has worked for me . Another method is to wet mold veg tan leather over the area as well as you can and then use cobblers nails . You can even hide the nails by using the blind stitch trick where the edges if leather is sliced about 1/2 inch deep through the side folded back , nailed then glued back over . I am a shoe maker so i think like a shoe maker . I am sure a saddler would have his method . I am actually interested in how a saddler would tackle it . I will keep watching this thread and see what evolves . -
@SUP . Try getting the handles off the way i described . Iron in a vice and pull while jiggling the handle . The come off surprisingly easy . This is because over the years the have been heated and cooled and the only thing holding them in is old dried wax and some charcoal soot . As FredK said lemon juice will work slowly ,so will vinegar with a table spoon of baking soda . Even coca cola which contains phosphoric acid . Or get some rust converter from the hardware or auto shop and soak them in that . You don't need to buy a big bottle and you will find a use for what you don't use . While you are there grab some small wire brushes . they come in a 3 pack of nylon , stainless steel and brass for about 2-3 dollars . I often get asked where do i find these tools. My reply is " i don't find them .they find me " . I am sure everyone on this forum experienced this . I can be out looking to buy a cake and come back with some obscure tool that i found in a place that was totally unexpected. Before Xmas i was in a country town looking to buy some local honey and handmade soap for my wife . I came home with a Vihl Pederson 308 sole stitcher . for $100 , they go for 2 grand. Some times customers just drop off random things to me because their grandfather was a cobbler and they have had this tool in their shed for 50 years and had no idea what it was but want to give it a good home . In fact a random customer came into the shop yesterday and asked would i be interested in 2 singer industrial sewing machines . Free to a good home . He needs the space in his shed . Yeah why not . Despite what media tries to make you think .The world is a fascinating place . People can be extraordinarily kind and willing to share their time and knowledge to complete strangers for no reward . You have to be in the state on mind to give and to receive. That's what i love about this forum . Ask a question or need some help ,some one is willing to do so . when you are finished doing what you are going to do , Post the photo of the finished product so we can all enjoy the fruits of your labour.
-
@ Sup , I do what i do because i have the means to do and i enjoy the process and i like the finished product. If you don't have the tools and equipment to do it them just clean them up and oil the steel so they don't deteriorate and just admire them for their former past glory and place in the history of shoe making . Understand someone has spent countless hours with those tools in their hand and i believe that imparts a part of their soul in them . Don't paint the irons . Do a search on ebay for antique cobblers tools and you will see a lot come up. Some in very crappy condition and many in my view over priced . But they are collectible and sought after but no one really uses them any more . I have once to make a pair of shoes for myself using completely traditional methods and i enjoyed it . But with no reference on how to use them properly i am sure i got a lot of things wrong . But i just love old cobblers tools and try to save them when i can . The walls in my shop are full of old tools that i have collected and don't use but i just love having them around watching over me like angels . My customers are fascinated with them . I have only every had one guy come in who knew what everything was and its purpose . He was a 90 year old Hungarian guy . He told that he felt like he was amongst old friends when he saw them and spent about 2 hours studying every tool . I really get where he was coming from because i feel the same . Enjoy your tolls SUP and when you are ready pass them on to someone who is worthy .
-
Weird and frustrating obstacle Setting up shoe patcher
Tastech replied to Annikita's topic in Leather Sewing Machines
That thread tension bracket looks like it was bent by using someones teeth or put in a vise and beaten over with a hammer . I wonder what they could do with 200 bucks or even 3 . Still cheap . The mechanical concept reminds me of an old werthiemer. I am not very familiar with either but they have some things in common. This old werthhiemer was going for $1200 And i passed it up because the seller would not budge $1 . I so out of spite i knocked it back . In hindsight it is a beautiful machine and worthy of a full restoration .
-
@ stampingdelight .Its called phosphoric acid. I noticed that most hardware store rust converters contain a high percentage of phosphoric acid. I had some laying around that i used for cleaning tile grout after tiling my bathroom and thought what can it hurt trying . It worked really well so now its all i use . Its much cheaper than rust converter . About $40 a gallon in Australia . I get it from a cleaning supplies wholesaler around the corner . They supply cleaning chemicals and product to commercial cleaners and detergents and stuff like that to restaurants . I used to be a stainless steel fabricator and noticed that phosphoric acid was in some of the weld cleaners i used . Its is also contained in stainless steel passivators which removes any iron on a freshly polished piece of stainless so it doesn't rust in a marine environment . One very important thing to be aware of is . Always wear gloves , simple nitrile gloves work fine and always protect your eyes . Phosphoric acid can absorb into your skin where it accumulates in your bones and makes them brittle . Like osteoporosis on steroids. So the safety sheets say . Use with caution .
-
Weird and frustrating obstacle Setting up shoe patcher
Tastech replied to Annikita's topic in Leather Sewing Machines
Just wondering . Do these machines perform as crappy as they look ? Man where is the workmanship in those machines . Looks like it was made by a one armed and one eyed grandmother with an irritable bowel living in a dumpster . -
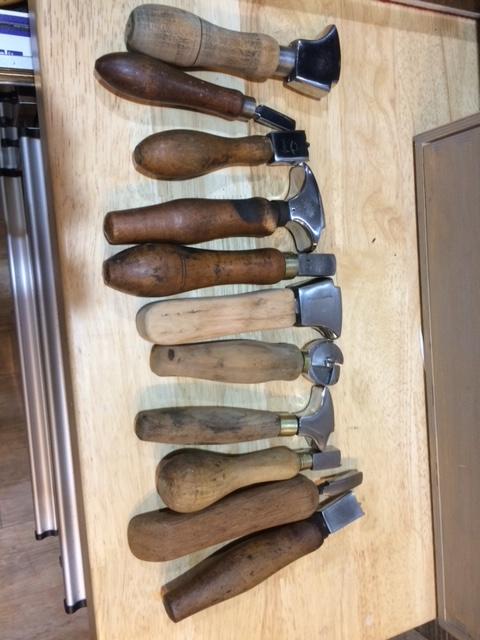
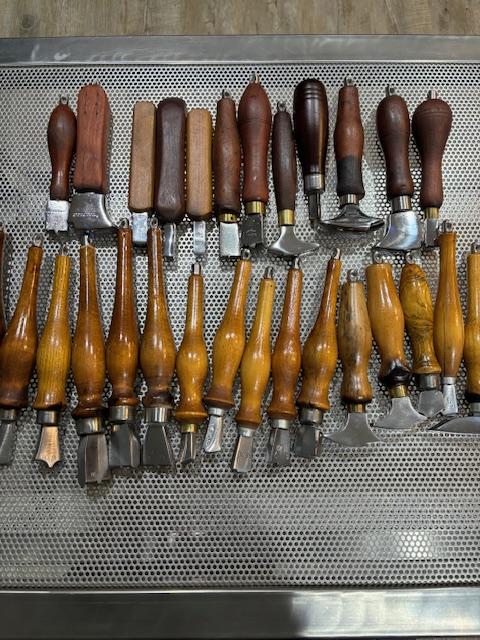
I forgot to mention , I use acid to remove rust and any other crap that is on them . Below are some photos of what each step looks like . the first is a rusted hammer head . the second is the hammer head out of the acid and finished with a wire wheel on a bench grinder . The third is the hammer after it has been ground back , linished and mechanically polished . The grinding and polishing takes about 1.5 hours . Heel irons take about 20 mins Also a i found some picks of my last batch of irons i got . First one as i got them , second cleaned and linished irons and stripped and ready for painting handles . the finnished product are in my previous photos .


-
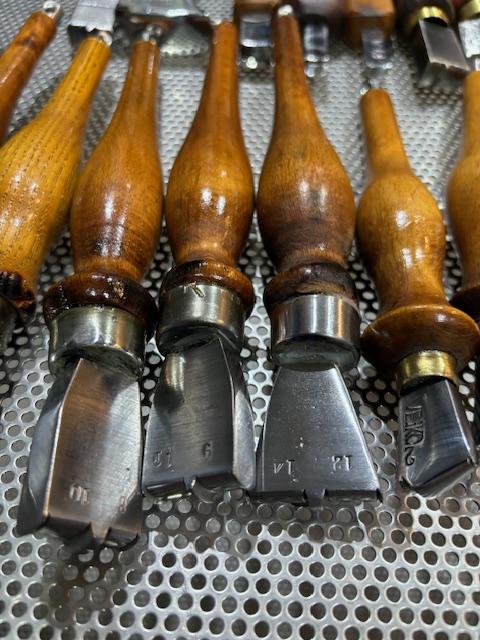
I was wondering what sort of tools your were talking about . So its heel and welt irons i see . The black on the metal is wax . Easy to get off with thinners , paint stripper or white spirit . But to by pass all that give them a once over with a wire wheel on a bench grinder . I am a shoe maker and i collect shoe irons . I don't use them much but i just like them. I also like them to look nice and shiny . There are thousands of them in the universe with patina but that,s not my thing . Shiny is . I have perfected my method to suit me . First put the iron end in a vice with not marking jaws and with a twisty pulling motion remove the iron from handle . I put the irons in a solution of phosphoric acid about 10 parts water to 1 acid . ( available from an cleaners wholesaler ) while the acid does its work .( about 2 hours ) strip the handles The way i do this is with a stanley knife . The knife is held just of 90 Deg and pull the blade towards you . Sort of like peeling a potato . rotate sightly after each pass and everything comes off easy . I then lightly sand with 240 grit . Some of the original patina remains but that is ok . When the irons are ready take them out of the acid using gloves and wash with water and soap using a course scourer . this will take the blackness off and prepare the surface for polishing . You will notice the irons oxidize very quickly so you have to work them the same day . You can either wire wheel them and leave them at that or go the full mirror polish . To mirror polish require some equipment and only very little skill . If you want to know how to do the mirror polish let me know . Because that can be fiddly often just linish them . I do the same to my cobbler hammer collection Keep in mind the irons are just that irons . They were heated over a spirit burner and used to melt wax into the heels and edges of shoes . They were never painted and never should be . To seal the surface i use Penetrol which i wipe on with a rag . It stops rust and dries clear . On the handles i give them 2 coats of a satin clear coat .
-
Advice on buying a leather machine for boots
Tastech replied to Jose4616's topic in Leather Sewing Machines
For sewing shoe and boot uppers a post bed machine is the way to go T70 thread is standard but T90 might be at the machines limit . Alternatively A singer patcher 29K 71 will do the job and more However the stitching will not always be strait unless you are very careful. And depending on what leather you use the walking foot may leave an imprint . If you are making boots for yourself and not for sale then a few imperfections add character. It takes years to learn to make flawless shoes and even the best machine in inexperienced hands is really a waste . But even a crappy machine can do a presentable job in the right hands . Sewing uppers is only a small portion of the overall task of making boots and shoes . Because it is done in the early stages of construction if you stuff it up all is not lost . You go back and start again . A singer 29K is a versatile machine and will always be in your arsenal no matter which direction you take . Your next machines will be more specific to do a particular task A flat bed machine is not for shoe uppers . You can do some parts but not others . Cylinder arms can work well but Roller foot post bed is best . Speed is critical the slower the better . Thats where a treadle 29K is a magic machine. Goes as slow as you like and can sew in any direction . Its more of a donkey than a thoroughbred Buts it is a handsome donkey . In conclusion try and get a singer 29k71 . Parts are still available and there are plenty around so they wont break the bank . Avoid models with numbers less than 71 because parts are unavailable . Alternatives are Adler and Claes. -
Singer 29k2 restoration and asking for advice
Tastech replied to Bosko90's topic in Leather Sewing Machines
With the stand you can do anything you like that you think looks good . Your frame is not the original pattern that was made when the machine was made . There are 3 versions, the one you have is the second generation which came out in the 1920's it is also the most common and in my view the best looking pattern . I will send you some photos of all 3 variations of my restored machines to give you a look at the differences . I think i have posted a few on this site somewhere before . I just got a new phone with a better camera so i will post some more on this thread using better lighting . I restore 29k's to suit my aesthetics black is not my preferred color . The way i see it is there are thousands of black originals in various conditions in the world but not many like mine . They are fun to work on ,simple yet functional and not at all hard to use . Although some parts look identical from different variations of the machine they are not . When sourcing replacement parts always make sure part numbers are identical .The part numbers are stamped on the parts. But most of all be patient , very patient . I waited 10 years to find replacement gears for a 29K53 , then found 2 complete gear boxes in the same month . Go figure . -
Small metal folding tabs for open end watch straps
Tastech replied to SteveOz's topic in Leatherwork Conversation
And then there are these . 8mm , assorted finishes and dirt cheap https://www.aliexpress.com/item/1005005561736842.html?spm=a2g0o.detail.pcDetailTopMoreOtherSeller.1.5aac3oGZ3oGZTi&gps-id=pcDetailTopMoreOtherSeller&scm=1007.40000.327270.0&scm_id=1007.40000.327270.0&scm-url=1007.40000.327270.0&pvid=da3111b2-0e64-492e-8115-e09a55a7b3bb&_t=gps-id:pcDetailTopMoreOtherSeller,scm-url:1007.40000.327270.0,pvid:da3111b2-0e64-492e-8115-e09a55a7b3bb,tpp_buckets:668%232846%238110%231995&pdp_npi=4%40dis!AUD!3.55!2.02!!!2.25!1.28!%402103011017134353955501997ee7cd!12000033551098195!rec!AU!3945930413!&utparam-url=scene%3ApcDetailTopMoreOtherSeller|query_from%3A&search_p4p_id=202404180316355972629836174016563233_0 -
Small metal folding tabs for open end watch straps
Tastech replied to SteveOz's topic in Leatherwork Conversation
Hey steve , have a look at these . A little closer to home as well . https://www.birdsall-leather.com.au/Y1279_dash_00/Leather-Staple-SS-pkt-100/pd.php -
A few years ago i did a repair on a similar machine . I used a handle from an old meat grinder ( meat mincer) . I had to drill it to size and drill and tap a grub screw to lock it to the shaft. Over all it was quite easy . If i see an old meat grinder at a yard sale going for next to nothing i buy it just so i have a few handles as spare parts . Note , most meat grinders have a square hole in the handle so take a measurement of your shaft and make sure the round hole you have to drill is compatible. Also take a measurement of the overall length of the original handle and find one that is close .