Tastech
-
Posts
148 -
Joined
-
Last visited
Content Type
Profiles
Forums
Events
Blogs
Gallery
Store
Everything posted by Tastech
-
I Agree with @fredk. Although some skills are transferable and quite a lot of the same tools are used in both saddlery and shoe making Its the mindset that is different . @treacyglenmore seeing that you are a fashion student , I think you may find shoe making more rewarding . Perhaps even bag designing and making . There is a big design aspect to shoe making as well as technical skill . Personally i find it rewarding on many levels . My plan to get your foot in the door would be this . See if you can find even a part time job with an old school cobbler . There you will learn a wide range of skills and get to see all brands of shoes and the good points and bad points . You also get to see what goes wrong with them . After a while you will imagine the ultimate shoe design and construction method . Its about this time you want to experience a shoe factory and they way things are done there . From there you could either go the design path or the making path or both . Making shoes in a factory can be monotonous so bespoke is what you want to aim for in the end There is a shoe academy in Milan Italy called Arsatoria google it and go to their website for more course info and see if it appeals to you . Its is the worlds best academy for shoe and bag design . They offer shorter courses and some longer courses . The students that do best are the ones with some background knowledge and skills . I will assume you are paying your own way so a paid job in a related industry will help get you there . Always keep it in the back of your mind that it is the journey and not the destination that really matters in life . You have to take the first step in the right direction and the path becomes clearer as you proceed . Approaching a cobbler may be a daunting proposition , Persistence will pay off . Cobblers can be a cranky bunch but its just a facade . If you go in once every 2 weeks and persist they will eventually cave in. Don't expect to get paid till you can hold your own and become an asset with your skills . You have to understand that to train someone slows you down and you can't put out the volume of work that you can when you work alone . I have no idea what the shoe making industry is like in Ireland or even if one exists but i do know that Northampton UK has traditional shoe making industry and is short of workers . ( look into it ) . Northampton shoe are the best made men's shoes in the world in my opinion . Your best option is to go work for a bespoke shoe maker from the get go so look into that as well , However i think its best to have experience in a diverse aspect of shoe making and leather work and you will find your niche . Having said that the Arsatoria course would be very beneficial if you could find your way there . I am excited for you and the journey that awaits you so keep us posted on which direction you choose . If you have any questions i am happy to respond . Tas
-
Without physically seeing and touching it i would guess that it is buffalo hide .
-
Replacing the insole in a riding boot.
Tastech replied to Mulesaw's topic in Shoes, Boots, Sandals and Moccassins
@mulesaw Sole leather is tanned differently and is harder . You don't have to replace the whole heel block . you can build up the worn outside edge with skived wedges . That is the standard practice with cobblers . You do need a belt type sander do do it properly. You sand down the worn corner to a uniform taper , Glue a piece of sole leather to it . trim it with a knife and sand it flat , some times it take 2 layers . Cobblers call this wedge leather a skive . We have a hand operated machine that cuts them . once the heel has been restored , put a few nails in the skive to secure it and use a heel rubber over the top . The heel is then sanded to a uniform shape . On my shoes i put 2 rows of brass nails on the outside edge of the heel for better wear . No need to make lasts , just buy them . plastic ones last longer . Boot lasts are different to shoe lasts . they also come in different toe shapes and widths . You can easily modify them to suit your foot by adding some leather to the sides and blending them in or you can take bits off by shaving them down . But you need to get them in the size you want give or take half a size . Ebay is the place to look . Etsy is a bit pricey .I just bought 8 pairs for $200 AUD delivered from England to Australia . Be patient and keep looking for them . get one pair your size and work on some shoes . you will learn a lot about them and base your next purchase based on that knowledge . Unless you nail it the first time . ( see what i did there lol) Steel lasts are for repair only and size is not crucial . The main thing is that the toe tip of the last can reach the toe of the shoe . Essentially they are an anvil. You just move the shoe around to curl a tack from toe to heel . If doing boots you need a long stand on the steel last . They are everywhere if you look . people use them as door stops . Its always worth getting a professional set if you find them cheap . they are handy . There is a trick we use to hold the shoe down when stripping the soles and heels off . That is a loop of either leather or webbing that goes over the waist of the shoe and the other end is 100 mm off the ground . You step on the ground end and it pulls down and holds the shoe in place . its the poor mans clamp . Pretty logical if you think about it . I have seen youtube cobblers at work but they don't really explain much , their emphasis is on entertaining the crowd not educating . Having said that cobblers and shoe makers tend to be a secretive bunch . I have never understood why . Afraid of competition i guess . They also tend to be a bit cranky as well . I am neither . -
@cottontop We spend about half our life in shoes and a third in bed , therefore it is important to have good quality of both regardless of price . When it comes to shoes . fit is king . The perfect shoe differs from person to person. The only way to get a feel for the fit is to try them on . Buying shoes online not knowing if they will fit is a waste of time and money . For the price of 2 or 3 cheap shoes you can buy a good quality pair that fit and will outlast the 3 cheap ones 5 fold or more . From my experience everybody's favorite pair has one thing in common and that is fit and comfort . Try before you buy . You can over spend on a pair of crappy shoes and you can find really good ones at a reasonable price . Fit should be your criteria not price , not style and not color . know your length size ( Number) and very importantly your width (letter) In every country . Full leather upper and lining is best . Avoid polyurethane soles , and don't buy shoes online unless it is a make ,style and size you are familiar with .
-
Replacing the insole in a riding boot.
Tastech replied to Mulesaw's topic in Shoes, Boots, Sandals and Moccassins
@Mulesaw You actually did quite well for a first attempt and probably learned a lot on the journey . From looking at the first photo most would write off the boots but they can be fixed to last quite a long time . There seems to have been a blowout ,where the boot has essentially burst at the seams . This is common yet easily fixed . I fix about 5 blow outs a week . To fix a blowout you have to "patch " the area . this is done by looking at the blowout area and open it up as far as it wants to go . Usually 10-20 mm either side . You separate the lining from the outer so you have room to insert a glue brush and leather patch . the patch is inserted as far up as it wants to go . 25 -40 mm is good . the same amount is left outside and will be tucked in between the innersole and sole when you are at that stage . . It's a 2 stage process . apply glue between the upper and lining and push the patch in while the glue is wet . this enables better positioning . Leave the rest hanging out for the second stage . Replace the innersole with a veg tan leather sole . Not sole leather . Use the existing shank . This is best done on a wooden or plastic last. Staple or nail the inner sole to the last pull the upper into approximate position apply glue and using lasting pliers and 30 mm x 1.2 mm nails go around the shoe the nails are temporary so only go in enough to hold every thing in place . check the symmetry and when happy tap the perimeter down . Remove the nails and belt it down good . With that type of boot the easiest way is not to stitch but to tack . You can put another leather piece over the top 5 mm bigger all around and tack ( Rivet is the correct term ) the 2 new pieces together with the upper in the middle . Think salami sandwich . to rivet or tack you will need a steel last inside the shoe , so remove the wooden one if you have one . The length of tack will be determined by the overall thickness you want to join . you need a tack about 3 mm longer than the thickness . The tack will curve over and and back when it hits the steel . One of those 3 legged common cobbler lasts will be perfect ( that's what they were actually made for. A riveted shoe is very strong so fear not . But take care , tacks are sharp little buggers . When done ,rough the bottom to absorb glue and glue a sole of your choice . When it comes to attaching heel blocks there is no law that says you can't use screws . For boots you need and extension piece and the correct bit . A screw gun is better than a drill . use countersunk plaster board screws and make sure the head sit flush inside the heel . Don't over tighten . Gently run your hand inside the boot feeling for raised tacks and take care of them with a hammer . There will be at least one so do it gently or you will tear a finger tip trying to find it . The whole process is easy and comes down to common sense . I would only have to show someone once and they are good for life . I got a thread going about vintage cobbler tools and what not . I should do a chat or thread about steel repair anvils and their quirks . At this stage i will say that they are not created equally and i have a preference for a particular type . Hoped this helped , and further questions or clarifications please ask . -
Darkening Leather Boots/Shoes
Tastech replied to cottontop's topic in Shoes, Boots, Sandals and Moccassins
@cottontop you can strip the shoes with acetone and dye with a leather dye . The amazon product is more than likely a paint. Because you do not color vinyl the same way you color leather . Any "does everything "product is more than likely a "does everything badly " product . Do it properly or not at all . -
Darkening Leather Boots/Shoes
Tastech replied to cottontop's topic in Shoes, Boots, Sandals and Moccassins
Post some photos of the shoes so i can see how brown they are originally and what outcome you can expect Some examples below The first pair has a base color of English bridle and airbrushed highlights in chocolate The second pair of boots has a base color of English bridle and a wing tip and heel brush dyed with dark brown raven oil Depending on the base color and on the color you want to change them to will determine the end result . Either way you will have to use stripper or deglazer before you dye on the area you will be working on to open the pores so the dye penetrates. Mink oil is a very good conditioner but it is known for not darkening the leather . If you are after the Antique effect you can use a darker cream polish or wax polish but it takes a while to build up the layers .

-
When it comes to stretching a shoe the are a few factors to consider. The material the shoe is made from , the construction of the shoe , where the stretching needs to take place and how much stretching is needed . In the case of EU sizes the difference between size length is about 9-10 mm per number . difference between widths is about 6 mm per letter . Stretching the width is relatively easy for 90% of shoes up to 2 letter sizes . Example a E width can be stretched to a EEE . When it comes to length only one size bigger can be reasonably be expected. Things like work boots and hiking boots don't respond well to a length stretch and only one size in width is possible . The ideal candidate for a length and width stretch is a full leather upper and lining with a goodyear welted leather sole . Depending on how much stretching is needed will determine the amount of stretching fluid needed . Stretching fluid or spray is no closely guarded secret . Make your own with 10% methelated spirit and 90% water . The metho and water mix . the metho penetrates the waxes, oils and polishes and drags the water in with it which allows the shoe to stretch . This is sprayed onto the shoe both inside and out and in the area to be stretched and let to sit for a while and then repeated . the shoe is placed in a stretcher and cranked up a little over the desired outcome . It is left to dry for a couple of days and then tried on to see where you are at and tweeked if necessary . In extreme cases ,and depending on the shoe you can fill up the shoe with hot water and let it sit for a couple of mins . Empty and towel any loose water and stretch from there . I use both commercial stretcher and the domestic ones depending on the shoe . There is also a funny tool called a bunion stretcher that i use for older people who have a localized bone growth that needs some room . I also have a calf stretcher that does the calves of boots . Below are some photos of the commercial stretcher that i use . These can be cranked to the extreme . Most cobblers will have one . By cranking the back handle it increases length by cranking the front handle it increases the front width @cottontop post some clear photos of the shoe and sole and any info you might think will be helpful and i can advise on a plan of action and reasonable expectations
-
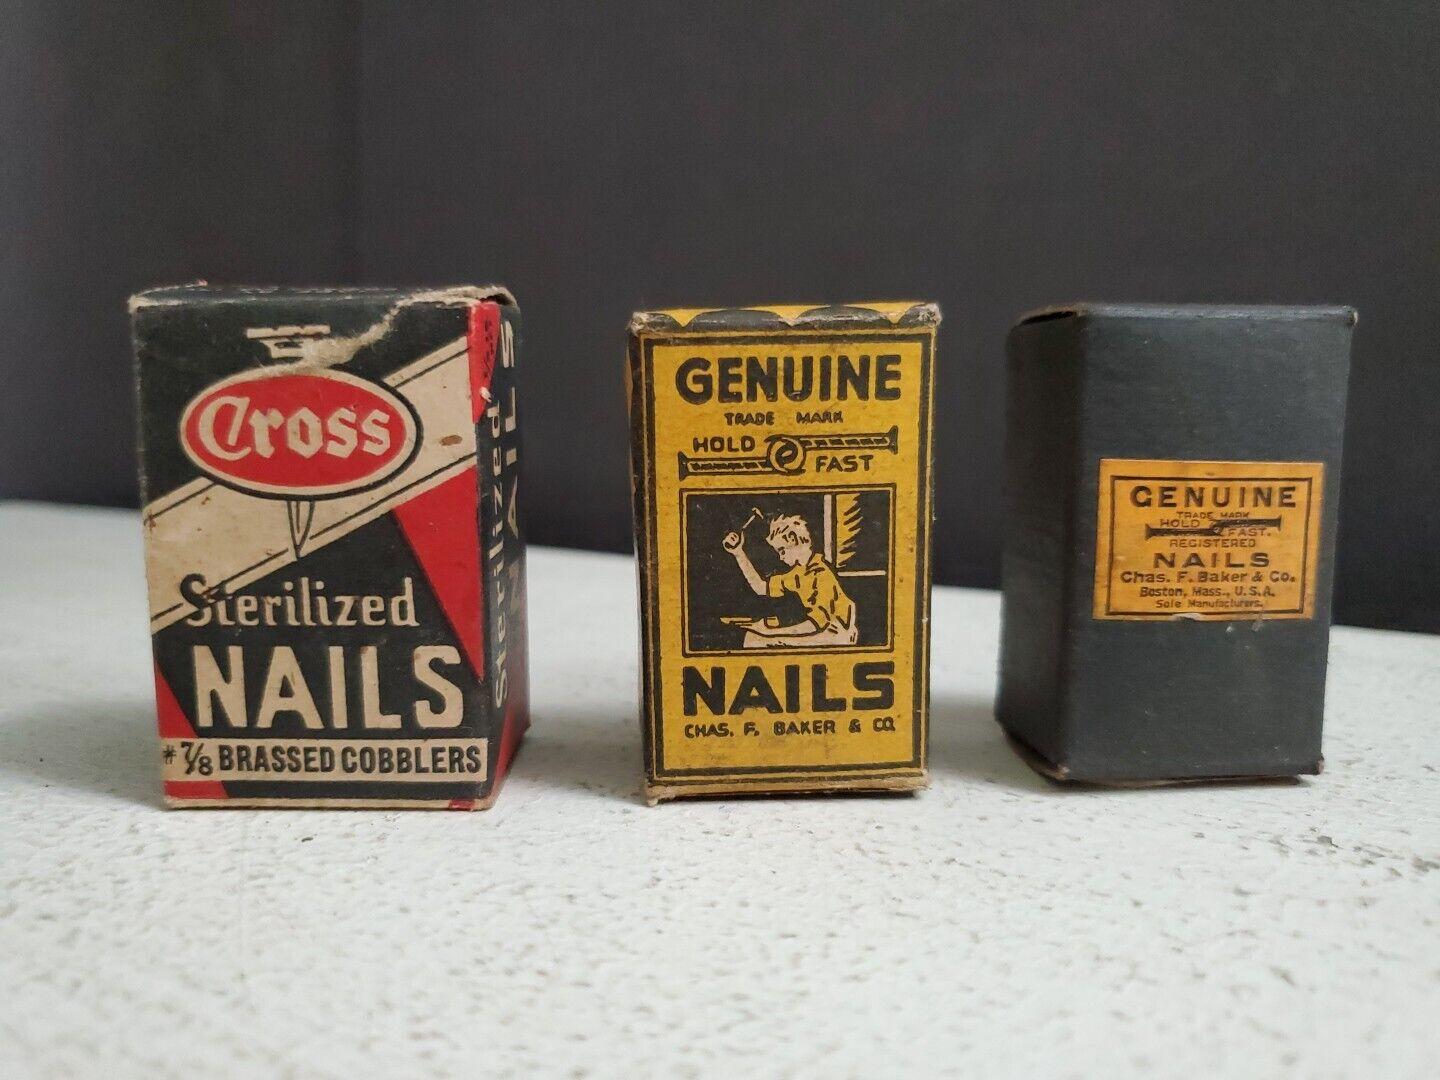
I found these for sale on Ebay . Quite cheap if you live in the US . I think the boxes are collectible if you are inclined to . Left to right Copper or brass plated lasting nails . Note the word sterilized Middle and right . Hold fast nails . These are the spiral shanked nails used to nail on a stacked leather heel from the inside of the shoe as i mentioned in a post previously . Can also be used for the heel rubber but it depends on how big the head is. As a general rule . Big head = inside. Small head = outside heel rubber

-
I get them from here https://www.ebay.com.au/itm/162385594816?itmmeta=01J2B87DHZDBPX76FQEWZHSK9S&hash=item25ceef89c0:g:TBsAAOSwsAtd05mH&itmprp=enc%3AAQAJAAAA4FVSmekn5T%2F9dexdFHjhEDWcTDbcDMxcQmR9hjL9dN5%2BVnkOr%2B%2FcrUwncTmdw9Kz9m%2FCPuxHXQDkVGi%2BBzVyxX2CFej%2F%2Bdu2xEs8z3h6yXJELd%2FzJyjeRevq5NhJRC1ymPVXzvKfUR4Cy6KaMnSMBGEmL3L7hbbfvlo3m0hDPlTuBbHPk6%2FO4SJKBHM0gtWHn9E5SJQ%2B2AAi5jVM1ECioimASoWBM2lX2og02c%2F4sqeeqec5iJSn%2BOP2SOhHxV5e8QDqYDIcDA429J9h3h0zCPwEWcEPUleJy--V3tF%2FwWkq|tkp%3ABk9SR4rZneiSZA
-
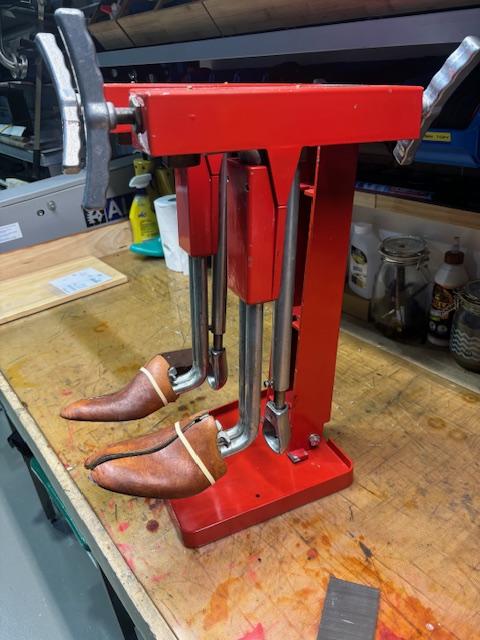
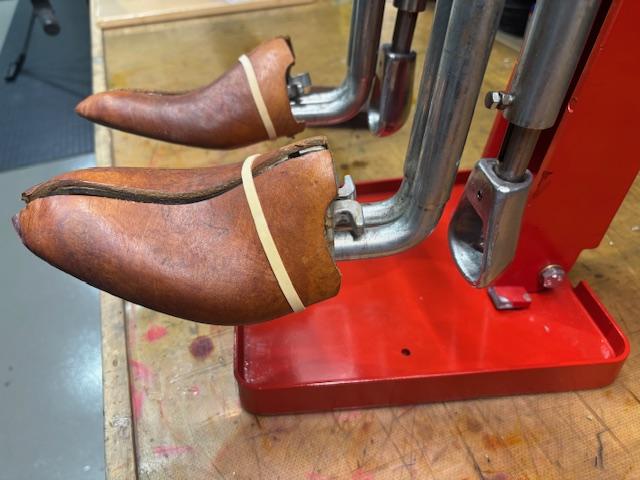
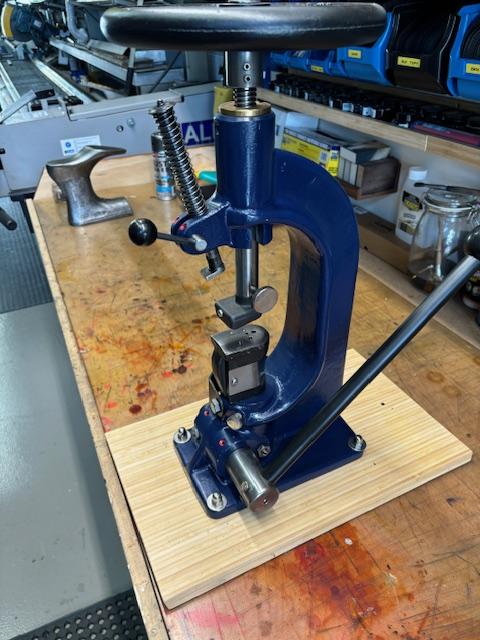
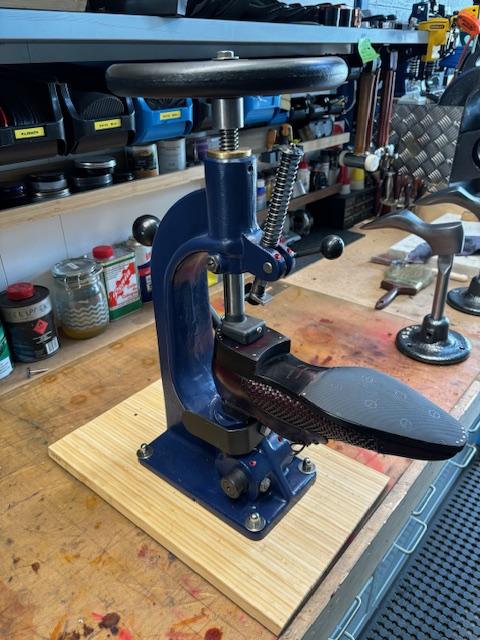
While on the subject of nails and heel nailers i will show some photos of my heel press . Photo #1 is the machine . Nails are placed into the anvil. The shoe gets placed into the metal anvil heel facing up and lined up , the wheel at the top is wound down to hold the shoe in position and then the lever on the right is pulled forward which pushes the nails up through the inside of the shoe via a cam mechanism . Photo#2 shows the anvil with the 5 holes where the nails are placed. Photo #3 shows the position of the shoe while the procedure is done . The machine shown is for men's shoes . There is also another jig that i made and shaped that will secure a ladies sitlleto heel it fits into the top part . There is another variation that has a long post on the bottom made for getting into cowboy boots but works on the exact same principle . Occasionally the pins that drive the nails gets bent or broken . I replace them with cut off 4.5 mm drill bits cut down to size because they have the hardness to cope with the nails and i can get them in the right diameter There is another machine in existence that i have never seen in action and it nails the heel rubber from from the outside . Its what we do by hammer and nail today . The machine does not use nails as such but has a wire coil that punches into the heel and cuts the nail off when the procedure is done . If i ever find a vintage one going for cheap i will buy it and restore it but will probably never use it .Its a stand up machine which is fairly large . I don't think even those who have one actually use it . And i don't know if the wire coil it uses is still in production . Its not what you would call a cool looking machine either. Unlike my heel press which has some nice curves and is a bit of a looker even if it doesn't get used much . I think that's about it for heel nailers ,presses and nails and i will move on . Any question will be answered Actually one more point about nails . The difference between nails and tacks are nails go into what you are trying to attach stopping short . They have a 4 sided pyramid point like a regular nail . A tack has a larger head and a shaft that tapers to a very fine point , they are very sharp and prick the fingers when reaching for one . Tacks are used with a metal last underneath so the tip curls around and back into the leather . When tacks are used the method is called riveting . A lot of old timey shoes were rivet construction not a welt construction . Related but not the same is pegging , where wooden pegs about the diameter of a match are used as a substitute for nails . It is an interesting method that has its own tools, procedure and purpose . Nails can rust and fall out when the leather gets wet and expands or loosens . Wooden pegs expand with the leather and tend to stay put . The method is still used in cowboy boots made in the US and mexico . I have done it a few times but i am no expert . Perhaps a US cowboy boot maker can give is some insights on the how and whys .

-
@TomEI just did a google search and asked the question "is copper anti microbial ? " the answer is below . Very interesting . I don't know much about horses ,but i have seen some you tube videos of some very nasty infected hooves . If anyone ever asks my advice is will recommend copper nails . A rusty nail can give you tetanus and septicemia and blood poisoning at the very least . I was talking to a customer just last week and she told me her father was a cobbler and died of mouth cancer about 30 years ago . she told me that he thought he got mouth cancer by putting nails in his mouth. At the time i didn't think to ask how he came to that conclusion . Did the doctor tell him that ? was it his own conclusion ? Any way i have never gotten into the habit of putting nails in my mouth sterile or not . Copper and its alloys (brasses, bronzes, cupronickel, copper-nickel-zinc, and others) are natural antimicrobial materials. Ancient civilizations exploited the antimicrobial properties of copper long before the concept of microbes became understood in the nineteenth century.
-
@Mulesaw @fredk. Its not hard to make a heel nailer . but the juice is probably not worth the squeeze. my tool is 400 mm long , the hammer shaft is 7.86 mm the outer tube is 12.7 however the tip of the hammer tapers down to 3.6 mm. the external shaft is 2 parts . the top part is to accommodate the 7.86 mm main hammer shaft .the bottom part has a taper and by looking at it is 7.86 at the top half and 3.6 at the bottom 1/3rd. It is important that the nail head has a reasonably tight fit . If it is loose it will knock the nail sideways . Have a closer look at the previous photos and you can see the tip is narrower than the shaft , this corresponds to what is happening on the inside of the tube as well . You can use any length of bar to send the nail home but you need to get the tip in first . I have previously used an awl it punch a starter hole , pushed the tip of the nail in by hand and used a round bar to knock it it but it is tedious work There is nothing wrong with using a screw to attach the heel block but a few things need to be considered screw length , coarseness of thread . type of head . what we call a particle board screw in Australia works just fine It has a course thread , it has a self countersinking head and cones in sizes from 20 mm to 100 mm and is available at hardware stores . It is always best to pre drill with a 2.8 - 3 mm bit . When screwing down i use an impact screw gun ( sometimes with an extension) because i can control the depth easier and the screw doesn't jump in the bit as it does when doing it with a drill . the screws are covered with a soft pad and an innersole so you don't feel it but it is important that it sits flush . The ideal heel screw would be a course thread pan head with a counter sunk head about 2/3rds the diameter of the head . If you want to use a heel nailer ,the nails are available from a shoe supply wholesaler . My last order was years ago and i got 5kgs ii still have a life time supply left . They come in various lengths as well . Below are links to the George Barnsley nailer that i have https://www.georgebarnsleyandsons.co.uk/product-page/tubularnailer the one below is the modern generic type https://shucare.com.au/product/heel-nailer-tubular-20/ I use 7 nails per heel in a horse shoe pattern from the inside and into a stacked leather heel . I just finished a full rebuild on a pair ladies boots . I had to replace a broken stilleto type heel . I had to do the pair because i did not have an exact match . Nails would not do the job because i had to come in on an angle because the heel tapered and i couldn't hold the shoe down . so I used screws . Pretty straight forward but because the boot was just below the knee and no zipper it was a pain to get access I used a 500mm extension on the screw gun and prayed i was where i wanted to be because i could not see inside the boot . i knew no one else could do it and they were good boots and it helped that the client was not ugly . LOL
-
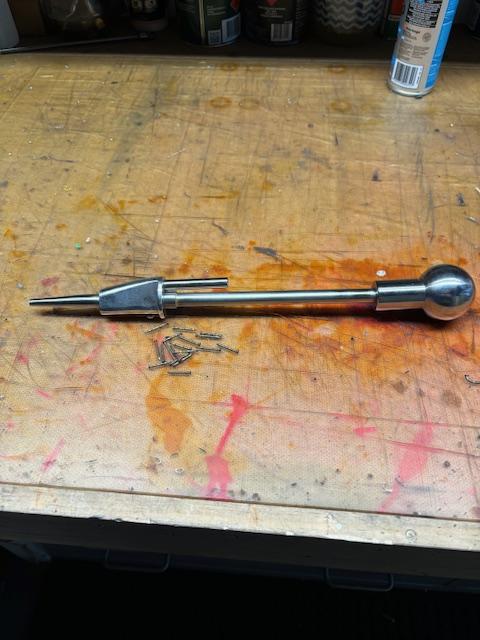
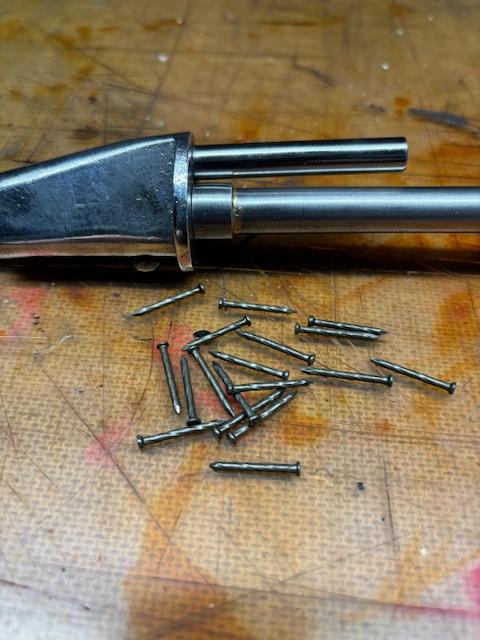
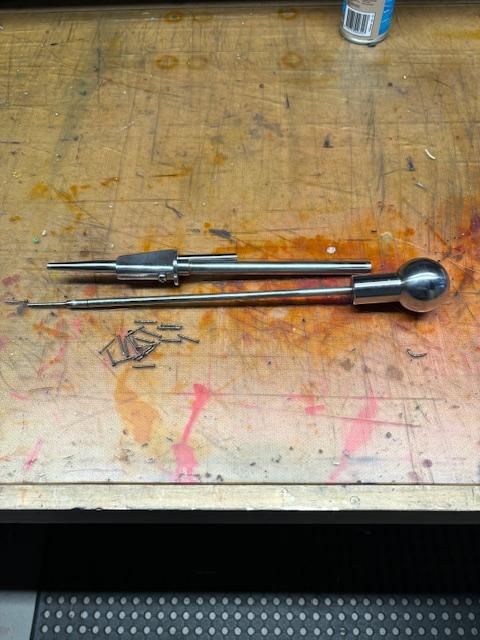
On the subject of nails and in particular heel nails . Have you ever wondered how heels are nailed on from the inside of the shoe ? Or especially how boot heels are nailed on when you can hold the nail to start or get into the boot with a hammer ? We use a slide hammer . Every proper cobbler needs a slide hammer . They are specialized tool that not many people have seen or even if they have would have no idea what it is . I have never seen one for sale on Ebay or other sites . The only maker i know of is George Barnsley . They were out of production for over 50 years but they recently revived the old tool and did a production run . My old one had just about had it so i bought a new one . Not cheap but worth it . The tool is used on the inside the shoe to nail the heel block on . Photo #1 the tool . You lift the ball slide and drop a nail in the side hole . with one knock the nail gets set Photo #2 The nails . The nails are relatively thick with a spiral shaft for holding down and not becoming loose and even more important not squeaking Photo #3 You can see the slide mechanism. The business end has a tool steel replaceable tip for contact with the nail. I use this tool mainly as a Repair tool for shoe making i use a heel press which is a small machine in itself . The slide hammer is one of my favorite tools . Actually now that i think of it there is a cheaper generic one on the market that you have to pull the slide right out to drop a nail in but it just doesn't have the sexiness of the George Barnsley and unbefitting of a gentleman . LOL
-
@Mablung. The nails are temporary and get pulled out as the welt is sewn on . They are then hidden under the welt . I do a carved leather sole and try to get my nails onto the raised bit where i punch the awl through for the welt holes or right on the edge between the 2 edges . I don't know if you know what gemming is . ( not a word you hear spoken outside of a cobbler shop or shoe factory ) Its the factory way of attaching the welt to the inner sole . Rather than use a thick piece of leather and carve out what you don't need leaving a raised edge around the perimeter 6mm off the edge . Factories use gemming . Its a canvas strip folded and only glued to the innersole . The welt stitches go through the gemming picking up the upper and the welt . Any cobbler will tell you that when you resole a shoe the gemming will always need some gluing back specially the sides . I don't know why they just don't pass a stitch around it to hold it on . it would take about 30-45 seconds per shoe to do so . A welt does not necessarily go around the full outside edge of the Sole . 80% of the time it starts and stops about 10 mm under where the heel is I posted a couple of videos on the cowboy boot thread showing a shoe making process . There you can see the carved sole . The youtube channel is called Terry KIM there you will see the carved inner sole and how he attaches the welt .There are some aspects of the complete process missing because the editor either thinks it is boring or he has a trade secret he doesn't want to share. Shoe makers were and probably still are a secretive bunch . Some work side by side separated by a curtain ( like in a doctors surgery ) They have a little method or quirk they do't want others to see . But then again they are probably just wanking . lol Nails for lasting pre welt are 30mm long and 1.2 thick ( you dont belt your fingers with that length ). I use copper coated nails because the don't stain the damp leather . plain steel leave a black spot . Fun fact . You used to buy nails in a box by the weight not quantity . Certain nails were labeled "sterilized " This is because you would put a few in you mouth to have them handy . Either way you could still taste the steel . Some tacks came as sterilized as well because reaching into the the nail bowl you would prick you finger tips and they would become infected . Nails and tacks are 2 different things used for different purposes .
-
@chuck123wapati Are you volunteering ? Feel free . lol I am not one to move the furniture around . If need be i can just do updates as they are required . I am sort of hoping there are a few more shoe makers on this site or come in from elsewhere and we can all really get into it and chew the fat . I am on another forum , a shoe repair forum .which i wont name but they are a miserable bunch of geezers and all they want to talk about is keys . I mentioned some where on here that those kiosk cobblers are like fast food workers . Hardly masters of their trade . This is the place to be and i love the collective knowledge that gets shared around from professionals to beginners in all aspects of the craft . Its funny how i will do a google search about some obscure tools or machine and this site always seems to have a mention of it .
-
@Mulesaw , I posted at thread in the shoes boots and what ever title , i thought it would be more appropriate there out of the way . It was only 20 mins ago and have forgotten what i called it . lol Now go home and fix those boots
-
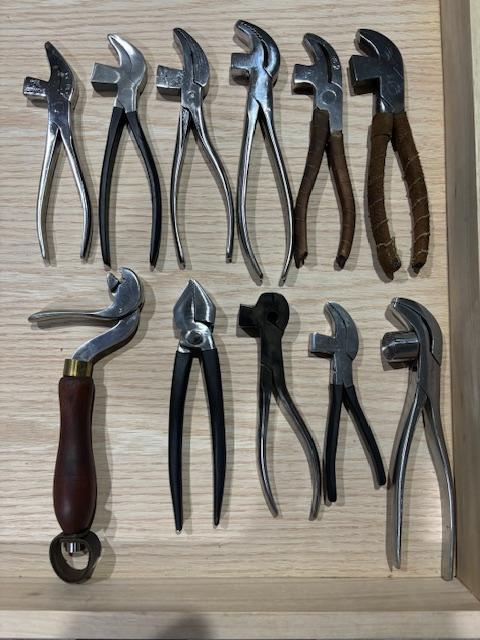
This is new thread dedicated to tools of the trade related to shoe making and cobblers . It appears that we get a bit side tracked on some threads and the shoe making enthusiasts and myself "hijack" some threads and start talking about shoes, so this thread is dedicated to the subject. I am a shoemaker and cobbler and have a passion for vintage tools and how they were used . I am also a collector of these tools and try incorporate them in my work . I am also a former metal fabrication and industrial engineer so i have the skill and means to restore them to their former glory . In another thread about cowboy boots i offered to explain shoe makers lasting pliers , the types and their uses so here goes . Lasting pliers are a tool specifically used by shoe makers for fitting the leather upper to a shoe last . There are various shapes and sizes including regional variations , shoe variations and for specific procedures . They all do pretty much the same thing but differently . Its not a tool that has multi function uses but you could extract nose hairs if you really wanted to . They are like pliers but most have a curved beak with a solid protrusion on the bottom side . They are used for pulling the shoe leather over the last and putting nails in place to hold it in shape while the welt is sewn into place They are also used for glue down construction . As i have mentioned at other times it is a process . the shoe upper ( the sewn leather bit) is put over a last of the correct size , lined up back and front and a nail is place through the upper heel part to find center . The toe area is then pulled over using the pliers and a nail place there. then back to the bottom of the heel and a nail placed there . The shoe is then eyed for symmetry and then the fun begins . Depending on what type of shoe will determine the ideal pliers. The pliers vary in curvature of the beak , the curvature of the handle and the width of the beak . For the toe and heel of the shoe a narrow width pliers is ideal because you make little folds to get around the curve of toe and heel . For the sides a lager plier can be used . The leather is pulled tight over the last using the pliers held in place with the spare thumb a nail is put next to the thumb and knocked in with the metal protrusion on the bottom of the pliers . So the lasting pliers are 2 tools in 1 . For pulling but also a hammer . The nails are not knocked in all the way because they are temporary . most shoe maker i know have 2 pliers , wide mouth and narrow . Most shoe makers specialize with a certain type of shoe or a similar style so their tools will be tailored to their specialty. A mens lace up shoe maker has different lasts to a stiletto maker and a boot maker has his own preference as well . But we are talking preference here . Once you get used to your tool you tend to use that and make use of what you got simply because you have a muscle memory . Posted below are a couple of photos showing some different types and different styles . Top from left to right German style marked 1 B narrow mouth Chinese made new . ( cheap and has a surprisingly good feel to it ) I highly rate it unknown English wide mouth English Timmins wide mouth , curved beak English George Barnsley medium /narrow mouth , moderate curved beak ( my favorite ) English George Barnsley wide mouth , Curved beak . (My second favorite) Bottom -Left to right . English George Barnsley Bulldog pliers . Very rare and unusual . Sought after and expensive . It is used to pull in the waist (shank ) area of heavy boots . The bottom handle straddles the last while you push down on the handle . Nordic / German pliers - wide mouth . They also come in various widths and slight variations Saddle makers pliers . Not exactly sure what they are specifically used for , but i think these too are referred to as bull dogs . My nieces lasting pliers - Narrow mouth -cut down . She can put a pro to shame . English Timmins . Wide mouth curved beak . Note the the hammer bit or anvil on the bottom . It screw out and can be tuned up or down to suit the weight you require . More of a boot makers plier but would use a narrow mouth smaller version if i find one . The second photo shows the various widths and beak tapers . Most of these were rusted heaps of crap when i got them and gave them new life . some would have spent a whole working career with the one person and even handed down to an apprentice . I really wish i knew the specific history of them all . The 2 barnsleys i use were handed down to me by Francesco Berlutti the master boot maker who taught me the finer details of boot making . he was the boot maker of none other than Benito Mussolini . Those pliers made boots for El Duce himself and i still use them to make my own . I feel like i channel old"Cranky Franky" when i use them . Any questions please ask . I got nothing better to do with my nights .lol
-
@Mulesaw and @MablungOk , good point , . Talk about fussy customers .lol No wonder i am a cranky bastard . I will post my promised lasting pliers rant some where but not sure where exactly so look for it .I will tittle the thread vintage cobblers tools .
-
@fredk, Ok ok dont shout .lol @RoToMiMo It's a beautiful machine . Mechanically it is the same as the American St Louis but has a different body shape , Dare i say more elegant . However it doesn't have the guard over the gears . I don't think they ever came with one . No OH&S back in the day . Not much is known about ESTO but i have asked a few old timers about them and they tell me this . Esto was named after and Estonian who emigrated to Australia in the early 1900's He made shoe repair machines and steel lasts for the cobbler industry . He was based in Woolongong New south wales where the was once a huge steel making plant . ( think Pittsburgh) Esto stopped production some time in the 1980's . I am not sure if it was because he died or it more than likely coincided with the demise of the Australian footwear and textile industry. I have quite a bit of Esto stuff but mainly steel repair lasts and lasting jacks . He also made a long arm trimmer and skiver known in Australia as a rough rounder . They still exist and are still being used in cobbler shops around Australia . Esto must have had some sort of licencing agreement with Landis because the rough rounder looks identical to the landis 5in1 and blades are compatible with each other . I have often wondered who Esto was and what his background was but can't find any solid information . Based on what he produced i have come to a couple of conclusions. He must have had a shoe making or cobbler back ground , Either him personally or his father and was exposed to the needs of cobblers . Through what ever circumstances worked in a foundry or was perhaps an engineer and when he came to Australia realized there was a gap and a demand in the market for his redesigned and improved products . I would assume he worked at the port Kembla steel works in Woolongong and had a side gig going . His products are not some backyard venture and would have required a blast furnace and sand molds . Therefore because of his background in both shoe making and engineering he combined the knowledge of both As would seem reasonable . His products are still around today and still widely used . And to Mr Esto i take my hat off to you sir ,you are a legend . Esto hold a place in my heart because i too am an immigrant ( from Greece ) I come from a family of shoe makers and cobblers ( 3 Generations at least ) because my family wanted a better life for me than to be another shoe maker the encouraged me to become an engineer . After 30 years of engineering i have come back to my roots as a shoe maker and cobbler . However because of my engineering career i have a love and appreciation of mechanical and and industrial machinery especially from the shoe making and cobbler trade . I feel a heart felt duty to source and restore old shoe industry machines and restore them to their former glory. It would be an honor to have it and restore it RoToMimo I will email you later . In the meantime some of the other members are expecting my lecture of shoe making making pliers and i can hear them yelling .lol
-
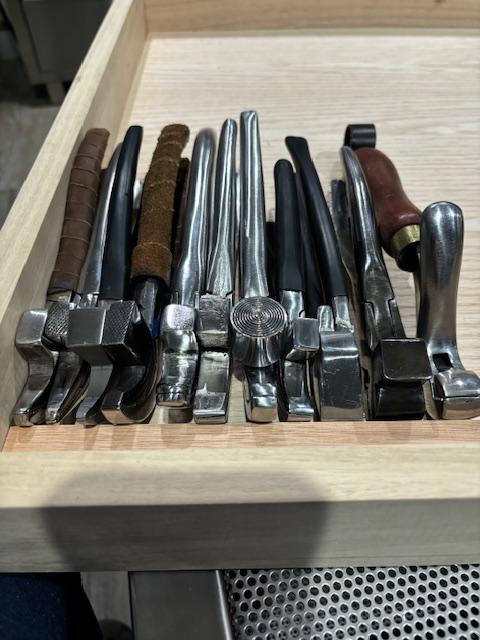
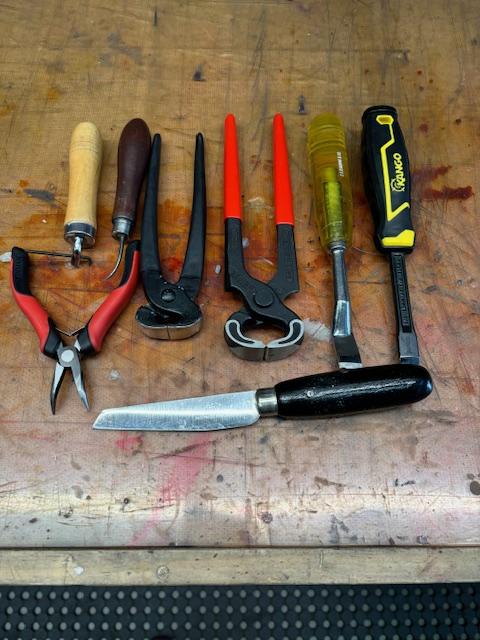
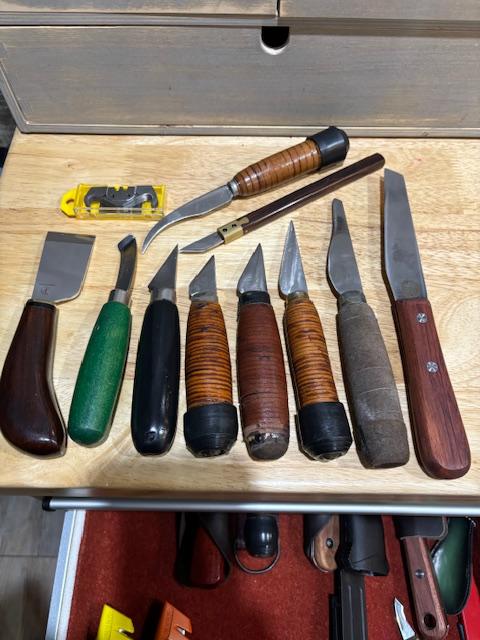
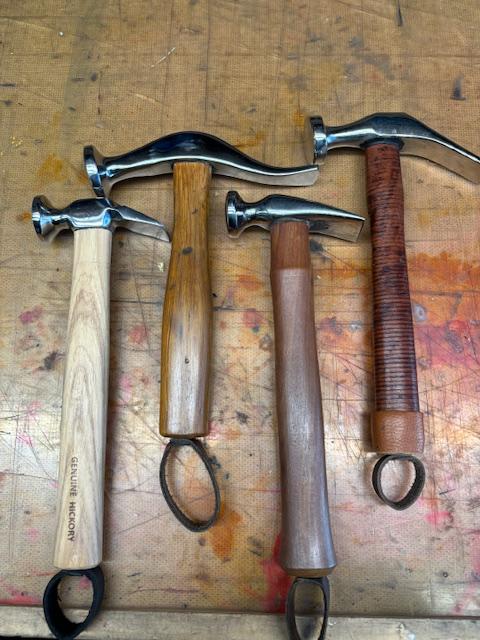
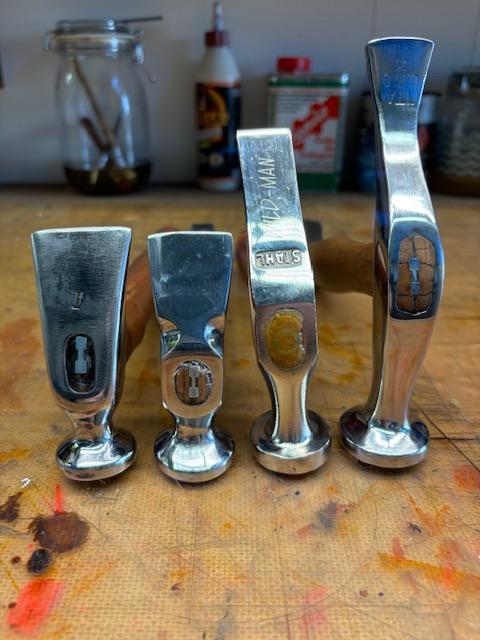
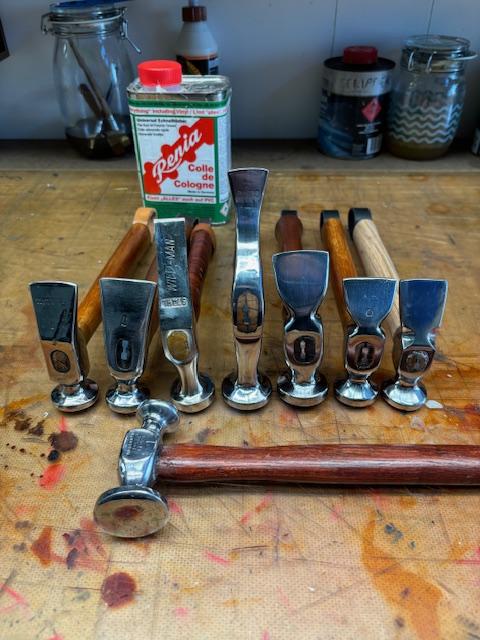
@Mablung, Here are some photos of some of the tools i use 1st one Basic essentials for removing soles and heels . Self evident accept the 2 on the right . One is a cold chisel with a fat handle that i poke under the heel rubber to lift it so i can grab it with the pincers , The other is what i use to remove heel blocks . It is an upholstery tool made by osborne. I have sharpened it to a fine taper . Osborne do make a heel lifter but i don't have one . Most cobblers just use a screw driver But not me . Because i have class .lol 2nd various knives . The knives start off full size and get reshaped as the get smaller from right to left plus a few others you will recognize them . 3rd hammer styles .left to right . London pattern , french pattern ( Napoleons hat ), traditional English, German . There are variations depending on the maker . The German pretty is much the same regardless of maker The English make 4 sizes of each as well as styles . For making i prefer a German , for repairs i prefer a London #2. But each to their own preference. I like a fatter handle on my repair hammers so i change them . There are also cordwainers hammer . Which looks a little wired to me but common in the US . Then there is a planishing hammer which is a double header , sometimes you see them sold as a panel beater hammer because people misidentify them . The one thing they all have in common it the have a slightly domed face . For a first hammer i would recommend a German pattern made by stahl because the flat end on the back is really good for starting small nails . They are available new for not very much . 4th top view of the styles 5th a few more variations From left to right . English x2 , German , French , London x2 All hammers have their niche but generally all do the same job , much like knives so pick a style and you will get used to it , Then when you see one going for cheap grab it . I buy mine from different online sources and usually just buy a rusted old head . I then acid bath ,grind them back to suit my aesthetic , polish and put a handle on that gives the hammer a good balance . I think the only new hammer i have ever bought was a German . The rest are about 100 years old maybe more . I know some purist will tell me that i have ruined the patina and to them i say F you . My hammers my choice . For my next lecture i will discuss the various makes and styles of lasting pliers .lol Just joking , but if anybody really want to know i will . Any one interested in cowboy boots needs to learn about pegging and the basic tools involved . (let the pegging jokes roll in guys ) Pegging is a US and Mexican boot technique that is no longer common in the rest of the world . Its a good way of attaching soles when nails or stitching is not the best approach for various reasons .
-
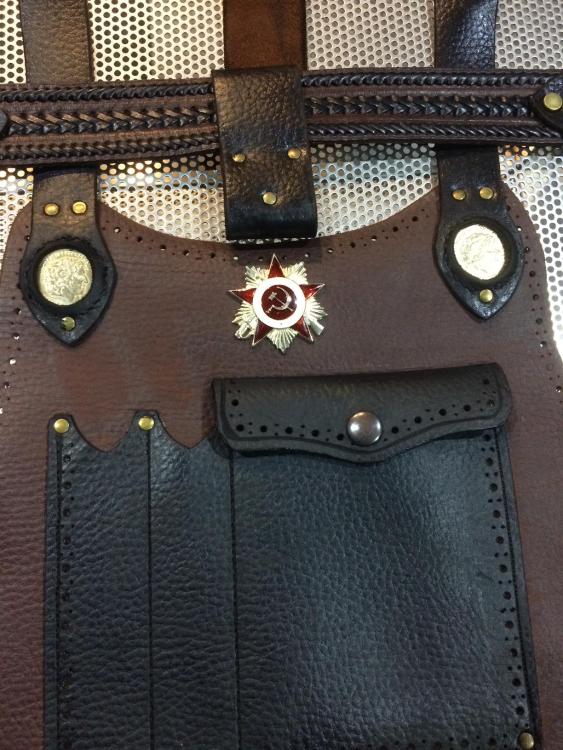
There is another type of leather suitable for heavy duty aprons call "KIP" leather . is doesn't have the pebble finish though. It's an open grain leather (matt finish ) and does have an oily feel to it and it is relatively soft for its thickness but tough as nails . It comes in various thicknesses . I have some 3mm that i use for sharp tool pouches , straps and heavy duty boots . From what i have seen , i thinks Nicks hand made boots uses kip leather for their boots . May i ask what is the apron you want to make going to be used for ?
-
@mablung Check out this George Barnsley catalogue from the 1920's . They made shoe makers tools in Sheffield . I use it as a reference for identifying vintage tools . If you are on a laptop turn the pages using the arrows if on a phone there is a slider on the bottom . I never knew there was so many awls shapes and sizes . Also check out the different knives and the hammer patterns . Many of these tools are in the US and UK and i think they are cheap . most are redundant but i still use quite a few of them . I have a huge collection of vintage shoe makers tools from all over the world . I have spent many an hour looking at them and wondering at the work they have done over the last century . I will some times do something in such a way as to be able to put some of the tools back to work for the day . I have over 30 cobblers hammers and try to rotate them but i do have my favorites but that can vary from year to year and from shoe to shoe . I also bought 11 Ebooks from etsy on shoe making that were published in the late 1800' and early 1900's . They are just a gold mine of lost knowledge and the best 11 bucks i ever spent . https://archive.org/details/barnsley-and-sons-shoe-tools-catalogue-1927/page/70/mode/2up?view=theater I hope other get the same pleasure i do from looking at this old catalogue
-
@Mocivnik You might want to take a look at shoe leathers called pebble grain . I am not sure if they come in the thickness you require .The soggy sides are somewhat greasy where the pebble grain shoe leathers are not ,also they are softer
-
Known is Australia as soggy sides https://www.birdsall-leather.com.au/5CCSDSBw/Brown-Soggy-sides/pd.php I use it for heavy duty work aprons and boots . you are after 2.6 mm , I think that might be just a little too thick and heavy for an apron . Based on the 2mm i have used