


Mablung
-
Posts
576 -
Joined
-
Last visited
Content Type
Profiles
Forums
Events
Blogs
Gallery
Store
Everything posted by Mablung
-
That’s going to depend significantly on what leather you use and what weight. That bag looks like pretty thin chrome tan, with a very shiny finish to it. Probably no more than 2/3 or 3/4 oz stuff. I’ll bet the leather is skived at the side cutouts to avoid creating bulk.
-
New to stamping, first project help need
Mablung replied to Mocivnik's topic in Floral and Sheridan Carving
Here ya go. This is one of the tutorials and the other can be accessed from the topic listing under the subforum. -
New to stamping, first project help need
Mablung replied to Mocivnik's topic in Floral and Sheridan Carving
A lot of the Craftaid sheets will show you where to use what tool. There are also YouTube tutorials that show how to do it, including tool order. Others have done oak leaves and shown their tools, on here. In fact, I think one of the tutorials pinned in the carving forum is for an oak leaf. ETA: There are two tutorials in the Figure Carving forum. That would be the better one to look at than the Sheridan/Floral Carving material (this subforum) because it’s a different style. -
Definitely substantial stuff, although I wouldn't think suede would add appreciable weight or bulk. But that may also depend on the volume of bag you're making, so a microfiber or other fabric liner may make a noticeable difference. it is certainly true that fabric is thinner and lighter than suede, so that may answer your need. Something like a nice flannel might make a decent pairing with veg tan, depending on the style of bag and what all you've done to the outside.
-
Look about on here for posts about lining bags with fabric; folks use a wide variety of fabrics, and much can be learned from the preexisting posts about what people used and where to get it. But if you're looking to reduce the weight of the bag (as the wording of your post implies), while using fabric instead of another leather as a liner will help to an extent, you might need to consider using a lighter exterior leather or a leather of a different type to reduce the weight significantly. That will likely make the biggest difference, as suede is not heavy stuff, either in the sense of literal weight or the sense of bulk.
-
I think this was just a result of my not measuring generously enough and then taking it down too far when trimming before stitching. I think sometimes times do shrink just a bit after dying, but not enough to create quite this issue, at least in my experience.
-
Well, it is too bloody narrow for the notebook originally intended to go in it. 1/16” of an inch or so too narrow. I have another, smaller notebook that ought to fit and some margin around the edges that I could cut off to adjust for the smaller dimensions (and clean up my edging and stitching, which are a mess). I’ll probably have to do that for now.
-
Well, I dyed it light brown but didn’t dilute the dye enough and then ran out before I could get the dye job even. I used a dauber, since I don’t have a tub big enough or enough dye to dip-dye it. It’s a bit blotchy as a result and a coat of NFO didn’t even it out. I’ll probably have to make the overall dye job a bit darker before I resist and antique it.
-
Not a bad rule of thumb, as long as it’s used as such and not as a set rule. But it sounds like you’ve got that straight in your own head.
-
Has anyone attended Jim Linnell's classes at Tandy?
Mablung replied to SUP's topic in Leatherwork Conversation
Exactly! Though, people in my office would faint, if I walked in carrying some of my knives; they already look at me like I'm nuts, when I bring my regular pocket knives. -
@toxo is right about that. Stitch length, not edge length, is the more important measure (although the couple gusseted bags I have made were close enough on both measurements that I was able to cut my gussets the same edge length and then do only minimal trimming). I’ll add that the details of the construction make a difference as well. Whether the gusset is curved or straight, darted or flat, molded outward as is done with veg tan bags sometimes, or a soft oil tan makes a big difference. So does whether the bag will be turned out after construction (like I had to contend with when making a bottom gusset tote bag for my mom). Lots of measurements and geometry are one’s best friends here.
-
Has anyone attended Jim Linnell's classes at Tandy?
Mablung replied to SUP's topic in Leatherwork Conversation
As the quip goes about men telling their wives how many guns they need: “Just one more.” Same applies to knives, lol. I have a whole variety of knives, leather and non-leather. One cannot have too many knives, even if only a few are carried regularly. -
I’ll ask for suggestions on this part: I’m trying to decide whether to dye this thing. On the one hand, I kinda like the natural look, but on the other hand, a nice brown sounds nice, with some antiquing. I’ll use dark brown Ritza 25 0.8 mm thread to stitch the notebook cover sleeve panels and the perimeter. Maybe that will contrast nicely with the natural veg tan conditioned with Obenauf’s Heavy LP, which will darken the leather a bit anyway.
-
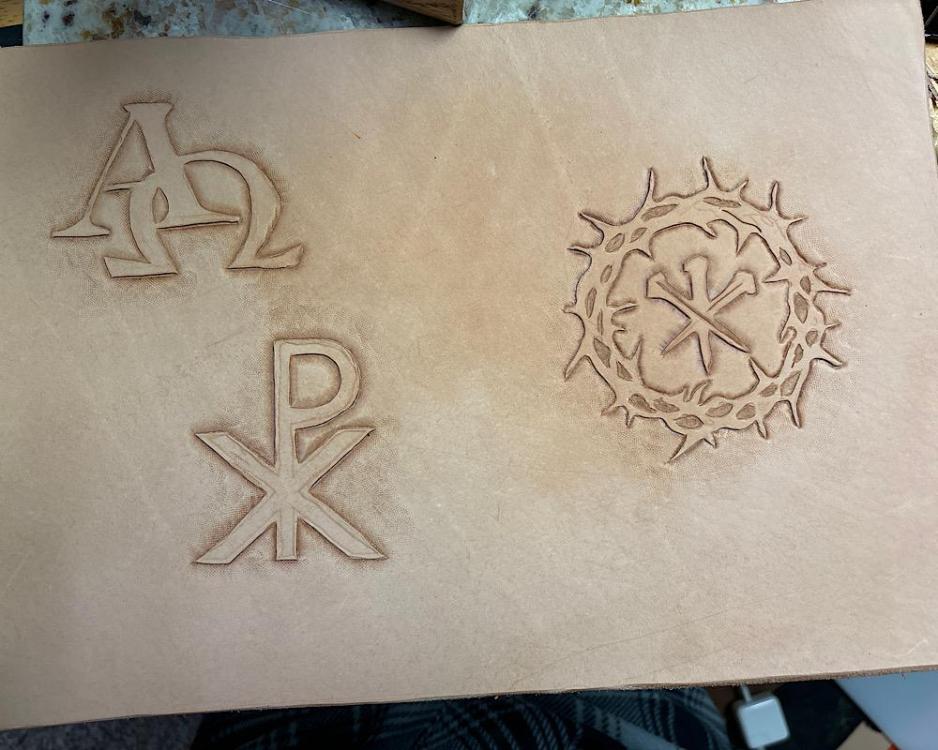
Bladegrinder's got it. I found that design online and traced it. Beveling the profile of the crown of thorns was substantially harder than I thought it would be, but at least you recognized the shape for what it is, @DieselTech.
-
I am making a cover for my church sermon notebook, with a few different motifs on the cover. The tooling needs work simply because I need more practice (and some parts look atrocious). But, I’m kinda proud of it, so here it goes in the Show Off section. Even so, critiques and suggestions are always welcome, as I’m not very good with my hands and looking to improve this skill.
-
Good point. I think one of the planes is off on mine--but I also know technique played a huge role in the janky-looking stitching. It is all over the place.
-
That does make sense. I thought about doing that but had not gotten my welt properly proportioned, so I knew I would need to do a fair amount of trimming after I stitched everything together. I also had to eyeball my chisel placement when doing the initial holes, so I knew it just wouldn't line up properly. I'm not very good at spatial reasoning and my depth perception isn't very good (partly due to an ocular issue with one of my eyes), so I took my chances with the awl--and while it looks bad, it was probably easier to do it that way, lol.
-
Just looked those up, and the tines look very similar to those on the Craftool Pro stitching chisels. The holes in the example picture look awfully nice. I might experiment doing more with my chisels and using them like pricking irons. Speaking of which, I did a knife sheath last night with a very thick welt at the top that I had to skive to a taper. The only way to push through from the starter holes I had started in one side of the sheath was to use my awl, as my chisels would never get all the way through. I polished my awl well and used it to stitch the whole sheath, for good measure. Holy crap does the backside stitching ever look terrible--maintaining a proper angle with the awl is hard!
-
Related to that, do pricking irons generally make narrower holes than stitching chisels? I have some of the regular Craftool black-coated stitching chisels, and the holes end up fairly fat in veg tan leather. I have some of the Craftool Pro ones with thinner tines but in too-narrow a stitch length for most of my stuff. Been thinking about getting pricking irons in order to make less obtrusive holes for firmer stitching.
-
I have trouble with my Ritza knotting at the base of my needle if I pierce it only once and bring the tail all the way to the needle eye. Otherwise, it’s fine. I generally pierce it twice in the “S” pattern. Occasionally I have to flatten out the pierced portions slightly, but usually it does what I want without whining. ETA: In reading responses that hadn’t loaded when I came to the page to make my comment, I realized my remark may not actually relate to what you guys mentioned about knotting. (Weird delta between when I originally loaded the page and the data that hadn’t gotten loaded on my end before I posted my comment.) Ignore me if that wasn’t helpful.
-
I haven’t experimented with many threads, but the Ritza is the best stuff I can get at my local Tandy store, and it’s pretty strong and consistent. Personally, I don’t have quite the issues some do with it twisting as one goes along, but when it does happen, it’s not a big deal. Looks a lot better and provides a much stronger thread than the twisted stuff I had been using. My halfpenny-worth thought.
-
I think those who have pointed out the necessary angle of the bevel Erynn relation to the leather have got it right. Another way of describing it that I personally found a little more helpful when trying to understand how to orient the tool is to say that the blade edge needs to be held perpendicular to, the corner of the leather. So if you are looking at the corner of the leather, not straight down on top, as though you were looking at the surface of the leather, but as though you are trying to look at a cross-section of the leather, then the corner point should go straight through the middle groove of the bevel. That may make it more complicated for you than what the others have said, but I figured I would throw that in there in case it was helpful. and definitely smooth out the edge. It may be a bit dolled from attempts at use and from working it over too course a grit of sandpaper, but with a little work with some finer grits, that can be fixed. Then strop it on a small strip of leather, or on some thread, and that should help. This reminds me that I need to spend a little more time with my own devil edge, as I haven’t sharpened it quite well enough.
-
Can you post some pics of the issues? That might help. Also, when you strop on the abrasive that came with the beveler, are you making sure to strop both sides of the edge, so that any burr gets polished off properly? You may also be putting some tooth back into the edge that is making it cut inconsistently, by stropping on some kind of abrasive rather than a corner of leather with polishing compound rubbed into it. I’ve also used scrap thread with jeweler’s rouge rubbed on it liberally, for both my stitch grooves and my beveler.
-
I still use my utility knife for some things, mainly trimming but I resharpen the blade and strop it, too. I’ve got a scalpel-style craft knife that also gets stropped that I use for some small, fine trim work and very tight spaces. Other than that, my round knife is my constant companion. Thought of something else to add. When I was looking on eBay for my large Osborne round knife, I ran across a linoleum knife C.S. Osborne makes that looks remarkably like a French head knife with a draw cut feature. It was tempting to get one to experiment with.
-
Personally, I think the learning curve for using a head/round knife is a bit overstated. I’m glad I started with a 4.5” head knife before getting the 6.125” round knife I just purchased and sharpened, but it’s really not that bad. Just practice on scrap to get the feel of how the knife handles and its quirks, making basic cuts and skives. I fell in love with it pretty quickly.
