Mablung
-
Posts
576 -
Joined
-
Last visited
Content Type
Profiles
Forums
Events
Blogs
Gallery
Store
Everything posted by Mablung
-
I can post some closeups of the handle and ferrule, if it would help. I didn’t do a quite perfect job setting the bevels, but it still cuts like a dream, as Nigel Armitage would say, so I love using it.
-
Snazzy. I had read the production moved to Harrison sometime in the early 20th century but hadn’t known some of that other history. It’s definitely a solid knife; the litany of owners before me took good care of it, and I intend to do the same. I use it for nearly all my cutting and all my skiving. Is there any way, that you know of, to determine more precisely how old it is? Obviously it’s at least 118 years old, given the stamp, but I always wonder how old it really is.
-
No room for two needles in stitching holes (pics)
Mablung replied to Dannyman's topic in Sewing Leather
Ah, I gotcha. Sometimes it is difficult to get them through, but I think that’s generally an issue of mismatching sizes of thread, needle, and stitching hole. You’ll start to get it dialed in with time. The amount of information on that subject is overwhelming. -
No room for two needles in stitching holes (pics)
Mablung replied to Dannyman's topic in Sewing Leather
I don’t think I follow. Do you insert both needles into the hole, then pull each one through separately? If so, then you’ll still have needless difficulty sewing. Either way, get yourself some proper harness needles, and that should help considerably. -
No room for two needles in stitching holes (pics)
Mablung replied to Dannyman's topic in Sewing Leather
What SUP said. I do occasionally push both needles through at the same time, but really only on softer oil tan leathers that I know will shrink back down from the extra stretching. A hole large enough for two needles at once is likely one that will allow the thread for each stitch to shift and wear prematurely anyway. It also appears you’re not using harness needles, nor are your needles the same size. Get some harness needles around the size DieselTech suggested. That will make the process considerably easier. I think you’re trying to make the wrong kind of needle do a job it wasn’t made to do. -
Interested to see the results. FYI, I tried to put the Instagram handle you listed into my browser, but got an error message from Instagram.
-
Do you mind sharing some closer shots of that butt cuff? I would love to make something very similar, cheek riser, loops, and all, but I haven’t quite digested how to put together the pattern.
-
Ahhhh, that makes much more sense. I also read the “-er-“ into “archy”.
-
Why is a magnifying glass part of her archery kit?
-
I think you could just taper the bottom of the loop a bit so that it is narrower than the shoulder of the cartridge. Like other similar wildcat-like rounds, it has a fairly sharp, defined shoulder. I would think that making the loop fairly deep and a bit tapered at the bottom would do the trick. @chuck123wapati made a cartridge loop pouch of sorts. Not at my computer atm so can’t find it quickly, but as I recall, it has a bottom to it so that the cartridges sit in a pouch, rather than in a true loop exactly. That may not fit the bill, but it’s worth a look.
-
using old leather clothing What leather for a knife sheath?
Mablung replied to volante5767's topic in How Do I Do That?
Or get a 12” x12” panel of veg tan from Tandy or another of the leather retailers. They’re not too expensive and allow you to make minimal investment in leather to try the craft out. If you can, look at the stuff in-hand in a store to get a decent piece. It’s hard to do it the right way with crappy leather. -
Best way to fix imperfections in purse seam?
Mablung replied to bluekush's topic in How Do I Do That?
You may know this already, but make sure you put the cement on both pieces, let it sit for several minutes (until it feels mostly dry to the touch, just a bit drier than tacky), then put the two together. I tried to use my EcoWeld contact cement more like glue at first and got subpar results. Then the directions clicked and it worked. On that note, something like EcoWeld or, I understand, Aqualim has a consistency in the bottle more like white glue, so it is tempting to apply it the same way. Barge and Tanner’s Bond look and smell much more like epoxy, so it’s easier to grasp how to apply it properly (at least for me). EcoWeld also tends to stay in little puddles like glue, too. So, make sure you spread it properly, whichever one you use. I’ve also had Barge and Tanner’s Bond sink into some nappier oil tan more than in some shoe leather I have and into that more than into loosely-grained veg tan. Each leather takes cement a bit differently (and each cement will interact with different leathers differently), so keep that in mind when figuring out how much to apply. Trial and error is your best friend, with generous helpings of both “trial” and “error”. -
“Ant-streak”. I like that.
-
Something else to consider that some members do is use a Sharpie fine point pen to mark in the tooling crevices, without resisting first. Others hate antique paste and will use small paintbrushes to contrast dye the foreground and background (more relevant in floral tooling and similar tooling work, as opposed to figure carving or something like basketweave stamping). I haven’t tried either of those techniques myself but figured I would mention them, since no one else has yet. When one would do each one will depend on the technique chosen. In either case, I would want to have prepared the leather for stitching but not yet stitched, to allow for application of the finishing topcoat before stitching.
-
For the antiquing not to stain the whole piece, some kind of resist must be applied first (Resolene or something similar) so that the antiquing only stays in the crevices of the tooling. Of course, if you want the antique to also stain the whole thing, then rub it over the whole piece (I did a notebook cover for my dad in that manner). I also do it after I dye and the dye dries. I do my stitching last on most things.
-
For what it’s worth, I find my posts bend the most easily when the body of the leather is not sitting flat in the same plane with the snap post. Even if I have the base of the snap piece I’m setting held flat to the anvil, once I shift to only applying pressure to the setter handle in preparation for striking it with my mallet, the leather shifts out of plane. Then I tend to bend the post, as the post has to adjust to sit flush with the leather surface as it mushrooms. A block or something under the body of the leather near the snap location will help allow the snap to set properly without the post bending. All the above assumes the post is the right length, but it sounds like you have that covered already.
-
Holster making literature
Mablung replied to JLopez38's topic in Gun Holsters, Rifle Slings and Knife Sheathes
That might be part of my issue. It’s 6/7 oz Tandy either Economy or Craftsman single shoulder. Appreciate you checking! -
You could, theoretically, make a wallet back with it, provided you use a veg tan or something else with a firm hand to make the inner panels and pockets. But LiftPig is right that it likely wouldn’t hold up to the banging around a wallet undergoes.
-
Indeed. I love my work, but sometimes I’d rather be making shoes. Appreciate the offer. I was thinking of PM’ing you anyway, as something about the issue isn’t clicking in my head. I’ll do so once I sit back down with my pieces and can start working it out.
-
Definitely have the spark. Just haven’t had the time. Trying to figure out how to adjust the overall dimensions and get the dart at the back right. Been busy with work, though.
-
Fantastic. I love those. Stirring me to go finish redesigning the heel piece for my chukkas.
-
Holster making literature
Mablung replied to JLopez38's topic in Gun Holsters, Rifle Slings and Knife Sheathes
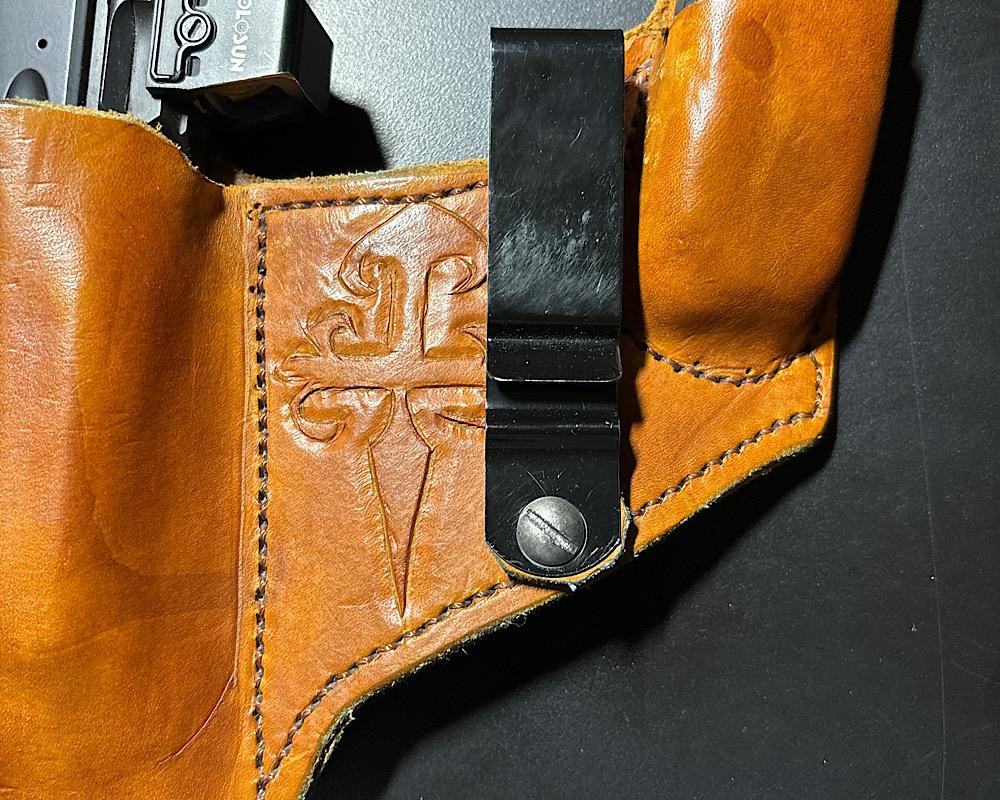
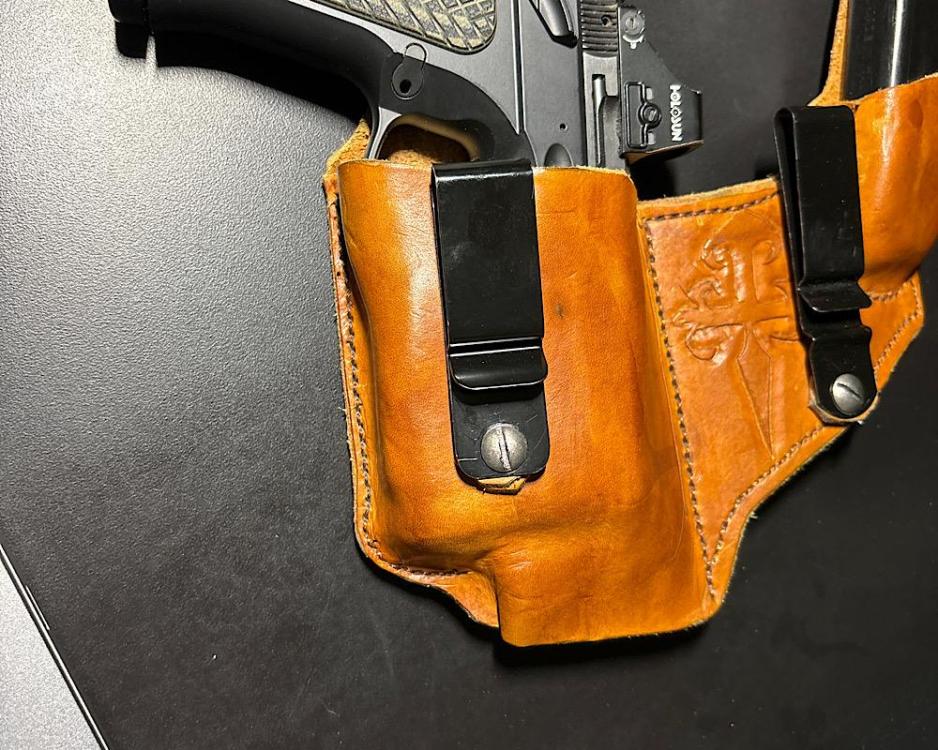
@JLSleather Here are a couple pics of the holster I was talking about. Looking at it again, it seems the stitch lines are in basically the right places, but it still seems it stretched out a good bit. Boning could be better, to be sure. Couldn’t mold the trigger guard much because the pistol has a light on it.
-
Read lots of threads about “burnishing” and “slicking”. Right now I focus on making my edges uniform with knife and sandpaper, then slicking with water on the edge and a wooden burnisher. Other methods produce better results; I’m just focused on getting those couple techniques down. There are a lot of good resources, too, and there are some search tips somewhere around here for using Google to search this particular site more efficiently.
-
Leather dyeing
Mablung replied to jarheaddoc's topic in Dyes, Antiques, Stains, Glues, Waxes, Finishes and Conditioners.
I gotcha. I won’t actually be much help with that , so I’ll keep my piehole shut so others can give relevant advice. -
How long have you been doing leatherwork? That’s a great set of stuff.