Uwe Posted February 7, 2023 Report Posted February 7, 2023 (edited) On the Adler 269 the feed movement is generated from eccentrics on the top shaft. There is no synchronization required between top and bottom shaft and you will not find instructions for that in the service manual. Moving the timing belt just changes hook timing. If you then re-time the hook, you’ll be exactly where you were before moving the timing belt. But very subtle changes in hook timing may have a noticeable effect. So you likely just timed the hook slightly differently, improving it. It’s also possible, but unlikely, that your hook is not original to the machine. An aftermarket or seemingly compatible hook may “fit” the machine, but may have slightly different geometries (e.g. the distance between the tip of the hook and the base of the hook that pulls the thread around the hook assembly.) I had a machine (Juki 563 clone) that exhibited the same snapping-around-the-hook problem. I thought that I had fixed it by moving the timing belt (and then re-timing the hook,) but later I realized that it was just the slightly different timing of the hook that finally made it run smoothly. (On that particular machine, moving the timing belt actually does change the feed timing, so I later reversed the timing belt move.) Just for illustration here are the before and after videos of that machine from 2016. I hesitate to post this because the subtitles refer to the timing belt move as the apparent fix, which is incorrect. The before video showing the thread snapping problem (which can also be described as a take-up-lever-pulls-up-too-early problem): After advancing hook timing (and when I still thought this was fixed because of the timing belt move): Edited February 7, 2023 by Uwe Quote Uwe (pronounced "OOH-vuh" ) Links: Videos
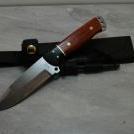
Members Icho Posted February 7, 2023 Author Members Report Posted February 7, 2023 5 hours ago, Uwe said: On the Adler 269 the feed movement is generated from eccentrics on the top shaft. There is no synchronization required between top and bottom shaft and you will not find instructions for that in the service manual. Moving the timing belt just changes hook timing. If you then re-time the hook, you’ll be exactly where you were before moving the timing belt. But very subtle changes in hook timing may have a noticeable effect. So you likely just timed the hook slightly differently, improving it. It’s also possible, but unlikely, that your hook is not original to the machine. An aftermarket or seemingly compatible hook may “fit” the machine, but may have slightly different geometries (e.g. the distance between the tip of the hook and the base of the hook that pulls the thread around the hook assembly.) I had a machine (Juki 563 clone) that exhibited the same snapping-around-the-hook problem. I thought that I had fixed it by moving the timing belt (and then re-timing the hook,) but later I realized that it was just the slightly different timing of the hook that finally made it run smoothly. (On that particular machine, moving the timing belt actually does change the feed timing, so I later reversed the timing belt move.) Just for illustration here are the before and after videos of that machine from 2016. I hesitate to post this because the subtitles refer to the timing belt move as the apparent fix, which is incorrect. The before video showing the thread snapping problem (which can also be described as a take-up-lever-pulls-up-too-early problem): After advancing hook timing (and when I still thought this was fixed because of the timing belt move): I was kind of thinking that the belt just changes the timing but was also hoping it was a part of the problem. I can't say for sure if the hook is original or not but it I can tell it hasn't been recently replaced and does look to be in decent condition. I won't be able to mess with the machine until later in the evening but I did manage to take a few pictures. It is as I left it after getting pretty good stitches and less thread snap. The 1st pic is needle bar on bottom. 2nd pic is tip of hook at needle and I threw in a 3rd just as the take-up lever starts to lift. I hope they are at the angle you were looking for. Quote
Members Icho Posted February 7, 2023 Author Members Report Posted February 7, 2023 Here is the 3rd Quote
Members Moti Posted March 23, 2023 Members Report Posted March 23, 2023 Hi, so how is it over or resolved, I have a similar problem with Adler 269 - 73, I am very interested in how this problem is resolved Quote
Members Icho Posted March 24, 2023 Author Members Report Posted March 24, 2023 10 hours ago, Moti said: Hi, so how is it over or resolved, I have a similar problem with Adler 269 - 73, I am very interested in how this problem is resolved Not fully resolved yet but it is better than it was. I have a theory I want to test out but haven't had tome or motivation to mess with it for a while. Quote
DonInReno Posted March 24, 2023 Report Posted March 24, 2023 (edited) This may not affect thread as it passes over the hook, and maybe it’s just the angle of the photo, but is the case opener adjustment fully to the end of its travel? Edited March 24, 2023 by DonInReno Quote
Members Icho Posted March 24, 2023 Author Members Report Posted March 24, 2023 44 minutes ago, DonInReno said: This may not affect thread as it passes over the hook, and maybe it’s just the angle of the photo, but is the case opener adjustment fully to the end of its travel? I can't tell for sure by the pic either but it has been moved around since. Unfortunately it has nothing to do with when the thread passes the hook. I'm kind of glad you guys committed. It may have gave me the motivation to get back at it today. Lol Quote
DonInReno Posted March 24, 2023 Report Posted March 24, 2023 (edited) On 2/6/2023 at 4:30 AM, Icho said: I tried the settings from one extreme to the other and everything in between so I thought it was just the way it is. I strongly suggest getting down close with a flashlight and adjust the case opener so it opens the gap enough for thread to pass through without binding - having the bobbin case tab centered in the notch isn’t required (doesn’t hurt), but thread has to pass through that gap easily. The adjustment range is quite small and 138 thread is only .4mm so this adjustment can’t be guessed at. If this is out of adjustment it 100% will cause problems - maybe not your main problem, but it’s not an optional adjustment. As the hook is pulling thread around the bobbin I’d want to pull on that thread with an O-ring pick so you can feel the amount of tension at any given portion of its travel - compare that to the tension above the needle plate. Same for other places in the thread path - more than one machine has been sold because a single thread guide had a defect that restricted thread movement. You mentioned it’s a new hook - if anything screams out a warning it’s a new part installed right before the machine stopped working - cheap replacement hooks are normally poorly dimensioned even if the surface finish looks good. If possible compare its dimensions to a known good hook - some replacement hooks are so far off they never work correctly because the distance from tip of hook to the area that transports thread around is too long or wrong shape. Id look closely for other parts that might have been replaced. I don’t remember any talk about snags in the thread path that would prevent a little upper thread from being pulled through the tensioners. Sometimes these are small grooves in the feed dog, improper case opener, thread guides that aren’t quite right, groove in take up lever, etc. A groove or sharp corner that functioned perfectly with a small thread, even one size smaller, can bind a thicker thread. I also agree with the others that the odds of this being a take up lever timing issue are very small, (a tiny fraction of 1%) while the odds of it being an issue with thread path or bottom end are over 99%. Edited March 24, 2023 by DonInReno Quote
Members Icho Posted March 24, 2023 Author Members Report Posted March 24, 2023 1 hour ago, DonInReno said: I strongly suggest getting down close with a flashlight and adjust the case opener so it opens the gap enough for thread to pass through without binding - having the bobbin case tab centered in the notch isn’t required (doesn’t hurt), but thread has to pass through that gap easily. The adjustment range is quite small and 138 thread is only .4mm so this adjustment can’t be guessed at. If this is out of adjustment it 100% will cause problems - maybe not your main problem, but it’s not an optional adjustment. That is the easy part. I'm not at home right now so I can't verify that it is correct but I have definitely had it set correctly and it doesn't make any difference either way with the problem I'm having. 1 hour ago, DonInReno said: As the hook is pulling thread around the bobbin I’d want to pull on that thread with an O-ring pick so you can feel the amount of tension at any given portion of its travel - compare that to the tension above the needle plate. Same for other places in the thread path - more than one machine has been sold because a single thread guide had a defect that restricted thread movement. It is tight all the way up to the point that I can see the lever and internals flexing until it gets around the bobbin. 1 hour ago, DonInReno said: You mentioned it’s a new hook - if anything screams out a warning it’s a new part installed right before the machine stopped working - cheap replacement hooks are normally poorly dimensioned even if the surface finish looks good. If possible compare its dimensions to a known good hook - some replacement hooks are so far off they never work correctly because the distance from tip of hook to the area that transports thread around is too long or wrong shape. Id look closely for other parts that might have been replaced. I didn't replace the hook. Just the hook gears. The hook looks likely to be original. The whole thread path looks to be in excellent condition with no wear spots. I'm not sure if you saw the attached video but it shows how it is tight until it passes the bobbin case to the point that you can hear a snap when it does pass. Loosen my tension makes it less severe of a snap but then the stitch looks loose. The machine sewing pretty good but I want to get it better because it is causing unnecessary stress on the lever and attached components in the head. Quote
Members LiftPig Posted May 18, 2023 Members Report Posted May 18, 2023 @Icho & @Moti did you get this problem resolved? I'm having similar problems and it seems to be not-too-uncommon with 341 clones. I got some good advice from @Wizcrafts & @kgg utilizing @Uwe's videos and the problem has improved significantly. I have one more adjustment to make this evening and I'm pretty convinced that this issue is going to go away once I do that. Quote


Recommended Posts
Join the conversation
You can post now and register later. If you have an account, sign in now to post with your account.
Note: Your post will require moderator approval before it will be visible.