Members dikman Posted September 7, 2016 Members Report Posted September 7, 2016 I'm not a great fan of leather carving (personal thing) but that is beautifully executed! The definition of the carving is superb. Which brings me to a question - do you wet form the holster to the gun? The reason I ask is that in my limited experience with stamping I've found it's very easy to lose definition by wet molding after the stamping, but yours doesn't appear to have lost anything. Quote Machines wot I have - Singer 51W59; Singer 331K4; Seiko STH-8BLD; Pfaff 335; CB4500. Chinese shoe patcher; Singer 201K (old hand crank)
Members Red Cent Posted September 8, 2016 Members Report Posted September 8, 2016 That is a solid looking holster. That would excite some of the speed demons in SASS. While I am always impressed with the tooling and other workmanship, I sure like those edges. Good to see someone else doing nice edges without using Edge Kote or dye. Did you do the burnishing slow and by hand? Gettin' pretty good with that new fangled machine. Quote https://www.facebook.com/redcentcustomleather?ref=bookmarks http://www.redcentcustomleather.com/
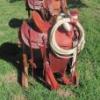
Members Josh Ashman Posted September 8, 2016 Author Members Report Posted September 8, 2016 Thanks Dwight! Plinker, I gave it a good heavy coat of neatsfoot oil and let that "soak" in overnight. After that I used Fiebings liquid acrylic antique in medium brown. I use a scrap of shearling to apply it and put it on heavy making sure to get it into all of the tooling. After I apply it to all of the pieces I go back and "wash" the top off with a damp paper towel. I let that dry for a good 24 hours then wipe it down with an old t shirt misted with liquid glycerin saddle soap (basically Leather New, but I buy a generic brand from Weaver by the gallon as it's cheaper and the same thing). After that I stitched it up, gave it a quick dunk in a tub of water and stuffed the pistol in. It's not quite right to say I did any "molding" but I did have to form it as the holster was quite tight. The liquid antique is pretty bad about wanting to rub, and or run, off so I try to be pretty careful with it, no rubbing with your thumbs or anything like that just stuff the pistol in give it a little twist back and forth and try to wipe anywhere the dye is trying to run. From there I let it dry overnight then wiped on my standard top coat of Mop & Glo cut 50/50 (or so) with water. Let that dry overnight then wiped the whole thing down with the liquid saddle soap again. That's everything I had done when I took the pictures. Since then I rubbed a little neutral Kiwi shoe polish on with my finger tips, let it sit for an hour or so and buffed it out with an old t shirt. that has it ready to ship out to the customer and it should hold up nicely. Based on previous holsters I can tell you that at this point the antique is all set and doesn't try to run anymore if it happens to get wet. Dikman, some folks like tooling and some don't. For me it depends on the type of holster and what I have been doing a lot of. If I build very many tooled holsters I really like the looks of a smooth one and if I've been building a lot of smooth ones I really like a tooled one. I guess for me it's about doing and seeing something different. See above in my response to Plinkercases about the "wet forming". I tend to carve pretty deep and the antique really helps to set it off, so the amount of definition lost when you stretch and form the holster to the gun is fairly minimal. If this had been basket stamped it would have probably lost a little more, but again, if you start with deep clear impressions they usually hold up OK to any forming for me. It is a bit of a guessing game though and sometimes things don't quite play out like I had hoped for. Thanks Red! going from hand stitching everything to using the Cobra has been a learning curve. I will say that now that I'm more comfortable with the machine I rarely, if ever hand stitch! I appreciate your compliment on my edges! Coming from you that is really something, as your edges are extremely nice and I know you put a ton of effort into them. My process on the mainseam is to cement it all together then sand the seam square with a dremel and the little sanding drum. I wet the edge to help cut down on dust plus I think it helps get it nice and smooth. Once I think it's all nice and even I'll gouge the stitch line (sometimes I don't gouge, like on a pancake, but if the stitch line is parallel to the edge I usually do) then I'll stitch it. From there I'll wet it with a sponge, not too much, just a little, and I'll round out the edges with a beveler, my latest favorite is the no name bissonette ones from Weaver. They work well for me and they're cheap enough that I just replace them when they get dull as opposed to trying to sharpen them. From there hit it with a sponge again and go after it with a scrap of cordura, I used to use canvas but the cordura seems to get the edge glossed up quicker. I run in one direction until it's nice and smooth then go back and forth pretty aggressively, friction and heat with some moisture seems to be what gets the job done. From there sometimes I wet it again and hit it with a wooden burnisher I picked up from Weaver, sometimes I use a bar of glycerin soap and sometimes it's already good enough to not mess with anymore. My process on all of the other edges is basically the same, the items that only apply to a glued and stitched edge just get skipped. Thanks again folks and have a great day! Josh Quote
Contributing Member JLSleather Posted September 8, 2016 Contributing Member Report Posted September 8, 2016 Lookin' good (still!). I usually don't care for that antstreak stuff on a carving, but this looks good - especially with those grips. Quote "Observation is 9/10 of the law." IF what you do is something that ANYBODY can do, then don't be surprised when ANYBODY does.
Members Josh Ashman Posted September 8, 2016 Author Members Report Posted September 8, 2016 Thanks JLS! Quote
Members Lizardo Posted September 8, 2016 Members Report Posted September 8, 2016 That is one awesome rig! Quote
Members dikman Posted September 8, 2016 Members Report Posted September 8, 2016 Josh, thanks for the detailed response, most informative. And yes, I did notice the edges before, very nice indeed. Much like I'm sort of doing (but I've got a little way to go yet). I prefer trying to get good edges with a "natural" finish as I don't want to use edge coats/colours - while they look "sharp" they still look somewhat artificial to me, my aim is to try and get my holsters/belts so that they will age gracefully as they get used (and probably abused!). Quote Machines wot I have - Singer 51W59; Singer 331K4; Seiko STH-8BLD; Pfaff 335; CB4500. Chinese shoe patcher; Singer 201K (old hand crank)
Members plinkercases Posted September 8, 2016 Members Report Posted September 8, 2016 I am dying to try the 50/50 mop-n-glow finish... perhaps for my own CAs rig I am planning out. Quote "Oh my God....I beseech thee grant me the grace to remain in Thy Presence; and to this end do Thou prosper me with Thy assistance, receive all my works, and possess all my affections" Brother Lawrence c.1614-1691 plinkercases.ca
Members Steve75 Posted September 8, 2016 Members Report Posted September 8, 2016 Truly a work of art. Quote Steve "No man is above the law and no man is below it; nor do we ask any man's permission when we ask him to obey it." Theodore Roosevelt
Members Dwight Posted September 9, 2016 Members Report Posted September 9, 2016 If I felt confident enough to use a SAA for my CCW, . . . I'd borrow the design and all, . . . and do one for me. The only thing I would change, . . . is I would make my belt tunnel between the two sets of Tee nuts, . . . As it is, . . . I barely feel confident with my 1911, . . . so I don't think I'll rock this boat for now, . . . But I am gonna think on it. I'm thinking shades of McCloud's, . . . cloud, . . . are wisping over me right about now May God bless, Dwight Quote If you can breathe, . . . thank God. If you can read, . . . thank a teacher. If you are reading this in English, . . . thank a veteran. www.dwightsgunleather.com


Recommended Posts
Join the conversation
You can post now and register later. If you have an account, sign in now to post with your account.
Note: Your post will require moderator approval before it will be visible.