All Activity
- Past hour
-
.thumb.jpg.6e903dd66163ad5672f00f144058c571.jpg)
New member here looking for direction
Northmount replied to Tommy1wide2high's topic in Leather Sewing Machines
Google is still a good search to use. Use site: leatherworker.net 132k6 This restricts the search to leatherworker. Add whatever search parameters you want to the search string. Google has larger servers, faster and better indexed. -

New member here looking for direction
fredk replied to Tommy1wide2high's topic in Leather Sewing Machines
@Tommy1wide2high a google search works best; try it for the item but add 'leatherworker.net' to it and it will find pages on here - Today
-

New member here looking for direction
AlZilla replied to Tommy1wide2high's topic in Leather Sewing Machines
Here's a start. 373 posts that contain 132K6. You could rerun the search and add "manual". https://leatherworker.net/forum/search/?&q=132k6&search_and_or=or Welcome aboard! -
Greetings, I seem to be at a loss here. I've tried to search for information and fourms on the Singer 132 K6 but don't fully understand the program. Forgive me if this is the wrong approach and direct me to the propper area please. I am looking for parts/owners manual for my 132K6 and any conversations that have happened already. I have, in the past as a guest, read many useful fourms when I was getting to know my 31-20 but that was thru a google search. Now that I am a member I can't seem to navigate this system. Please advise, thank you. Tommy1wide2high
-
Two BBC news stories 1. a female saddler in Ulster is within this longer story; https://www.bbc.co.uk/news/articles/cx2gl642rpzo 2. A young Scottish cobbler in this video new story; https://www.bbc.co.uk/news/videos/c9qe825q35zo
-
To sand the edges or not to sand
fredk replied to ThisIsMyFirstRodeo's topic in Leatherwork Conversation
In my experience edge paint will accentuate the unevenness of a non-sanded edge. It needs to go on an almost perfect edge I sometimes use an edger before construction but most usually after construction -

Juki DDL-8700 Oil Pump System Clogged
friquant replied to friquant's topic in Leather Sewing Machines
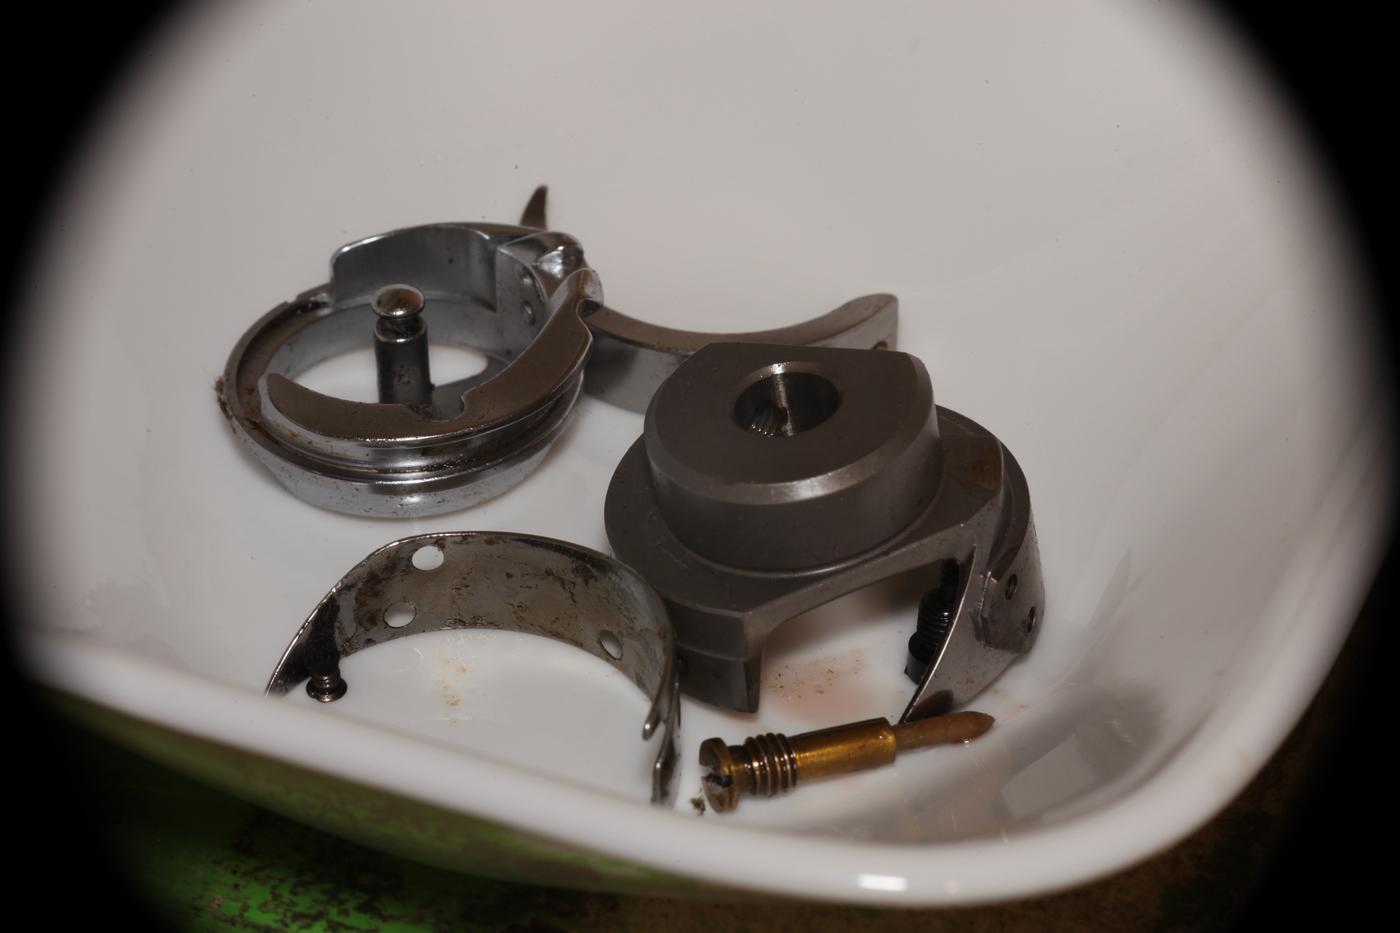
The "fiberglass" piece was removable. I pulled it out carefully. The jet was clogged, but shoving a sewing pin through it cleared the hole. In this photo we have: (left) Oil jet (middle) The clog. (silicone-like texture) (right) The "fiberglass" piece. (filter?) Am hoping that after reassembly (without the silicone-like clog) that it will weep a few oily tears for the hook.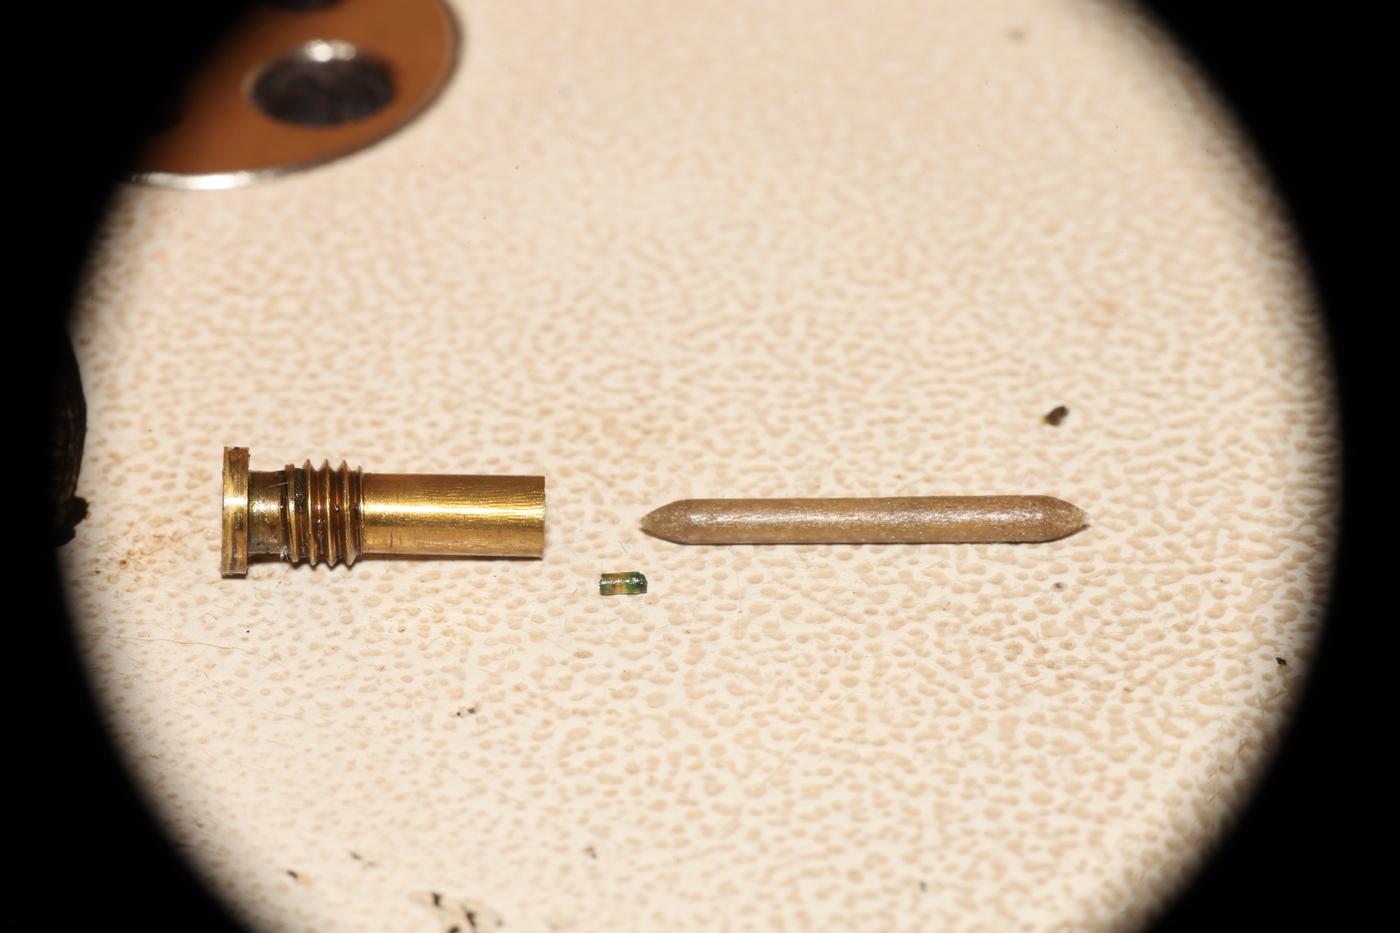
-

To sand the edges or not to sand
ThisIsMyFirstRodeo replied to ThisIsMyFirstRodeo's topic in Leatherwork Conversation
I guess it’s a related question… Will edge paint (such as EcoFlo Edge Flex) mask my mistakes, or will it make them more obvious? Never used an edge paint before. I forget why I didn’t bevel the panels or gusset of the bag first, but I’m already ~75% assembled, and don’t feel like cutting the stitches loose. I’ll definitely be sanding, but if there’s a faster way to the finish line (besides do it right the first time), then I’m all ears. — AZR -
Juki DDL-8700 Oil Pump System Clogged
friquant replied to friquant's topic in Leather Sewing Machines
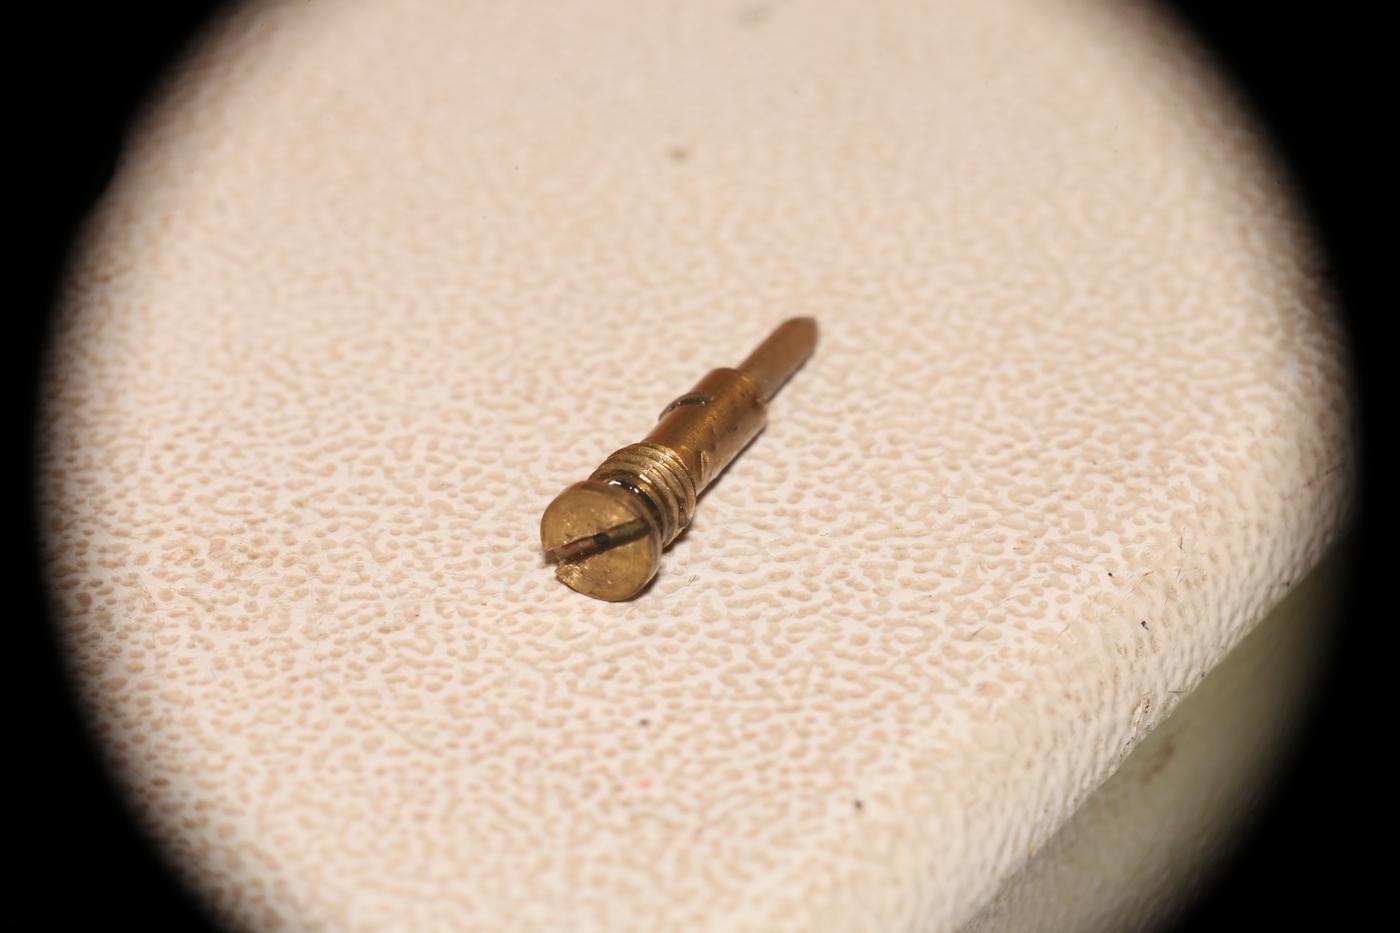
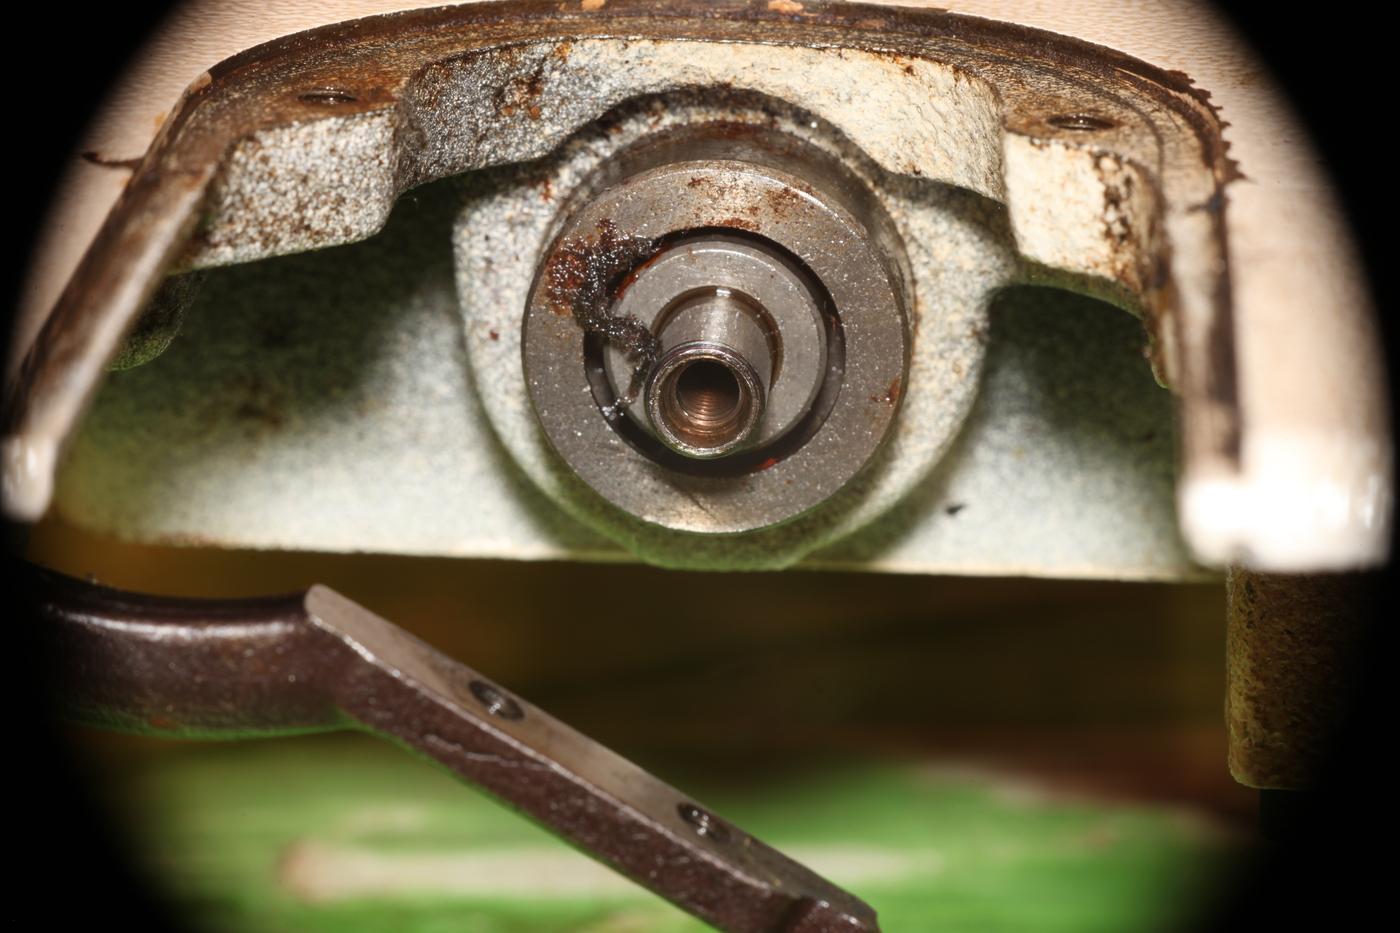
Removed the hook This brass screw was screwed into the end of the hook shaft. The near end has a tiny hole in it, like a carburetor jet. The far end is not brass...rather looks more like fiberglass. Perhaps it is porous? After washing the brass screw in soap and water, I tried blowing through it. Nothing seemed to come out.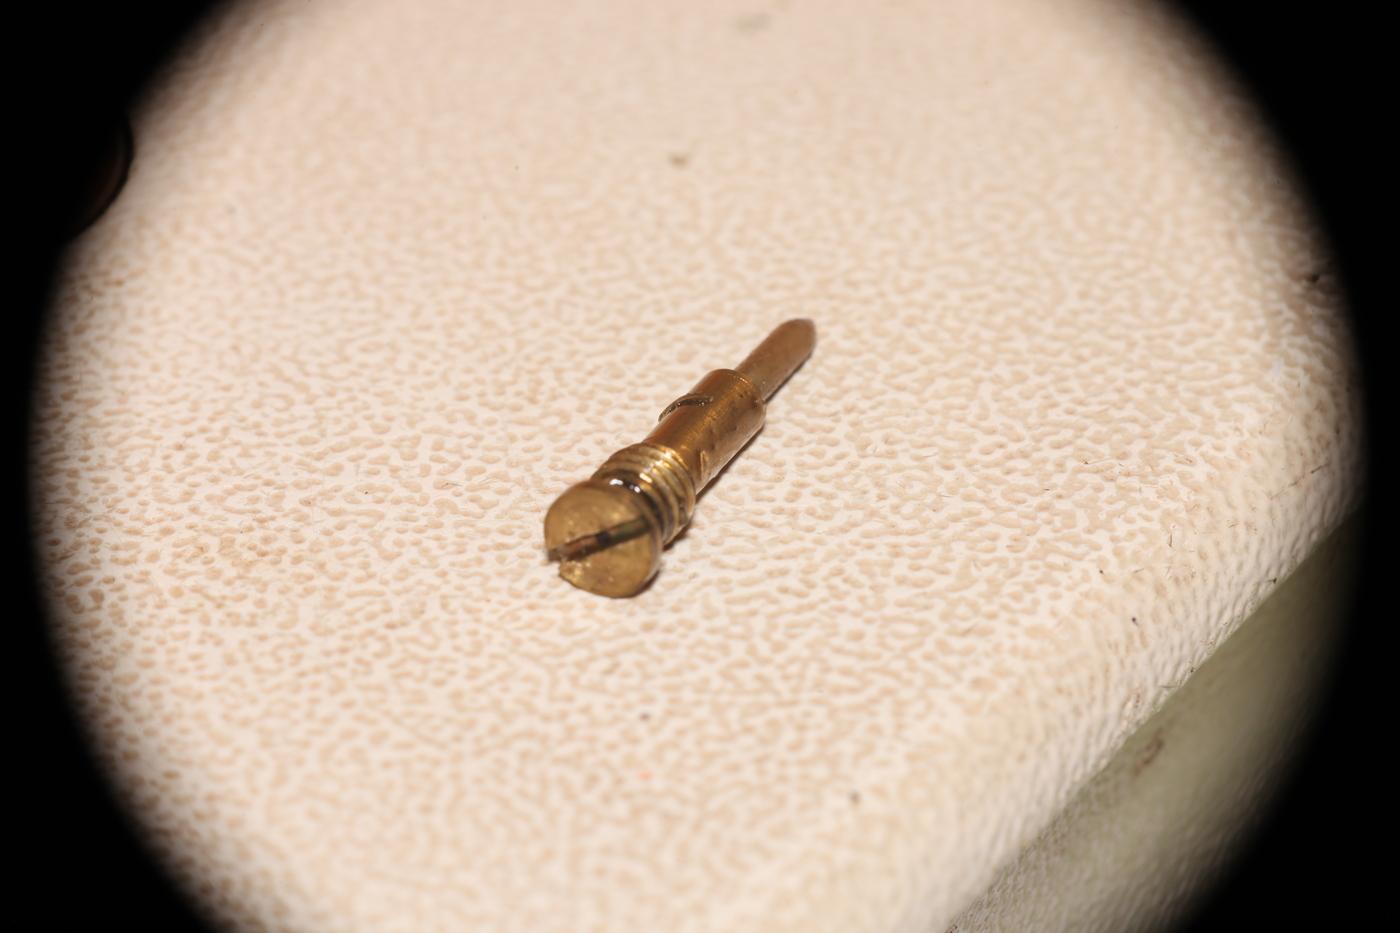
-
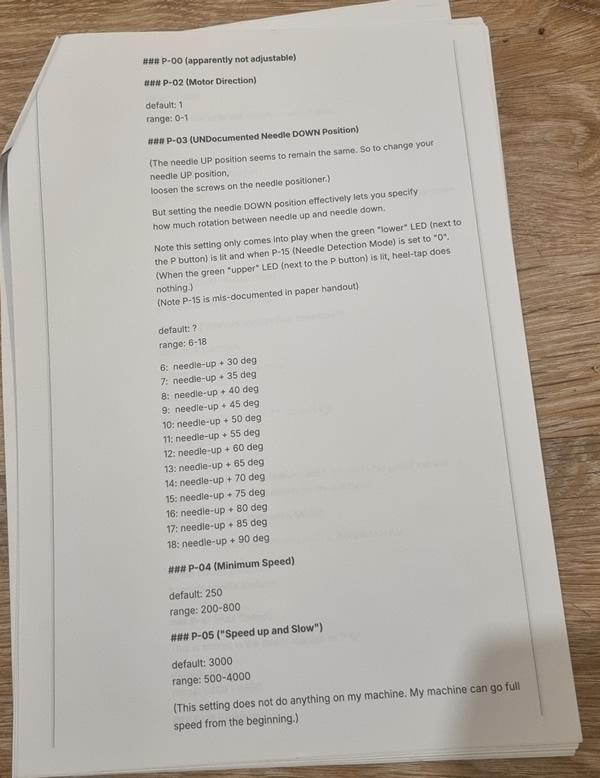
In the Stitchman Servo Motor: The Missing Manual Specifically this part:
-
To sand the edges or not to sand
fredk replied to ThisIsMyFirstRodeo's topic in Leatherwork Conversation
I only sand down edges when absolutely necessary. I've only been doing it for the last five years or so, after I learnt on here that leather could be sanded. I use whatever grade is needed to do the job; a 60 or 80 to really remove and level a bad cut to 600 grade for just a tidy-up before slicking -
 sallyee joined the community
 -

Are needle positioners for brushless servo motor drives all the same
toxo replied to beefy's topic in Leather Sewing Machines
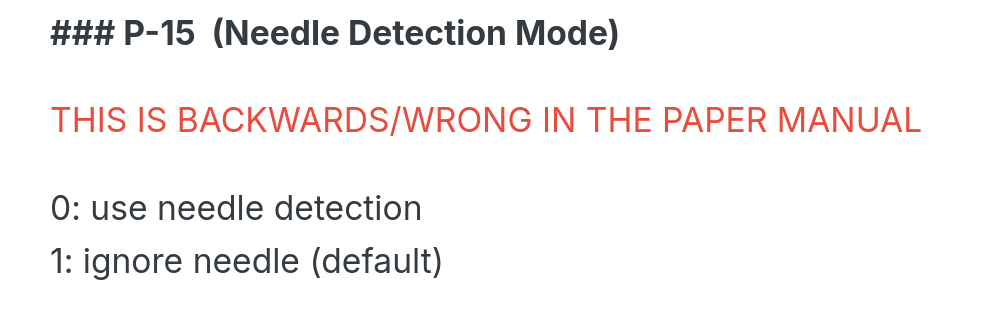
Which P-15 did you mean? This one? Or this one?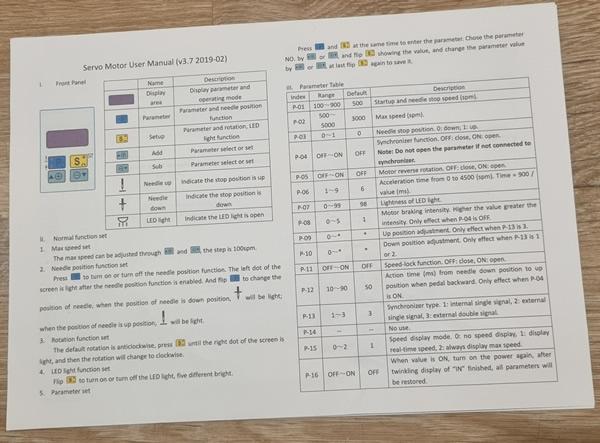
-
For wallets and cases I use plumbers aluminium insulating tape. Its about 0.4mm thick
-
What settings did you try for P-15 (Needle Detection Mode)?
-
Are needle positioners for brushless servo motor drives all the same
toxo replied to beefy's topic in Leather Sewing Machines
After reading this thread I thought I'd have another go. Another waste of time. Tried every setting with the same results. Everything else works fine except the needle position. No matter what the setting, every time I stop the needle is in a different position,sometimes up - sometimes down and never up/down in the same place either. It goes slow enough that it's more of an irritation than a pain but short of ripping out the speed reducer and replacing the handwheel and motor pulleys, I'll live with it.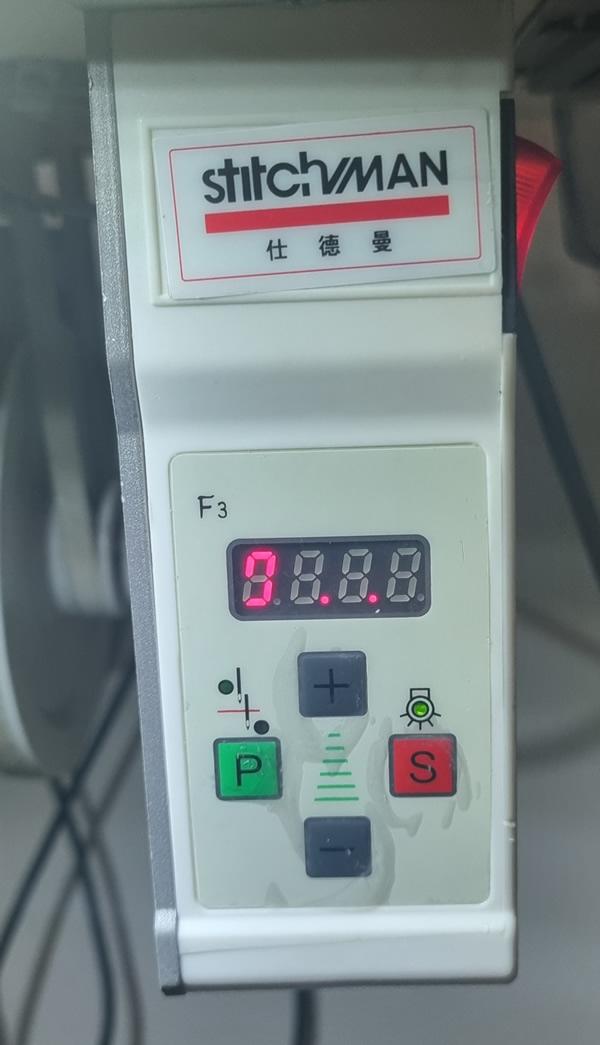
-
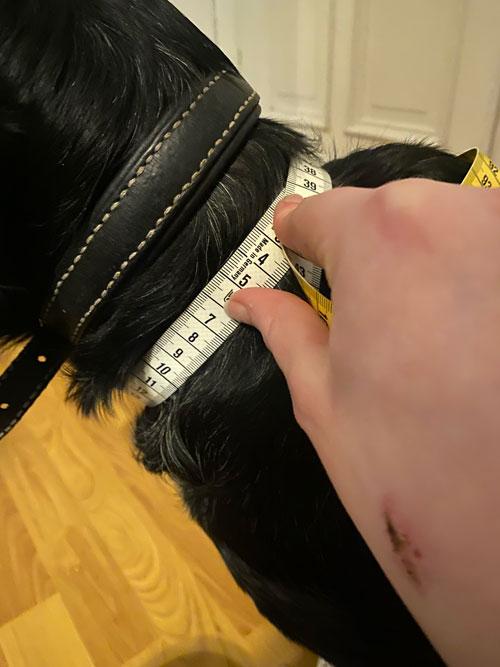
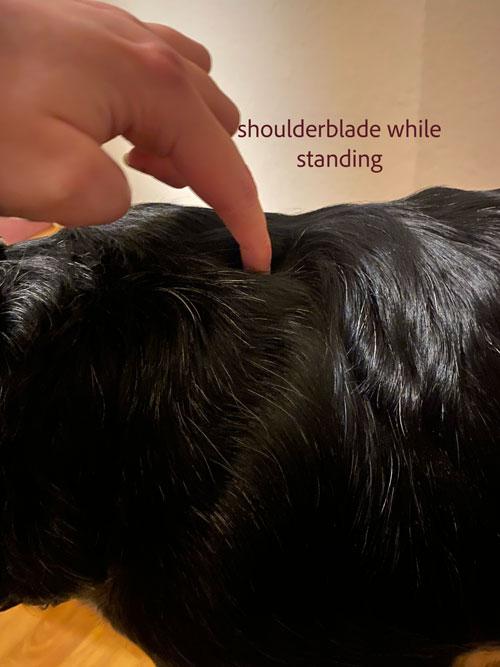
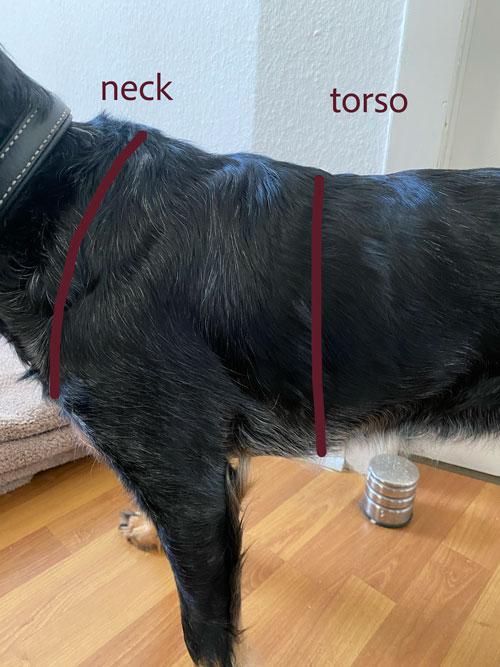
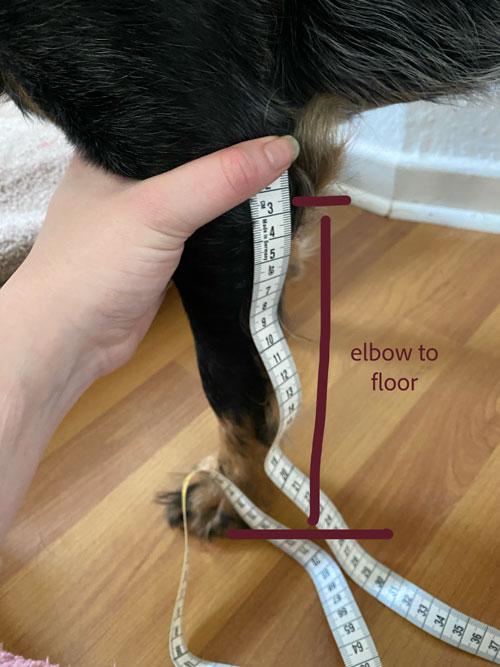
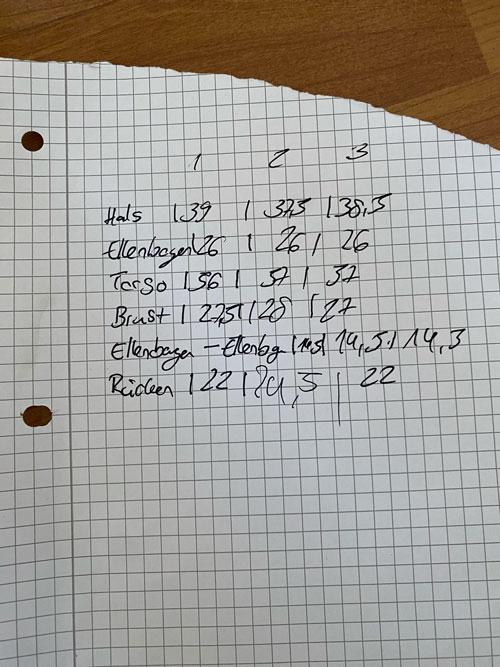
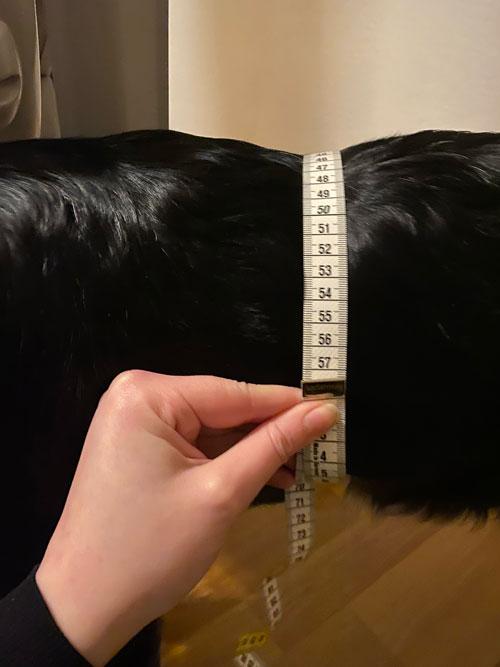
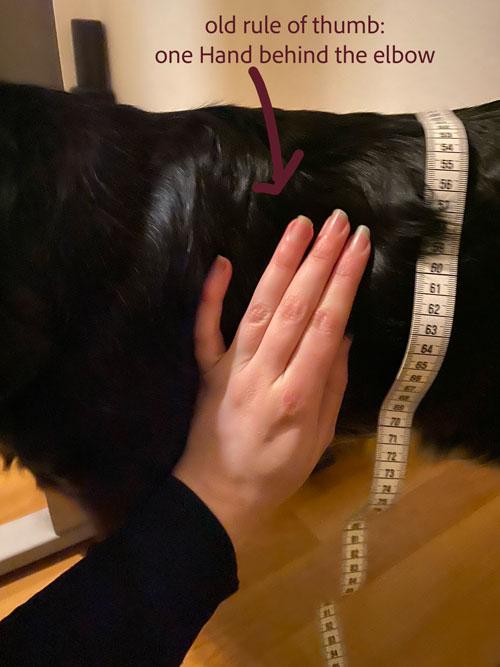
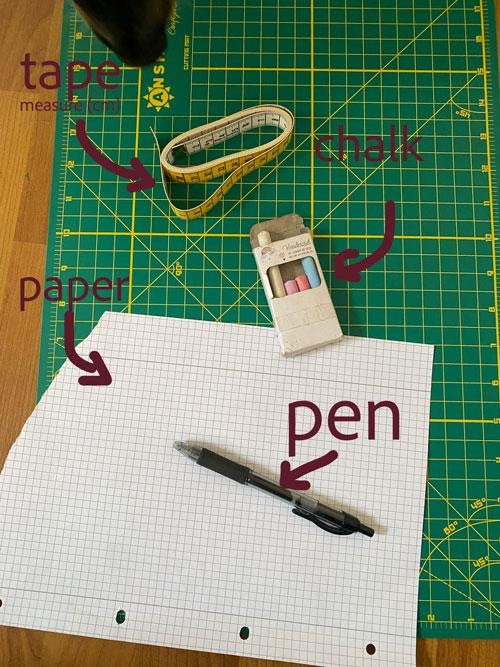
 Part 2 – Measuring Your Dog This part is much more hands-on. You will see photos and graphics and get an explanation for every single measurement, so you can fully understand what you are measuring—and why it matters. Before we start, I want to introduce the dog who will be the model for all graphics and pictures in this guide. Meet Tova This is Tova. She is almost three years old and an English Setter mix from Tuscany, Italy. I got her when she was imported to Germany at six months of age. Since then, we’ve been a team—chaotic, playful, and always on the lookout for an adventure. When I got her, I already had years of experience with dogs and their equipment. Still, I quickly realised that I didn’t know everything. It started with collars and ended with constantly ill-fitting harnesses. The harnesses she wore caused discomfort over time, especially for her long back—and that was on me. They were always some unfortunate mix of too large in one place and too small in another, and I didn’t spot the problem early enough. She is the reason I want to do better. So, how do we actually do better? By measuring our dogs correctly. General Measuring Rules - Take each measurement three times - Let your dog move a few steps between measuring rounds - Later, before cutting leather, check each strap length three times - Precision matters. Your dog will thank you. What You’ll Need Chalk (as soft as possible) or any non-toxic, non-permanent marker that shows on fur A flexible tape measure Something to write on Something to write with What We Are Going to Measure Neck circumference (in front of the sternum, below collar position) Elbow to floor Elbow to elbow Distance between the shoulder blades Torso circumference (widest part of the ribcage) Distance from chest to torso Distance from neck to widest part of the ribcage Before Measuring: Position and Anatomy Before taking any measurements, we need to understand the anatomy of the individual dog in front of us. Your dog should stand directly in front of you. I was able to measure Tova on my own, but if your dog is more active, get someone to help hold them calmly. Make sure: all four paws are on the ground the paws are as parallel as possible the dog stands “closed” (equestrians know exactly what I mean) Now grab your chalk—and a good amount of patience. Marking Anatomical Landmarks (This Is the Key Step) 1. Shoulder Line First, locate the shoulder and draw a line along it. In my photos this may be hard to see because Tova has her winter coat and the chalk didn’t show as well as I hoped. If you’re unsure what to look for, Figure 1 will help. Repeat this on both sides, then connect the lines across the neck and chest. 2. Shoulder Blade Positions (Static and Dynamic) Next, locate the shoulder blades and mark each side with a dot or cross. Now lift one front paw as high as your dog normally lifts it while walking. Feel for the shoulder blade again and mark its new position in the same way. This shows you how much the shoulder blade actually moves. 3. Elbow Movement Zone With the paw still lifted, locate the elbow and draw a vertical line marking its range. Repeat this for both sides. 4. Widest Part of the Ribcage Now locate the widest part of the ribcage. Some companies recommend measuring “one hand behind the elbow.” From observing different conformations, I’ve found that this rule of thumb does not consistently hold true. Instead, visually and manually identify the widest point and mark it with a vertical line on both sides. ------------------------------------------------------------------------------------------------------------------------------------------------------------------------ At this point, your dog will look like a child discovered abstract art. Now is also a good moment to calmly reassure your partner or other dog owners or concerned bystanders, that yes—you are completely fine. These chalk lines are our guides. They show us where movement happens and where straps must not interfere. Our motto here is very much work smarter, not harder—especially if your dog is not the calmest individual. Taking the Actual Measurements 1. Neck Circumference Using the shoulder line you drew earlier, measure above this line and around the neck, between the chalk line and the collar position. The tape should sit flat You should be able to slide at least one finger underneath If this measurement does not fit over your dog’s collar, that is not a problem. This will make sense later when we translate measurements into design. 2. Torso Circumference (Widest Ribcage Point) Use the vertical chalk lines marking the widest ribcage point as your guide. Measure all the way around the torso. Keep the tape level and as vertical as possible Now cross-check with the elbow movement lines: there should be at least two finger widths between the torso strap position and the elbow movement zone If not, move the measurement slightly backward. Elbow clearance is non-negotiable. 3. Distance Between the Shoulder Blades Measure the distance between the dynamic shoulder blade markings (the lifted-paw positions). This measurement tells you how wide the dorsal (back) strap is allowed to be. In Tova’s case, I ended up with less than one inch of usable space during movement. This means: the strap must be narrow, padding must be minimal and carefully planned Ignoring this leads to direct scapular restriction. 4. Distance from Chest to Torso (Between the Front Legs) Measure from the chest/sternum area back to the widest ribcage point between the front legs. This measurement defines how long the chest strap is allowed to be without drifting into the elbow movement zone. Measurements That Seem Odd—but Matter a Lot 5. Elbow to Floor Measure from the lowest point of the elbow straight down to the floor. This measurement tells us: how low a chest or Y-strap may sit where vertical restriction begins whether a harness design risks interfering with stride extension This is especially important for chest strap and Y-harness designs as this measure give us an overview of the swing radius of the dog. 6. Elbow to Elbow Measure horizontally from one elbow to the other. This measurement defines: how wide a chest strap or Y-front can be how much lateral freedom the forelimbs need Too narrow causes pressure and rubbing. Too wide pushes straps into the shoulder joint. Now take these measurements another two times until you have 3 measures for each measurement point. Caption: This is written in german and says Neck, Elbow, Torso, Chest, Elbow to Elbow, Back ------------------------------------------------------------------------------------------------------------- Final Note for This Part If a strap crosses a chalk movement zone, it will interfere with movement—no matter how well it “fits” on paper. Measurements are not just numbers. They are boundaries defined by anatomy and motion. In the next part, we’ll use these exact measurements to: choose the appropriate harness type and translate them into a functional design This is where everything starts to come together.


-
 I am currently doing a study on the hertz of car key fereday box and bag carry and finding out that there are different frequencies regarding both. So, I don't know what others are using for key pouches.
 -

Heads Up:I am going to sell most all my leather "stuff"
Darren8306 replied to Ferg's topic in Hand Tools-Leatherworking Tools
Haven't tried kangaroo hides before. Does anyone know what kind of friction it would add, to try to get these from north of the border? And what the HECK do I make with a kangaroo hide of ANY colour ? Thanks for thinking of us here, @Ferg I hope you can easily find new homes for the items you want to clear out. -

Are needle positioners for brushless servo motor drives all the same
1hp replied to beefy's topic in Leather Sewing Machines
there are at least two sizes of 4 wire plugs. bought the wrong one first. this instruction sheet may help: Servo Motor Technician User Manual(v3.7 L-Type 4-Bar for ShuangZheng).pdf -
Thank you! Ah! Yes, that was definetly a mistake due to sleepiness. My trainer would yell at me as we just had a discussion about martingals and when and when not to use them. 😆 The measurement part, is currently in wirting and I hope to have publish ready this evening. And again thank you! I hope to learn a lot and maybe even find a new calling. I'm literaly sick and tired of pro-bono work by now and constantly having to fix the issues non-certified consultants caused. They get paid a lot of money, I don't even see a cent while doing the work they promised to do but failed to deliver - I don't think I have to say more. 😅
-
 Praying for you and your health, my friend and wishing you all the best.
 -

To sand the edges or not to sand
JDFred replied to ThisIsMyFirstRodeo's topic in Leatherwork Conversation
I keep two of those rubber sanding blocks around one which 120 grit and the other with 220. I use them to straighten out any wobbles I had cutting something out and to even up multiple layers after they’re glued together. And I if things get really out of hand and I get a profile way wrong then I will use the belt sander. -
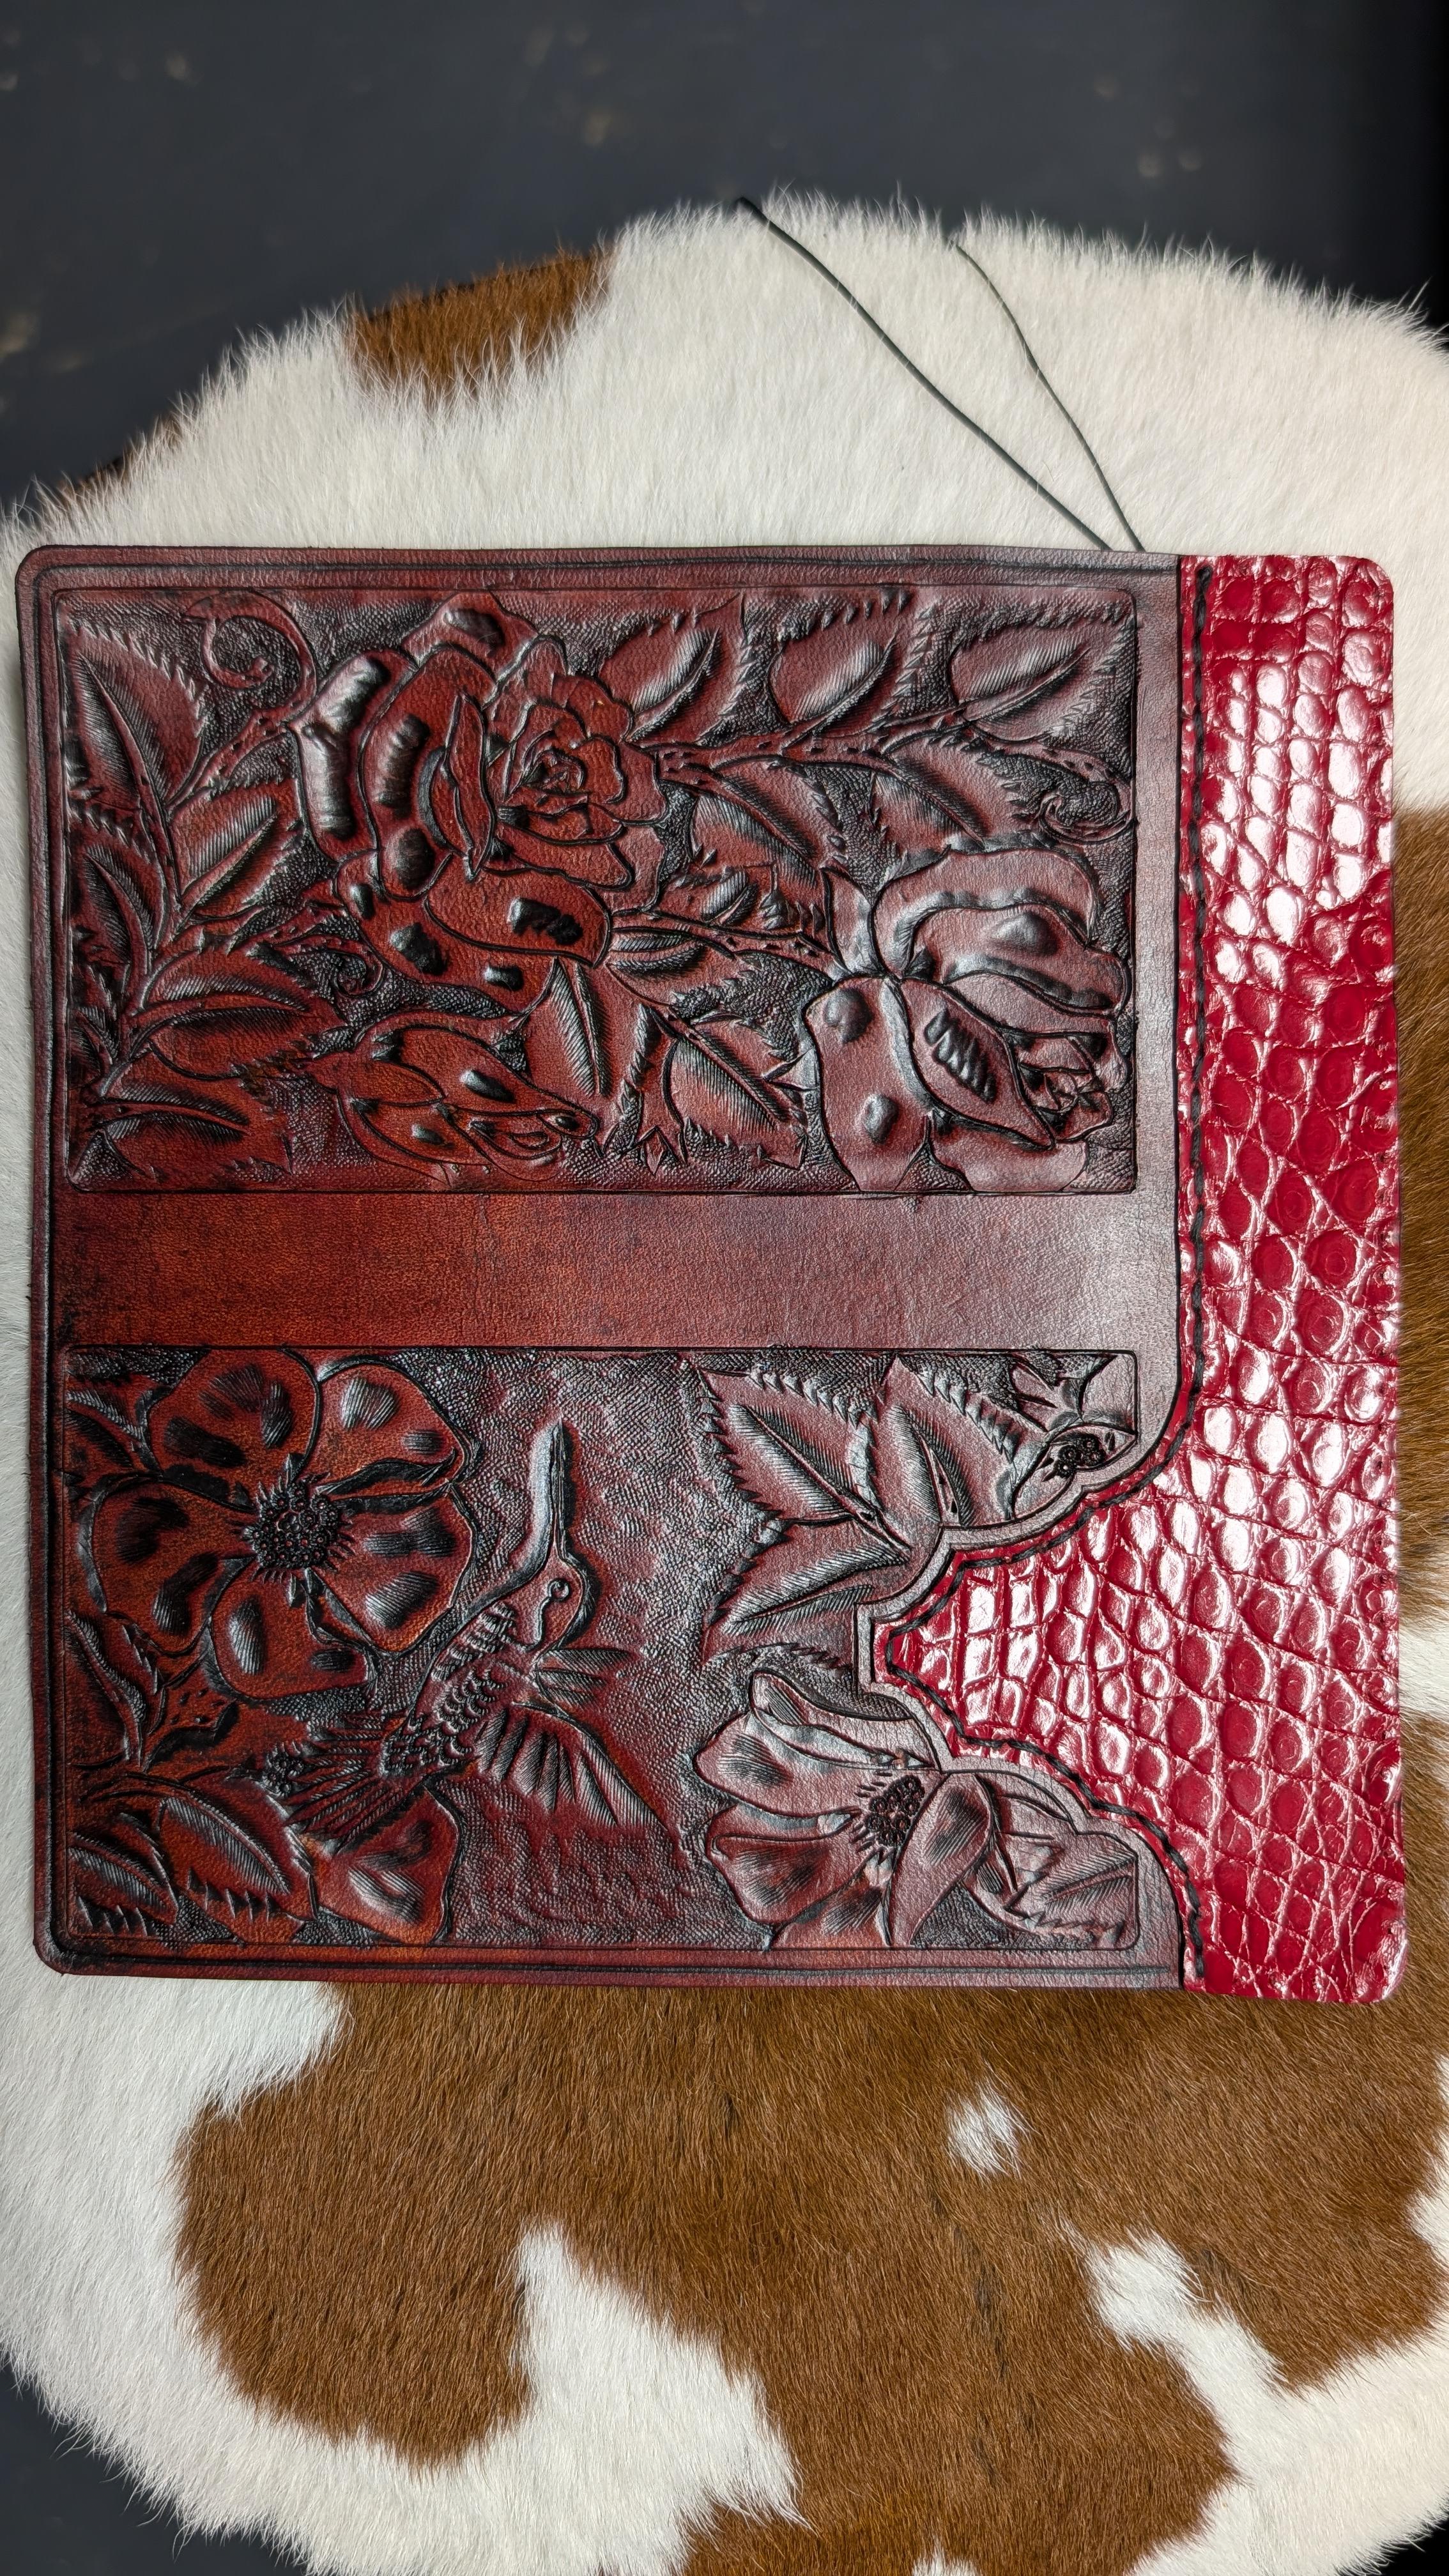
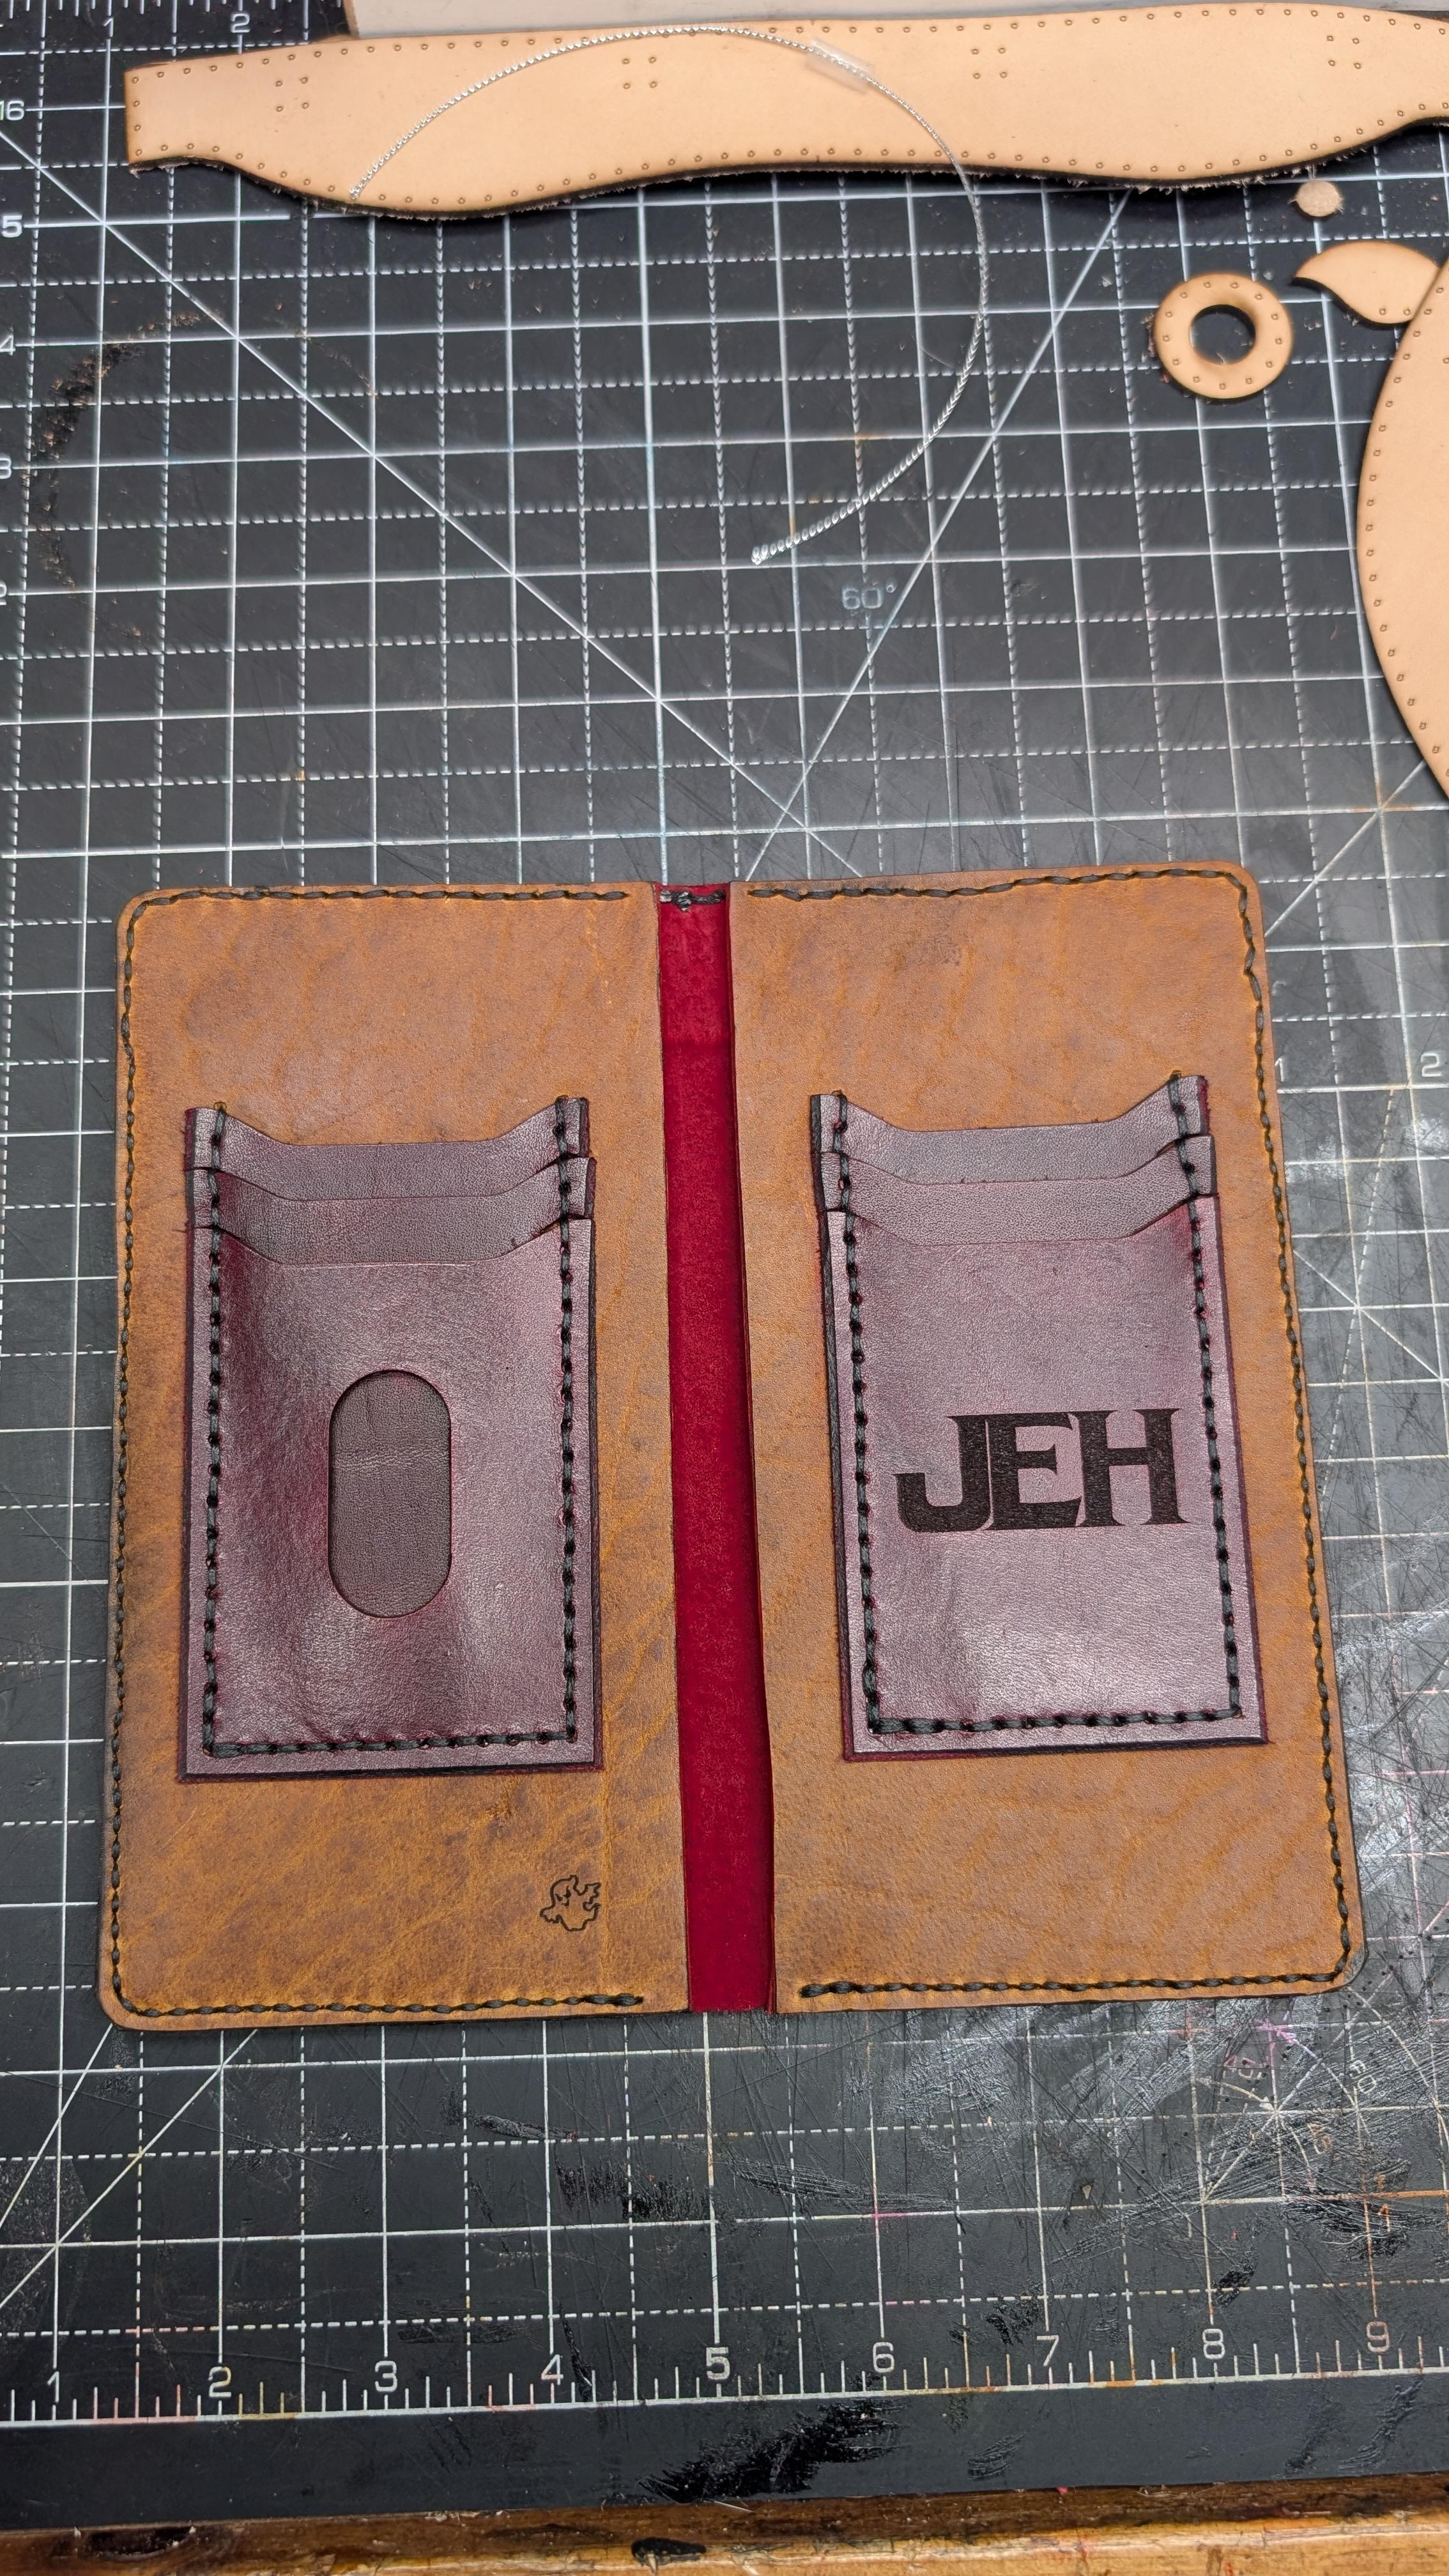
Good job, your hummingbird turned out great. I understand the struggle of wallets coming out thick someday I’m going to try some kid skin for lining and pockets. Keep up the good work.
-
Good job and good save !! thinner leather is the key to thin wallets.
-
This was one of those "hurry up on Christmas morning" projects. New wallet for my mother-in-law. I was terrified of tooling the hummingbird, so I kept putting it off, until I couldn't any longer. I need to learn how to add card slots without making the wallet so darn thick. I see wallets with 6 card slots that look great. I haven't figured that out yet. 4/5 veg tan outer with real gator accent, pig suede lining, "peanut" bison dividers, 2/3 veg tan pockets. Bismark brown dye, black acrylic antiquing.