

All Activity
- Today
-
Yes whoever invented the layback sewing machine deserves a prize 🦄
-
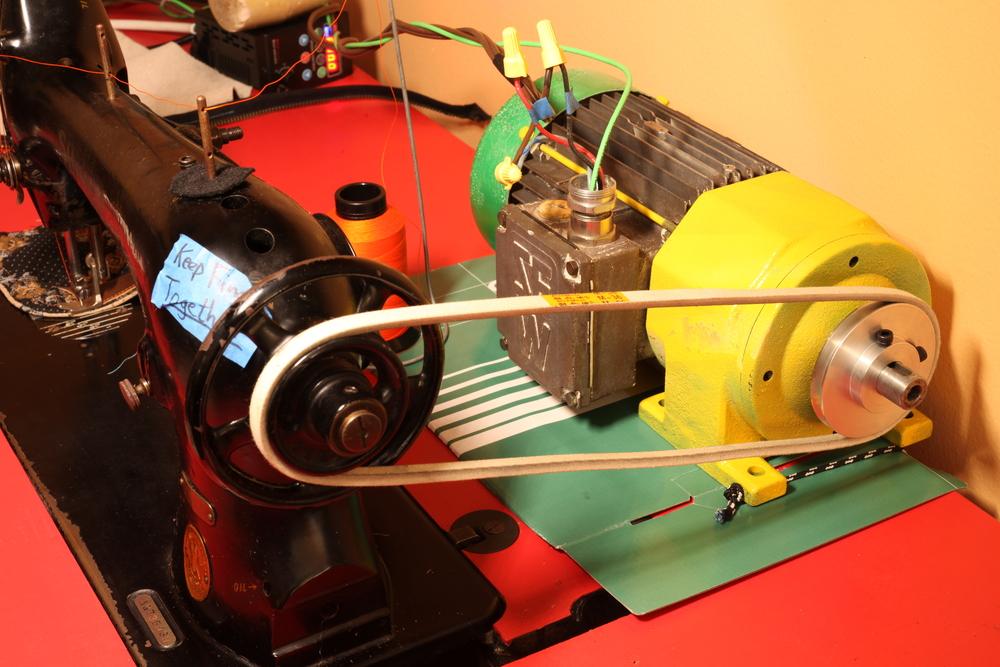
 Servo motors: You can use either a brushed or brushless servo motor on any industrial sewing machine and it is a straight swap out as the mounting hole pattern is the same. You may have to move the "go" pedal slightly to the left or right. You can buy from a vendor or from Amazon / Temu / Ebay but you are not limited to the dealer should you want / have to change the motor. Brushless servo motors come in typically three puke favours. Cheap ones have 6 internal coils for the servo motor, mid grade have 9 internal coils and the better ones have 12 internal coils typical wattage ratings of 1/2 hp to 1 hp. The more internal coils the better. Brushed servo motors are simpler to repair with no computer controls, longer lasting with typical wattage ratings of 1/2 hp to 1 hp so less frustration. kgg
 -
i'm kind of stuck looking for bed hinges. They're originally from a Wheeler & Wilson D12 (Singer bought W&W in 1905 and this 111w156 is related to the D12). I need to work back and forth under the bed and up top. Flopping around on the bench is a pain in the ass.
-
 Many of us, including me, use this type of "brushed" servo motor: https://www.tolindsewmach.com/motors.html. Unlike the one you linked to and own, which starts at 200 rpm, this motor starts turning over smoothly from zero rpm when you move the foot pedal down. There is no jerky start, nor any complicated electronics panels to replace. The only parts that experience wear are the two carbon brushes, two of which which come extra with the motor. I've yet to go through the original brushes in a motor I installed around 2014.
 -
Yeah, I'm a slow learner...
-
 Update: First of all, I was today years old when I learned that Uber has a courier service and it is awesome. Spared me 3 hours of traffic. Had the pedal and controller at the store at 10 am and 10 mins later the owner called me that he fixed it. He said the problem was the cable between the controller and the pedal, there was a pc board in there that failed: he replaced it. Got my delivery from Uber and tried it and now my machine works again. So, many of you were correct in your hypotheses. I appreciate you taking time to read and trying to help me out. You are good people. For future reference, lets say that I wanted to buy a whole set of Motor, controller and pedal like @kgg and others mentioned, would I have to buy a specific one or it would not matter since replacing all 3 parts would basically replace the whole system? If yes, could anyone link me one? I might just get one to leave in the basement to hot swap it if somewhere happens again so that I can still work while they fix the broken one. This is the one i have now, but do I have to buy an Artisan or can anyone recommend a better one? Thank you. https://bobssewvac.com/product/acf-680-880-watt-servo-motor/
 - Yesterday
-
I wonder if an ultra-sonic cleaner would work?
-
I have since acquired a machine that uses 7x3 needles. 7x3 seems to be the round point equivalent of 7x4 and 794. These are about 68mm long in total, 60mm from butt to top of eye. Worth reading is Wiz' blog on dumbing down a cowboy 4500, which also uses 7x3 needles.
-
Did you get this machine up and rolling? Would love to see some videos 🎥
-
Did you get your machine running? I'm not familiar with the 291. If a machine has a safety clutch, it will likely be built into the timing cog underneath the machine. Follow the timing belt from the main shaft down to the horizontal timing shaft. The cog on the horizontal timing shaft---if it has levers and pawls on the right side of it, your machine has a safety clutch. Here's a video by Uwe that shows safety clutches: https://www.youtube.com/watch?v=N-MClgDKnq4
-
Thanks Northmount, I tend to get sidetracked sometimes - I'm also very good at hi-jacking threads.
-

Free watch strap templates (A4 + Letter size)
TonyV replied to Danne's topic in Patterns and Templates
I've been thinking about making a watch strap and bingo! just the templates I need. Thank you! -
I like this method a lot. Yesterday I made the mistake of bringing the Singer 144 all the way down to ground level, and then later had to figure out how to get it back to table level. (I did it in two stages, with wooden trough made to fit the 144. First hop onto a chair with the trough, both hands on the trough. Second hop from chair to the table, left arm through the machine like a purse. Well maybe not as high as a purse, but at least up to my elbow. When I get to the table and it's time to lower the machine, there's a bending-over sort of motion required to get the machine a few inches out laterally from me and into the cutout. This lateral motion is hard, and I aspire to invent some wooden accessory so I can set down on wood, then skooch it over and lower one half at a time. But not there yet. You know the other thing that's a pain in the butt...good paint. I'm avoiding marring the orange paint on the table, and that avoiding gets expensive. I'm thinking "Who I could drag over here for a two-person lift?" The neighbor on one side used to be quite strong. For now I made a label out of blue tape that says "Two person Lift" to remind me to lay off it by myself. I also bought a chain hoist with straps, rated for 500 pounds. I even introduced the chain hoist to my girlfriend, but haven't admitted yet that I actually want to ceiling mount it in her living room. 🤩 Now that I've thought through it, the two hardest parts of the transfer are A. Getting from ground level to table level, and B. Leaning forward four inches to hit the slot. I can work around "A" by never putting it on the ground again...just transfer it to a workbench. And if I ever need to move a heavy machine from ground level to table level, then I gotta make friends with the neighbor...which would be good for me anyway. 🤷♀️ I'll start looking for another table. If not for in the house, then at least I could set up one machine in the cellar. (I would call it a basement, but that would be generous) 🤣 Luckily, I'm full up on motors. They are the easiest thing to tuck away so nobody can tell me I have too many of them.
-
Me too. Only about 45 years.
-

How to Lift a Sewing Machine Safely
BlackDragon replied to friquant's topic in Leather Sewing Machines
I see that you're using the same motor for the two machines. If you don't want to add another motor you can put another table so they are back to back and can share the same motor. You'll just have to switch the belt which you'll have to do anyway if you're switching out the heads. -
Put your arm through it and carry it like a purse.
-
 DogLegLeft joined the community
 -

How to Lift a Sewing Machine Safely
bruce johnson replied to friquant's topic in Leather Sewing Machines
If you have room then yes another table. Besides making your own, you can check around. The cutouts for a lot of these tables are standard. I have been in a couple industrial sewing machine shops with tables in a give-away section. The heads in some industrial settings give out before the tables. FaceBook marketplace sometimes has a "machine doesn't work - $50" listing with a good motor and table under the boat anchor. -
Nice. Hard to make a 1911 look bad.
-
Thanks for that. It was inspired by the Frazier holster in packing iron.
-
Carefully and with two people. The strongest one on the heavy end. I would suggest making another table and avoid swapping them back and forth??? kgg
-
How do you swap machine heads in and out of a table without hurting yourself? I have a Singer 31-15 that came with a table, which we painted orange. I also have a Singer 144W103. Eventually I discovered that the 144 fits into the same table slot, it just rides lower in the water. So I removed the sheet metal drip pan / knee protector and started using the 144 in the orange table. Now I want to switch back to the 31-15 for a different project. But lifting that damn machine...
-
I'm kind of new to 1911s, maybe 5 years or so. At first a toe loop style holster looked odd to me. But really, in 1911 it would have been quite natural to copy cat or modify existing revolver style holsters. I'm really not a fan of modern holsters anyway, so I'm quite happy for mine too ride in toe loops.
-

Singer 16-188 timing vs take up spring issue
friquant replied to peterstarch's topic in Leather Sewing Machines
That's great! As timing adjustments go, setting the needle bar height is the easiest. So if you do end up swapping to other needles... The most convenient way to set the needle bar height is to put a black mark on the needle in the middle of the scarf. Then adjust the needle bar height so the hook crosses at the black mark. -

Singer 16-188 timing vs take up spring issue
peterstarch replied to peterstarch's topic in Leather Sewing Machines
@friquant Thank you for the response! I imagine I will have to fiddle with my check spring regardless but I believe I have solved the skipped stitching issue. I bought 16x63 needles (what the manual instructs) thinking the previous owner never re-timed this machine, but I believe he actually did re-time it to take 135x17 needles. Both a blessing and a curse, because the 135x17 are much more common and offer a lot of variety, but now I have to get new needles because I don't think its worth the effort to readjust it to use an almost obsolete needle type. Thank you for your help!!!! -
 archery-crafts joined the community
 -
Singer 16-188 timing vs take up spring issue
friquant replied to peterstarch's topic in Leather Sewing Machines
You are correct, scarf goes on the hook side. The long (longitudinal?) groove is on the other side. (Wishing for better names here haha) I'm not familiar with the check spring on that model. But in general, there are two or three adjustments that can be made on the thread check spring. (I expect neither of them will have as profound an effect as getting your needle bar height correct.) Here are the two adjustments that I understand about check springs: Adjust the preload. This is usually done by loosening a screw that is down lower on the body so that the whole check spring cylinder can rotate freely. Then you put a screwdriver in the big slot on the front in between the threads of the thumb nut...use the screwdriver to gently rotate the whole check spring cylinder left (for less preload) or right (for more preload). Adjust the amount of travel. Typically there is a secondary lever in a banana-shaped slide with a screw holding it in place. Loosen the screw, slide the adjuster, tighten the screw. I'm not familiar with yours in particular, so I can't say for sure which screws do what on your model. But a little experimentation (and looking for additional screws under the mechanism) may unlock the mystery for you.


