

All Activity
- Past hour
-
here is what works for me. I take a regular 5-gallon food-grade plastic bucket with a tight lid. Drill a hole to fit 1/4" tubing tight, then get a pint mason jar with a lid, drill a hole in that lid to fit the other end of the tubing into push it to the bottom of the jar fill the half full of water and you have your air lock and airtight fermenting barrel. you do your fermenting in this until it's complete. Then when its done press your mash and put the wine into the carboy with your clarifier. You're basically done now except for time. When it's clear, re-bottle it into your smaller vessels and enjoy it. you want your barrel and carboy as full as possible so there is little to no air, A hydrometer is what you needed for your water issue. You create your chosen alcohol content by the amount of sugar in your mash, if you want less alcohol more water type thing. You can add sugar to make stronger wine also. You do this at the start of your mash. And yes fix it!!!!
-
I watched your video and here is my two cents worth. i) When you started you did not hold the thread properly to prevent thread movement (Top and Bobbin) like you did at the 5:54 mark. ii) At the 3.10 mark you can see the top thread (black thread) gets pulled in slightly which is causing a slack in the top thread and causing a jam at the 3:20 mark. iii) You did not back stitch after three stitches to lock the thread before starting your seam. iv) When you finish the seam you are not back stitching to lock the thread. v) With a thin piece of material like what you are using in the video there is almost not space to bury the bobbin thread knot in the material particularly with thicker thread and vinyl is a sticky material as far as the thread is concerned and will want to catch on the sides of the hole the needle makes. Keep in mind for every hole of each stitch you have the thickness of three threads (top thread and the two halves of the bobbin loop). vi) When finishing the seam and after back stitching try hand wheeling the needle up to the point where the tension disc release before removing the material. What size of needle are you using???? What size of thread??? kgg
-

Finishing Coat
fredk replied to Cactusman's topic in Dyes, Antiques, Stains, Glues, Waxes, Finishes and Conditioners.
I just retired* a 20 year old belt. Thinner than Dwight's, about 3.5mm. Not used every day but often. The resolene finish coat was still alright * retired cos I wanted a change in pattern on the belt imo, leather items should show some wear and change in colouring over time. Its what makes leather so unique -
Tips/advice for 1st craft market tent?
fredk replied to ThisIsMyFirstRodeo's topic in Marketing and Advertising
Good point about the bags. I forgot about that. I use white paper bags with handles on them. They cost a fraction more than than plain brown bags but look so much better. Sometime in the future I'm going to get sticky labels with my brand printed on so I can stick them on to the bags - Today
-
I presume you have one of these; Get one of these; Get a couple of these; for tidy skiving of edges I have several in 6mm, 8mm and 10mm widths Avoid this like the plague, sold as a 'skiver'. You'll waste your money
-

Tips/advice for 1st craft market tent?
RidgebackCustoms replied to ThisIsMyFirstRodeo's topic in Marketing and Advertising
Have bags / pack out bags for after a sale. Plain brown bags sized for whatever you're selling. My very first sale I just handed it to them and they had to carry it around the rest of the show. Was something I didn't even think of and one of my "duh" moments cemented in my brain. -
 russ8605 joined the community
 -
 Ashlee A joined the community
 -
Tips/advice for 1st craft market tent?
fredk replied to ThisIsMyFirstRodeo's topic in Marketing and Advertising
In medieval times leatherworkers who traveled about had rails to hang belts, scabbards, gloves and pouches and other items from. A clothes rail will work too but one made of wood suits leather better. I'm not a wood worker by any means but I made myself a wood one which could be knocked down into its parts for carrying in my car. Mine was an A frame spanned with two 4ft pieces each side, at different levels, between the end A's Have you got camp chairs? a couple spare for weary customers. A flask of hot water, to make coffee? This may be very different but you'll get some ideas; when I published a few magazines we bought an old caravan and converted it to a hospitality caravan. At shows we were after subscriptions and selling odd car related items. (like books) We had seats in the caravan and a kettle for tea & coffee on all the time. We always came away with plenty of paid up subs and far fewer books and such. You need to push yourselves to the front, far beyond your competitors. Then people will remember you; maybe not your name exactly but 'those nice people who had candy/coffee/a seat for us' Actually thats how most of the car enthusiast ppl remember me; 'didn't you have that blue caravan with tea and a seat?'. And it was 30 years ago! -
Thank you so much!!!. If anybody has it and would like to share pictures of the proper position of needle and hook for the timing would be of tremendous help. I have seen several videos of cylinder machines...but none that I have come across are close. I more of a visual kind of person ti get things done. Thank you in advance!
-
I replaced it, thanks!!
-
@AlZilla here is a smaller version of the above video if you are able to replace it hemiyota-01_small.mp4
-
For me, the key was learning to get the knives really sharp with a ~15 deg bevel. I am mainly skiving veg tanned leathers. I place the leather on plate glass with a bit of beeswax rubbed on the glass to grip the leather because I am working on small pieces that are difficult to grip while skiving an edge. That cheap Chinese knife from Amazon does a reasonable job when kept sharp. I've been meaning to learn how to use a safety skiver and this Don Gonzales video has some tips. He also notes (in another video?) that the blade should move diagonally along the edge when skiving, not straight down the beveled edge.
-

Tips/advice for 1st craft market tent?
ThisIsMyFirstRodeo replied to ThisIsMyFirstRodeo's topic in Marketing and Advertising
Toxo: We’re in the American SW, in Arizona. Monsoon season is already petering out, and it should be sunny and perhaps a bit cool (by our standards at least). We will be set up in our 3m x 3m popup tent (good quality), and we do have enough tables to set however desired. Great idea for the vertical displays, and hey, it’ll give me another creative puzzle to solve with all of the random bits of salvaged wood and scrap in my yard! Thank you for the note to work with the promoter for table position, it honestly had skipped my mind. Thanks, AZR -
Here's a video from last night. Surprisingly it didn't jam, but probably would have if I had sewn some more. The rats nest on the vinyl pieces were from when I was playing with the thread tension. I thought that it might be too tight and that was why it was pulling the top thread from the table. Not the problem. I'll post another video, like someone suggested, of hand sewing and having the bobbin rotate very slowly...... hemiyota-01_small.mp4.fccfab5cb49dca5dcbd57ba3f09f1fc3.mp4
-
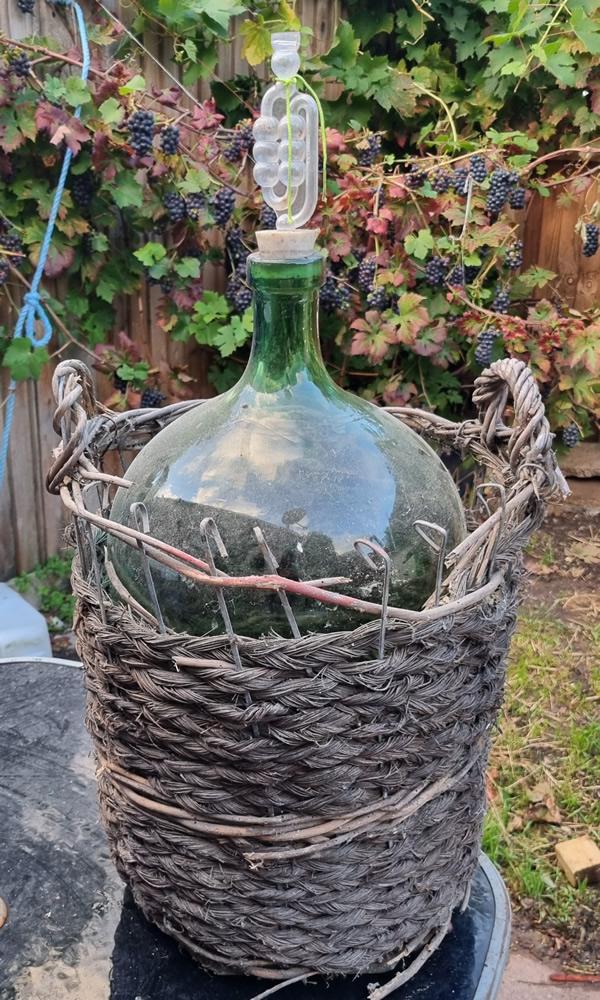
I acquired a large carboy and a few demi-johns as well as the rest of the paraphernalia needed for this journey. I now have three mash bins full of de-stemmed grapes and water and yeast that was put in two days ago and the must is almost at the top of the bins. I haven't adhered strictly to the recipe due to lack of equipment at the right time. I'm told online that I shouldn't have added water despite the recipe calling for it. Time will tell. This post is about the large carboy. I bought it from my new French friend who brought it from France years ago. To say the basket is very fragile is a huge understatement. I know I don't really need the basket but I'd like to know you guys thoughts on how easy it would be to restore it. I will make a leather bottom and lace it to something around the top but I will oil it and look for some wicker? I think it's worth saving. Your thoughts guys?
-
Tips/advice for 1st craft market tent?
ThisIsMyFirstRodeo replied to ThisIsMyFirstRodeo's topic in Marketing and Advertising
I’ll start with the easy one first… Bladegrinder: yes, we are set to accept credit, Zelle, CashApp, and Apple. Fred: thank you for the idea of the candy bowl. It’ll also be just a couple weeks after Halloween, so maybe I won’t eat all my.. ahem… my daughter’s candy… I think it will indeed draw people and keep them closer to strike up conversation, especially because I’m not the best “people person” and I’ll need to push myself outside of my comfort zone. I definitely need to talk leather and find what the local demographic is actually looking for. Thanks! AZR -
I had a size 26 needle installed when checking the timing, and I haven't previously noticed any problems with switching needle sizes. To my knowledge, there is no shimming of the shuttle on this 441 clone. I set the hook timing 3 years ago following the same procedure and it's been working fine for leather. I rechecked it yesterday and made some minor changes. Sews fine with leather and one layer of Biothane. The missed stitches occur erratically so I am thinking it's friction and/or how I am feeding material through the machine. Thank you, Wiz. Lots of good information. I am using black thread from LMC and it is considerably stiffer than other colors. I will test out white thread and fiddle with the foot pressure and check spring tension. Guess I will order a lube pot and lube to find out what that's all about. We mostly use Biothane halters in our barns. They used to affordably priced with stainless hardware, but the prices have risen considerably so I decided to make some for us and friends. Not interested in large scale production of this item and competing on price with bigger vendors. I definitely like sewing leather better than Biothane but this is a good learning experience for me.
-
I used to sew Biothane and heavy webbing in a previous location. I found that I had to move up one needle size, and use a diamond or round point needle. Additionally, I had to double the foot pressure to keep it from lifting with the ascending needle. Running the top thread thru liquid silicon will help the knots move up with less friction. It might help if you adjust your check spring to give more slack top thread as it goes around the hook. Try it on a test strip. Thread color also plays a part in all heavy sewing jobs. Black thread is often double-dipped to get total color penetration. This process stiffens the thread more than lighter colors. You can usually feel the difference when you handle the thread to feed it through the guides on thread stand. Straw color is usually much softer than black. That translates into tighter knots being formed. Tighter knots are easier to pull up in dense materials, like Biothane and thick webbing.
-
I’ve seen those too — they’re really handy. You can sometimes find ready-made patterns on Etsy or Pinterest if you search for ‘leather stylist tool holster pattern’ or ‘DIY barber pouch.’ If you or your daughter like sewing/crafting, some leatherworking supply shops sell downloadable templates that you can print and trace right onto the leather. Another option is to look at simple leather apron or tool belt patterns and scale them down - the construction is similar, just smaller pockets for scissors and combs. A basic kit from Tandy Leather or Weaver Leather might be a good starting point.
-
What size needle did you use for your initial timing? Does your machine require the shuttle to be shimmed when changing needle size in order to maintain the same hook-to-needle distance?
-
I'm trying to figure out what skiving knife to buy. I have pull skiver, one that looks like a potato peeler, and a little flat blade knife from amazon. None of these work very well for me. I'm looking for one I can buy that's going to provide better results. I don't really want to make a skiving knife myself.
-
Good morning everybody! I’m working on a small bag about 8”x12” and need to learn how to figure how long the gusset has to be. I tried laying a waxed thread all the way around the side piece like the video showed but it came out way too long, like 2”. Sooo…..I’d like to get it closer the first time. The sew line will be 3 /16” from the edge so does that mean the dimensions are now 7-5/8”x11-5/8” ? That makes sense to me…. Any sound reliable advice will be greatly appreciated! HELP! Dano P.S. Thought I should say the panel will overlap the gusset, panel on top.
-
I don't have a clear plate to view the hook, and it seems to only happen with the holster plate. I'm going to reconfirm that leather sews without skipping stitches using the holster plate. I am guessing that the skipping is caused by friction on the upward stroke through biothane, causing flagging even though I'm not feeling it. With a size 25 needle and #207/#138 thread the knots were on top, even after considerable decrease in top tension, so I installed a size 24 needle and that buried the knots. I guess I could switch back to the larger needle and try increasing the bobbin tension. If I can't find the right needle and thread combination then I guess lubricating the thread is the next step.
-
I'm using a product I believe is similar to Alcantara: https://www.onlinefabricstore.com/wine-microsuede-fabric-.htm I don't know how the quality compares, but this stuff it pretty nice. Years ago I looked over a Louis Vuitton bag that was lined with something similar...I believe the LV material was superior to this stuff. Alcantara is over $135 per yard...maybe it's worth it, but that seems pretty expensive to me. I can see now that rolling pressure is not the way to go with gluing this to the raw side of the leather. I want to make sure I have good adhesion without soaking through the microsuede. I guess I'll just lay it as flat as possible on the glued leather and pressure with heavy book to make sure it bonds well. I think I'll take your advice and glue the edges of the fabric. I don't want to have trouble later and wish I had done a simple step like this. I'll think about which side of the holes I want to terminate the lining. I don't know how well I'll be able to paint the edges if there's a layer of liner mixed in with the edges.
-
So when I measured my pattern for my fender I guess I made a mistake as I made it too wide and so now that im at the installation step I can not get it to lay flat, as it extends out over the edges and creates waves when I try. I think I have to trim this down on both sides to the inside of the stitching(aka good by all that hard work); but before I do that I was wondering if anyone had any better ideas? I also was going to use 3m tape to adhere it to the fender and not the pinion hole in the back Images are of the fender bib and of my bike fender. Thank you for the ideas/help!


-
.thumb.jpg.6e903dd66163ad5672f00f144058c571.jpg)
Finishing Coat
Northmount replied to Cactusman's topic in Dyes, Antiques, Stains, Glues, Waxes, Finishes and Conditioners.
I moved your post to Dyes, Antiques, Stains, Glues, Waxes, Finishes and Conditioners.


