All Activity
- Past hour
-
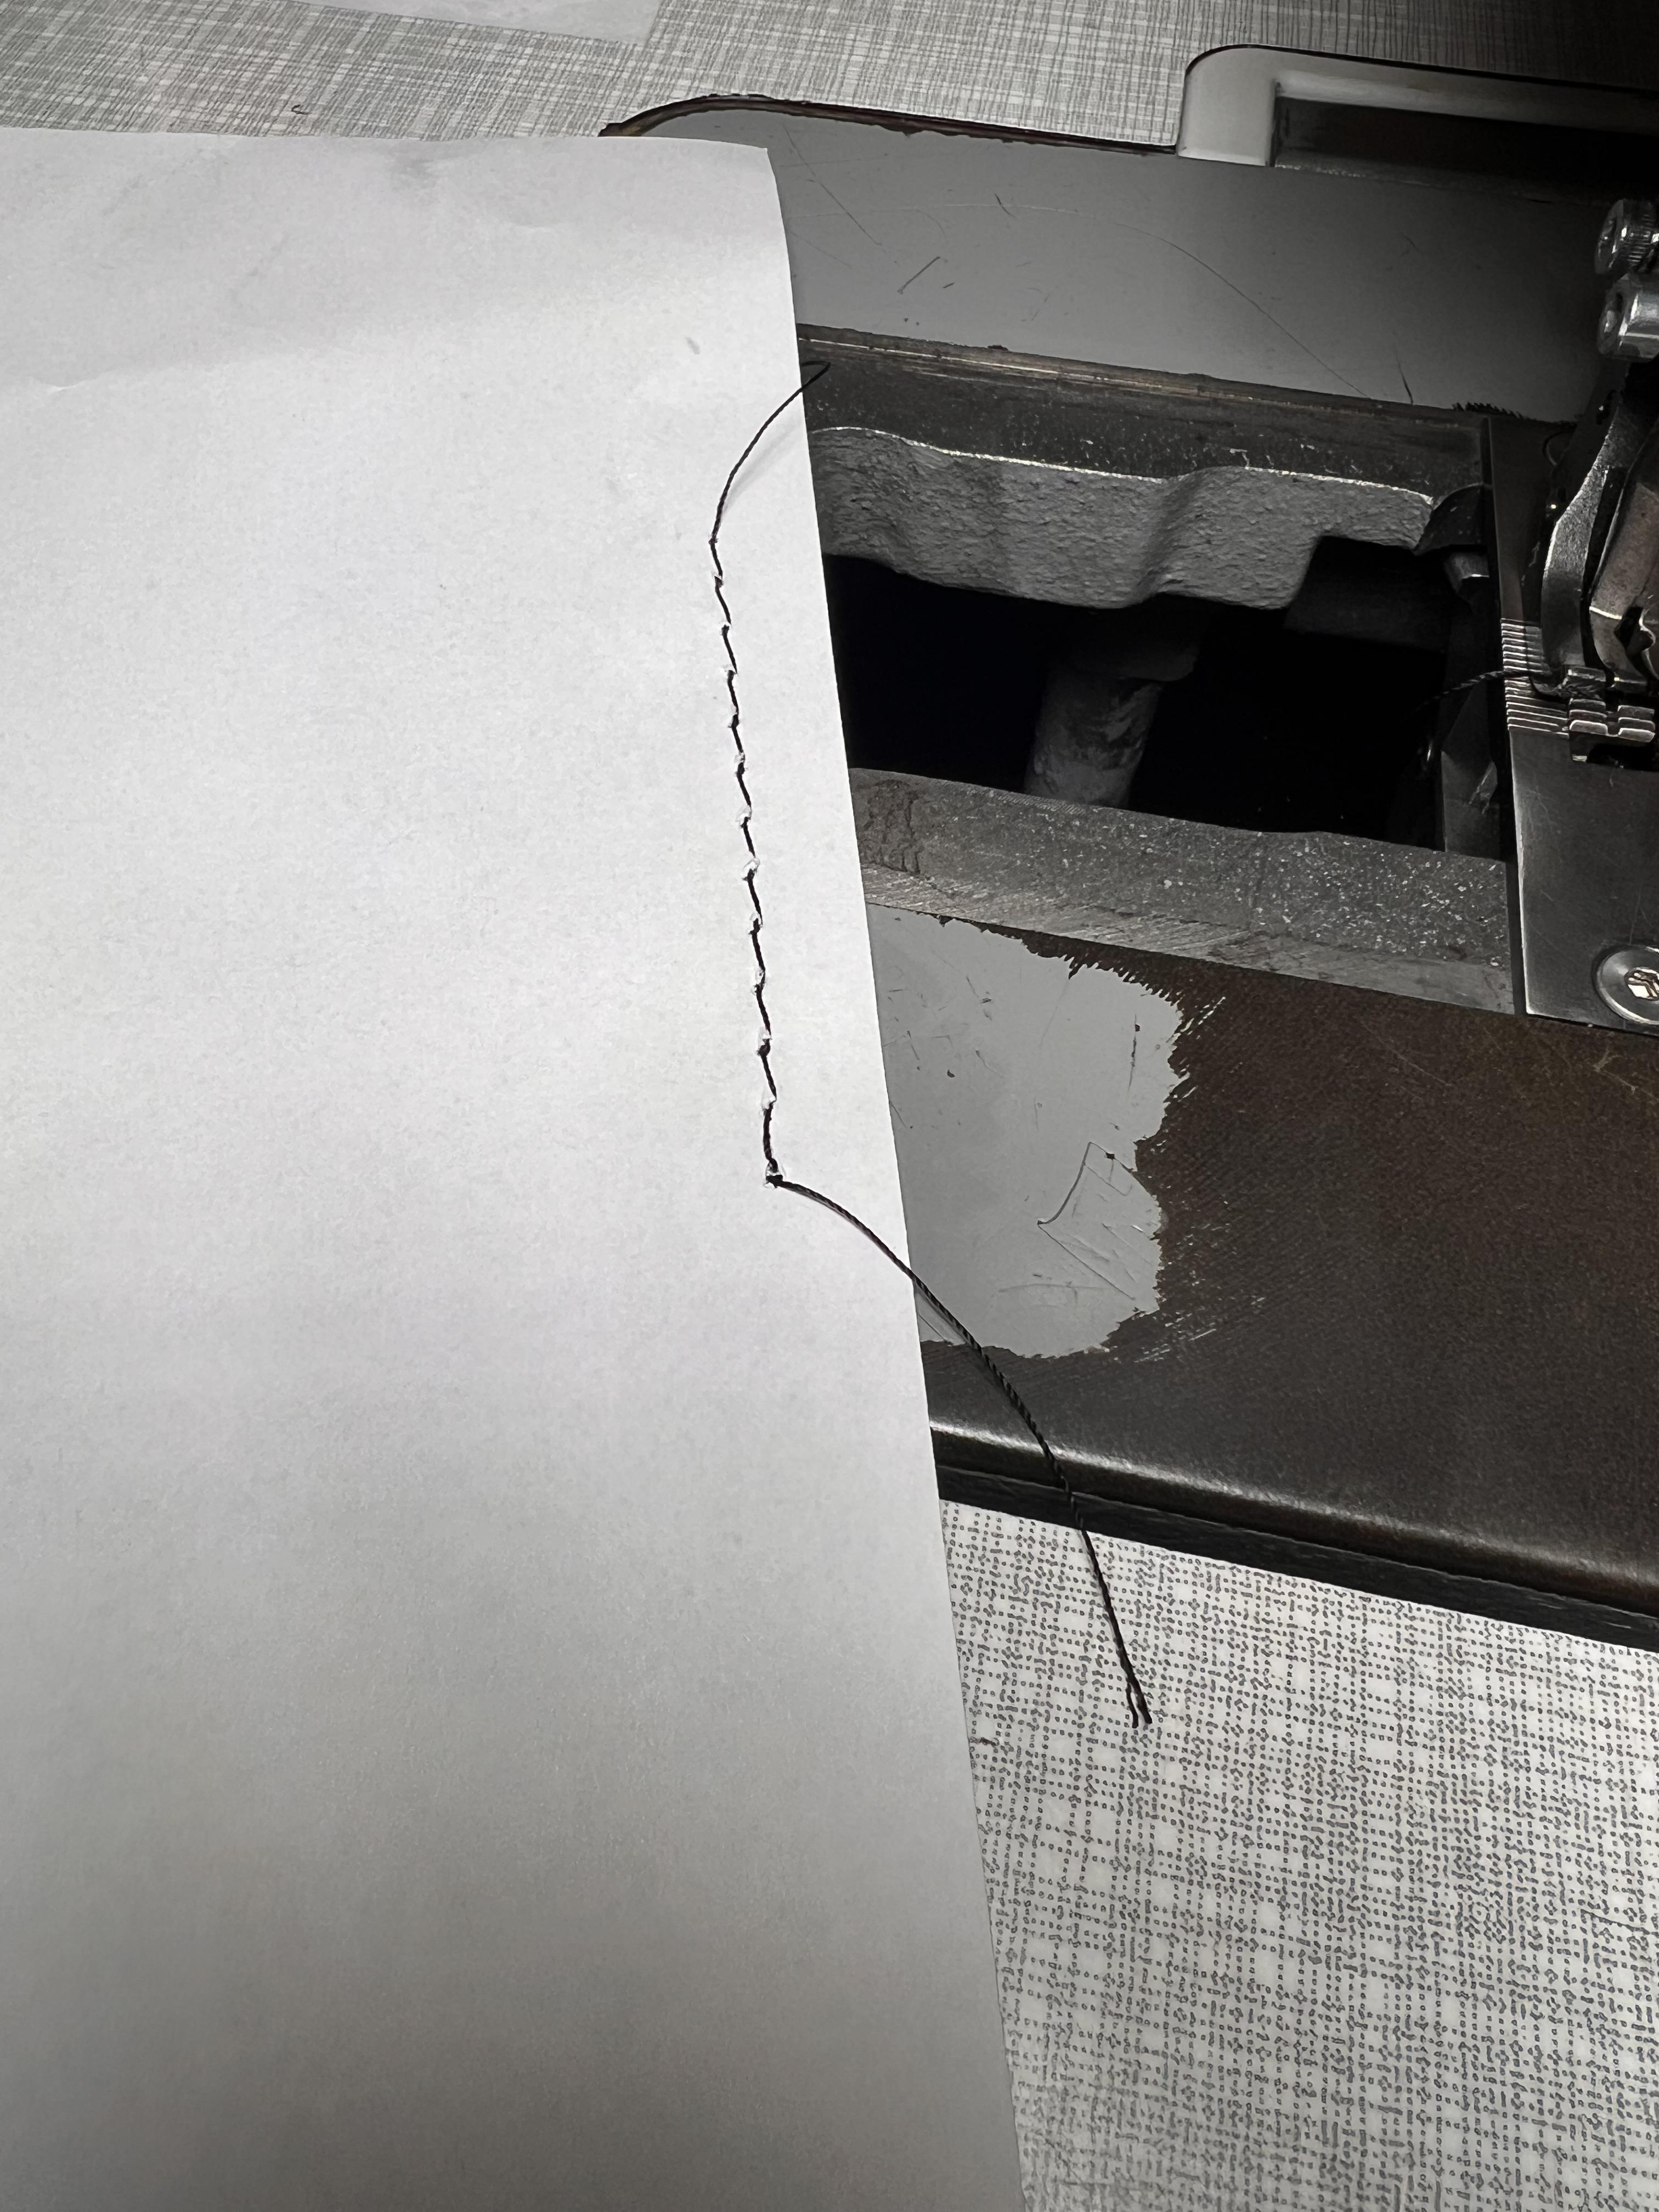
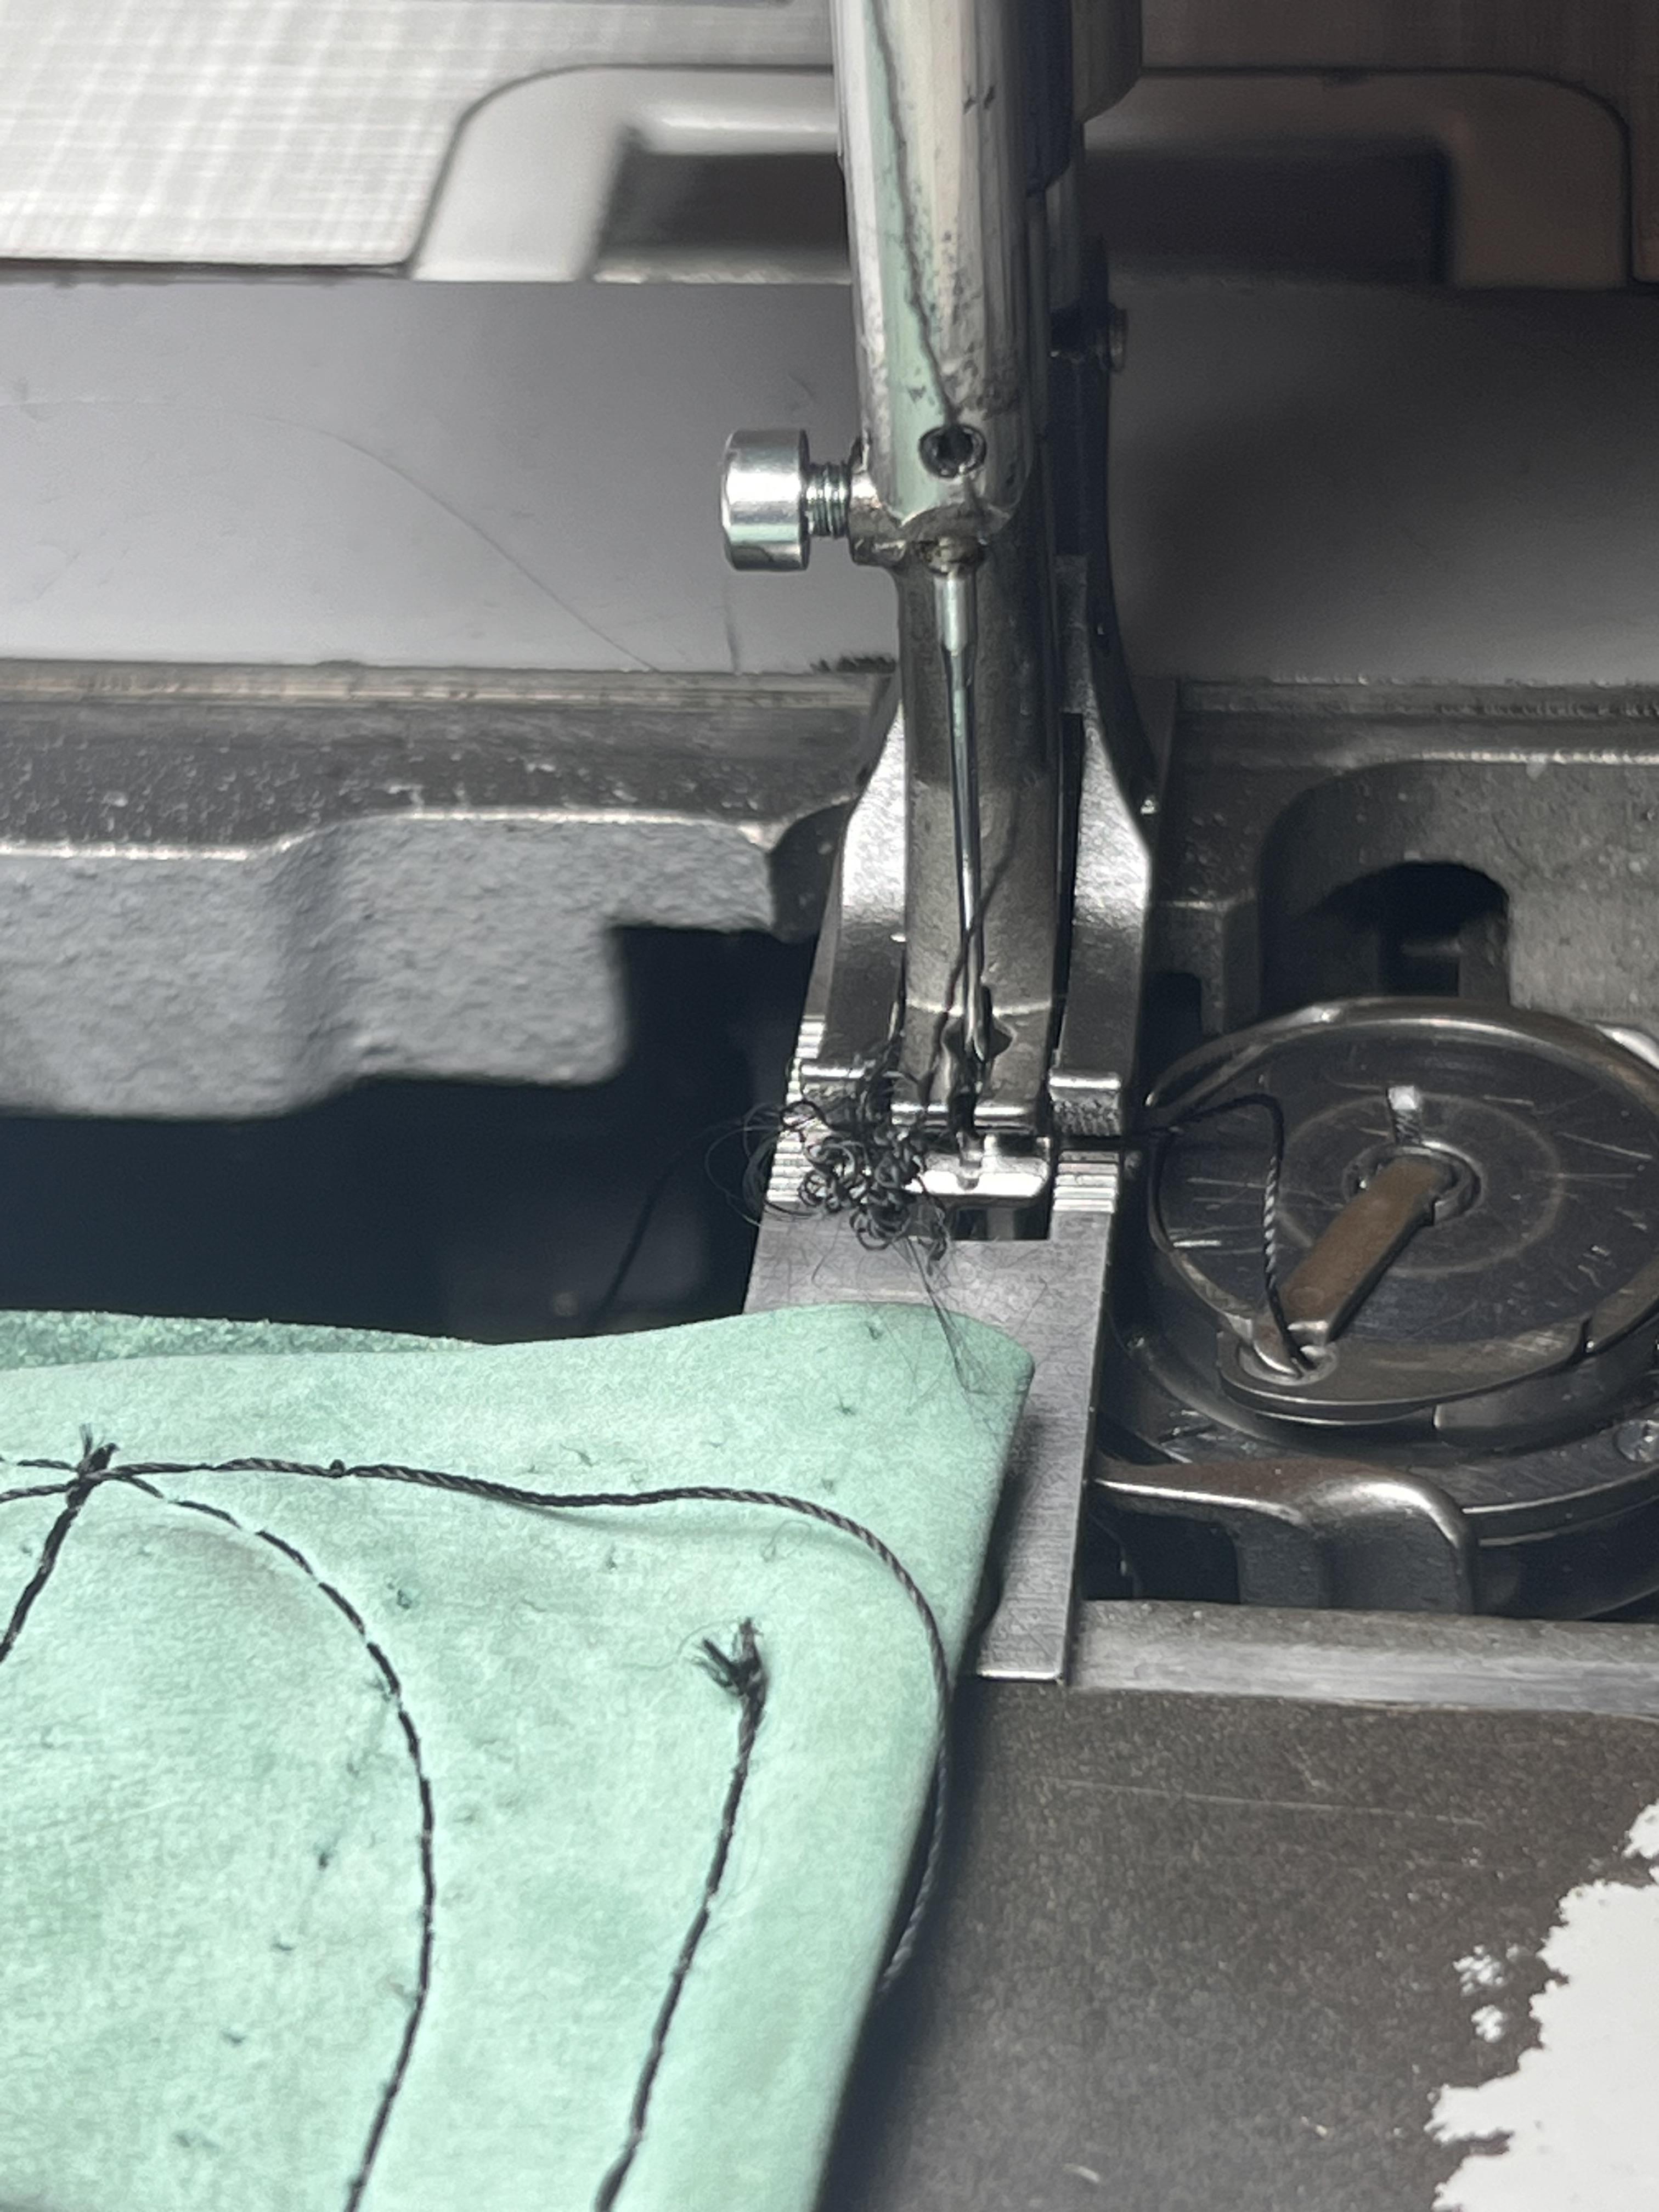
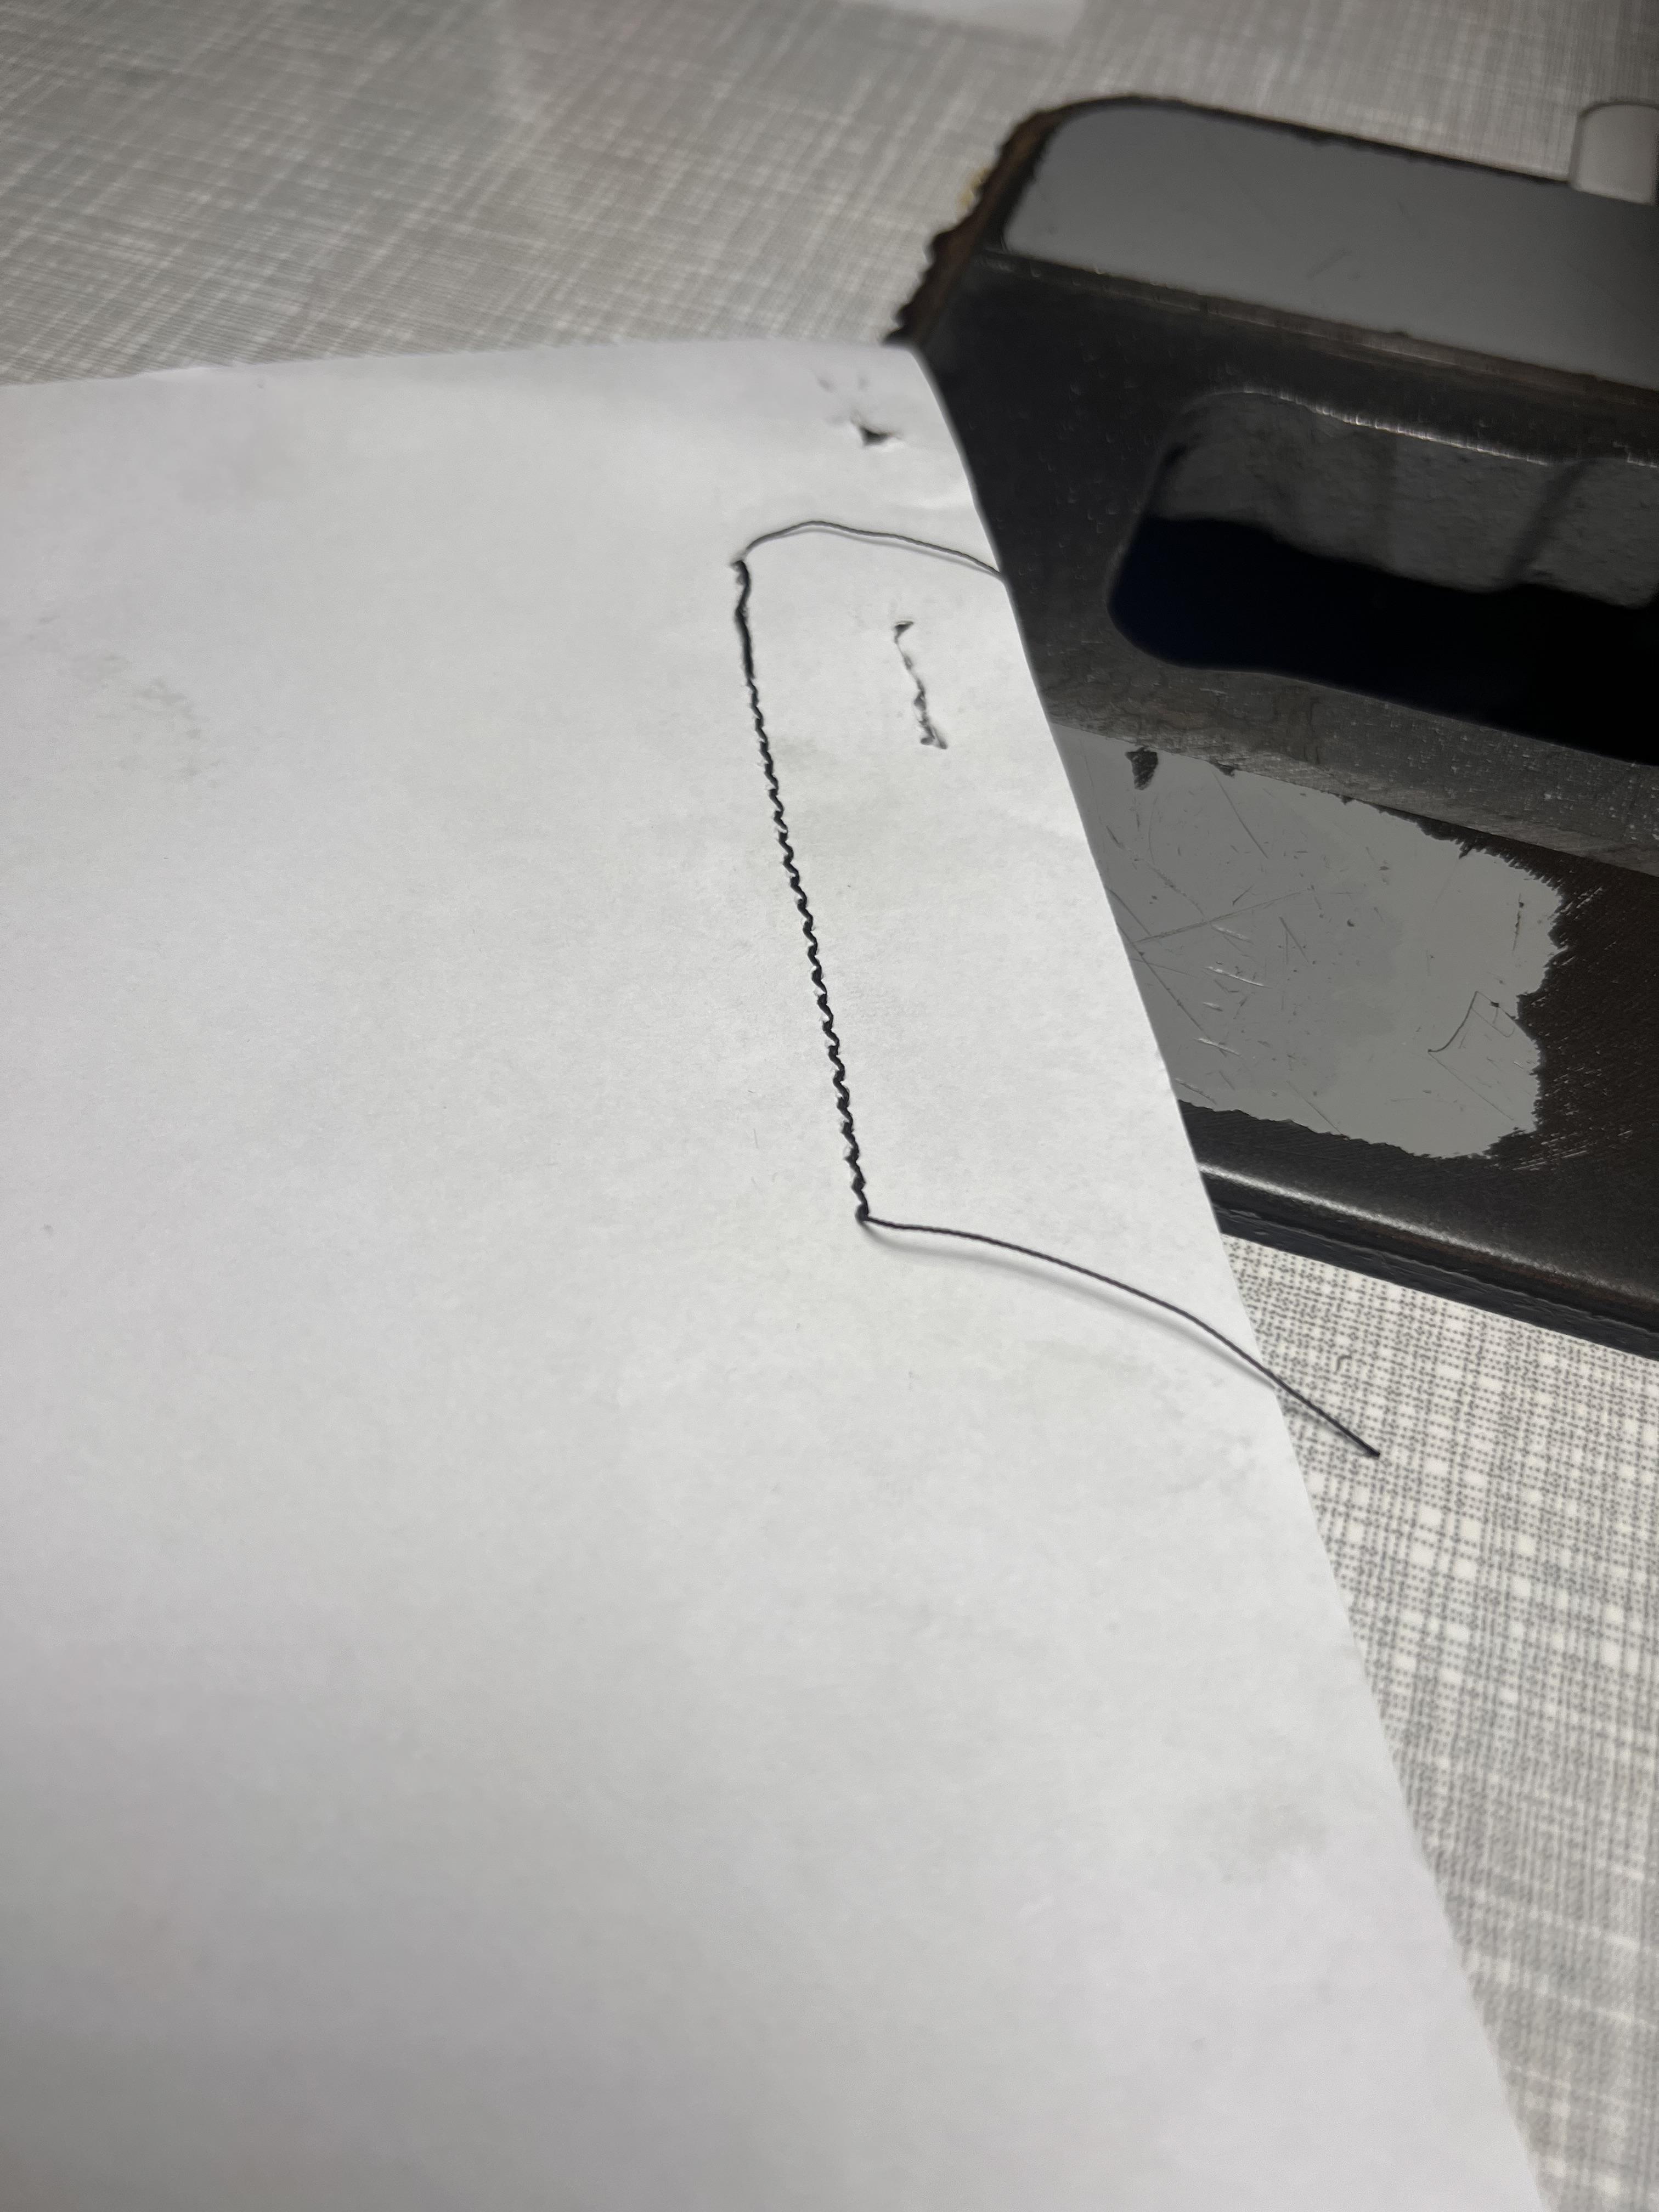
So cleaned her and tried to set the hook timing right. Now she stitches on paper but if I try thin leather after a few stitches the upper thread gets splittet . The needle is new .
-
This probably won't help but I find most peeps are a bit frightened of going too far with leather. It's a lot tougher than you think. I've decided to get back into fishing and was looking for my shooting boots. Gave up shooting a long while back so haven't needed themm After searching the house for two days I realised that they must be in the garage That I don't use and was flooded a couple years ago. Sure enough that's where they were. And this is how I found em. I thought about binning them but I liked these boots and they were worn in. They went straight in the washing machine. (Not a full cycle) After sloshing about a few in the soap and a bit more rinsing. I got em out and dried em on a radiator for 2/3 hours, they were still soaking on the inside so I stuffed em tight with dry rags tied everything together and bashed all the folds and creases out with a hammer. This is how they look after a second coat of Neetsfoot oil. They'll stay like this for a couple days then I'll prolly give em some dye and seal em when they're dry. Prolly re-do the leather around the top also.


-
For leather work After using all mentioned so far, my choice for heavy duty leather projects I'd rank contact cements as follows: 1. Masters or Petronio Shoe Master All Purpose Contact Cement 2. Barge 3. Weldwood 4. Tandy low odor, water based cements. #1 is the ONLY cement(s) I'd use for cobbler work. I've not had good luck with Weldwood from Hardware/Big Box Stores. It's okay for temp tacking but not for extended use... maybe I got a (couple) bad batches and it's fine for most everything else but never again for leather work. That being said, the Barge/Weldwood I've gotten from my suppliers has different labeling and did work pretty well.
-
Want a Cobbler cheat? Lay a light coat of cyanoacrylate (super glue) and spread thin with a business card over the area to bond. Let dry or hit it with accelerator. Then use your contact cement. The superglue will act as a bonding primer for your contact cement and/or most synthetic glues. If the cyanoacrylate won't bond then there is probably a lubricant or the finish is gassing off like Starboard. (Did you try scuffing the seam allowance with an abrasive first? Question: are you bonding flesh side to flesh or Flesh side to Top Grain?)
- Today
-
How to remove mold/musty smell?
Ole South replied to DeWayne Hayes's topic in Leatherwork Conversation
A couple of things to try: 1. "Dust" the inside (maybe the back) liberally with 20 Mule Team Borax laundry powder and let sit for a day or two. 2. Suspend holster flat a few inches above a wide flat container (approx. the size of of the holster. DO NOT WET the holster) with about 1/4-1/2 inch of vinegar and cover with a plastic bucket for a day to a week. Check after a few hours to insure the finish(black dye area) isn't being affected. Borax is a "dry" deodorizer that has worked for me on moldy smells and about the only thing I've found that will truly neutralize dog and to a lessor extent cat urine(takes longer) from carpet and upholstery. (sprinkle thin layer over carpet area spotted, and mist lightly with water, then vacuum up about 2-3 days later, repeat until odor is gone). I've never had issue with it affecting pile or color. Vinegar (vapor?) is especially effective removing cigarette/cigar smoke from upholstery. The vinegar will draw many unwanted odors out. I've tried it with black mold and it removes the smell until the mold "blossoms" again but it doesn't kill badly infected leather. For furniture, fill a cereal bowl size container or two, half full of vinegar, then bag and tie opening shut(works best) or drape the item in plastic sheeting, tape closed as well as you can, and leave it for a couple of weeks or until the smell is no longer noticeable. (*Note: you may want to change out old vinegar with fresh every 2-4 days. If you choose to spray/mist leather, do so with caution! It will stiffen, darken, and brittle veg tan, even cut 50/50 with distilled water.) -
 Angiemarie joined the community
 -
One Sunday morning, the pastor decided to shake things up a bit. With a mischievous grin, he addressed the congregation. "Today, we’re going to try something different! I’ll say a word, and you’ll sing the hymn that comes to mind." Excited murmurs rippled through the pews as the congregation prepared for the challenge. The pastor began. “CROSS.” Without hesitation, the church erupted in song: “On a hill far away, stood an old rugged cross…” Nodding approvingly, he continued. “GRACE.” Immediately, voices filled the sanctuary: “Amazing grace, how sweet the sound…” Encouraged, the pastor called out, “POWER!” The response was just as strong: “There is power, power, wonder-working power in the blood…” Feeling playful, he decided to throw in a curveball. "S@X." Dead. Silence. The air grew thick with tension. Eyes widened. People shifted uncomfortably in their seats. Husbands avoided their wives’ gazes. The pianist looked like she wanted to crawl under the bench. Then, just as the pastor started to regret his little experiment, an 87-year-old grandmother in the back of the church stood up. With a shaky yet confident voice, she began to sing: "Precious memories… how they linger…"
-

can anybody please help me find this "sole trimmer"?
TakashiOkada replied to TakashiOkada's topic in Leather Machinery
thank you! 🙌 -
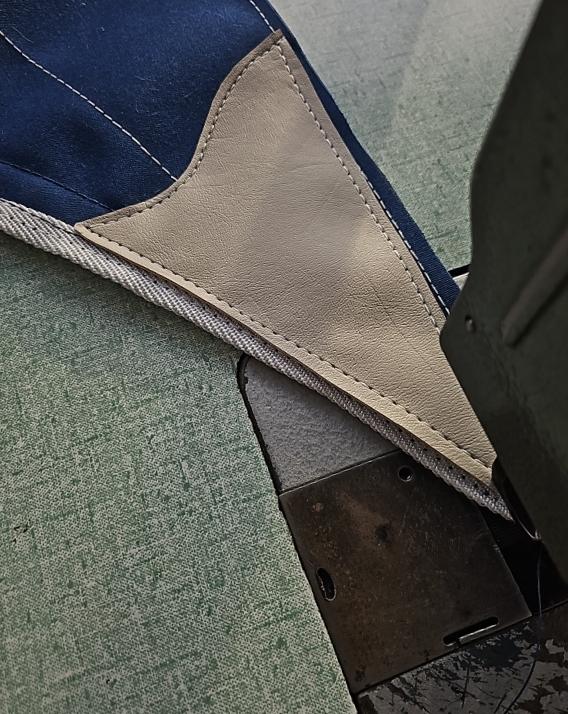
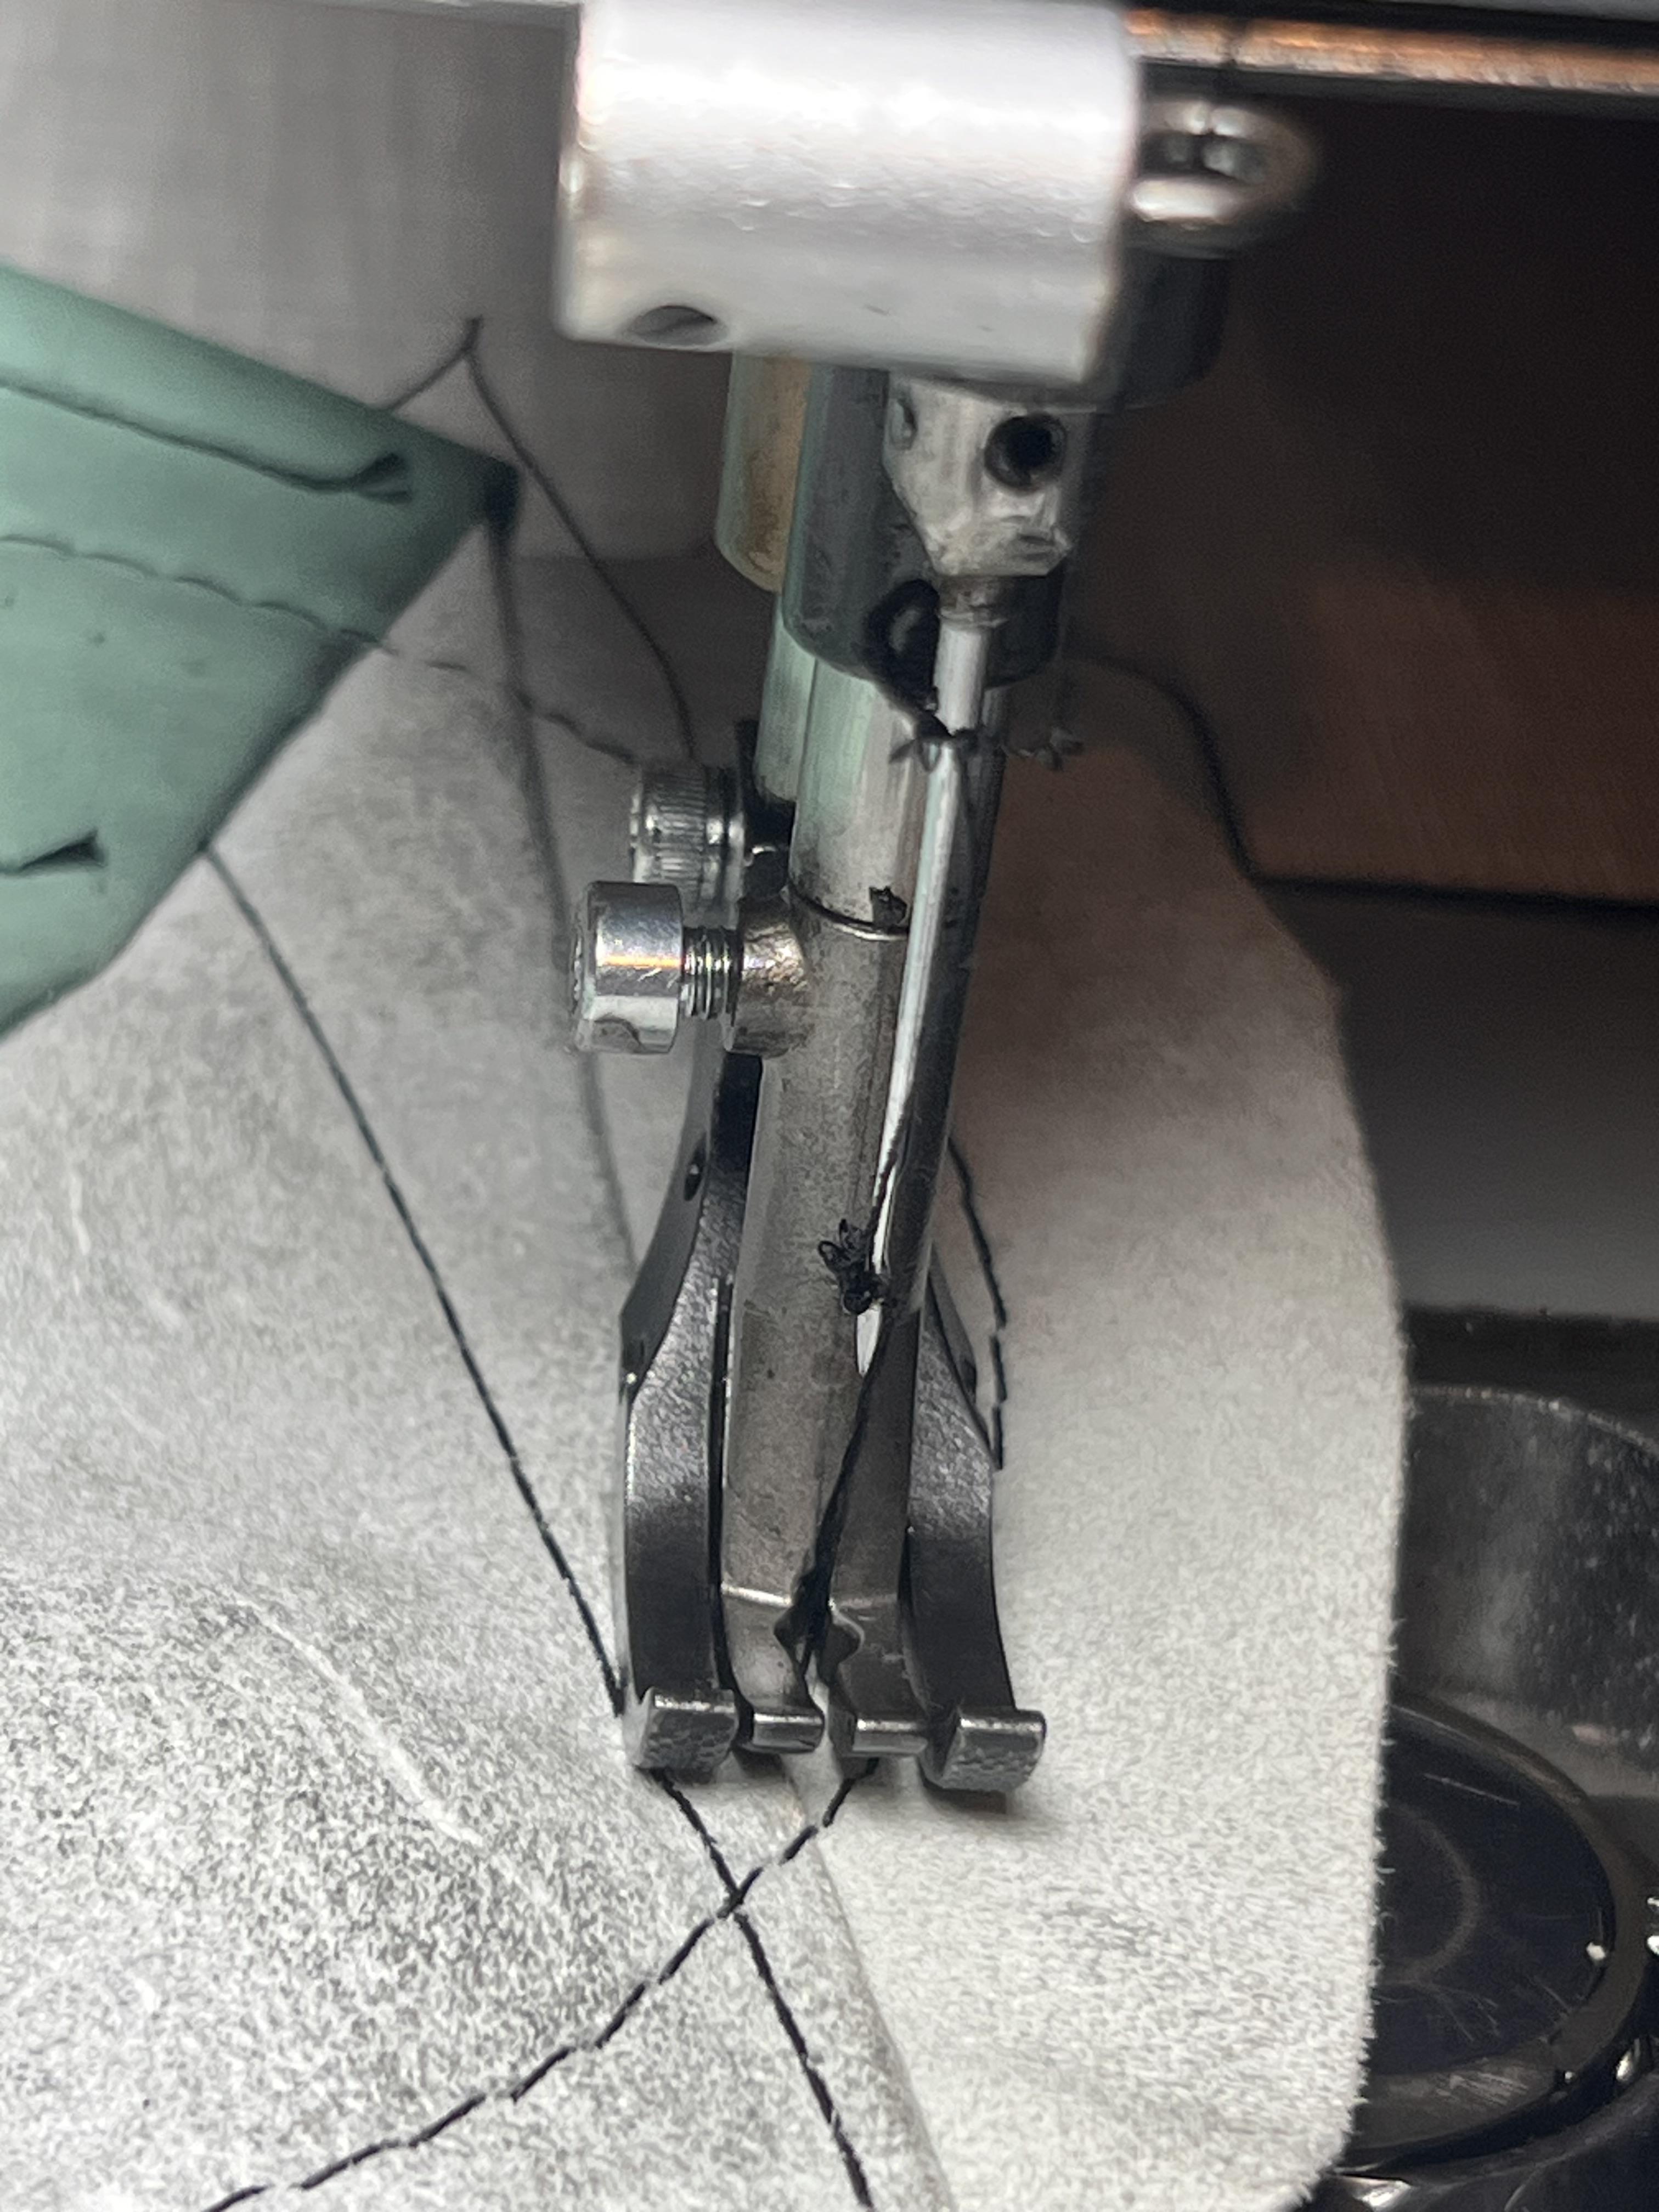
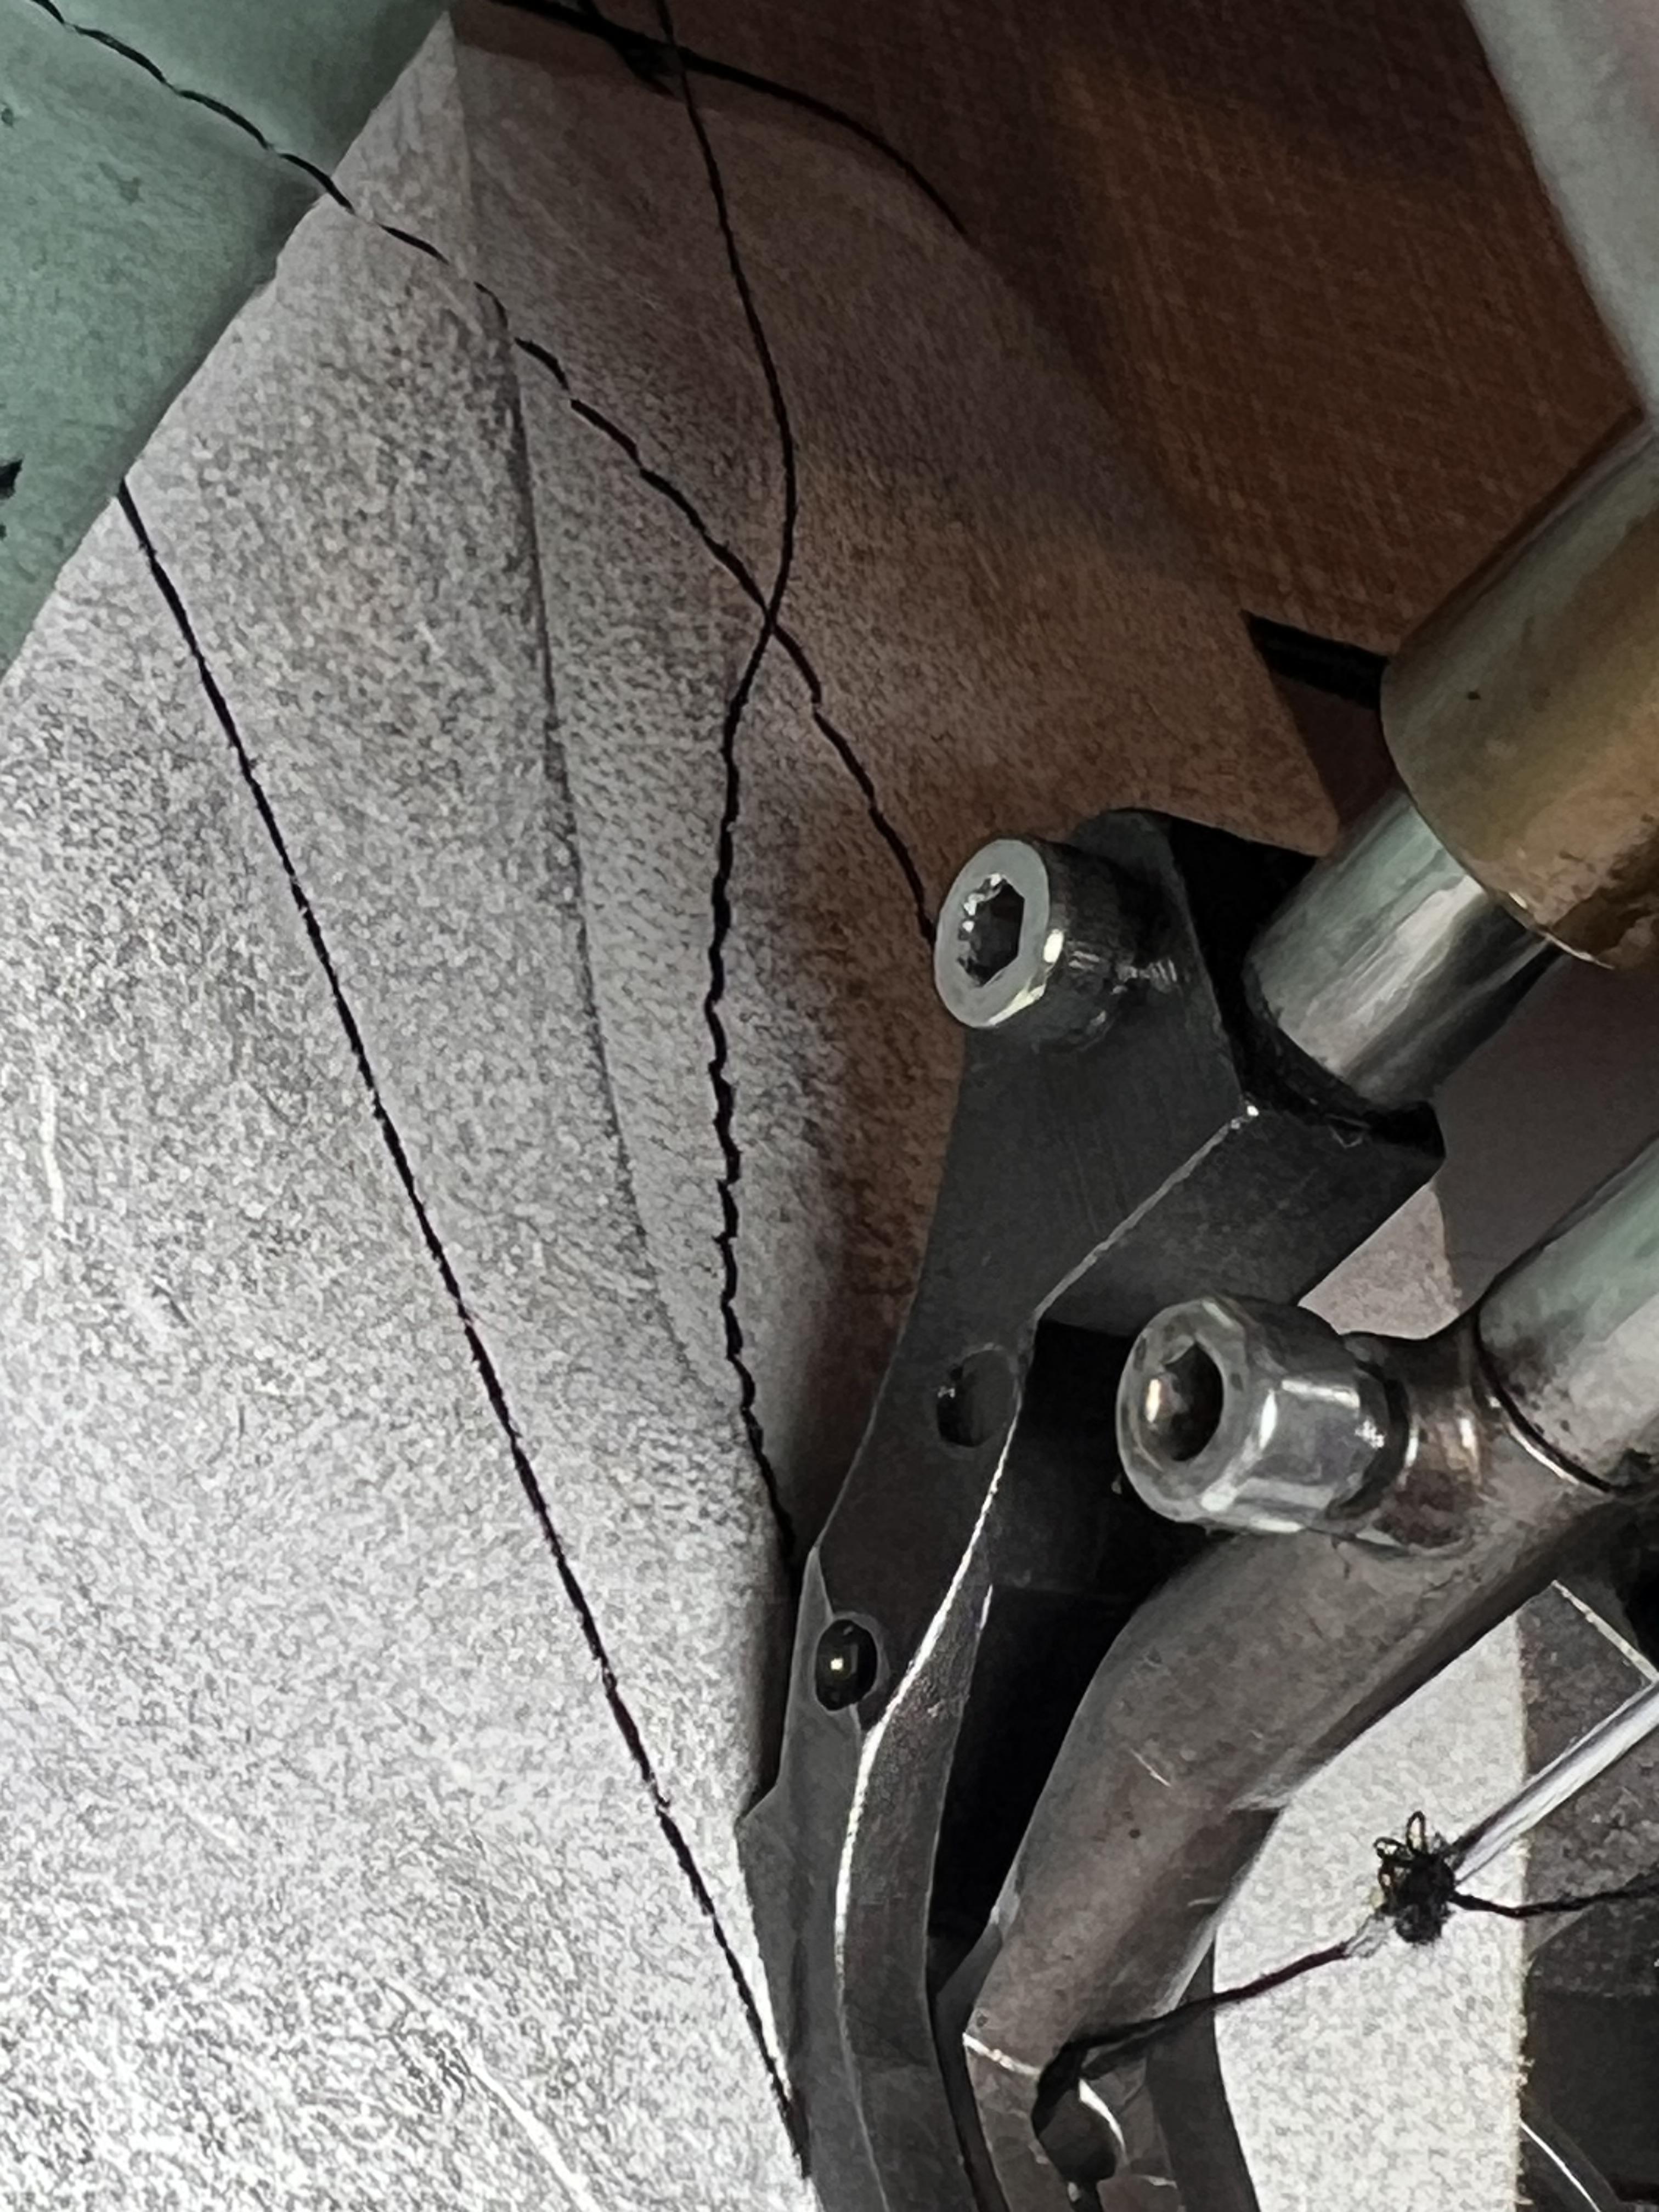
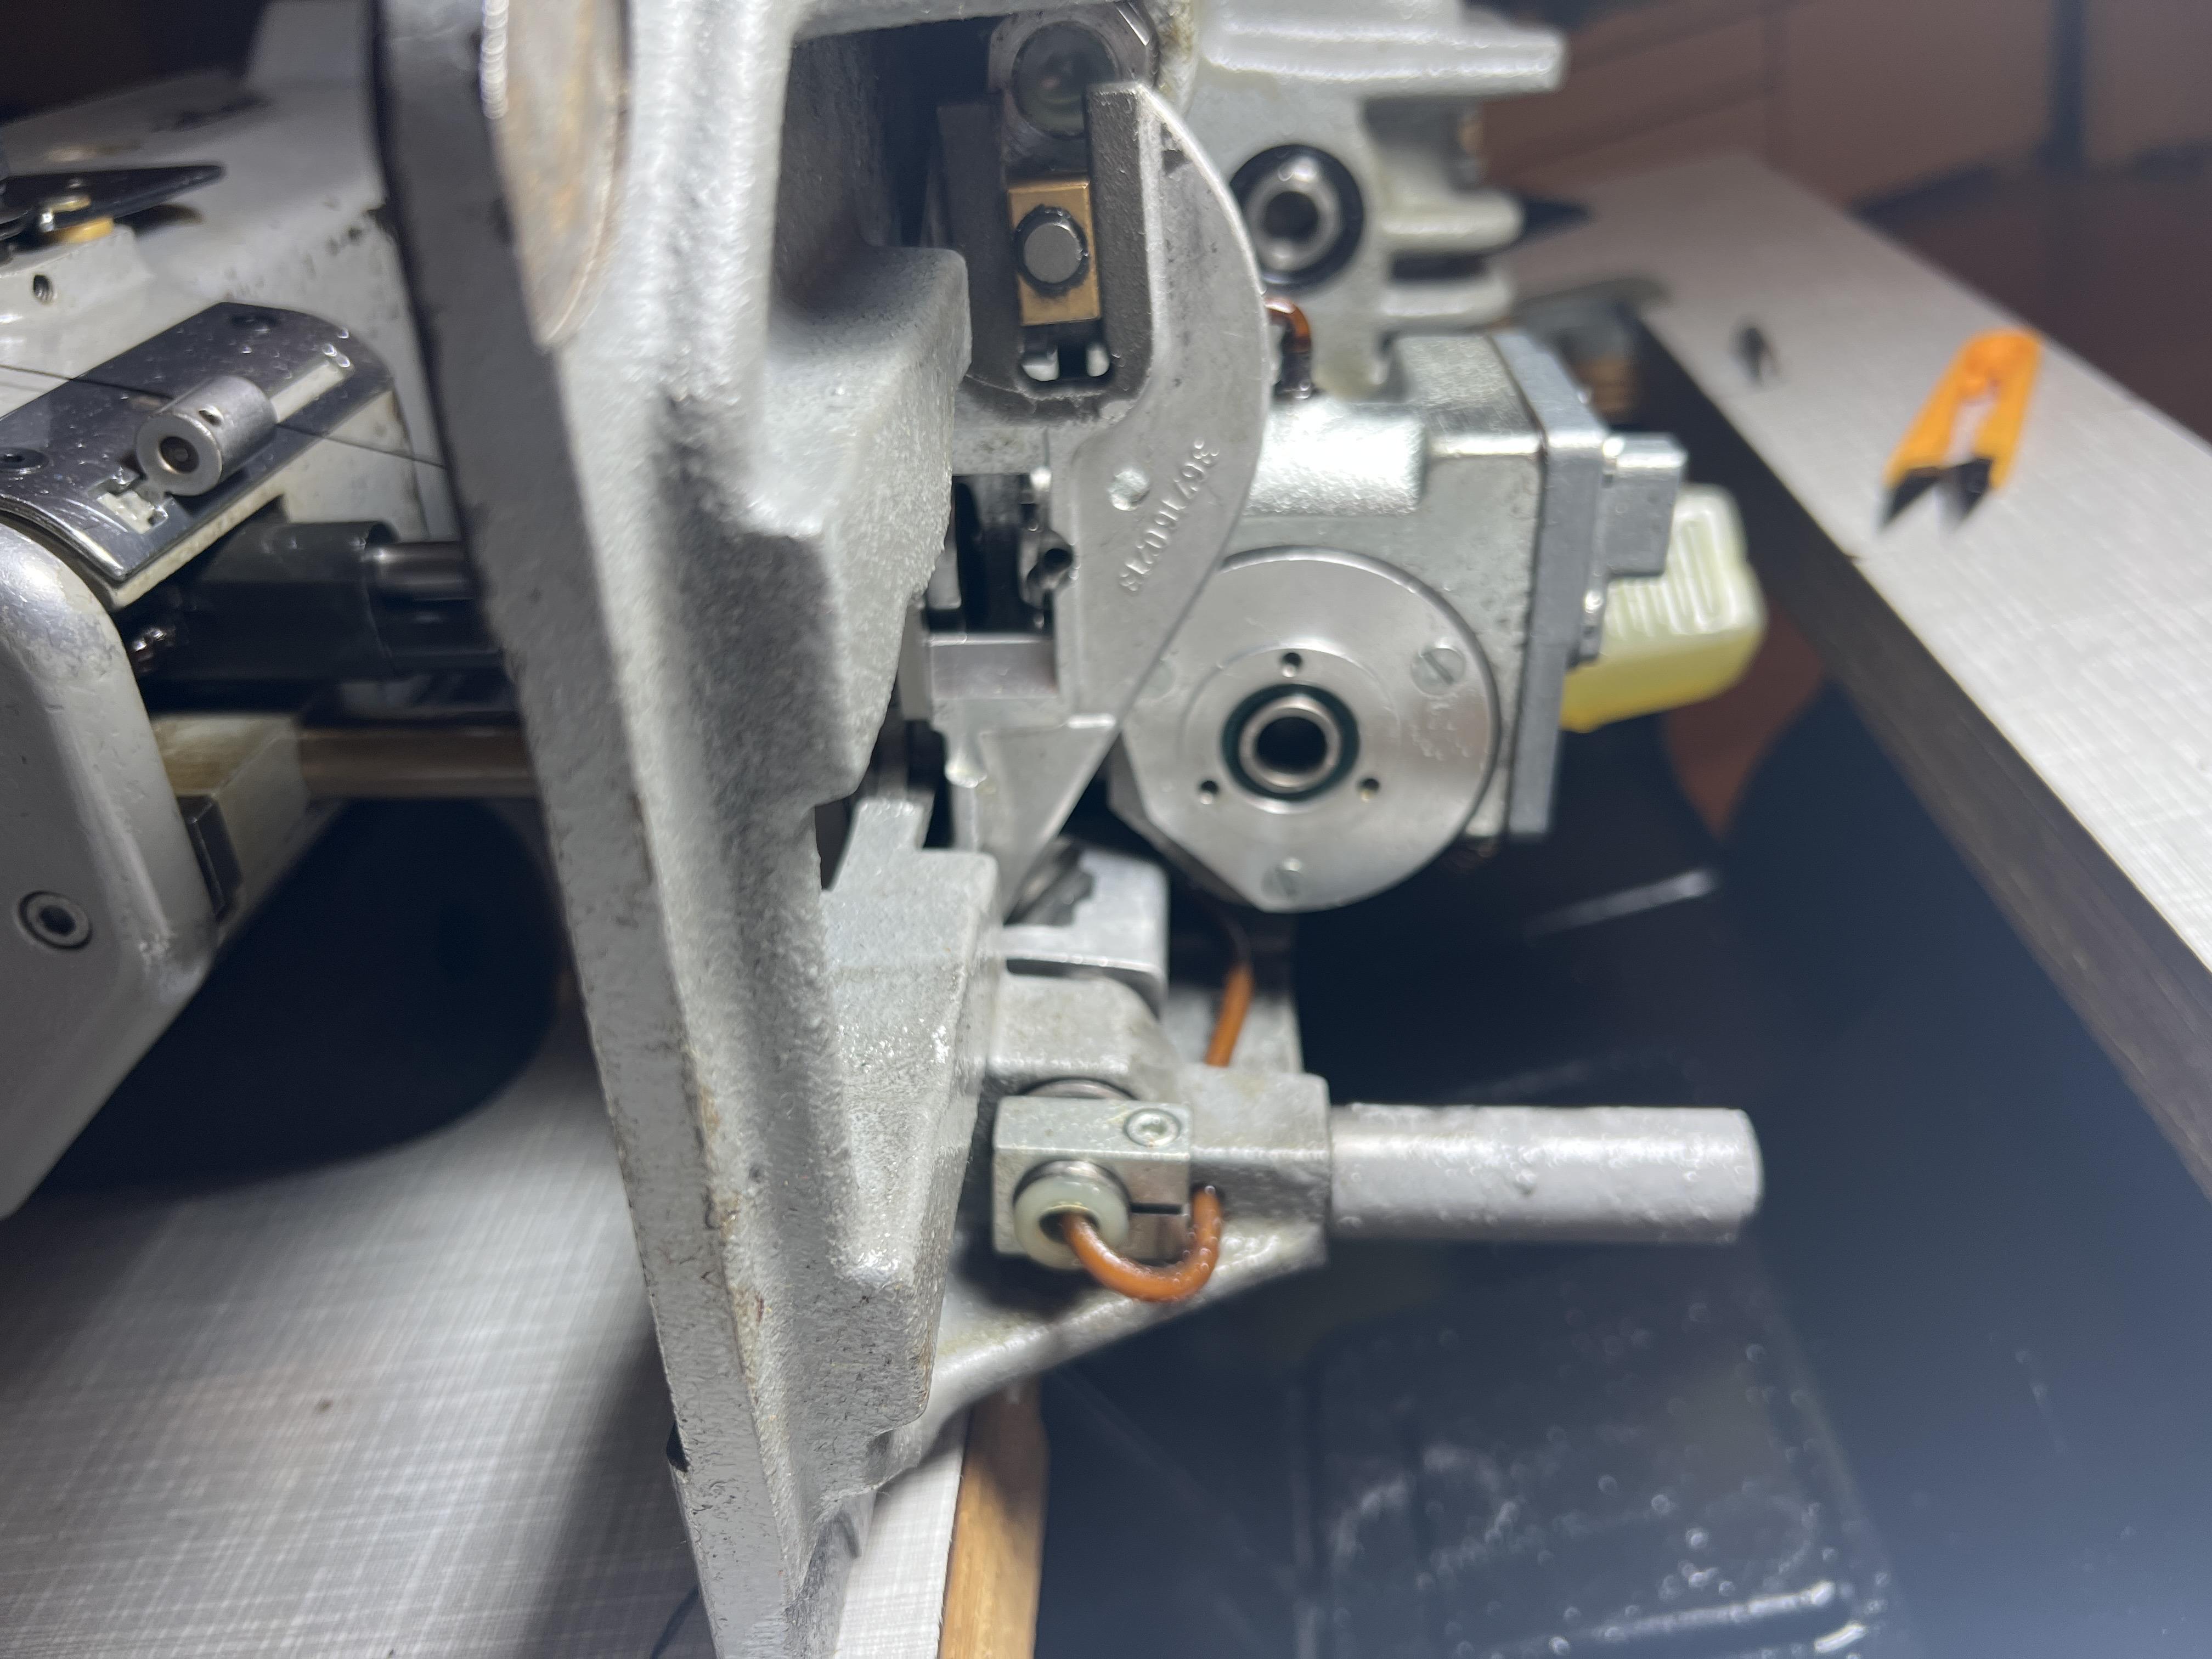
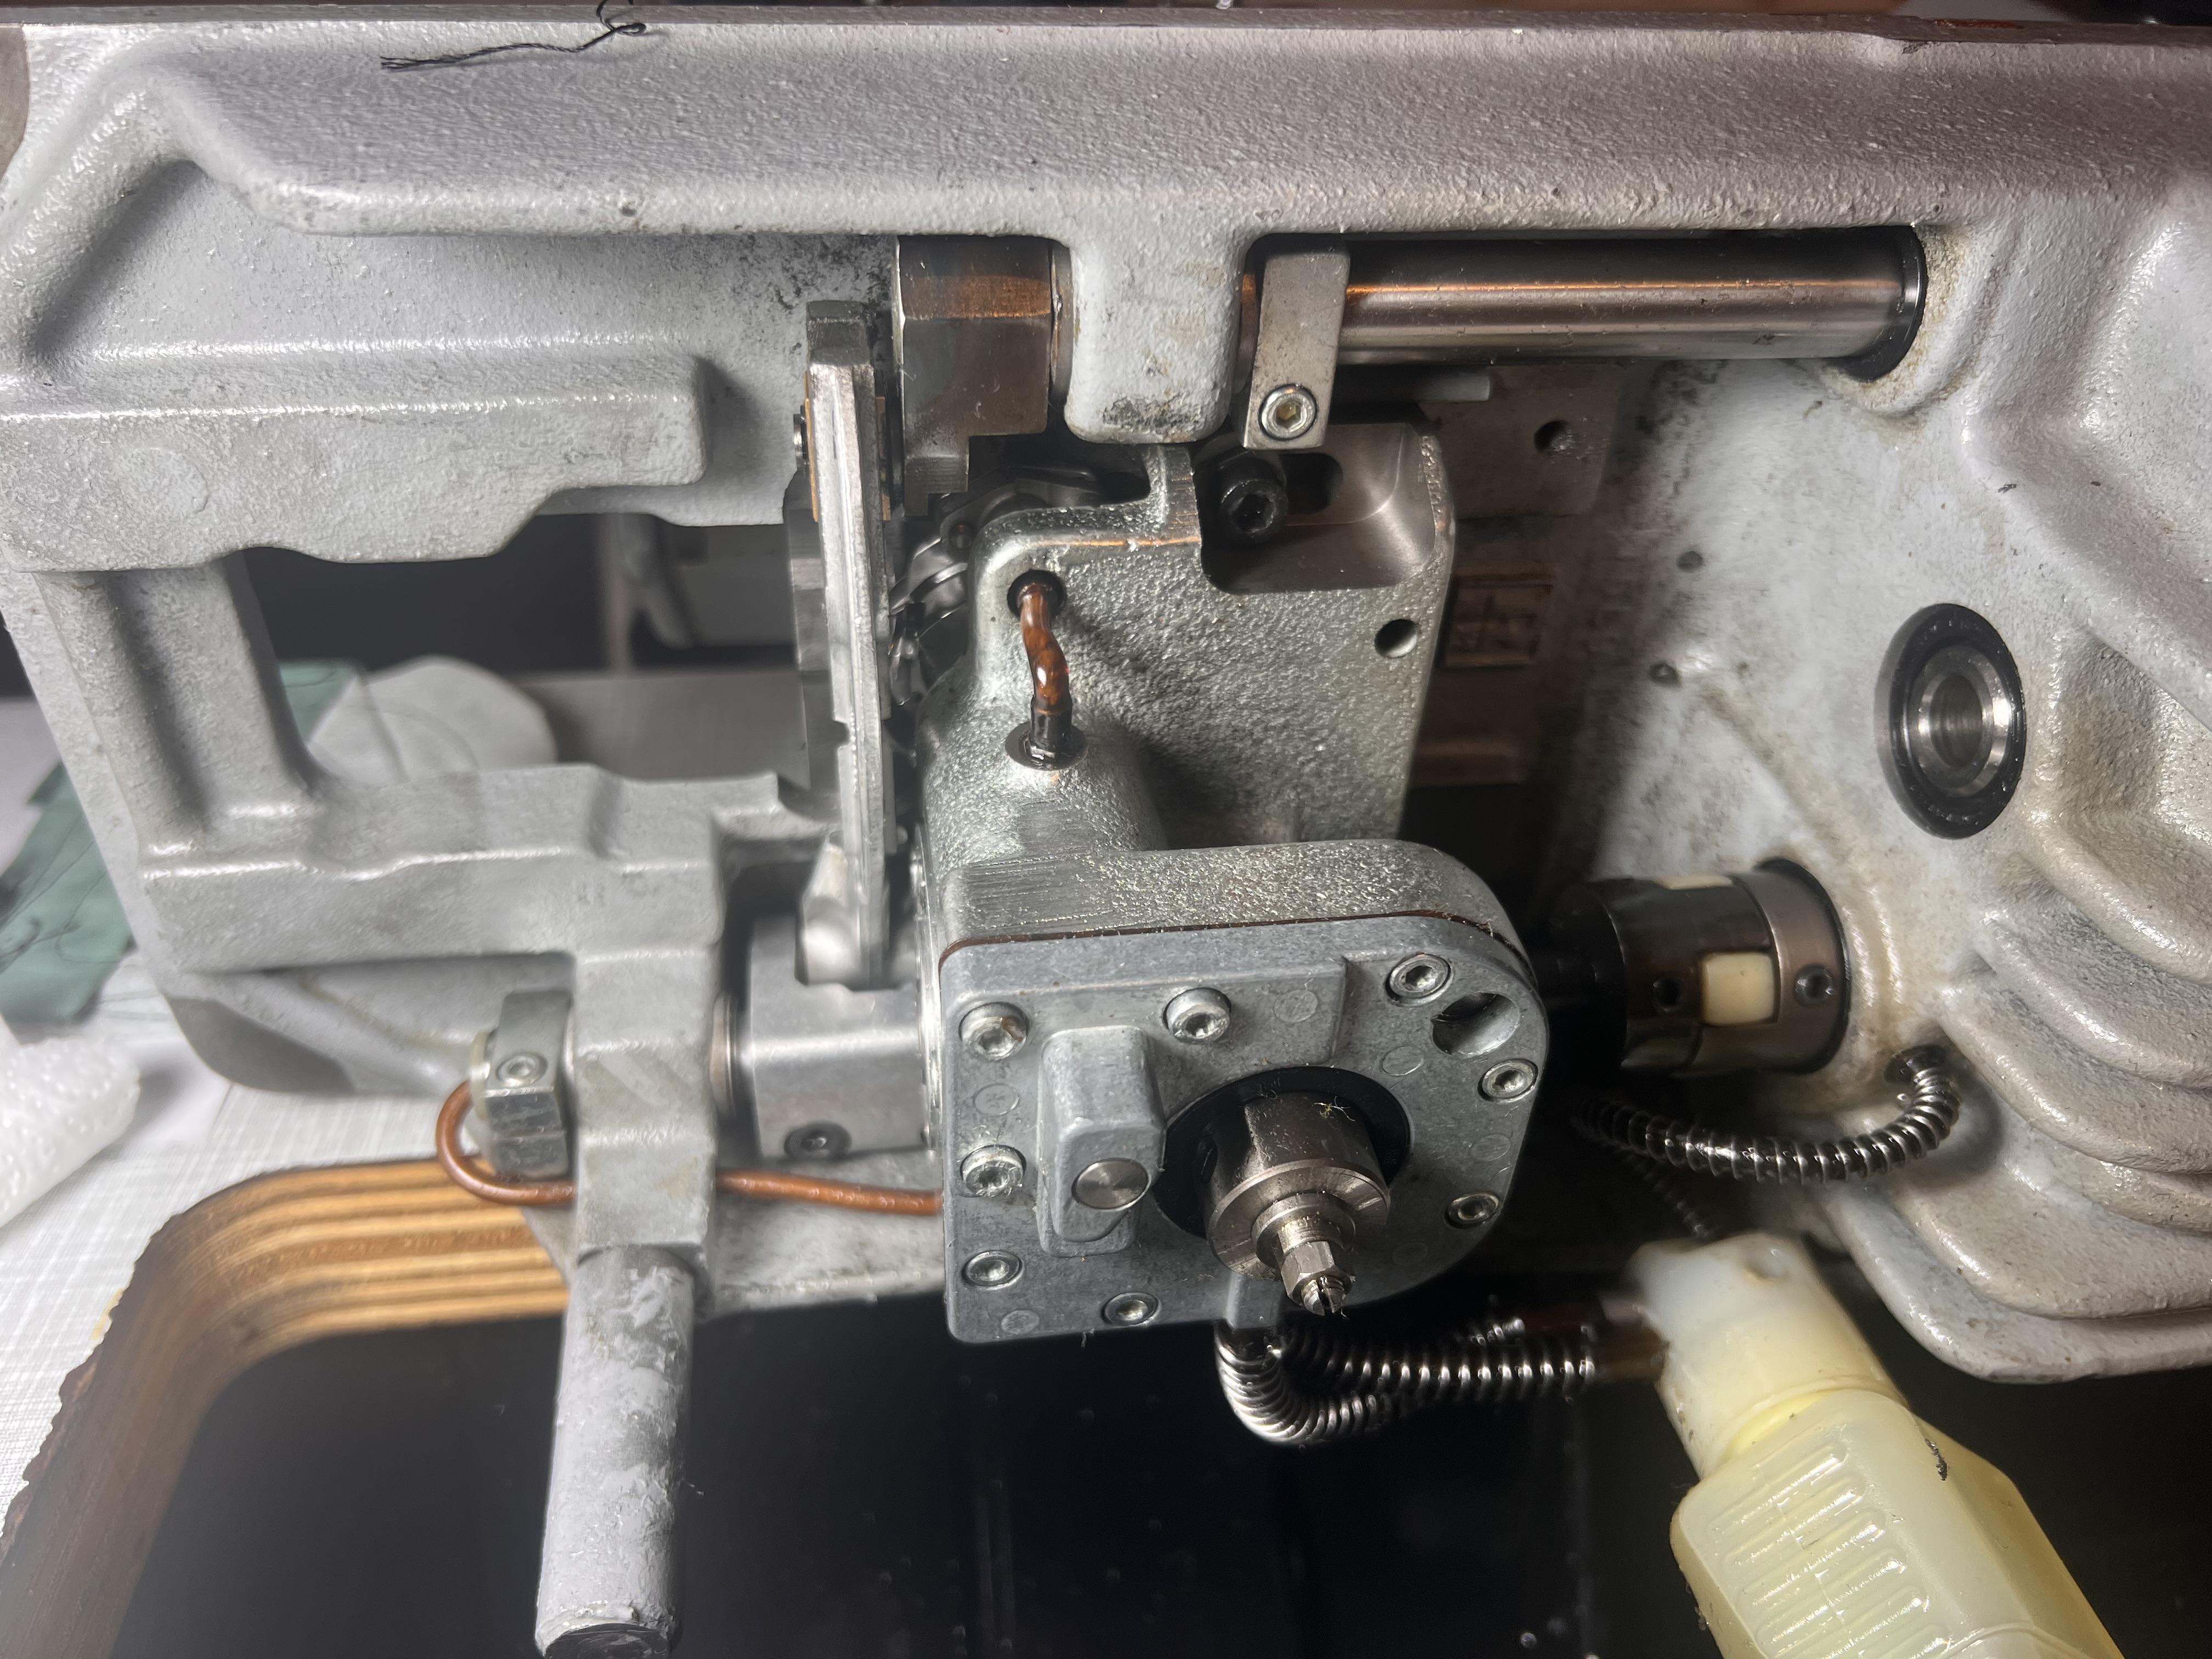
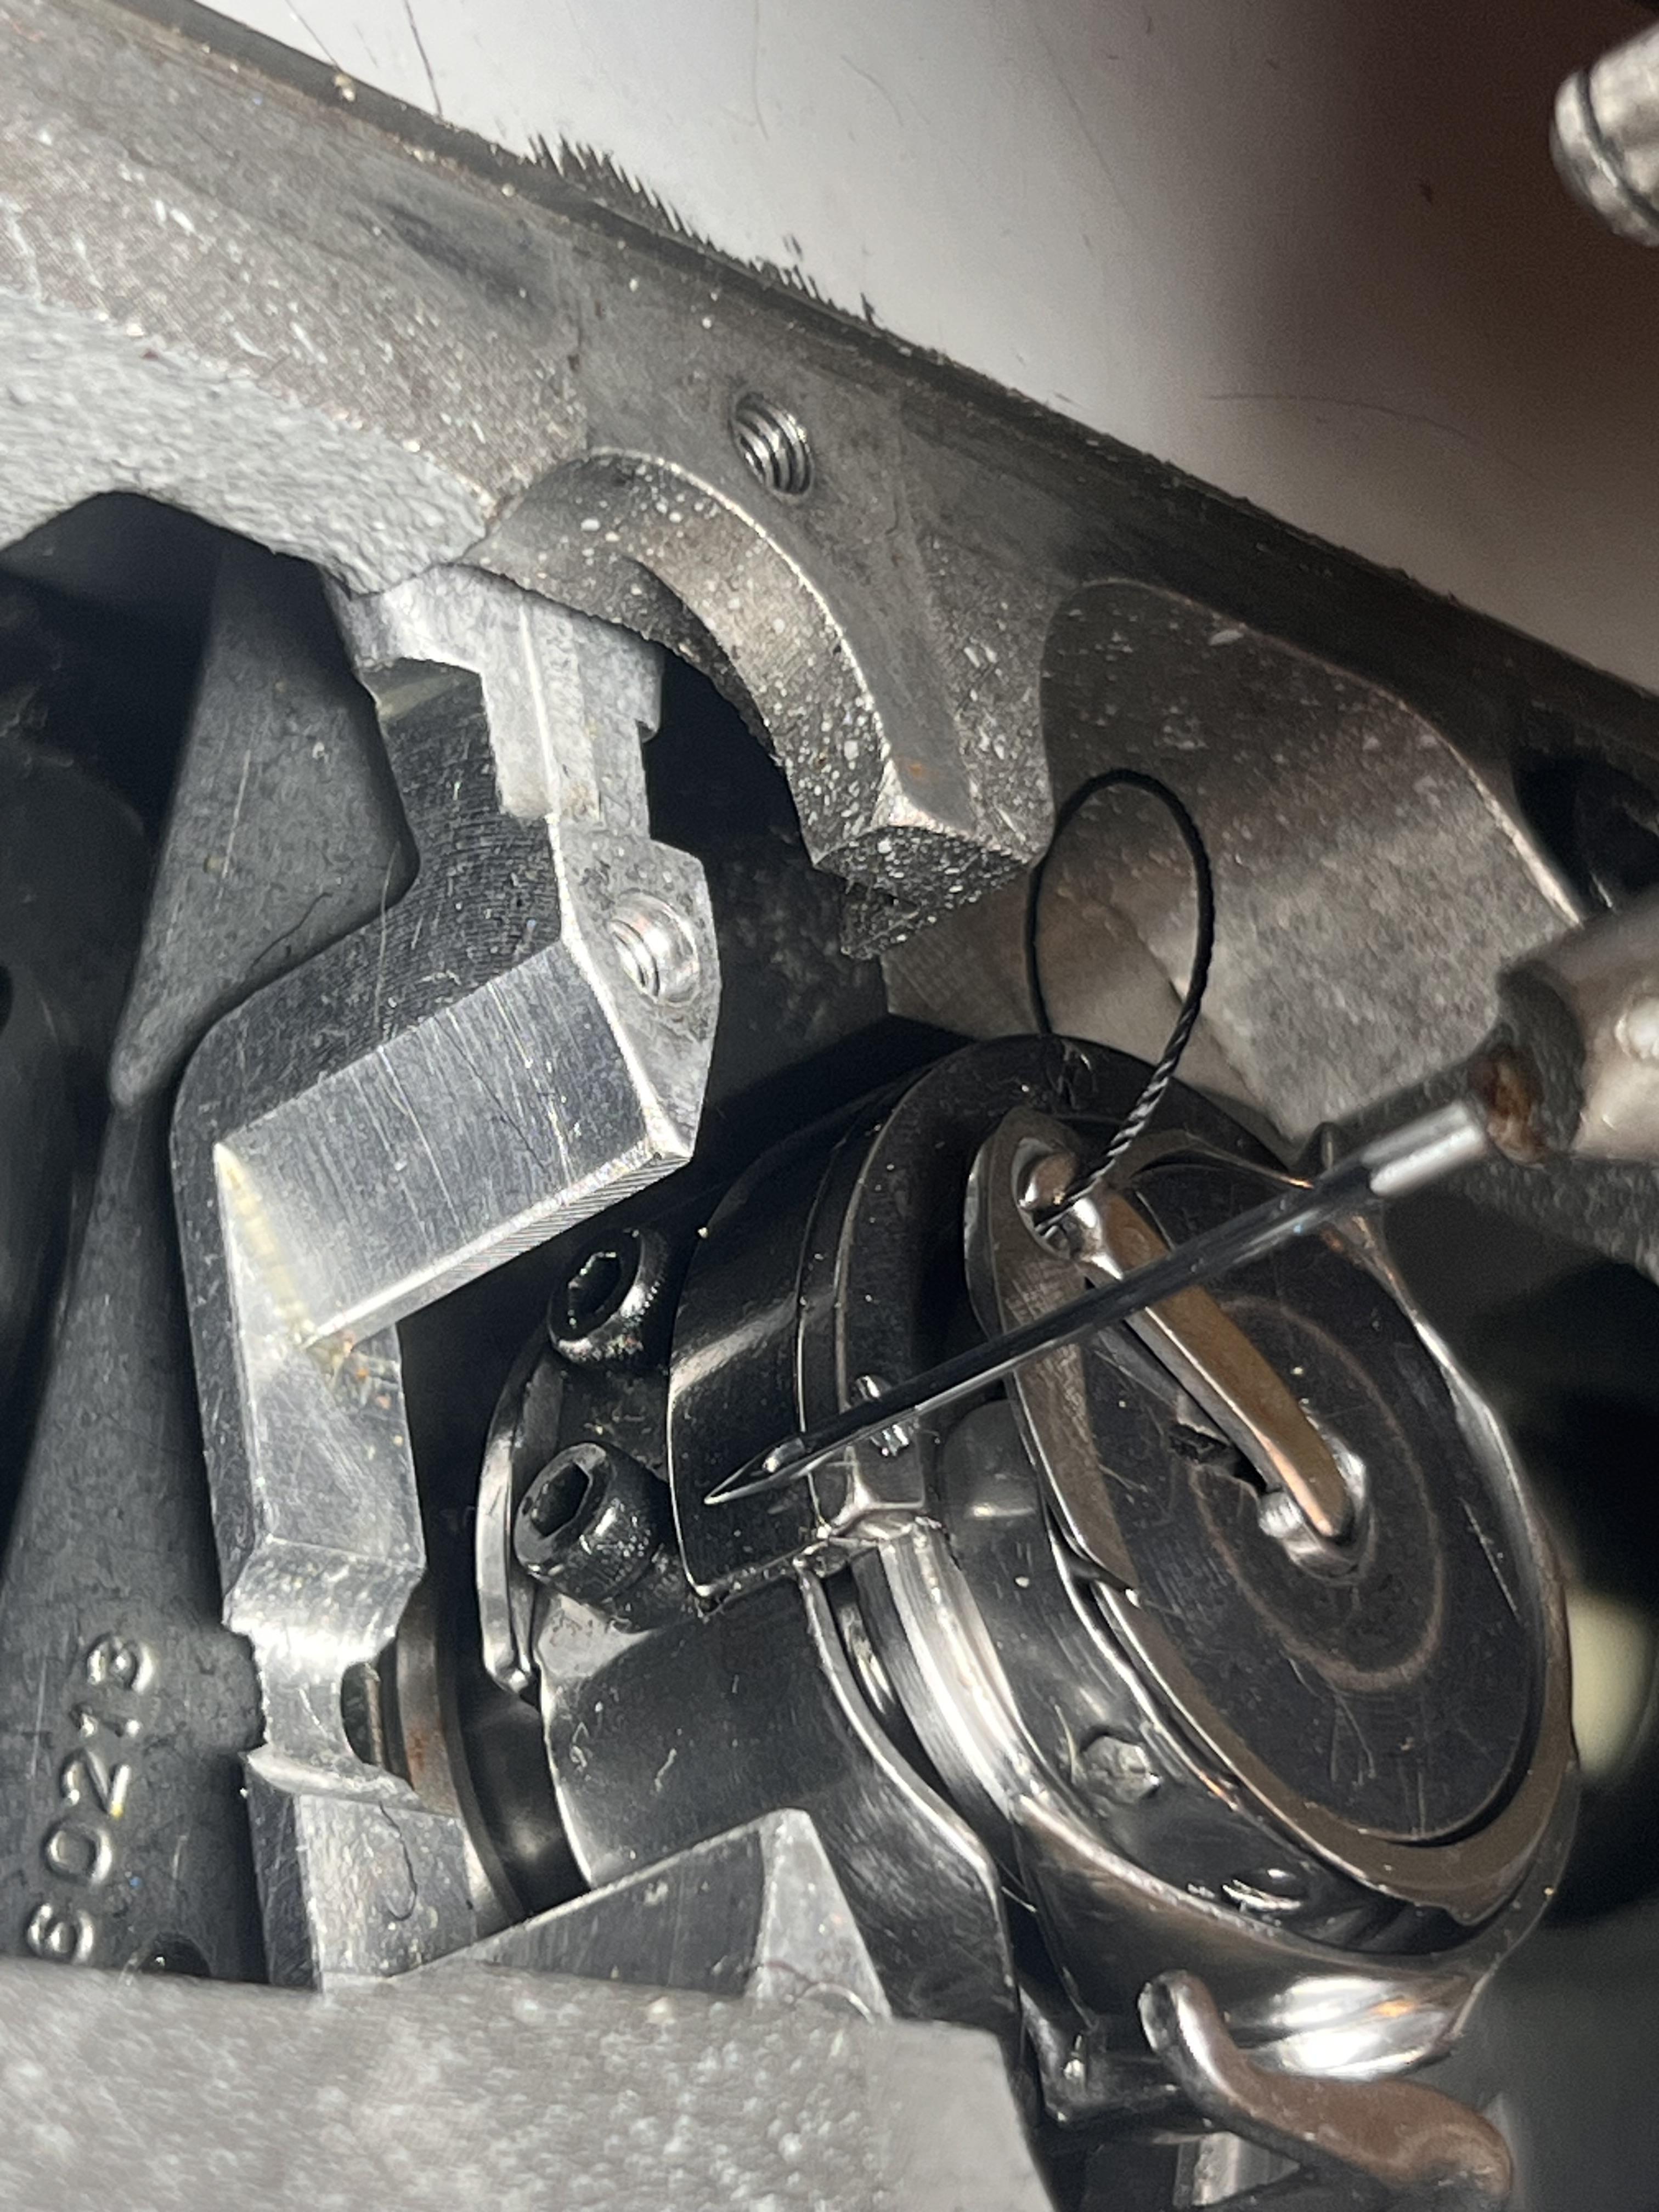
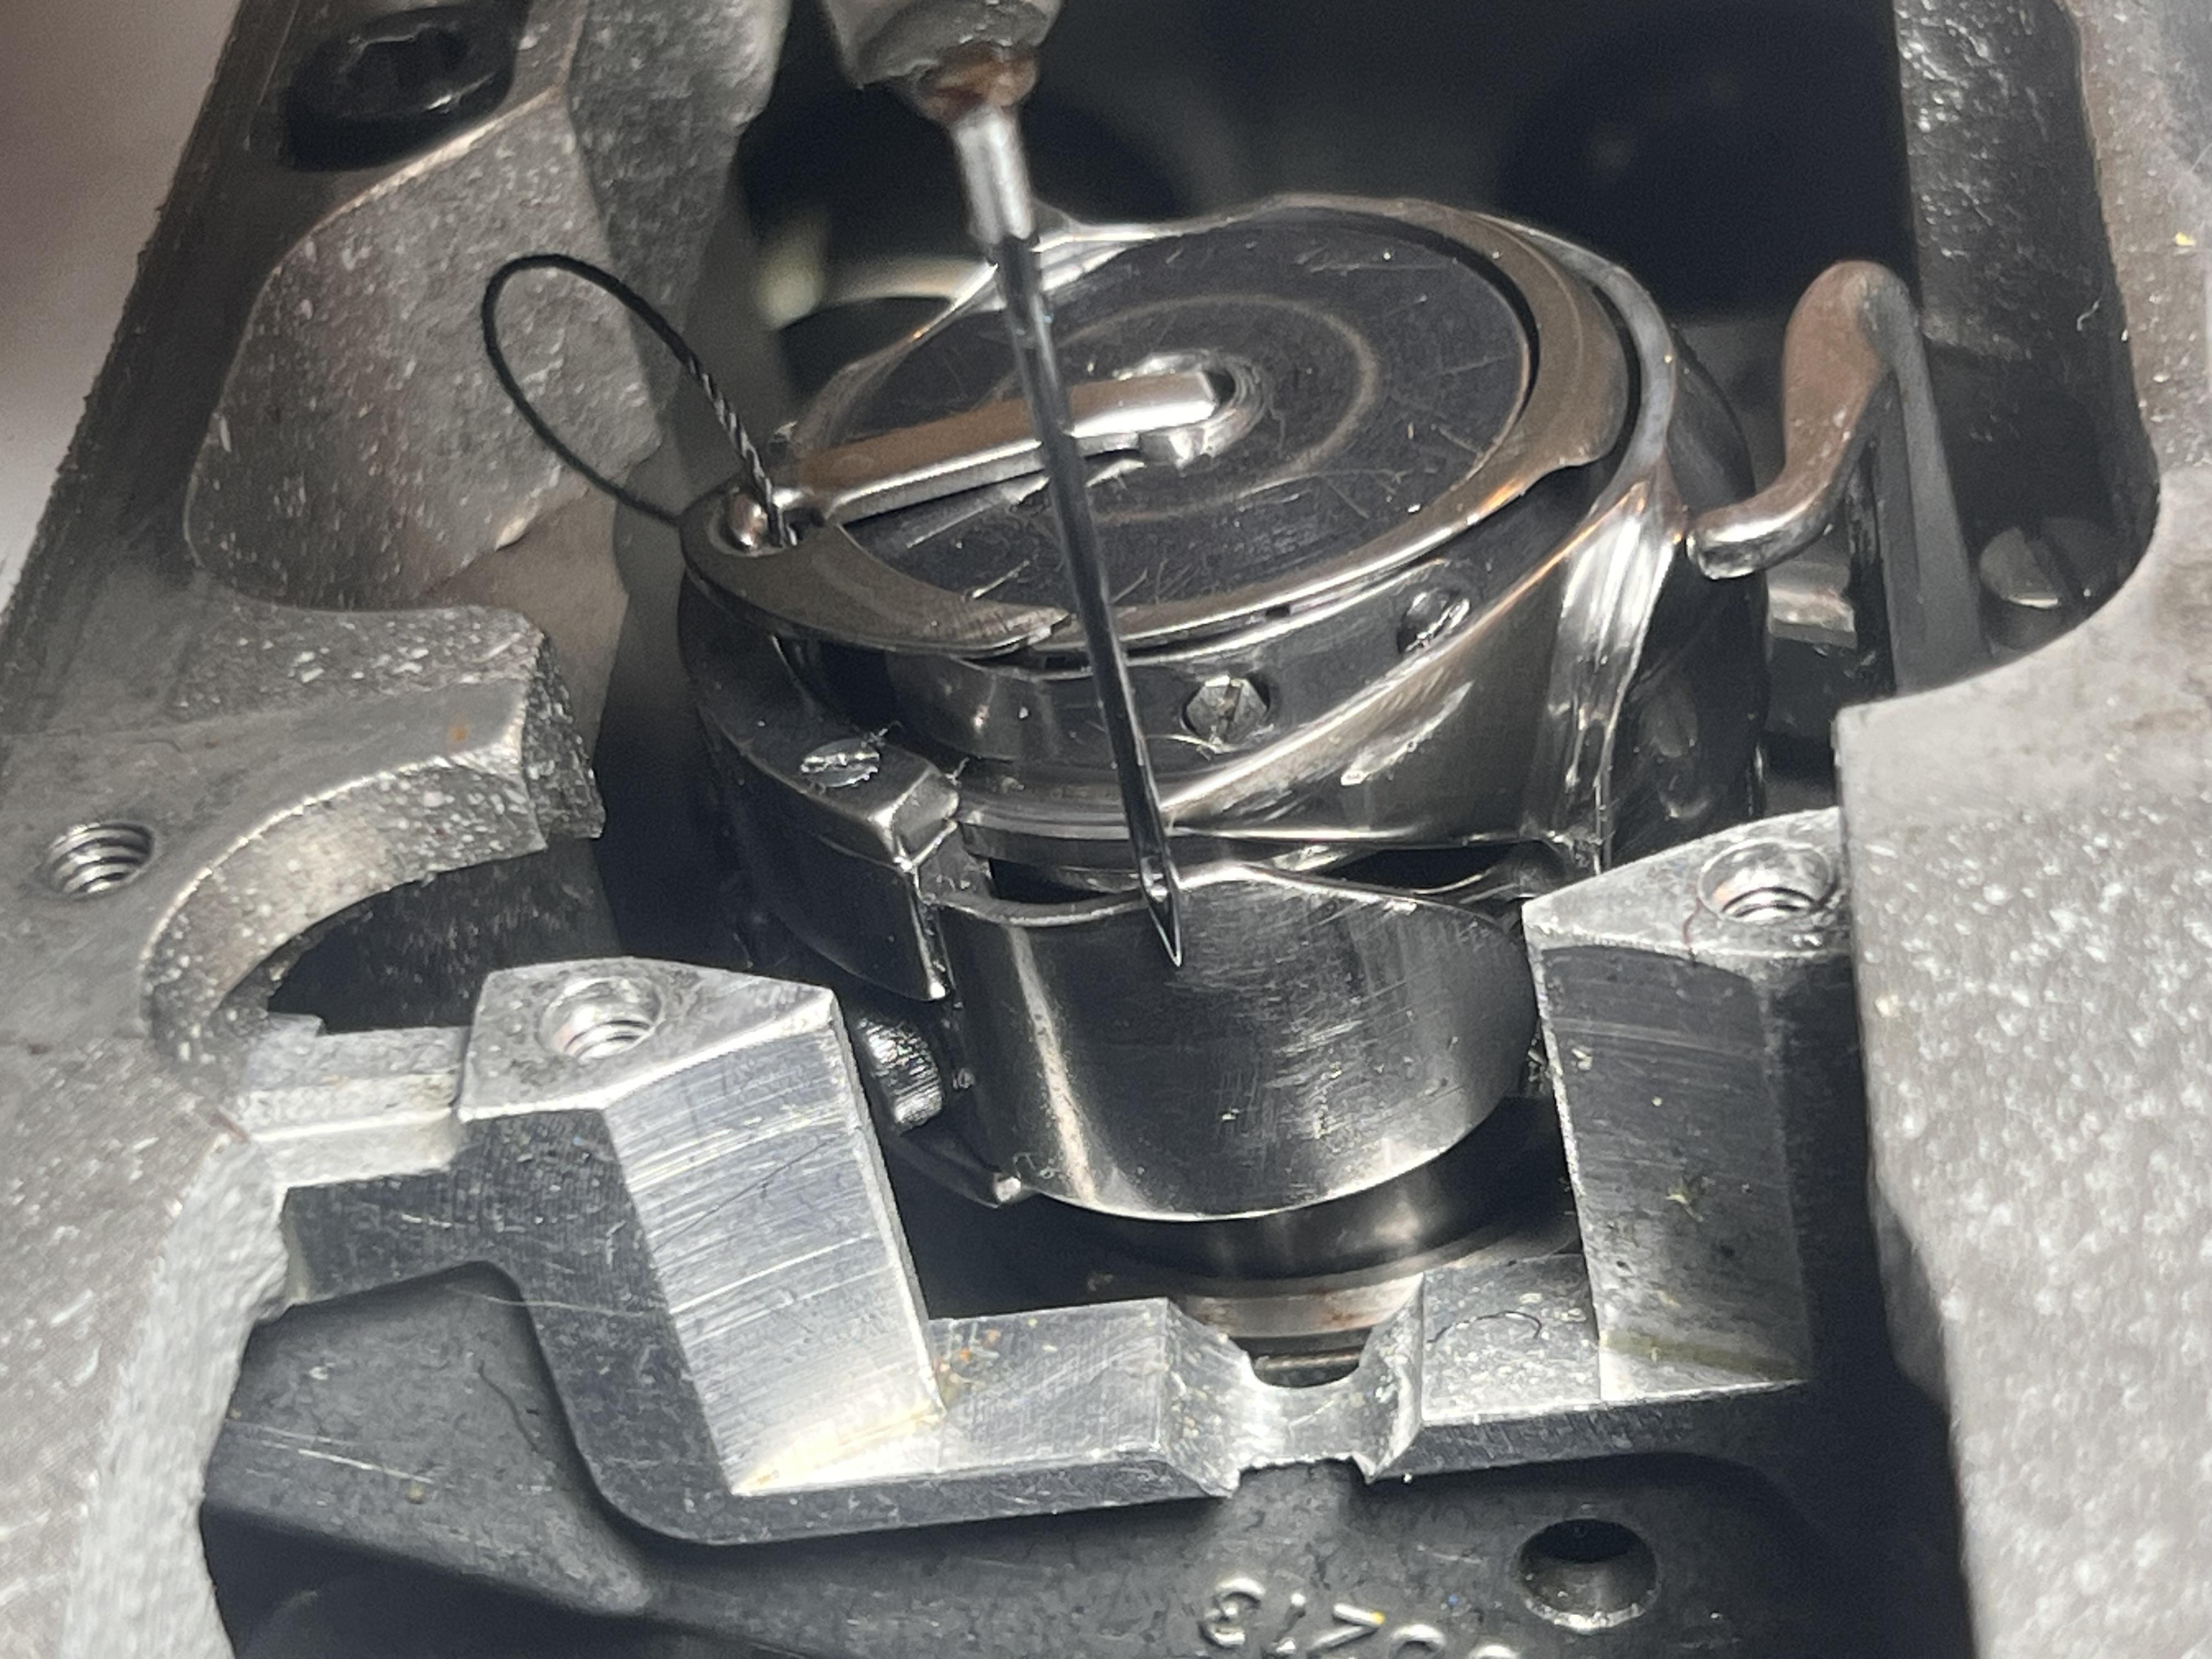
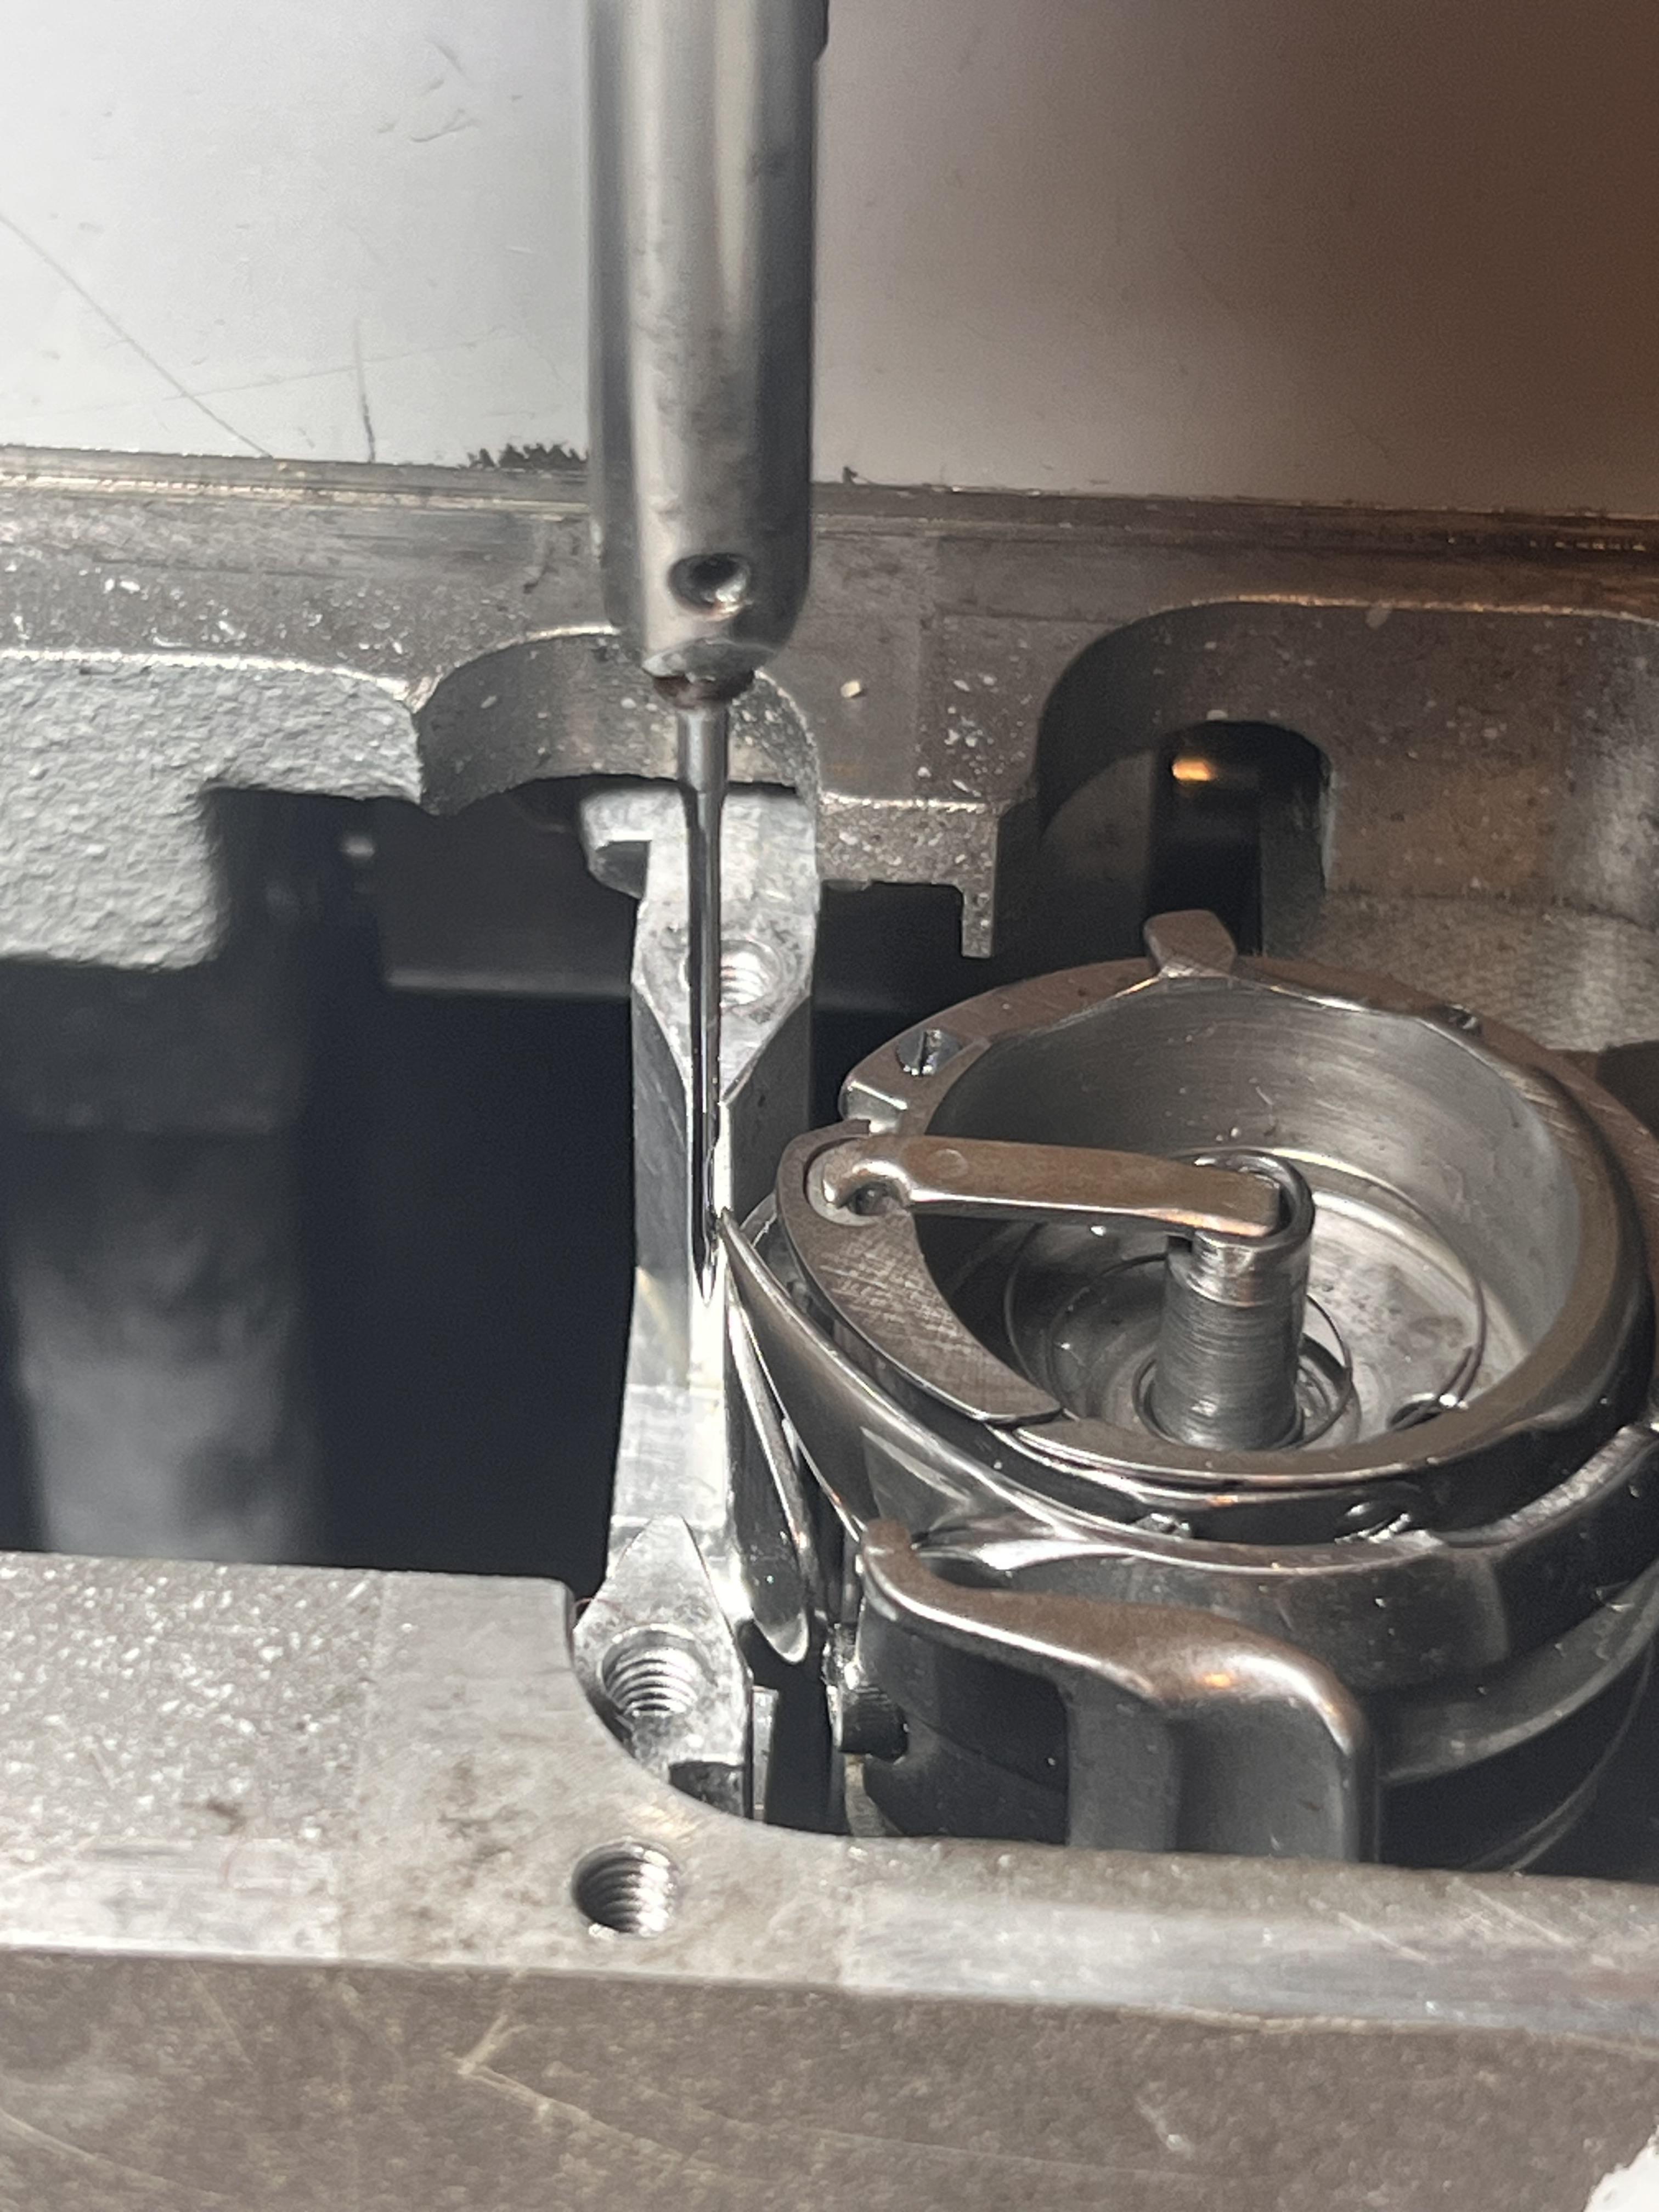
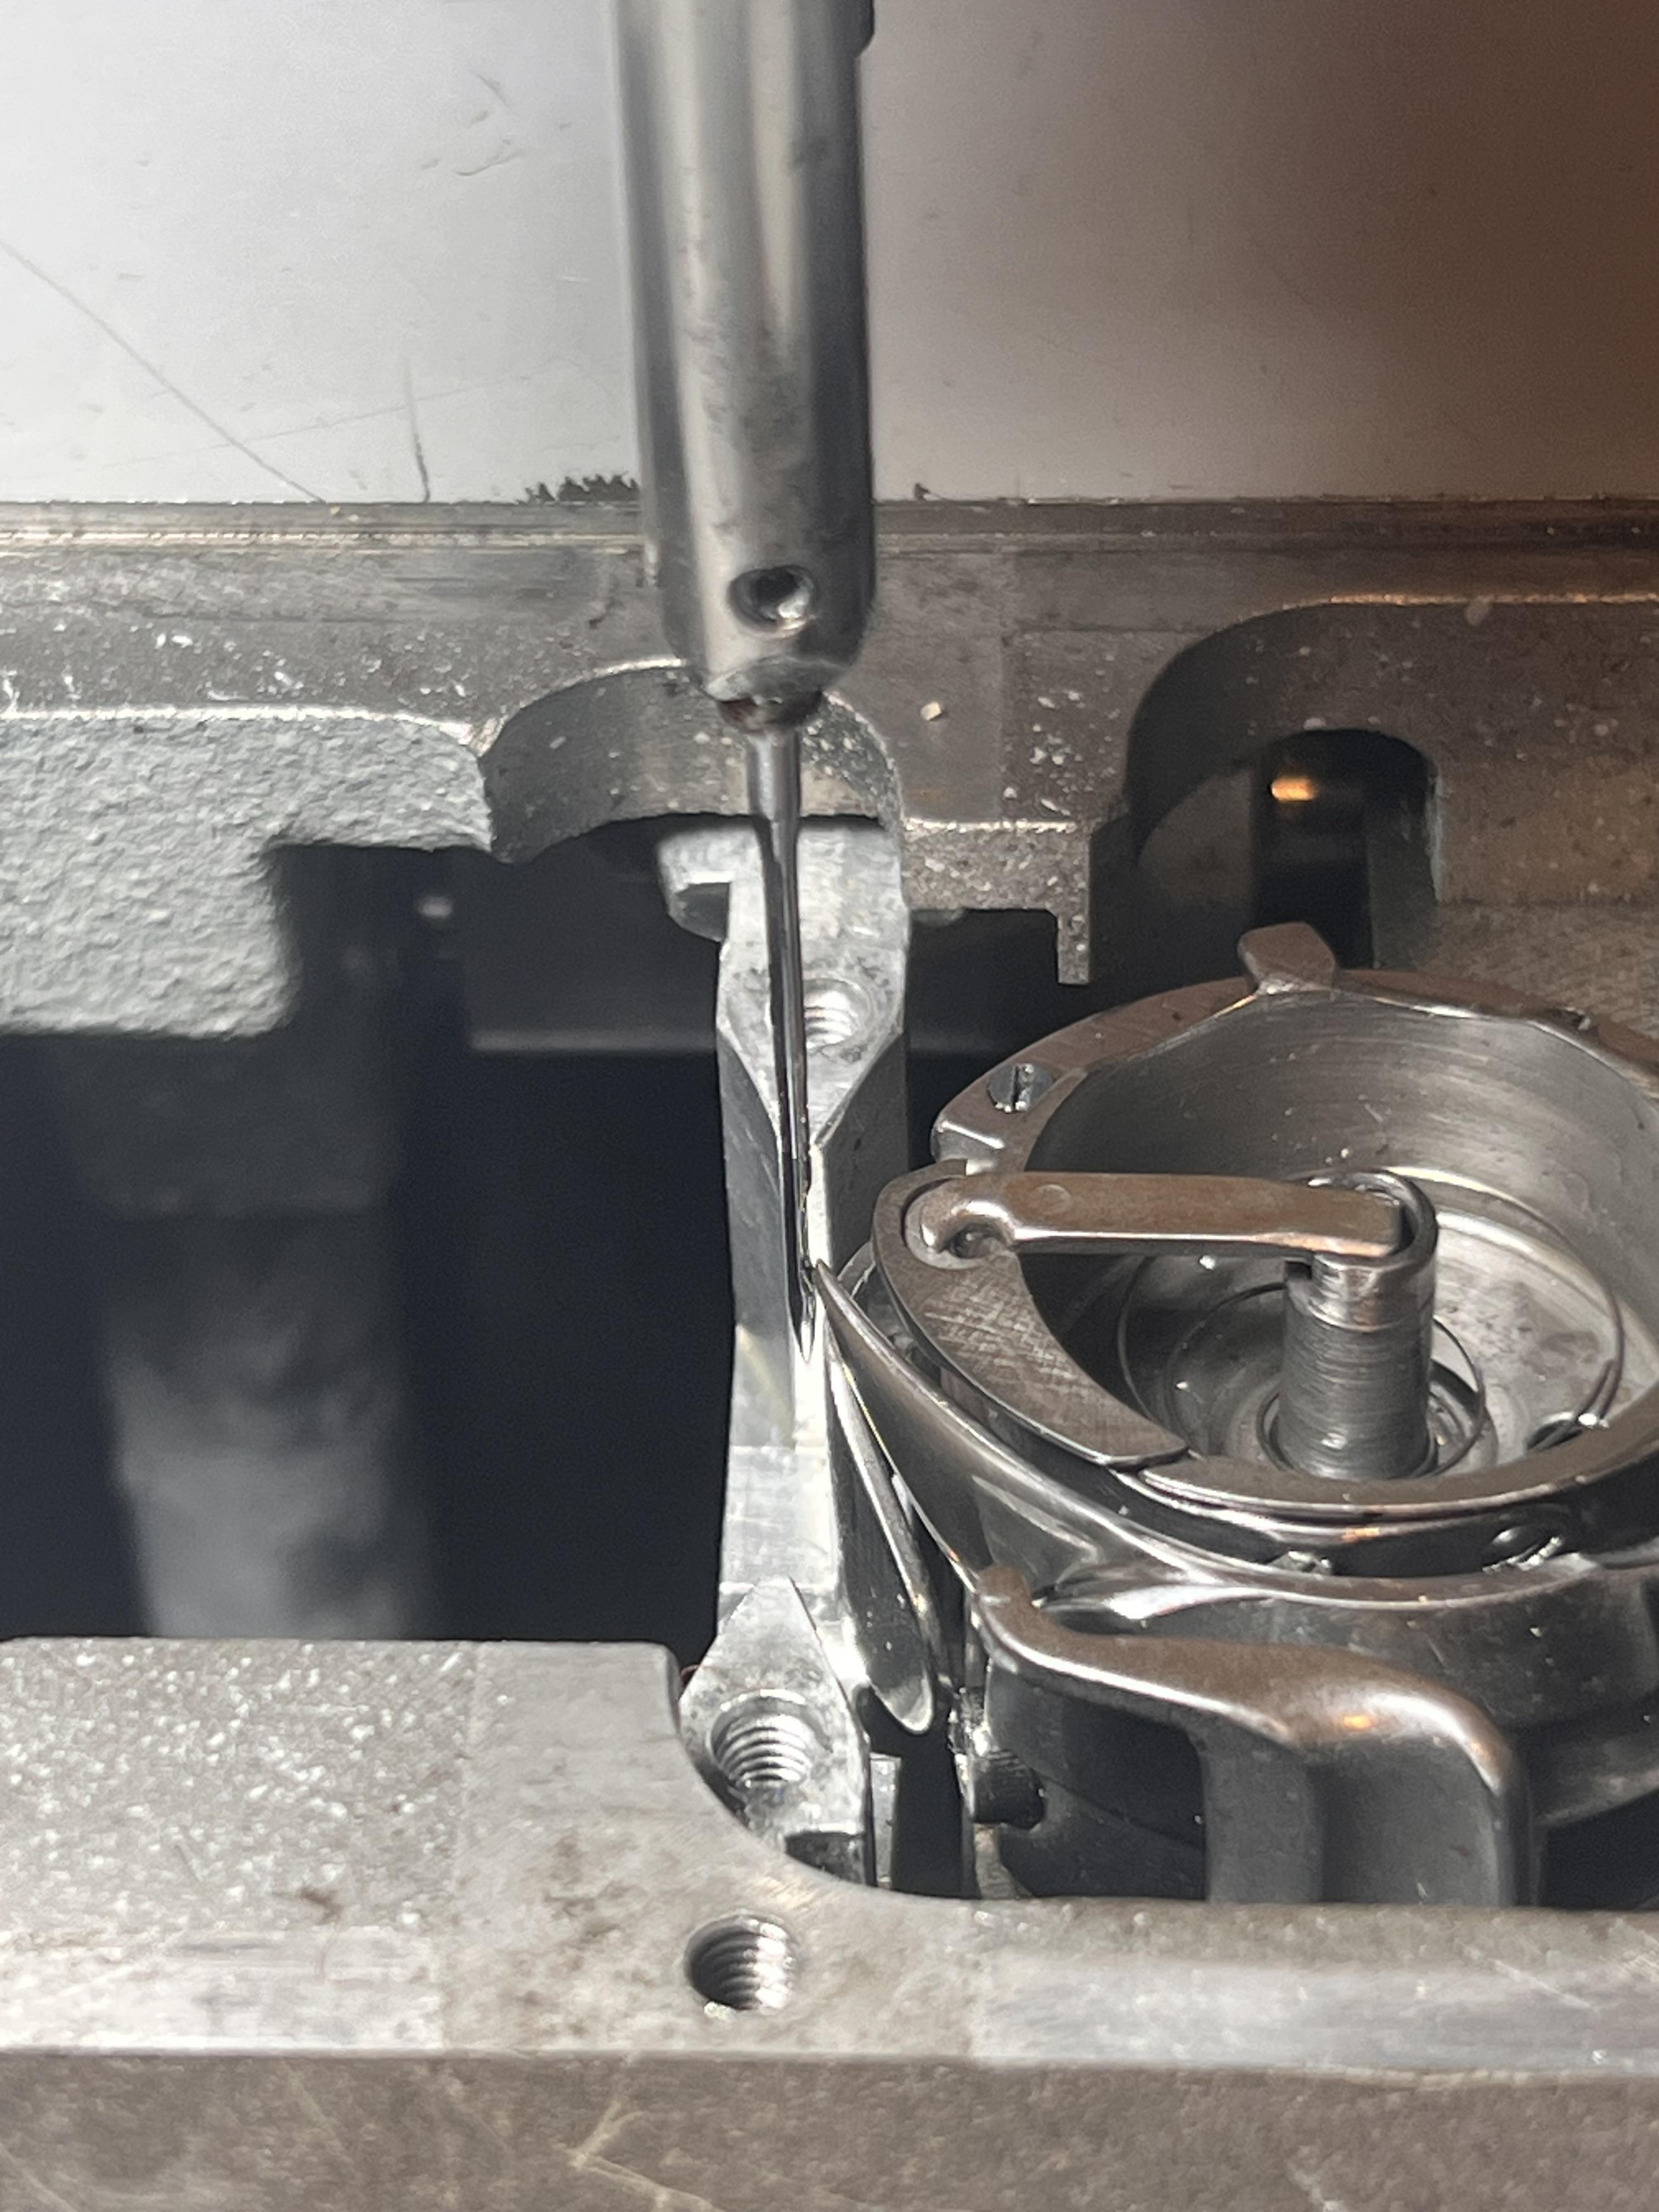
Hello, I’ve received an old lady. She spent 10 years in a basement. It’s an Adler 467-373 that comes from an upholstery shop. My problem is that it frays the upper thread, and I think the timing is off. I cannot find the screw on the shaft to loosen the hook on this model. I’m sure you can help me. I’ve attached a few pics. thank you Leo
-
 VANTAGE V8 joined the community
 -
Not knowing what the console looks like or is made of; maybe staple or tack it in place?
-
hey there, my wife is asking for a center console cover for her pickup for Christmas. Any suggestions so that it stays in place? I don’t necessarily want to glue it in place. Should I just mold it or are there other suggestions? thank you!
-
hey there, my wife is asking for a center console cover for her pickup for Christmas. Any suggestions so that it stays in place? I don’t necessarily want to glue it in place. Should I just mold it or are there other suggestions? thank you!
-

What do you think of the Mitsubishi DU-105?
friquant replied to Zonker62's topic in Leather Sewing Machines
Show us your bobbin orientation. The thread will come out of the slit if you load the bobbin backwards. -

can anybody please help me find this "sole trimmer"?
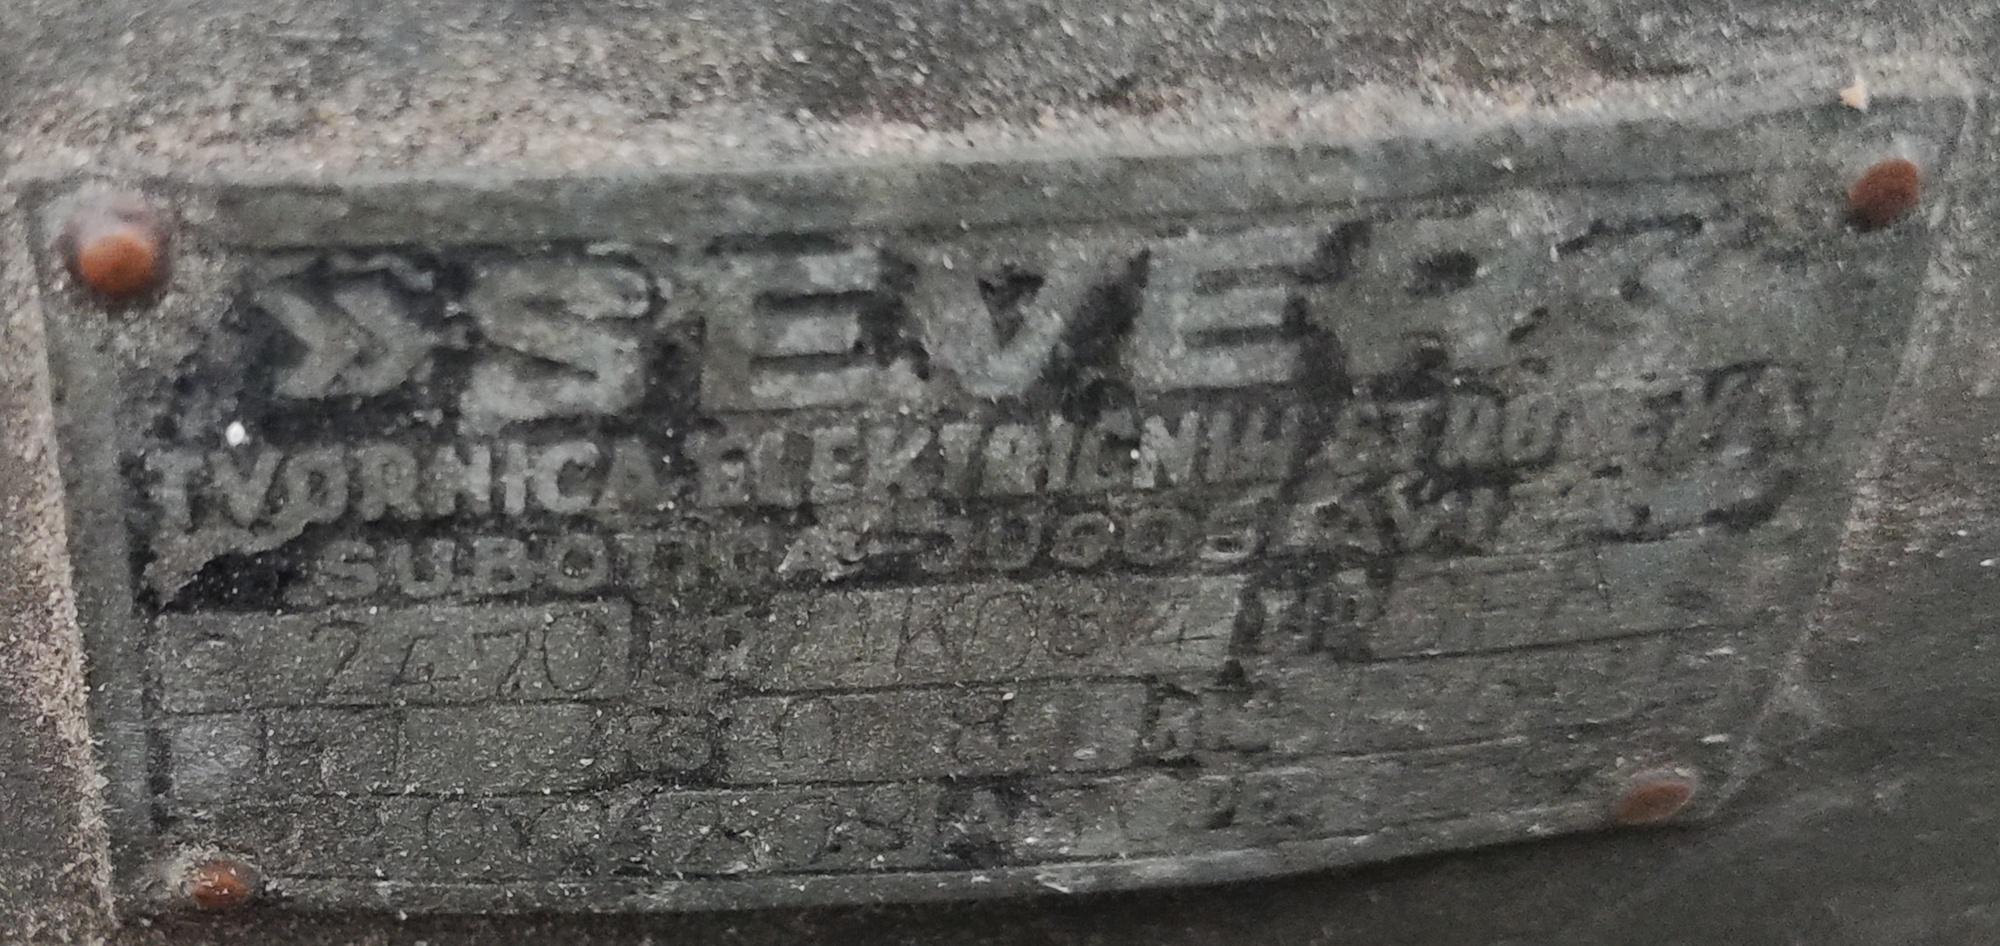
kgg replied to TakashiOkada's topic in Leather Machinery
The photo with the nameplate info appears to be for the motor which was made in Croatia. The wording "tvornica elektricnih strojeva subotica" converts to say "Electrical Machine Factory, Subotica". I would send your photo's to USM ( https://usm-americas.com ) and see if they could match up something. kgg -
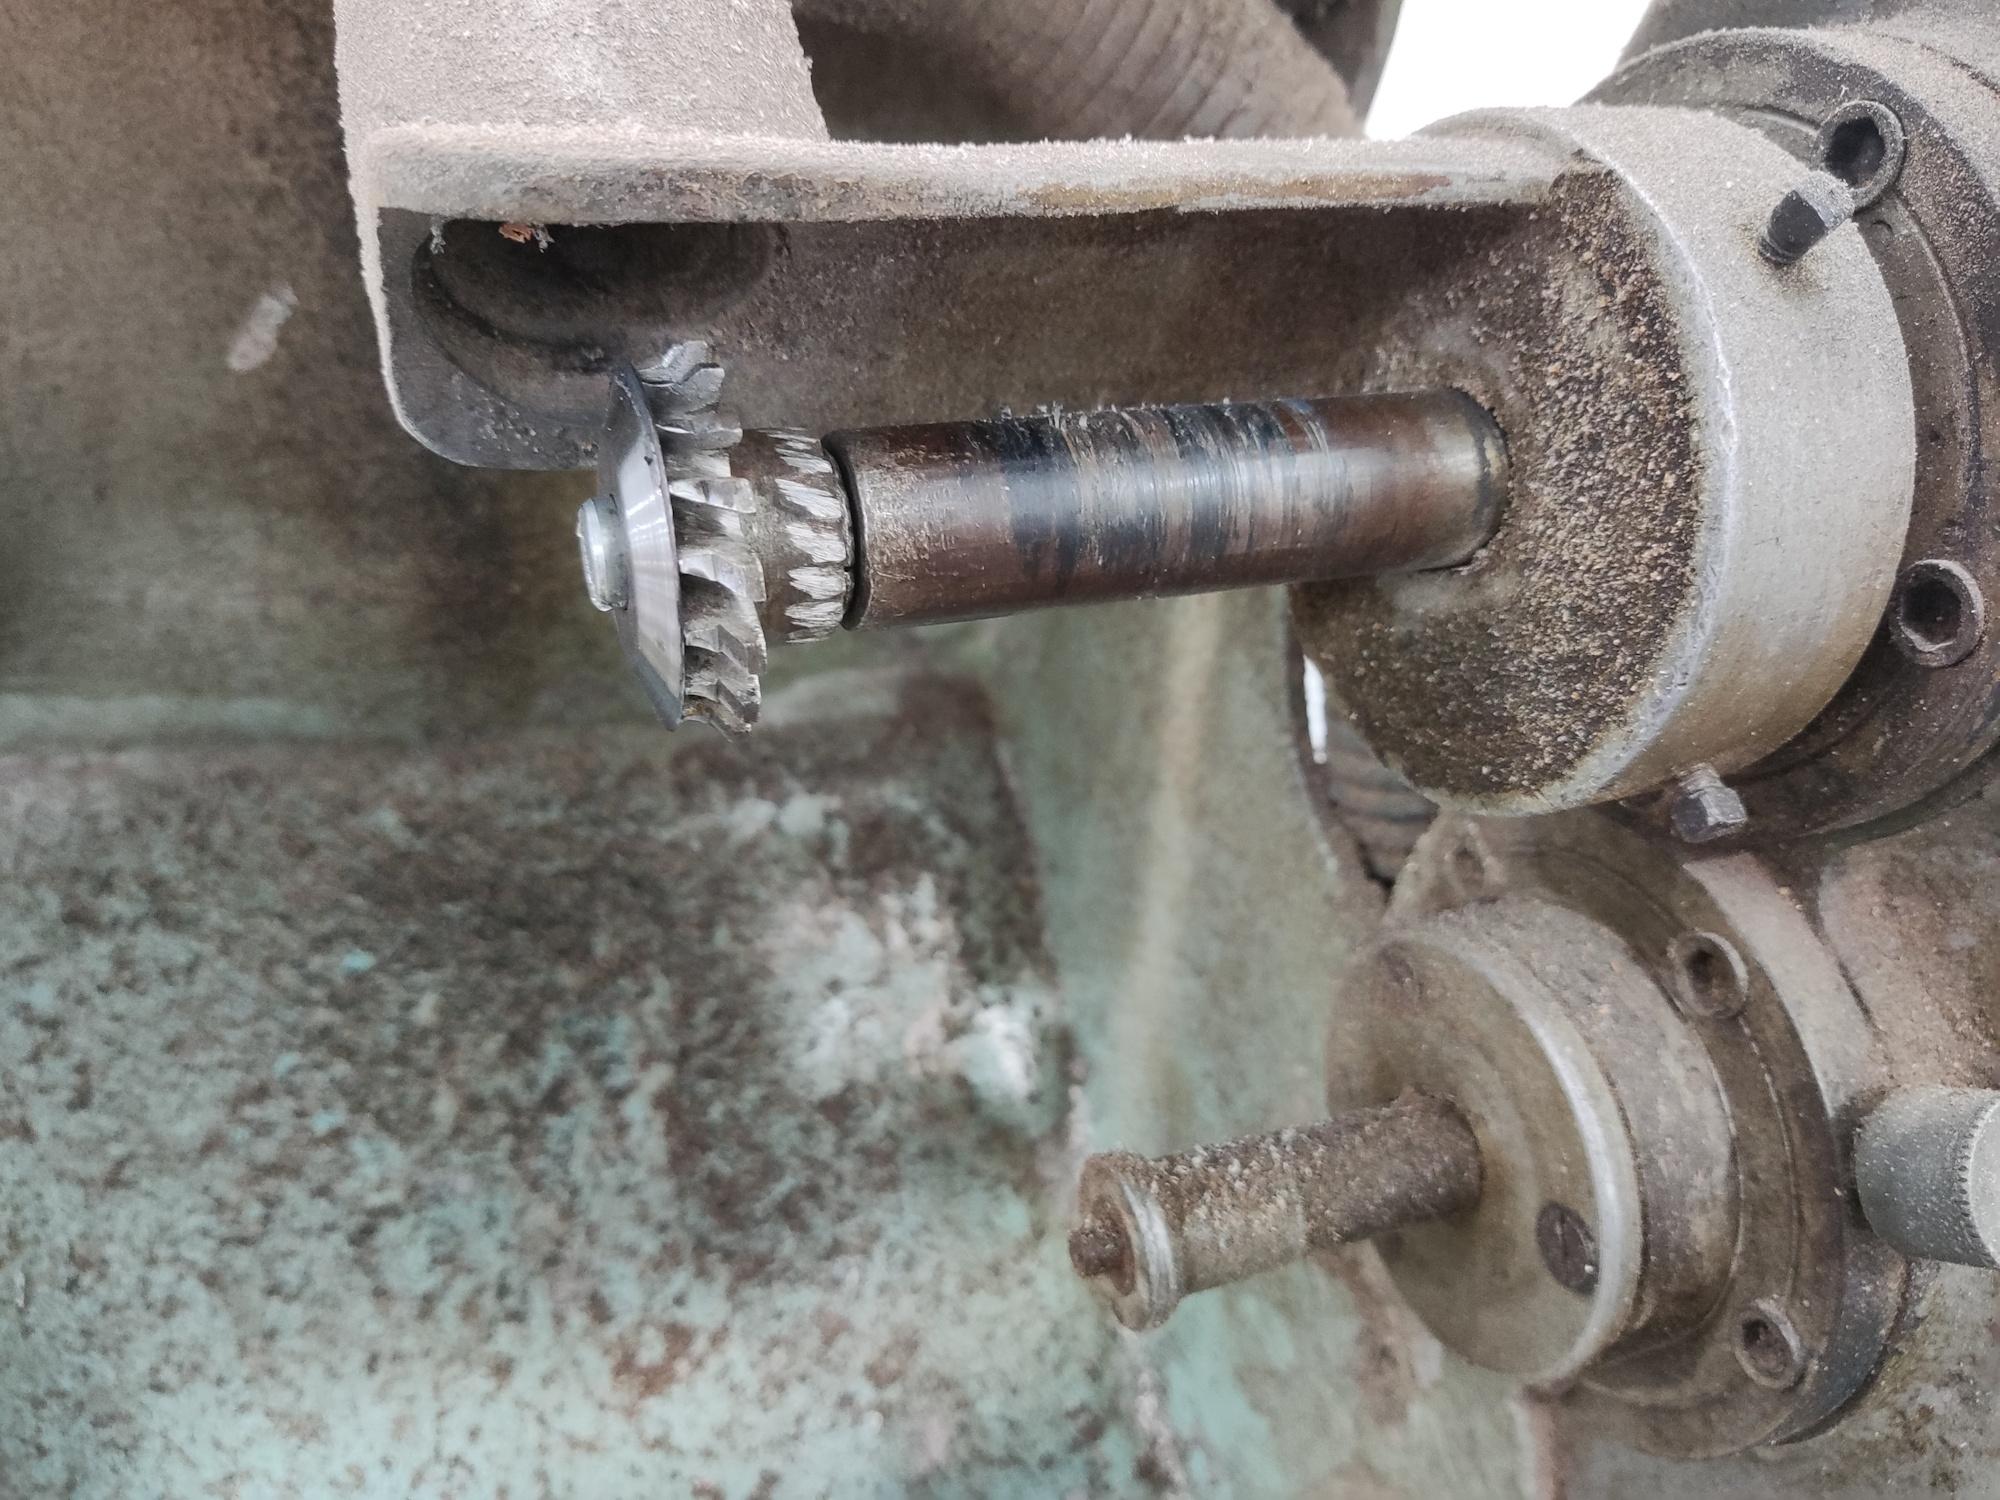
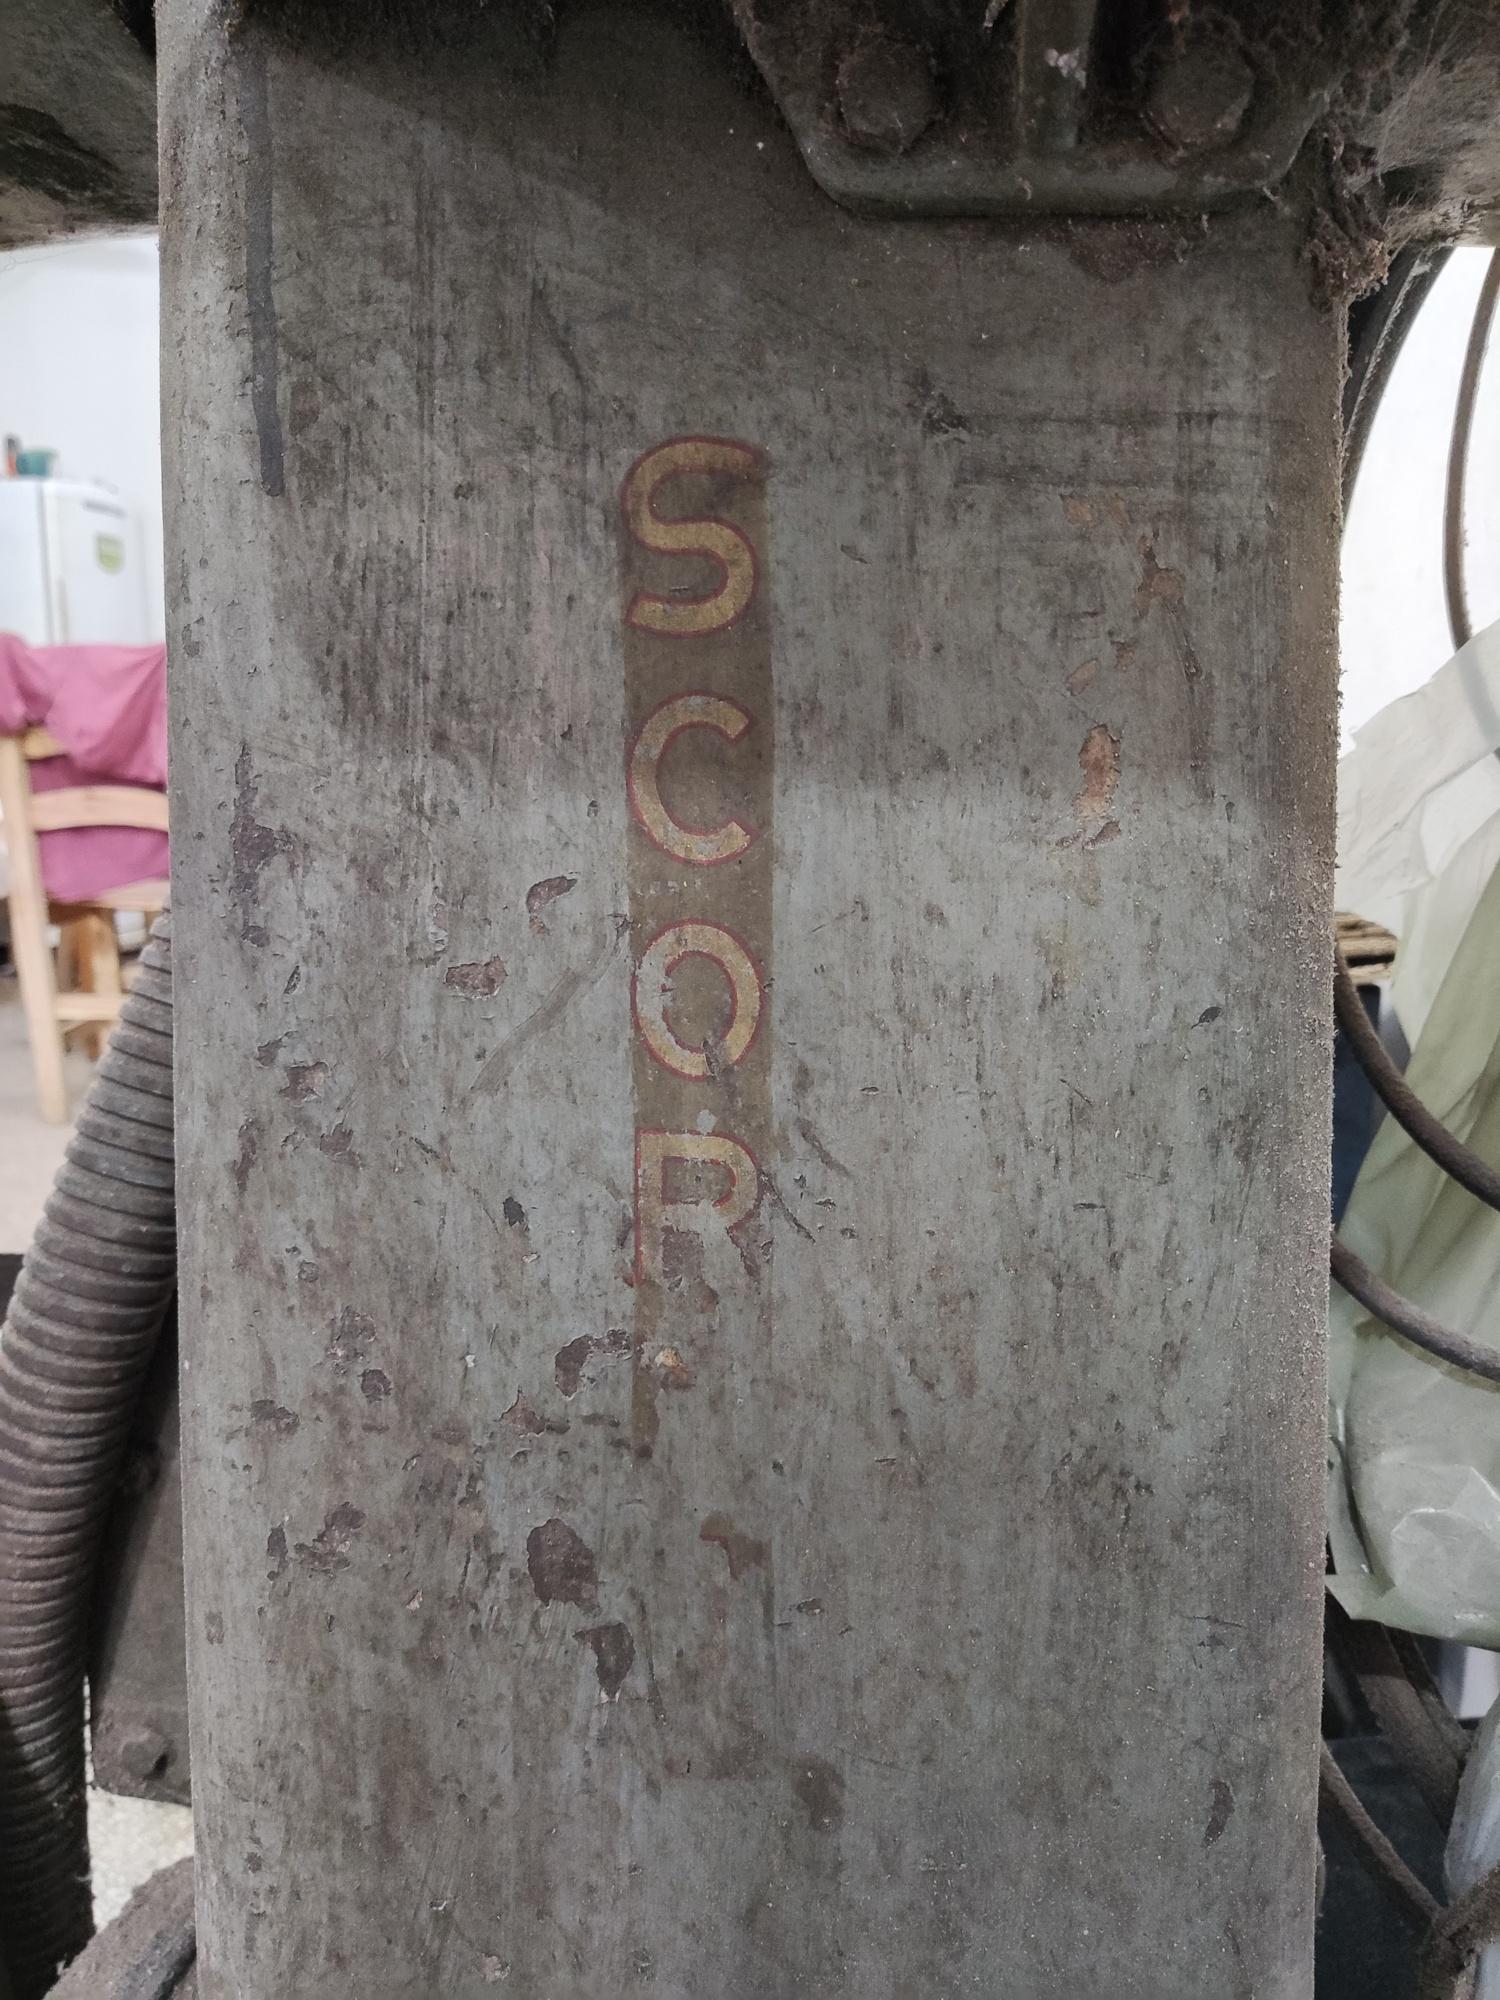
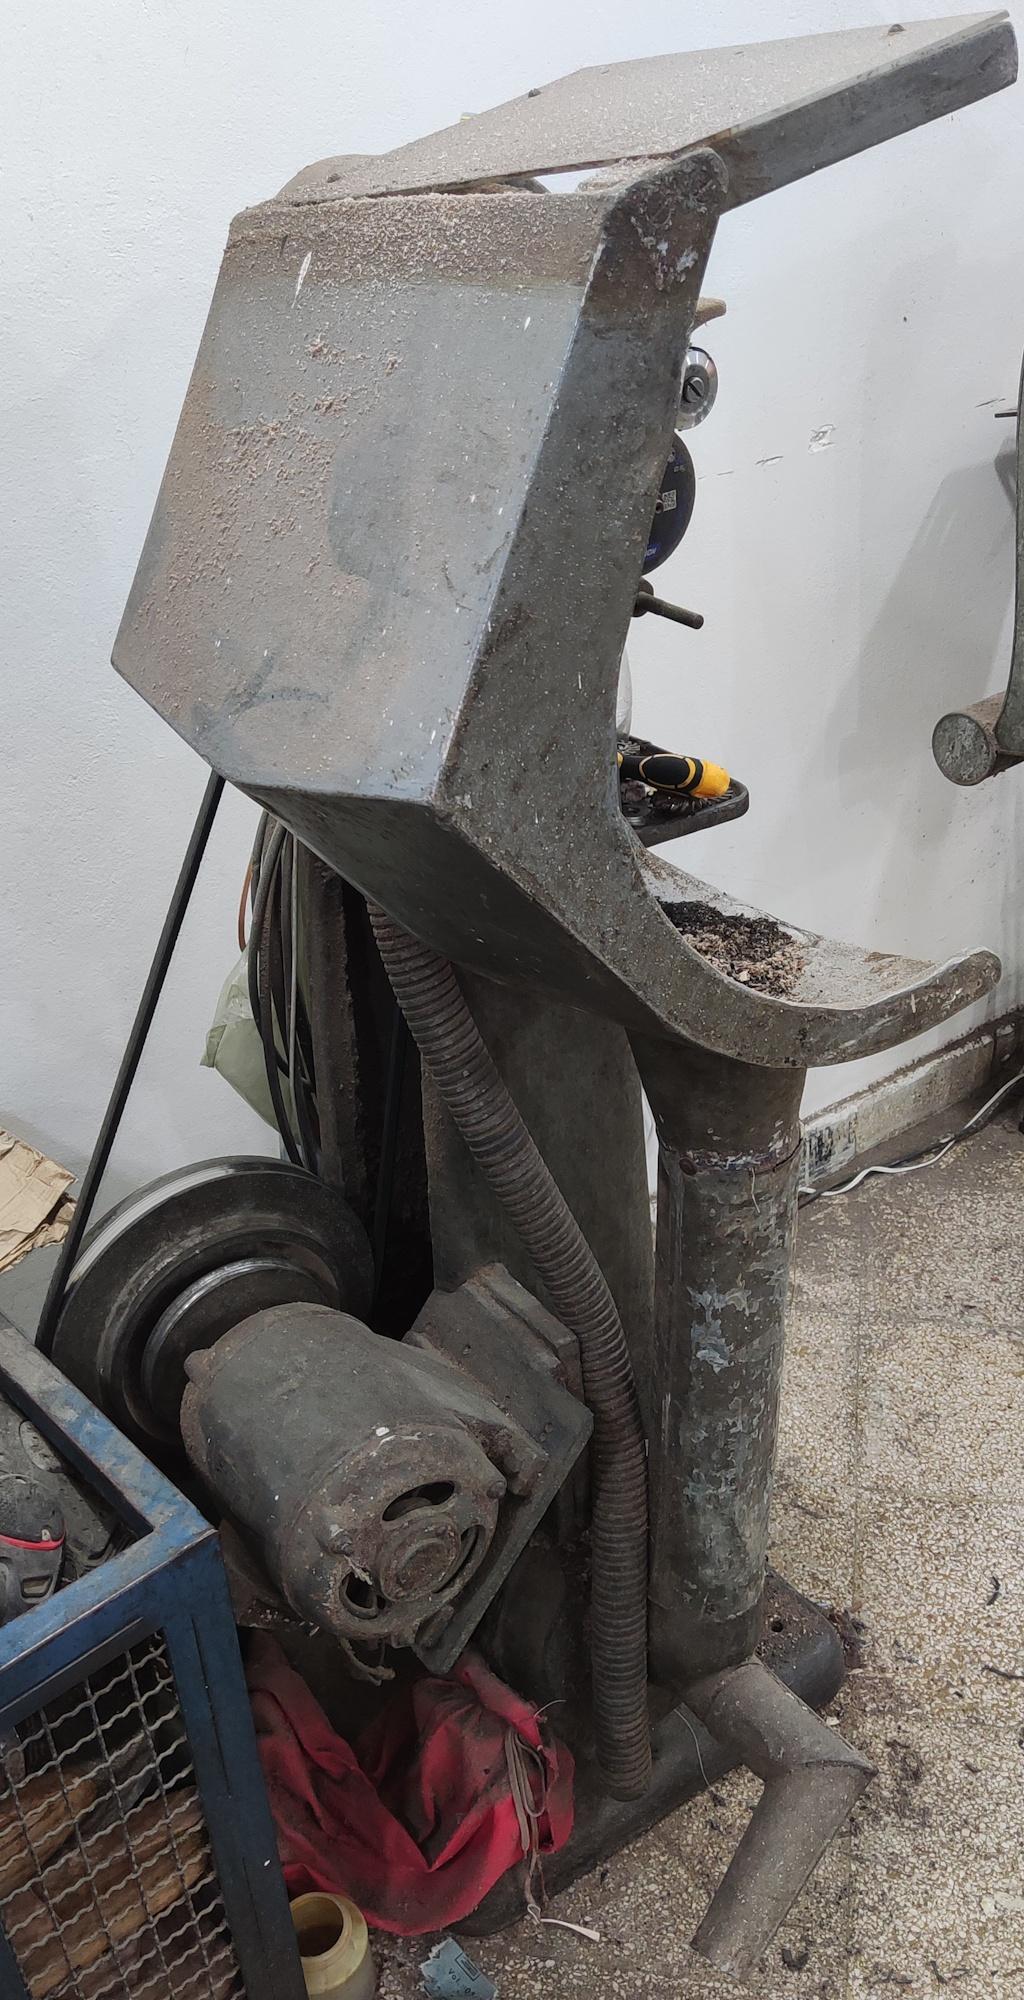
can anybody please help me find this "sole trimmer"?
TakashiOkada replied to TakashiOkada's topic in Leather Machinery
sorry, here are some pictures.

-
His ip address shows that he is in Canada.
-

What do you think of the Mitsubishi DU-105?
Zonker62 replied to Zonker62's topic in Leather Sewing Machines
OK! understood! -
college sewing in the UK for sure has the parts. I have used them for my 29k71 back then. But the parts where tight and IIRC the shaft had no hole for the tapered pin that holds the bevel gear. But I may have some used parts. Please send em a message. Where are you located?
-
What do you think of the Mitsubishi DU-105?
kgg replied to Zonker62's topic in Leather Sewing Machines
I would like to see the path of the top thread starting from the spool of thread on the thread stand following it as it passes through each thread guide or tensioner to the eye of the needle particularly the tensioner assembly. kgg -
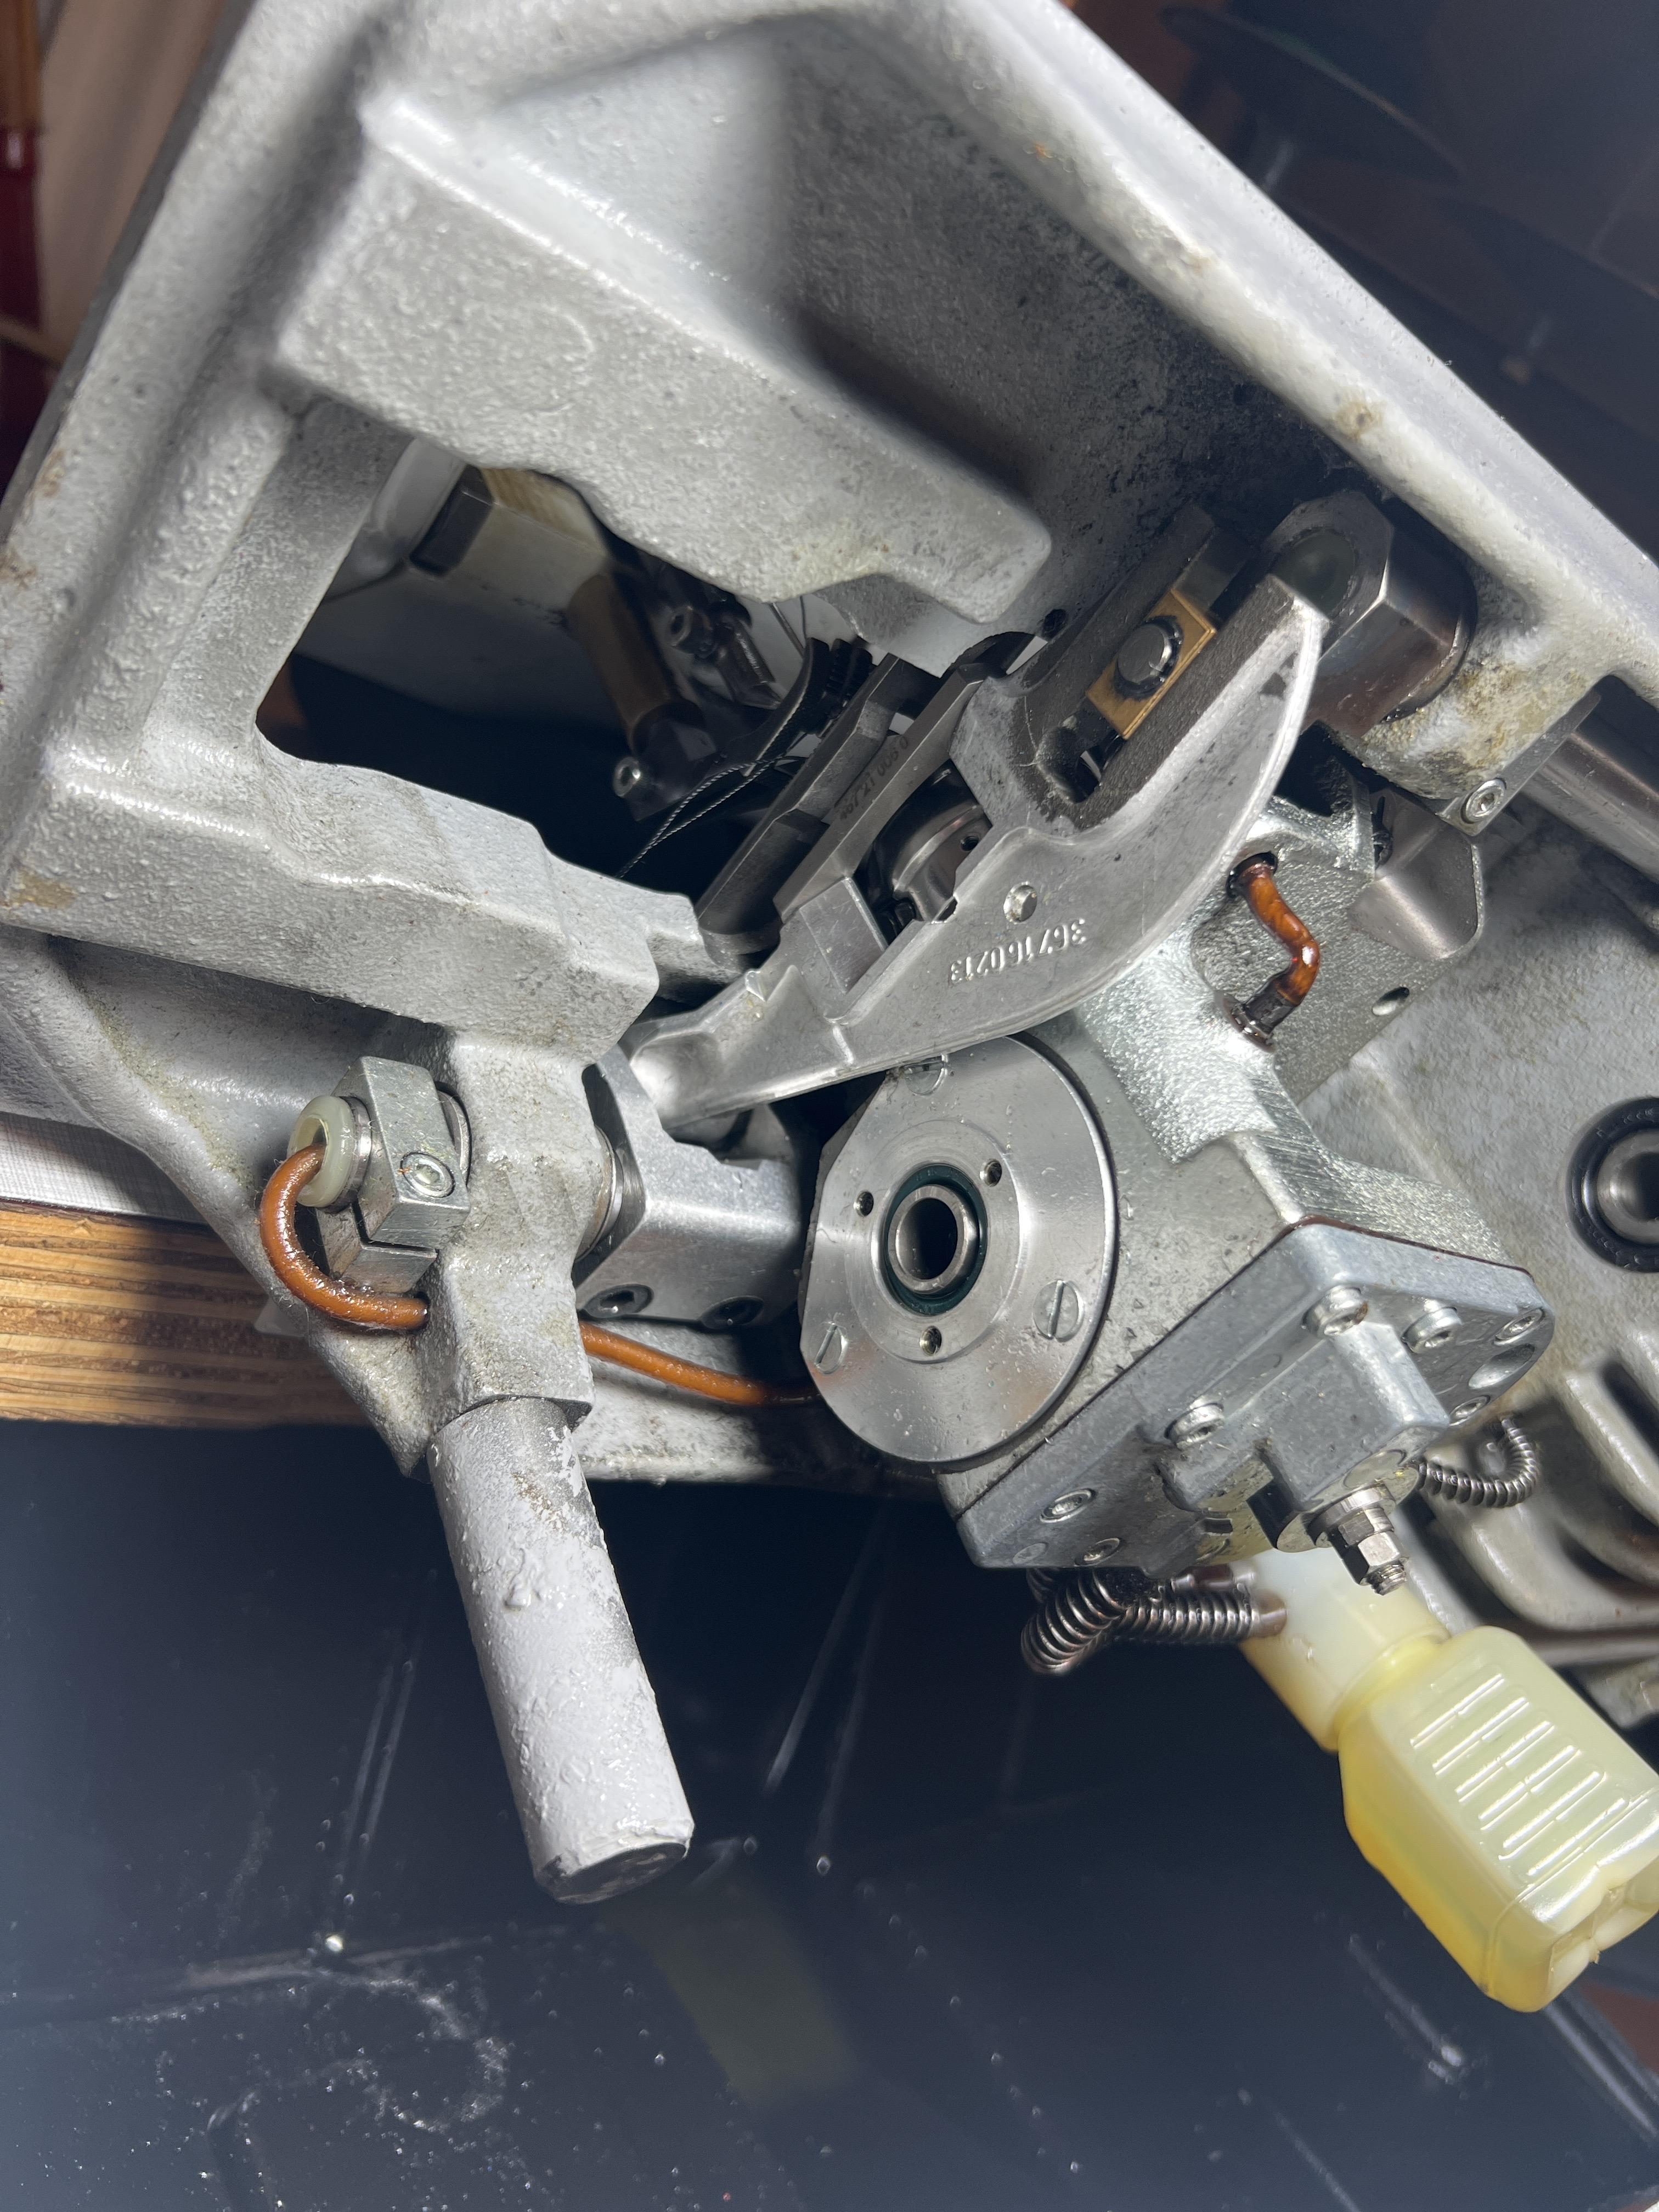
It's been a while since I was here. I have gotten a 29k58 machine. For some unknown reason a previous owner took out the front shaft that allows for the balance wheel to be mounted on the front. The hub is still there. The part numbers are 82008 for the shaft and 81869 for the gear. From the research I have done so far it seems that those parts are the same on most if not all Singer patchers. Can anyone tell me if they know if those parts are still available, even used. And if the parts from an Adler or some clone would fit.
-

where to buy parts for Adler 30-7?
Constabulary replied to TakashiOkada's topic in Leather Sewing Machines
I may have the parts. Can you send me a list of what in particular you need? Please send me a PM message. -
What do you think of the Mitsubishi DU-105?
Zonker62 replied to Zonker62's topic in Leather Sewing Machines
@KGG Thanks, it's night time now a comin' but I'll do that tomorrow. If I understand well, you want a close up of the thread going from the spool to the needle while the hook is passing by? I'll try to make some shots but it won't be easy.. You gave me a hint, needle bar height? Will post tomorrow... Have a good one! -
What do you think of the Mitsubishi DU-105?
Zonker62 replied to Zonker62's topic in Leather Sewing Machines
Thanks Northmount! Cool! -
What do you think of the Mitsubishi DU-105?
kgg replied to Zonker62's topic in Leather Sewing Machines
Could you post a few photo's of your top thread from the spool to the eye of the needle. I think this is a fairly easy problem to solve. kgg -
Real Leather Brown Canvas Cartridge Bag
rktaylor commented on Bantoro craft's gallery image in Gallery- Our Leatherwork
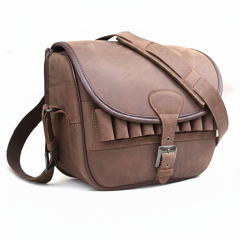 Thanks for sharing your work. I am planning to make a similar bag in the near future.
 -
What do you think of the Mitsubishi DU-105?
Zonker62 replied to Zonker62's topic in Leather Sewing Machines