Spinner
Members-
Posts
1,373 -
Joined
-
Last visited
Content Type
Profiles
Forums
Events
Blogs
Gallery
Store
Everything posted by Spinner
-
From the album: Three Mutts Customs pics
finished the color tonight on the fender bib for a 2007 Harley Road King Classic. Photo lighting isn't the best, but it's what I had for the moment.© © Three Mutts Customs
-
Thanks Chancey, I missed this post somehow but I'm sure I'll find a use for the letters at some point. Chris
-
I can't view the pic on Facebook but from the posts I'm guessing you made a bag out of veg-tan leather using traditional fabric sewing techniques? If so, that is the problem. If you do a search here on the forum for bags you'll notice that pretty much 100% of the bags made from veg-tan leather are sewn with the stitches on the outside with an inward curving gusset. The reason is that veg-tan is known for taking marks (tooling) easily, especially when wet, and by sewing inside out and turning the bag it causes the wrinkles and folds you see. Due to the properties of veg-tan, they are now part of the bag's story. For bags that can be made high fashion style bags, you'll want to use chrome tan or oil tan leathers as they tend to be lighter weight and resist wrinkles better and should a wrinkle form, it can be ironed/stretched out for the most part.
-
Help With Leather Sewing Machine Decision - Please!
Spinner replied to jcuk's topic in Leather Sewing Machines
The Cowboy machines are also good 441/205 clones, in fact our own Bob at Toledo Sewing is a USA dealer of them. Issues I see with that listing: first it is for the head only so you'd need to source the table, motor, etc. separately. Second is that it looks to be a drop ship from the factory which means it will not be set up to sew out of the box so you'll need to be versed in the initial set-up, which most folks are not. Cheers, Chris -
So, My Techsew 2700 Has Been Shipped
Spinner replied to Phatdaddy's topic in Leather Sewing Machines
Hey Andrew, Just as TT said, I do the same thing. Once I had the machine dialed in to a common & known setting, say for "6oz of leather, XX needle & thread size" that becomes my baseline. From there for the knobs, it would simply be a matter of dialing the knob all the way in, counting the turns and that is the setting number. The reason for going in versus out is that by going in you know the the knob will stop at a given and generally set point. Going out, you may not recognize when the knob reaches the ends of the screw threads thus counting an extra turn, etc. Be sure when you have the tension knob bottomed out to mark the knob & machine to identify "top dead center". So say for your known setting it is 9 counter-clockwise (ccw) turns to loosen to the correct point from zero and you need to switch to a different needle/thread. Simply change them out and start adjusting, counting the additional or less turns required and record it. To test/confirm, return the knob to zero (bottomed out) and open it back up to the new setting. Make slight adjustments as necessary and note the findings. Note, not all settings are full turns. It's very possible to have 1/2, 1/4, etc. to get the thread to loop exactly mid stack. As with anything, always sew off a test piece of the new materials to ensure the setting is correct. It seems like a lot of work in the beginning but later on when you need to switch confidently and quickly, one look at the notes and a few turns and you're done. Cheers, Chris P.S. - to make things more frustrating, different leathers of equal thickness may have different settings. Example: 12 oz of veg-tan is stiffer than 12 oz of lamb and will require a slight adjustment to the tension. -
Yes to both. As for using on bike gear, I use the waterstains as a 'top color coat' to Pro Oil dyes as my base/penetrating coats. Pro Oil dyes, while they penetrate well and look great still have a residual golden tone no matter how many coats and I have never been fond of the "dye blue first and then black" trick as you get a midnight black, not a coal black. Most OEM bike parts are coal black vinyl so matching is important for my bibs and such. Two light coats of the Waterstains Black over 3 wet-on-wet coats of Pro Oil dye gives excellent penetration, the dark solid coal black color and no color variation. I do this on all my bibs, tooled or blank and have used it with paint brushes to outline some of the two tone paint jobs I do like the POW/MIA logo like this: Here are a couple to show the color difference: Pro Oil dye only: Pro Oil + Waterstains As you can see, the color of the black is so much more true in the second one it almost fades into the black paint job, that's how I like them to look. Cheers, Chris
-
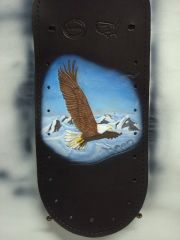
From the album: Three Mutts Customs pics
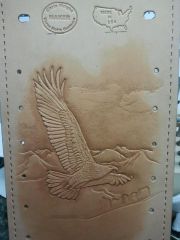
Eagle soaring over snow capped mountains. This is the tooling for a 07 Road King Classic rear fender bib. Full color and 12mm spots to be added soon.© © Three Mutts Customs 2012
-
So, My Techsew 2700 Has Been Shipped
Spinner replied to Phatdaddy's topic in Leather Sewing Machines
Welcome to the club Phatdaddy! I've had my 2700 for 5 months now and love it. First bits of advice: #1 - Do not attempt to adjust the presser foot or thread tensions until you are fairly confident you have a grasp on the process. #2 - keep a pad & pen handy and make notes of the adjustments as they are made so you can reverse them if necessary #3 - make one adjustment at a time and run several test stitches with it to be sure it's what you were trying to do: yes, move to next step - no, refer to #2 Unless of course you want to drive yourself bats**t crazy and like talking to Ron a lot, then by all means just start turning dials thinking you can "figure it out as you go". Not that I did that or anything, just sayin'... Once you get everything figured out, keep the pad handy. I make notes all the time, what tension adjustments for what needle/thread size, what presser foot adjustments for leather thicknesses, etc. Ron has a good needle/thread size chart on the website too. I can give you help/pointers where I can, just drop me a PM with questions. Cheers, Chris -
Thanks Ferg!
-
A few more from the last two weeks: 2006 Honda VTX1300R Whaletail tank bib & grip cover set with matching Fleur de Lis tooling & double buckstitch 2007 Honda VTX1800F Whaletail tank bib with 12mm chrome spots & tooled & colored "VTX Knight" logo 2004 Honda VTX1800R Whaletail tank bib with Punisher skull & VTX logo tooling In process still, this is the whaletail tank bib for a 2003 VTX1800C with tooled & colored V-Twin heads & bike name. Will be part of a 4 piece set, tank bib, side covers, fender bib & backrest pad of similar theme
-
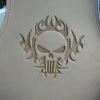
I just realized it's been awhile since I posted new works here so here's the highlight reel from the past few months: 2008 Honda Shadow Spirit 750 tank bib & side cover set. Blue lambda inset stars with silver stitching. The pockets in the side covers are a custom item I do and are fully functional. Pics taken by the owner in front of Cowboy's Stadium, TX. 2011 Harley Davidson FXS Blackline rear fender bib with swan icon tooling 2002 Honda Valkyrie 1500 Standard Whaletail tank bib with Shiner's logo tooling & acrylic painting. The bag flap was laser engraved by my friends over at Chester Mox with the client's club name. 2003 VTX1800R Whaletail tank bib with VTX logo tooling 2010 Honda VT1300 tank bib & backrest set with gray stingray inlay & pebble chaos tooling 2007 Honda VTX1800F Whaletail tank bib with VTX 1800 tooling 2006 Honda VTX1800R/S Whaletail tank bib with 12mm chrome spots & tooled & painted pink ribbon Fun close up of the VTX1800 tooling A couple of other toolings for tank bibs that I haven't gotten pics back of them on the bikes: Punisher skull with tribal flame background U.S. Army Senior EOD Insignia Enjoy! Chris
-
Backing For A Tank Bib 'n Fender Cover....
Spinner replied to Mudruck's topic in Motorcycles and Biker Gear
Yeah, I can see how that would mar the paint a bit, LOL. One of my first clients did the spill Coke thing and then pointed a finger my direction. It wasn't until I asked for the bib back for inspection and pics of the affected area on the bike did she admit the true problem. Since then I make sure to include a "care & feeding" bit in my correspondence discussing the same as above with the final delivery email. You're right though, most folks put them on and forget about care & cleaning only to realize years later they never cleaned underneath, essentially turning their custom bib into the equivalent of a brillo pad with road dust & other crap. -
Backing For A Tank Bib 'n Fender Cover....
Spinner replied to Mudruck's topic in Motorcycles and Biker Gear
I respect your right to your opinion, but to be fair David, there is a major difference between "chewed up, toasted paint" and slight discoloration or faint, buffable marring. The latter is what folks should expect a well made and properly maintained tank bib to cause happen to paint. I have never said that a tank bib won't leave some kind of a mark, to think so is simply delusional (leave anything on paint long enough it will leave a mark just from sitting in the sun). However, proper maintenance of the bib & paint underneath will reduce marking greatly, this includes regular cleaning of both. The method I describe above is the best way I have found to reduce the marking to a minimum for those that prefer bibs for their look and/or utility. After having various bib styles on my personal bike for 7 years, 3 of those have been my own bibs, and being able to correct any marks with a bit of buffing & polishing when needed; the difference in having one on and not on a frequently ridden bike is negligible. ----------------------------------------------------------------------------------------------- For my main clientele, they are looking for ways to keep jacket buckles, zippers and tank bags off the tank, which will do more damage, faster than any bib will. Other reasons are storage options and multiple ways to customize without committing to the look and cash outlay of a custom paint job not to mention those that simply enjoy the look of leather vs. custom paint. Another common reason for a bib, whaletails in particular, is on the larger bikes, like the VTX1800 with their very wide tanks, is that chaps and jeans commonly rub the rear corners and paint can literally be rubbed through in less than 1-2 seasons for a everyday rider without something to buffer it. Different strokes for different folks... -
See, the cup is half full...you could have made the mistake on the quiver itself instead of just the trim piece! An extra quiver wouldn't be a bad thing either, worst case put it on etsy and/or ebay and make some $. I can sympathize though, awhile back I made a mistake on a tooling of a piece near the end of the tooling after I had spent close to 4 hours on just that part, not to mention the time and materials leading up to that. it was a total loss and I had to start over, didn't have a choice.
-
denatured alcohol will pull most of the resolene off the piece but not 100% so you'll have patches where the dye won't penetrate. if you go that route through, after removing the resolene & letting the whole thing dry for a bit you should be able to apply the new professional waterstains as they don't penetrate much if at all but provide a pretty even coverage. I haven't tested them on top of resolene but I suspect they won't adhere well. Careful on the alcohol application though, it's possible that if it gets to the dyed area too heavily it could pull or push the color through the leather. All in all, my best suggestion is to enjoy the brown one as is and make a new one for the two tone version. You mentioned having "just lost 3 days of my life" over this one if you had to redo it but in reality, you're a more educated person than you were yesterday because of the mistake and discussing it.
-
Dye won't work as it needs to penetrate to work correctly. With the resolene having pretty much sealed the project your best bet is likely going to be acrylics on top of the resolene once it has dried completely. It will be a little sketchy though as the resolene will have smothed over some of the pores & natural texture that paints & stains use to adhere to so be sure to use a good top coat over the acrylics to help keep them in place. FYI - resolene does not work well over acrylics, it has a minor solvent to it that likes to lift them. try Super Sheen or a similar water based acrylic finish instead.
-
Backing For A Tank Bib 'n Fender Cover....
Spinner replied to Mudruck's topic in Motorcycles and Biker Gear
Two to three coats of resolene (thinned 50/50, let each dry in between) followed by Pecard's Weatherproof Leather Dressing hand buffed in. I usually apply a second application of the Pecards before I box it up. -
Backing For A Tank Bib 'n Fender Cover....
Spinner replied to Mudruck's topic in Motorcycles and Biker Gear
Here's an example of one with the felt backing & the edge undercut. You can see by the top vs bottom that the lacing & leather is totally separated from the paint. One thing to keep in mind is to remind clients, no matter which technique you use, that tank & fender bibs should be removed everytime the bike is washed and the backing cleaned off. Road dirt & dust can accumulate at the edges of a bib & just underneath it and over time that debris will be come abrasive if not cleaned regularly. Now, most clients won't ever take their bib off or might do it once in a great while, but making it policy to remind them is a good practice. -
Backing For A Tank Bib 'n Fender Cover....
Spinner replied to Mudruck's topic in Motorcycles and Biker Gear
I specialize in tank & fender bibs and for mine I go the no-metal, felt backing route. Felt is easy to clean, lightweight and will compress under dashes and seats better than leather for those tight fitting ones. I use 6oz leather and wet form the bib at least partially to the tank where possible to avoid the curl non-formed bibs can get over time. The other thing to consider is the felt can be adhered to cover the lacing on the backside whereas leather needs to be laced in. The edges of the lace, if not buffered from the tank will leave vibration marks in the paint over time. I have a rear fender in the shop that had a fender bib on for 3 years without felt under the edges to show clients the marks those types can make. What I do is to make the bib 100%, laced edges and all and then use a high quality industrial/automotive grade spray glue like 3M 90 to glue the felt to the backside including over the back of the lacing. Then take a pair of very sharp sheers and trim the felt to the edge of the bib. If you hold the sheers so they angle slightly, you can undercut the felt so it still protects the paint from the lacing but doesn't show when the bib is mounted. I then stitch the front and back ends (where they will be hidden by the dash & seat) to keep the felt in place should the glue ever fail. The 3M90 is seriously hardcore spray adhesive so I haven't had a backing come off yet. Main drawback is it runs about $18/can and a can will do about 7-10 bibs depending on size. I use this same method for little pieces like fender bibs all the way up to my big whaletail tank bibs. Cheers, Chris -
Good to hear, keep it up!
-
Great to hear Ed. I have a few things like the shopping cart to finish up but I was able to finally finish the FAQ section last night so the information side of the site is 100% complete now. Now I just need that maul information...
-
It's baaaaack.... http://www.leatherburnishers.com
-
Woohoo! I should have the website ready to go for a midnight release tomorrow night and along with the new stuff I'll be adding a real online shopping cart to make ordering easier. For those curious, I'll be handling the tech/website side of things while Beary & Ed handle the manual labor & money and customer service parts. Since I pretty much live on LW.net though, feel free to hit me with burnishing questions too. Cheers, Chris P.S. - here's a pdf of the announcement for anyone wanting to share via email, Facebook, etc to pass the word along: lb_re-opening_announcement.pdf
-
The wax dip trick does work, apologies, I thought you were going for "purposeful submersion" versus temp scenarios. Only drawback is that extreme temps can remelt the wax making the piece soft until it cools down. There are a number of folks here that make recreation wine & water skins and leather mugs using the wax technique.
-
It could be done by using a finish like Mirror Coat or Clear Coat that is sold in woodworking stores but the properties of the finish itself would render the piece with a hard, shell like finish and wouldn't be familiar as leather in feel or performance any more. I've used it on wood vases before to make them 100% waterproof but again, it ends up looking like Glendon said, a piece sealed in a hard acrylic shell. On the plus side, that stuff is also chemical & fire resistant once completely cured! How's that for survival gear?!


