


Spinner
-
Posts
1,373 -
Joined
-
Last visited
Content Type
Profiles
Forums
Events
Blogs
Gallery
Store
Everything posted by Spinner
-
So what did it look like?! I can't imagine one of your seats beating this one http://www.urheilukuvat.net/Show/HBS12/23454883_rhrQVs#!i=1895280989&k=sqXVxZJ for worst seat!
-
1. Look at the business' bank statement. 2. Set a goal like buying a new machine, tool, etc. and think of it as working towards that goal. 3. Space your orders out move evenly. Many times burn out comes from overbooking, taking that 'one extra job', etc. because you're thinking about the $$ and the possibility of that client going elsewhere if the wait time is too long. Get used to that feeling if you have any kind of a backlog. If your quality is high and prices are in the right range, most clients will be willing to wait, the ones that pitch a fit tend to either be impatient by nature and usually will end up with a crazy request, change, alteration mid process anyway and then can't understand why it can't be done in the same time frame. Decide what schedule is good for you and your family and plan accordingly. I know it can be hard to resist a job when the cash in on the table but sometimes the best thing is decline a job that has the potential to set the shop back/behind thus making life crazy. Cheers, Chris
-
How Are Sales This Year So Far?
Spinner replied to Iron Pounder's topic in Marketing and Advertising
I've been booked solid 3 months out since last November so I'd say pretty well. As for CCs, check out http://www.squareup.com I've been using it for 6 months now without a hitch, rates are comparable and better than some and their customer service has been helpful when I needed it. It's great because you get a swiper for free to use with a iphone or android smartphone, no monthly charges, no minimums and if need be you can key in the numbers as well, which is what I do most of the time for phone orders. I'd say my business increased a good 20% just by adding that as an option along with paypal. -
First true Sheridan tooling on a 3MC tank bib coming up. A big THANKS to King's X for the patternwork!
-
LEATHER COVERED TELECASTER : BACK: GHOST RIDERS STAGE COACH ROBBERY
Spinner commented on chancey77's gallery image in Our Leatherwork Galleries
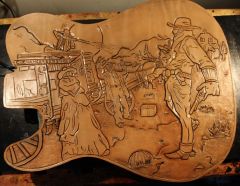 Looking good Chancey!
 -
Just a side note to further muddle the waters but I currently have 4 mauls (3 Bears and one AS) in: 9, 16, 21, 28 oz. The 9: light tooling/texture, 16: general purpose and all around tooling, 21: heavier backgrounding & basketweaves, 28: hole, slit and slot punching
-
Keep in mind, it may not seem like it but just moving up a few ounces makes a big difference. Most folks I know use somewhere between a 16 and 21 oz maul to tool. On larger toolings, even a 21 ounce starts to feel heavy...32oz (2lb) would have me taking advil after about 45 minutes. My heaviest maul is 28 ounces and that will run a hole punch or lacing prong through 12oz leather without much help from me. As for makers, my personal favorites are Beary & Ed "The Bearman" and Barry King makes a decent maul as well. The nice thing about custom maul makers is they can make the exact weight you want and provide a pretty handle too. The poly materials the Bears and King use are much better than rawhide IMO. As for tapered & straight, I like straight myself but some folks like tapered as you don't have to lift your arm as much to strike the tool. I like straight simply because I don't have to worry about lateral glancing of the maul head if my arm is out of position. Cheers, Chris
-
Only solution that I know of. Some leathers have a finished back but it doesn't look nearly as clean as a real grain side.
-
I think PLO1 has it. If you look at the far left of the photo at the end of the strap right before the button you can see 3 distinct highlighted edges in the black. A single piece of leather wouldn't cast that many.
-
If it helps any, this bag was sewn on a Techsew 2700. The leather thickness ranges from 3-10oz and thread sizes from 69 to 138 were used on various parts. Should give you a pretty good idea of what's possible on a cylinder arm with a flat bed attachment. The motorcycle tank bib and side cover inlay were also sewn on the TS2700, 6oz cowhide & 2oz lambda using 207/138 thread combo.
-
Just got a request for a whaletail tank bib with dual 1911 Colt 45 holsters and two mag holders integrated into it...no so sure about that one.
- Show previous comments 4 more
-
How much tank would this have to cover just to *hold* 2 .45's?
-
If ya make it, be sure to post it.
This, I *gotta* see!
-
I went with LNL's thoughts and declined the job...I can just imagine what he could want this for aside from the 'holy crap' factor.
-
It should definitely help with your hands McJeep, and worst case scenario, you can always grab the traditional knife for any areas the TB doesn't work in and then switch back. One thing you'll find out pretty fast is the realization of how much we (people in general) over shoot lines & such on curves. The part that will take the most practice with this kind of knife is the U-turn as you notice right away your mind & hand have a tendency to want to close the circle. have fun!
-
Hey Renee, That's coming along nicely! I missed the post originally (haven't been on the forum much this last two weeks due to serious shop backlog) but glad I came across it. On the long thin lines, a trick that can help is to use a temporary mask. Basically get a 3 x 5 card or thin plastic and butt it up against the edge and then draw paint. Simply slide the mask along with one hand as you paint/draw with the other. Crisp lines with no tape residue and less clean up. As for the super sheen over dressing, it does work somewhat but make sure to let the dressing soak in well and buff off as much excess as possible before applying the SS. Using a hairdryer on the piece to warm it and get the dressing to pull in deeper should help too. Heat, buff, let cool, wipe off excess, polish with clean rag. Glad to help on the airbrush info, which did you end up getting? Cheers, Chris
-
Interesting idea, taking a pattern cutting knife and making it bigger for leatherworkers. New idea for the application, but not a new knife design/idea. I've been using similar knifes for pattern cutting masking film & mylar for airbrushing for years. There is a definite learning curve as folks will likely find and as Electrathon mentioned, they work best with an angled blade and being held very straight. Tilting them for undercut curves or for using a straight blade will work but they cut can get choppy and hangup as the blade will want to cut deeper if laid over on it's side at all. The knife will also want to track in materials with a grain pattern so you'll likely find that on cheaper leathers or if using a not-so-sharp blade following a line will require more concentration while you compensate. On the plus side, with enough practice this type of knife is great for intricate patterns and follows exactly where your hand leads it so push and pull cuts should feel exactly the same. It's not magic though, if you can't draw a straight line or flowing curve with a pencil already this knife won't change that for cutting. The concept is like a tractor trailer, the trailer follows where the cab goes. Knowing both types of knives pretty well though I'll stick to a traditional swivel knife as there are too many variables that can affect the path on this new style since you don't have 100% control over the blade movement. (not to mention at $140 it should come with a basic blade at least...very pricey for just the barrel IMO). Want to give the knife style a try before shelling out big bucks? Xacto has two versions of swivel knives both for around $10 each. They have different style handles but will still give you an idea if you like the "trailing cut" style of cutting versus traditional. Any decent craft store will carry them, just look for "XACTO - Craft swivel knife". Cheers, Chris Cheers, Chris
-
The 16oz is what I use for tooling on 4-9oz leathers, which is why i say it's a good all around maul. 14oz should be fine as well but the extra is nice to have occasionally. I also have a 9oz for very light leathers and for fine detail tooling and a 21oz for heavy backgrounding/basketweaves, etc. along with the 28oz for punching. Worst case, if the 14 oz ends up being light later on you can always get a second one!
-
16oz is a great all around maul for tooling, light punching, etc. For strap ends, hole punching in thicker leather, etc. a 28-32oz should be perfectly fine. 48oz is a pretty beefy maul unless you're using cheap/dull tools or your leather is extra thick (12oz+).
-
My Hidden Snap Tutorial.
Spinner replied to jlaudio29's topic in Gun Holsters, Rifle Slings and Knife Sheathes
Looks like the link got muggled up in the posting...here's the corrected link: http://s138.photobucket.com/albums/q261/jlaudio29/Hidden%20Snap%20tutorial/ -
One of my pieces made it into a regional motorcycle mag gallery from the Memorial Day rides...a small step in the right direction! http://kickstandup.smugmug.com/2012Events/05282012-The-Ride-to-Remember/23247987_njBVTn/1874936283_2cNwjn7#!i=1874936283&k=2cNwjn7
- Show previous comments 4 more
-
Rad
-
Thanks folks!
-

Fantastic! I went to the site. Impressive!
-
I find it very interesting that some folks have issues with Oil dyes. To date I have had no issues with rub off (except with USMC Black) and I use it exclusively on my tank bibs - I go through at least one 32 oz. bottle a month. Some of those are very large pieces that I expect folks to rub against quite a bit so rub off is a huge concern. First a few questions - are you using the dye from the 4oz or larger bottles? Did the bottle look newish (no dust, etc) in the store when purchased? How long has it sat around the shop? Did you use a deglazer or at least clean the piece with alcohol prior to dying? I have found that Pro Oil dye acts a little differently than the others when it gets old. The carrier medium stays liquid, unlike the others that simply evaporate, but gets thicker as time goes on after opening the bottle. Left long enough, it turns the consistency of mud before it even starts to dry out. What this means to the end user is more pigment - less carrier and thus less penetration & more rub off. Now, if it still looks 100% good and flows like water then it may be the application method. Of all methods to apply dyes, I have found the good 'ol trimmed wool scrap to work the best. Paint brushes, daubers and rags tend to apply a thinner top coating layer whereas the wool scrap unloads the dye very well as soon as it hits the leather (or your hands, clothes, etc). Saturate the wool scrap, rub on in a circular motion, overlapping the last areas dyed by 50% or so. Let sit for 10-15 minutes and apply a second coat in the same manner. The piece will feel pretty 'wet' and soft. After the second application, I use the unloaded wool scrap to 'massage' the leather and remove any extra pigment. Seems odd to use a wool scrap previous loaded with dye to remove pigment but it works. Now, without letting it dry completely, apply a generous coat of Neatsfoot Oil using a new cloth (I like diaper cloth or automotive polishing rags for this) and saturate the piece using the same overlapping circular motion. Let sit overnight. When you come back to the piece, use a fresh rag and buff the surface, medium pressure in the same overlapping, circular motion. There should be very little rub off at this point. Apply a good finish like Resolene, Saddle-Lac, etc. (matte or satin finishes are also fine like Bag-Kote, etc) per the instructions, let dry. Last step, apply a good leather dressing like Pecard's and rub in well & buff to finish. Personally, I'm not fond of the just oil & beeswax finish on a heavily dyed piece. Wax never truly dries and wears off easily. On hot days it can reliquify easily and if it's absorbed enough of the dye during application, the rub off/buffing of the wax will come off tinted. Heavily dyed pieces that are intended to be handled or come into contact with often should have some kind of a sealing top coat, but that's my opinion. That's my process, other will undoubtly differ so take it with a grain of salt. Cheers, Chris
-
I own knives from both and believe you'd do good by owning either one. They both make quality knives and both stay sharp and cut well. They use different materials for their blades, not sure what all the metalurgy details are. You mention wait though and that may be the deciding factor. Last I checked Terry was shipping orders within 1-2 weeks. I believe LW states on their website they are 7-8 weeks but it wouldn't hurt to double check after Sheridan as they may have stock left from the show (doubtful but worth asking).
-
I started with mallets like everyone else but switched to mauls once I had the opportunity to use a good one at a friend's shop. A maul is just a bit more versatile, you can swing it like a hammer or bounce it more traditionally in the side rap method where the maul weight does the work, not your arm. For tooling this is awesome. I have 2 currently with 2 more on the way. I started with a 16oz for an all around tooling maul and then added a 28oz for hole punching, light stamping and heavy backgrounding. I'm adding a 9oz and a 21oz to round out the set, the 9 will be for fine tooling and the 21 for heavier tooling the 28 is just too heavy for like basketweaving. Hope this helps. Chris P.S. - Aside from the 16oz Al Stohlman maul I have, the other three will all be Ed "The Bearman" mauls. Ed does great work and his maul head material is great stuff. My 28oz, even though it's used a LOT on a daily basis doesn't even look like I've used it more than an hour. Should last me years and years.
-
Trigg Brothers carries this one: not sure if that was what you were looking for though...
-
Looking good Ed! Let me know how much for #3 if it's available when they are done. Chris
-
Thanks for the clarification. I knew I wasn't picturing that correctly.
-
I'm not a holster maker by any means but in reading this something strikes me as odd and not very user friendly: Now, I'm trying to envision this and it would seem to me that these three things make this the most unusable holster imaginable. If I'm reading this correctly, he basically wants to have to dig into his butt crack to grab his weapon? Not to mention in the case of an accidental discharge he could potentially head shot the person next to him. Please educate me as something seems amiss (but a funny visual at the same time - not the head shot, the first part).


