Spinner
-
Posts
1,373 -
Joined
-
Last visited
Content Type
Profiles
Forums
Events
Blogs
Gallery
Store
Everything posted by Spinner
-
That's the goal for today!
-
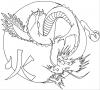
Here is the line art for the seat design I am working on for Jen's bike. It was about 3 hours in the making, it's based on photos of various dragon statues and bronzes in the gardens of some Japanese Temples. If you read the dragon styles thread, you can see that I did enough research to put together a drawing of a female Japanese dragon, the final piece will hopefully be red and the kanji character in the lower left is the symbol for fire. Enjoy! Chris
-
Another option for sharpening & polishing is the JoolTool system. It's only $279 for the starter package and additional discs are fairly inexpensive. http://www.highlandwoodworking.com/index.a...amp;ProdID=7280 I used to do woodturning demos at woodturning shows & symposiums = a crap ton of sharpening. About 3 summers ago, I had the opportunity to be a guest demonstrator in the JoolTool booth at the Las Vegas AWFS show and got to know the system pretty well (8 hours a day, 3 days of nothing but sharpening various tools). Just thought I'd throw it out there, with the right discs, it will do more than just sharpen and is well worth the money. I love mine. Disclaimer: I am not affiliated with the company at all, I simply did one weekend demo for them and fell in love with the system.
-
Glad someone enjoyed learning about them... I should have the line art for my first drawing ready tonight. I'm going to start practicing the design for application on the seat but I'll share the line art early for folks to check out.
-
Just thought I would share some of the information I have come across on dragon styles in the last two days of researching Jen's (my fiancee) motorcycle seat. There are two themes of dragons with variations all over the place. Asian-Indo and European. Being mythical, they can be pretty much made to look however you want, but if you're going for traditional or historical based on one of the two originating styles here are some tips: Asian: Generally do not have wings, they were believed to either mystically appear where ever they wanted or simply floated on the wind as they were believed masters of the elements. The 5 main colors for them are green (earth), brown (wood), blue (water), white (wind/heaven), red (fire) and gold (metal/wealth/prosperity). For Asian dragons, the number of toes tells where it is designed for. Chinese - 5 toes Korean - 4 toes Japanese - 3 toes To tell if it's male or female, look at the tail. Female dragons will have a fan-like plume at the end while males have a bladed or pointed end. Both males and females typically have beard-like whiskers and a wild lion's mane of hair. They usually have just one head, but there are references in both Chinese and Japanese folklore of the first dragon king having 9 heads and tails. Some stories have him with one head/tail and his daughter having 8 or 9. The globes you see in many pictures are pearls, believed to be part of the first dragon king's treasure...likely being protected.
-
Have you tried the new Bing.com image search? I had been looking on google for the right pictures (unfortunately having read up on "traditional" dragons and my fiancee being 1/2 Japanese, it's gotta be technically correct as well as nice looking) and found a lot on google but then yesterday tried Bing and whoa! A whole ton I hadn't seen showed up in the search. Ended up drawing my own last night based on pictures of statues & bronzes from some Japanese Temple gardens. I really like how you got the colors to fade from a golden hue to red then to black on the seat, it looks awesome that way. Could you give a quick overview of how you accomplish that? I'm still learning about dying processes. Thanks, Chris
-
Very cool Roger. The braiding looks awesome too. I'm in the process of designing a dragon themed seat for my fiancee's bike right now and hope it turns out as well as yours did. She wants a traditional Japanese Tatsu dragon though so finding good photo references is a pain!
-
Check Bobocat's previous posts TF, and look closely and you can see the beveling around the outside of the main piece. It's leather and he's just that good at carving/coloring it.
-
Hey Kings, I was fortunate to sit in on Wayne's lesson. Definitely gave me reason to practice my swivel knife technique more! It was pretty straight forward too. He simply had a floral pattern that was mostly scrolls (5" x 5") and gave us just the major outlines to use as our pattern. We traced the pattern and then cut it in with our swivel knives. Once we had all the outlines, he gave us the interior details via a photocopy and we had to freehand the details with our knives without tracing them first. It was great practice for judging placement, shape and technique. Next time I talk to him, I'll ask about posting the samples used in the lesson. Chris
-
Thanks Kevin & Luke. Kevin - the design I worked up was based on a historical sketch I found and some reproductions. As for the buckle, I had planned to get an antiqued one but by the time I got to that part of the project I realized Father's Day was right around the corner and I didn't have time to get one (my fiancee found this one at Joann's last minute). I've already ordered up matching buckles for future ones.
-
Here is the Possibles Bag I made for my dad for Black Powder Shooting. This is the bag that I posted the pattern for about 2 weeks ago, worked out pretty well. I did forgot to put a second pocket inside the bag but for my first bag ever it's ok, if my dad really misses the pocket, he can ask for a new bag at Christmas! The bag is tan Elk hide with brass d-rings and buckle. The dark brown pieces are 4oz veg tan dyed with Fiebings Dark Brown Antique Dye to give it a slightly worn look. All hand stitched with artificial sinew. Chris
-
skull bag
Spinner replied to Scary Leatherworks's topic in Purses, Wallets, Belts and Miscellaneous Pocket Items
Now that's really thinking out of the box! Cool idea. -
HELP! New pan.... New ground for me
Spinner replied to KliffsKustomHouse's topic in Motorcycles and Biker Gear
Ah, the infamous Honda Spirit 750 seat...I know your pain! Mainly because my fiancee has a '06 Spirit and I eventually want to make a seat for it or recover the existing one. At least the owner was cool enough to reshape it and cut the pillon off! I don't have any advice yet, but look forward to what you do to it. The factory vinyl is held in with staples, but I read on here that using rivets with washers works well. The pan sits pretty close to the frame so that should help. If you need pictures of the bike with the seat on or off for photo references, just let me know. -
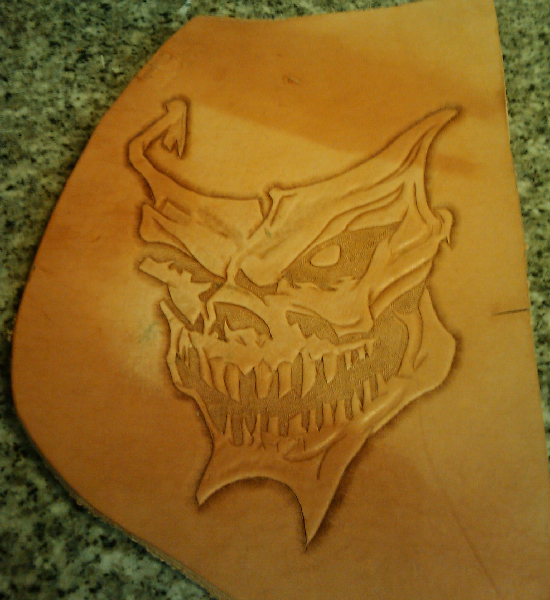
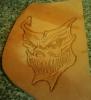
Thanks guys. Madmax - I had thought about that but didn't bother since the piece had extraneous cuts from other projects already anyway. That and it was 8:30 pm when I finished tooling it. Spider - I'm not quite sure yet, mentally working on a background design to go with it but it very well could end up as a seat design or a patch.
-
I came across a piece of leather than had gotten into the sun a bit so it was discolored and figured it would work for a practice piece. Now I wish I had used some good stuff! I'm pretty happy with how it came out. Unfortunately due to the discoloration, the highlights are a bit off on the left side, but it looks nice in person. Of course, being a practice piece I decided to see how it would look all black and kind of regret that now, but cest la vie...I can always do another one! ~Chris
-
Vinegaroon progress
Spinner replied to mikeymoto's topic in Dyes, Antiques, Stains, Glues, Waxes, Finishes and Conditioners.
I'm new to leatherworking, but this is the same process that is known in woodworking as "Ebonizing" oak and such. The main difference is that the wood is not soaked in the solution. A mostly sealed box (fume box) is made and the vinegar/iron mixture is put together and once the metal is broken down to create the solution, the wood piece(s) are sealed in the box for a few days and the react is achieved just using the fumes. Not sure if it would work with leather, but for those folks having trouble getting darker colors with the simple soak method, would not a fume box work here as well? I'm not sure if leather reacts the same way as wood does to just the fumes, but soaking and then fuming may achieve an even darker color than just one method by itself... -
Very nice and very expensive choice in wood! I gotta say though, the client has taste!
-
You can also get a flexible ruler at most art supply or sewing stores. They are nice because they will hold pretty much any curve for drawing and will measure around radii when trying to determine lace length, hole layout, etc. They are plastic with a stiff core so they will hold a curve. Makes life nice if you need to get the curve from an object and then walk across the shop to put it on paper.
-
I know this is an old thread, but just wanted to say thanks Clay. I'm going to try the tooling in this order to see if it helps get the definition I seem to be lacking in some areas.
-
In reading through various posts, it's obvious that Kangaroo is the upper crust if not the best lace. I'm assuming stuff like the Tandy Vinyl lace is the lower tier but where do the other fall in? I'm not near good enough to use 'Roo yet but the vinyl stuff doesn't look quite nice enough to use on a finished project like the bike seat I eventually want to do. In the meantime, what is somewhere in the "pretty nice stuff but not 'roo" range that us poor lacking in skill folks could use to get decent results without breaking the bank? The lace names I have seen online are: Kangaroo Latigo Calf Suede Rawhide Florentine Vinyl Can someone give me a sort of grading system or simply put them in order from best to worst? And if I left something out, please educate me by adding it to the list. Thanks! Chris
-
Yep, that will be my first stop...I'm going to try and swing out there today or tomorrow after work before they close.
-
Thanks, I could just see myself placing an order wanting the smallest one and getting the largest one. LOL. Now to figure out which ones to get.
-
+1 to that...nice ride! The new seat does it justice.
-
Hmmm....wonder if one of my non-CA relatives can get ahold of some. Not for me of course...hehe
-
This is probably a pretty obvious question but coming from a hobby where tools were anything but standardly sized I wanted to make sure before I buy the wrong tool. On Barry King's website his bevelers, for example, are listed as sizes 0-4. I'm assuming 0 is smallest and 4 is largest. Is this correct? TIA Chris