Spinner
-
Posts
1,373 -
Joined
-
Last visited
Content Type
Profiles
Forums
Events
Blogs
Gallery
Store
Everything posted by Spinner
-
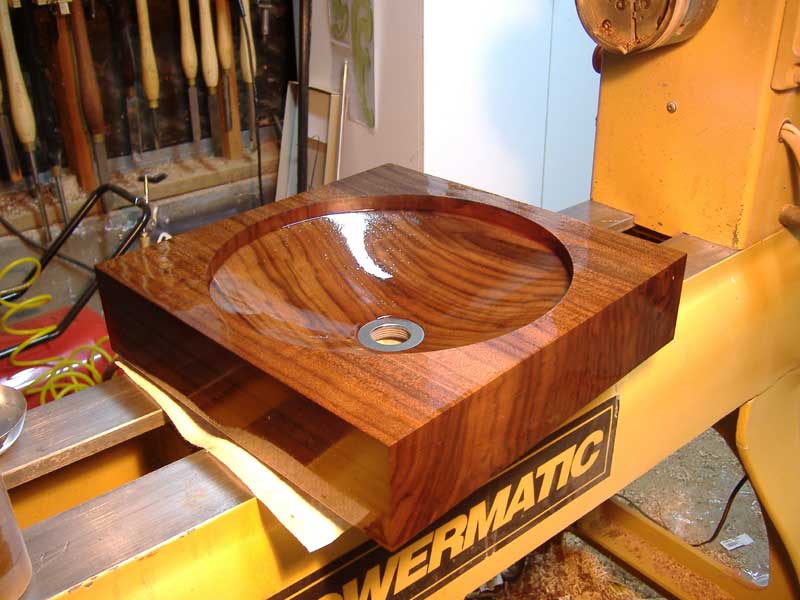
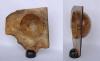
Thanks Tim. The leatherwork isn't quite up to the level my woodturning was but I'm working on it. Glad you like the sink, it was a pain to make. It actually maxed out my big lathe as the corner-to-corner size was almost 19" and I only had 20" of clearance...having 3 1/4" thick corners whipping by your face and hands and 1000 rpms will surely wake you up.
-
Depending on the spindle size, you might be able to put something together fairly cheaply. The easiest solution would be to simply have someone turn you a wheel from walnut or cocobolo that you could replace the pumice wheel with. You would want it turned so that the side grain ran along the outside of the wheel though as the end grain doesn't burnish as well and will just soak up the wax, etc. The other option, which would be slightly trickier is to have someone turn a spindle type burnisher (someone here does them, can't remember the user though) and have one end drilled out to put a nut or threaded adaptor into it that fits the spindle.
-
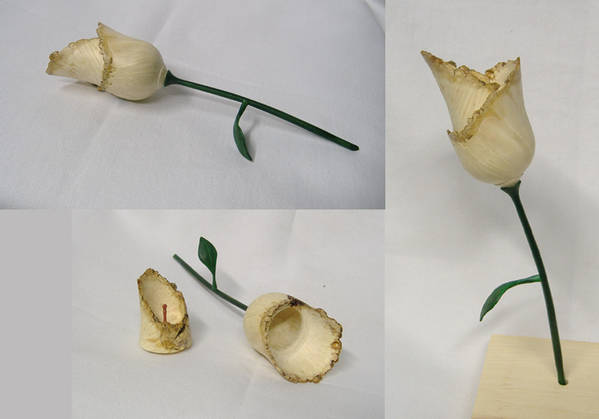
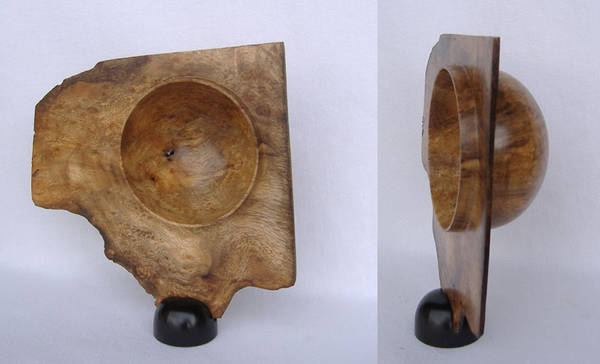
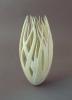
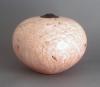
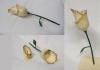
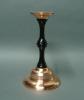
For those wondering about the woodturnings: 1: 7 1/2" tall x 4" wide, sycamore. turned, carved, bleached - had a small part in a local Indi film. 2: Maple burl hollow form with ebony collar and foot. 7" dia. x 6" tall, 1/8" wall thickness 3: Box Elder Burl Rose box with dyed maple stem & leaf - 7 3/4" Tall 4: Claro Walnut Sink - 13 1/4" square x 3 1/4" thick (single slab) - custom design for interior designer 5: Hand spun copper & African Blackwood candlestick: 8 1/4" tall x 4 1/2" base dia. 6: Camphor burl natural edge/square edge bowl. 6 1/2" width & height. Wing thickness is 3/32". The bowl is 3" dia. and 2" deep. Ebony stand.
-
I figured since I've been more actively involved lately it was probably time to give an introduction. My name is Chris and I've been working on learning leatherworking for a total of about 8 months. Currently living in L.A. near Eagle Rock with my soon-to-be wife (June 26th) and our 3 dogs. I started back in late 2008 when I was looking for a new hobby and decided that I needed a new motorcycle seat for my bike. So off to Tandy to buy a book, some tools and ask questions. Met a couple of good folks, found out about the local guild and spent about 6 months tooling around. Took a 1 day class from Bob Beard and one from Wayne Christiansen at Standing Bears trading Post and then about a month later had to step away from studies due to time and money. A year later (about a month ago) things got back to normal and I picked up my tools again and am all fired up to learn. Before leather, I have dabbled in a number of mediums including drawing, ceramics, acrylic painting, wood carving, some metal work, metal turning & spinning, computer graphics design and most recently woodturning. The woodturning bug lasted about 7 years, the last 3 I did mostly custom and one-off pieces on commission including a piece for a indi art film. My work & articles was featured in Woodturning Design Magazine and a couple of galleries & private international collections. I also founded and ran the popular website, Woodturner's Resource for most of that time. Unfortunately, in late 2007 a severe allergic reaction to a wood I worked with one day caused a pretty nasty skin reaction and my doctor suggested I stop out of fear of doing permanent damage. I still have most of my tools and play once in awhile but am a bit gun shy as I like having hands & feet still attached. I'll attach photos of work from my previous life at the end. I'm looking forward to one day achieving the same goals I had set for myself in woodturning via leatherworking and look forward to the journey & making some new friends along the way. Chris

-
A belated congratulations to the new family!
-
Troy - I knew there were books on the subject just didn't know which ones. Thanks, will check those out. Max - yeah, it's amazing what improvements come naturally just by having room to work! Hilly, thanks - hadn't seen that post yet but those are great notecards to print out and keep nearby.
-
Here's the second attempt at getting faces & the female form right...comments, suggestions & tips welcome! This one is about 125% larger than the last one to give myself a little more room to work & experiment.
-
Rattle Snake Skinnin
Spinner replied to badLoveLeather's topic in Exotics, Reptiles, Furs and others
Judging on the makeup of the solution, the acetone is just a secondary cleaner/drying agent. Alcohol is great stuff but won't dissolve some oils effectively. Acetone is slightly more caustic and will clean those left behind by the alcohol. The Glycerine portion is likely a moisture content replacement for the water/oils being cleaned out so the leather doesn't turn into cardboard during the process. -
First thing I can see is that your email and phone number are buried at the bottom of the page and don't appear anywhere on the contact page. Bring them both up to the header on the main page and put them on the contact page. Many folks will keep moving if they can't immediately see how to contact you. On the home page, you have a good number of pictures and good descriptions, adding "starting from $xx.xx" type pricing will help folks decide if it's in their range. General rule of thumb (at least here in L.A.) is if there's no price displayed, most folks can't afford it! I see you do have prices on the product specific pages but again, make sure your contact info is at the top of every page, including pages 2-3 levels deep in the website. Hope this helps.
-
Those bags look great Nomad. Always did like the Rune, it's a beast of a bike.
-
Soapy & water is also a popular woodturning trick for keeping green wood wet a few extra days. On the website I used to run, we had a member who was an amatuer scientist that conducted a few tests to find out if it was valid or just 'snake oil'. What he found was that the soap raises the evaporation point of the water just enough to keep the moisture content up a bit longer than the water by itself. An easy experiment folks can do is to simply wash your hands...first without soap and then with soap but don't rinse it off. You'll notice the soapy water on your hands takes much longer to dry. Ivory in particular does a better job of this because in the early 1990s they started to leave the glycerol in their soap (most companies remove it to eliminate the 'oily' feeling). Some little known facts about Glycerol that explain why soaps with glycerol are great lubricants: In motion-picture production, glycerol is used as a non-evaporating substitute for perspiration or tears on actors. For tincture extraction and preservation of essential oils and chemicals from herbs Glycerine is used as an anti-drying agent in watercolor paints. Glycerine is used as a preservative to keep tobacco mixture for use in hookahs moist. Probably more than you wanted to know, but I thought I would answer the why it lubricates/stays moist part.
-
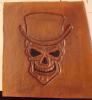
All black seat...tribal dragon head
Spinner replied to leatheroo's topic in Motorcycles and Biker Gear
THANKS ROO! I first saw the Pebble tools in the Cox seat tutorial on Bikernet and have been wanting them ever since I saw them but my local suppliers didn't have them or anything like them. Picking up all three. Love the seat design too, gonna have to try non-beveling carving and see if I can screw that up like my beveled work. -
Rare earth magnets (good ones) can be very strong. Generally speaking, they are like any other closure, too small and you won't have enough surface area on areas needing a strong bond.
http://rare-earth-magnets.com/ makes some nice ones I've used before and they have various sizes, shapes and thicknesses. For what you're doing I'd say go with something 1/2" o...
-
Yeah, it's one of those things I'm just going to learn to work around. We actually live in a house but the original garage was converted to another room that used to be the craft room. Cement floor + opposite side of the house was perfect for pounding away. However Jen's younger sister just finished college and needed a place to make camp while she sorts out her newly acquired adulthood responsibilities (job, car, place to live) so the craft room is now a bedroom and my gear is now in the rarely used dining room which has hardwood floors over the typical California crawl space so even just walking in tennis shoes echos. We actually get up at the same time (about 6am) but I generally go to bed around midnight, 3 hours after her which is where the time is. Guess I'll have to start slipping some bourbon into her drink at dinner so she sleeps a bit more soundly. Hopefully this is all just temporary but I have a suspicion I'm looking at a year or so of being the gender minority...hehe Most of this was just a rant out of frustration of the new 'living' arrangements. I want my work room back! You all are right though, there is more I can do...I'm still new so right now carving is at the forefront of my studies. I am studying up on the European 'pauting' technique though, which is 100% modeling tools so the time may come in handy soon when my supplies get here from Finland.
-
Ah, ok. Yeah if her scoot is baffled then it probably wasn't rejetted and likely won't need it. Just keep an eye on the plugs cause sometimes the Aeros can run rich if someone just slapped pipes on and didn't tweak the carb at least. (btw - the carb adjust screw is on the bottom of the carb behind the carb drain nipple. Takes one of those D-shaped tools.) If you're interested in one of those racks, let me know before you buy it. I may still have one in the shop...put it on for a while and then took it off as the bike progressed in a different direction. If I still have it, I'm sure we can work something out in trade or something. Yep, my bike is lowered 1 1/2" in the rear. Scootworks & Baron make the brackets and it's a cakewalk install. http://www.meancycle...ser&CompanyID=0 Note: if you shop at Meancycles, use the Aero 750 forum discount code: AERORIDER to get a 5% discount. I lowered mine to tuck some of the extra tire into the fender since I can't go with a fixed fender. If she is tip-toeing it though, it's definitely the way to go. There are a couple of companies scamming folks with a 'front end lowering kit'...don't buy it. If you want to lower the front (rear only is fine for most folks) let me know, the kits are simply sch80 PVC pipe cut to size to replace the OEM spring spacer tubes. I can send ya pics from when I messed around with all that. I'm also running slightly larger than OEM Metzler 880s to get a bit more rubber under me and to help fill out the fenders. I can look up the size if you want to check it out.
-
I had the chance to try Akvis tonight and it is simply amazing. The detail is great and the transfer of full color to b/w sketch was pretty much perfect. I'm going to try some of the others but unless the really perform I'll likely be buying Akvis. Thanks for the links! Chris
-
Making a Shadow quicker: yes and no. There are a number of things you can do that will improve performance but nothing to get huge gains without seriously modifying the heads and such and by the time you do that, you could pretty much buy a bigger bike. The Aero was really designed with retro touring in mind. Had I known then what I know now I probably would have gotten a different bike (I ride pretty agressively). A couple of things that are straightforward to do and reasonable cost are: re-jetting, different air cleaner/box, pipes, clutch springs and the infamous 4 degree timing mod. The pipes are taken care of as you mentioned. Something to check on the pipes though for Aeros (actually all current Hondas) is you can get full pipes or just the mufflers. If the pipes look like they are 2 separate pieces they likely only changes the mufflers - changing to full pipes will open it up some more. Rejetting and the airbox/air cleaner options are pretty straightforward in reasoning. Generally done at the same time as only doing one will throw off the power triangle, especially if the pipes are already done. The clutch springs won't make it faster but they will make it respond better off the line and through shifting. The OEM springs are pretty soft and don't allow for as good as possible response from lever to tranny. Barnett makes a nice spring kit for Aeros. 4 degree timing mod. There is a theory that by advancing the timing module forward by 4 degrees that it raises the power band by 2-5 hp depending on the reports due to the factory retarding the timing by about that much - air purity controls, etc. I did it on my bike and while I like to think it made a difference, I never put it on a dyno to find out. Long story short, the best you'll get out of it with mods and no heavy rebuilds is going to be 4-7 hp more than factory. Between it being a 750cc, single carb and other things like using a hypoid geared drive shaft (makes a 90* turn from tranny to final drive) instead of a chain or belt the Aero is really one of those bikes you get for it's style and ride vs. speed. Sadly, my fiance has a 750 Spirit which is the same engine only dual carb, chain drive and just those two things alone give it more umph than my bike but mine looks way cooler.
-
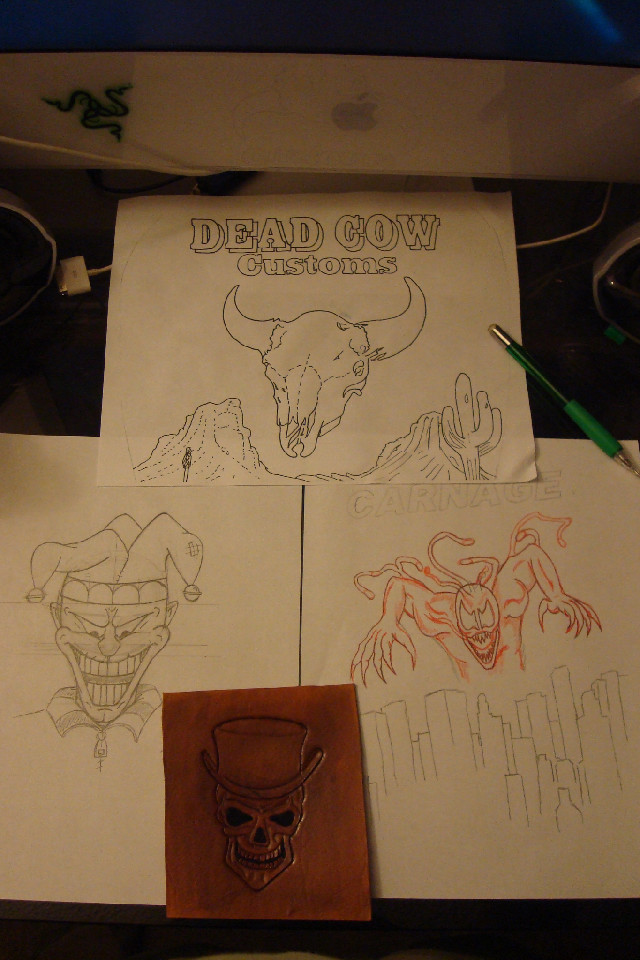
On most week nights, between chores, dinner and my fiance's earlier-than-mine-bedtime I haven't been able to carve much lately. So I tend to watch movies and draw/doodle designs for future projects. I do try to get some carving practice time in though, I just feel like I'm going nuts lately having 2-3 hours of absolute alone time each night but unable to pound away due to it being too loud (and having no garage). So a little vent & share...I've vented so here's the sharing...a couple of things I worked up the last two nights:
-
You status totally brought back memories, not sure if you meant it but they way it was worded sparked the memory! Thx!
-
Yeah, forming a seat (or trying to) with dry leather isn't fun, that's for sure. My new one is going to have another 1 1/2" of foam added to it as well so I'm glad I found out about wet forming. I'm also going to use better lacing as the stuff on the first seat was 3/16" square rawhide and it makes a pretty nasty seam to sit on (cuts into the back of my legs). I don't know how you keep 3 seats going at the same time, I have trouble finding time to get one started let alone more than that at once. My biggest issue now is trying to figure out a theme/carving for the new seat. I'm thinking the new one is going to be done with a "Maximum Carnage" Spiderman video game cover type of thing with Carnage rising over the city. I had that airbrushed on my truck tailgate many years ago and loved the look the artist did. (picture reference below) As for the 'mule', dump the rear pillon and the bike will looks loads better. There is a retro looking rack that direct bolts on that looks slick and gives you that much more strapping space for gear. http://www.meancycle...ser&CompanyID=0 First thing you'll likely notice when you rip off the cover is the sides are huge for what's needed. For some reason the foam extends past the sides of the seat a good 1.5-2". It could easily be sheared down to give the bike a slimmer look without affecting the seating position/comfort. Speaking of the foam, it's not attached really well to the pan either. You can actually pop it off the pan without breaking it to see if you want to attack reshaping it with all new foam. If it doesn't work out, simply pop the old foam form back on. Side note, if you need any info on mods/additions to the Aero, feel free to drop me a line.
-
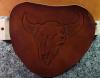
Queen Chaps - Left Leg
Spinner commented on mauifarrier's gallery image in Our Leatherwork Galleries
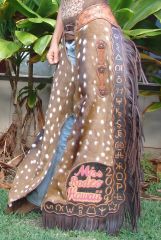 Pretty wild and alot of work from the looks of it. Also pretty impressive for your first leatherworking project!
 -
Thanks Billy, that was actually my first leatherworking project ever; so looking back (as I cut the old cover off it) I could see many places to improve. The leather was 5/6 top and sides and as you can see on the sides, I had to lace in in 2 sections since I hadn't learned about wet-forming yet.
-
Bowie Sheath /more Pictures Soon/
Spinner replied to pitman's topic in Gun Holsters, Rifle Slings and Knife Sheathes
Nice job on the gear and excellent photo presentation. Looks straight out of a magazine. The map is a great added touch. -
Yeah, there is about a inch of 'airspace' between the vinyl and foam on an Aero factory seat in the butt section. Mine is 6 years old and still has that space. A few years back I made a custom pan out of fiberglass that has held up pretty nicely and slimmed down the profile and width quite a bit. I'm in the process of re-foaming it and making a new cover. Here are the pics from making the pan. Part of the reason I am redoing it is it only has 3/4" of memory foam right now and I'd like a bit more cushion. That and my tooling skill is considerable better now so it could look much nicer.