Spinner
-
Posts
1,373 -
Joined
-
Last visited
Content Type
Profiles
Forums
Events
Blogs
Gallery
Store
Everything posted by Spinner
-
Since the majority of the topic is shipping, I just want to give props to Springfield Leather on this area. A few weeks back I ordered some of the pebbler tools and odds & ends from SLC, they gave me the price and all was good. I called back 2 weeks ago to order 2 extras of the tools so I can customize them into other shapes and when the girl gave me the total it didn't even equal the price of 1 of the tools. So when I asked why the bill was so low, she explained that the actual shipping charges on my previous order were less than what their shipping system estimated so they gave me a store credit for the difference. It wasn't a huge amount, but the fact that they were honest enough to give it back was enough to make me a very happy customer. That combined with the fact that I have had Kevin answer product question emails late in the evening, well after they are supposed to be closed, gives it a 'family business' feeling that I like.
-
+1 to 50's suggestion for Epilog. They make awesome stuff. The lasers are adjustable in intensity so you can burn/etch leather, wood, plastics, most metals, etc. They can also be programmed to do precision cutting on wood, etc (with minimal scorch marks on the edges). If there is a major woodworking show in your area they may even be there with live demos. A previous acquaintance of mine had one he used to engrave his co. name and such into his anodized aluminum tool handles. Edit: in the meantime, on brass plates, simply visit your local trophy shop or mall store like "Things Remembered" to have them engraved. Many times if you get a number of them done at the same time you can get a discount. They can usually turn them around in 1-2 days for decent prices.
-
woohoo! I was worried I'd actually have to work at the day job tomorrow...glad the forum is back runnin'!
-
Updated my design about a week and half ago to include more stitching, better lacing, new buckle style and a place for a concho. Got it posted on the motorcycle forum I frequent and got my first order today! Today was a good day.
-
 Excellent molding job! How the hell did you get it to wrap around all of those compound curves with no stretch marks/extra stitching?!
 -
On certain items recently (moderate to high wear) I have been adding an extra step to the process and it seems to be working out well. Dye > Resoline > Mink Oil > Fiebing's wax. The Mink Oil, in theory, should add a bit more water resistance to the piece. So far it has worked out nicely.
-
Sweet, I love the old Chevy and Ford trucks...hope to have one someday myself.
-
Nice job on the panel...not something you see everyday! So where is the picture of the truck itself?
-
Just a side note regarding kitchen oils. We experimented with a number of them in woodturning and Olive Oil (along with Canola and the normal cooking oils are not a good idea. Many have additives from corn, rice, veggies, etc. that will go rancid over time. Neatsfoot is probably the best choice for leather goods. However, if you're looking for an oil other than neatsfoot (allergies, etc) Walnut Oil is available from most grocers and is great for finishing products. Walnut Oil doesn't go rancid and will help resist some types of stains, particularly food/mold related. You can also find complementary Walnut Oil waxes for finishing/burnishing and it leaves a very homey, familiar smell that folks like. Here is a product I have used for years on food safe wood products and have tried a few times on leather with decent results: Walnut Oil Utility Finish Walnut Oil Wax
-
Simple but elegant. Very nice job, I'm digging the pattern at the nose.
-
Thanks for the offer Bex DK. I actually used to be a regular on a German woodturning forum so I picked up a good web based universal translator. Google Chrome also has integrated their translation service into their new browser so it's becoming even easier. They aren't perfect but everything is understandable enough to read. Some of the word-to-word translations can bring a chuckle to the 10 year old in me though.
-
Hey Dave, Yeah that is a good tutorial as well. I think I posted that link in a previous thread when I was researching the techniques to see if anyone had experience with these. I really like that the author shows both methods so we can see the differences in the two styles. by the way, the loop method they use on the Scandi sheath is pretty cool, it doesn't look like much but it holds really well when done correctly. Chris
-
There are a number of websites about Puuko knives and the sheaths for them, the problem is that most of them are in Danish & Swedish and have to be translated. A google search for Scandinavian knives brought up the first bit of info and then I started to find suppliers and professional blade makers websites that led me to the more specific articles like the one I referenced above. Thanks for the info on the book, I'll have to check it out.
-
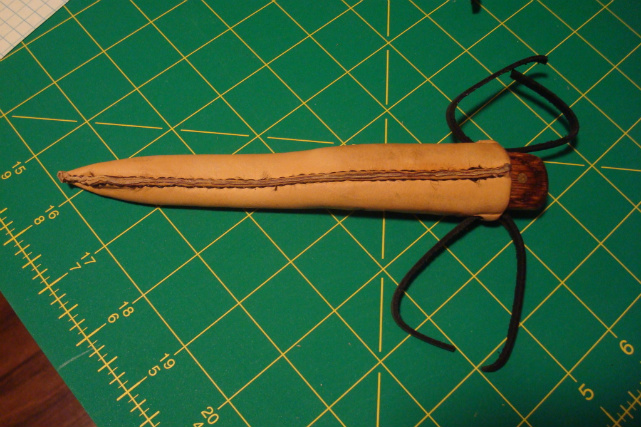
Here's a good picture of the sheath style I am trying to learn (I also purchased a blade to make one of the knifes) and a link to the article I used: Knife & Sheath by Jens Rahbek Jens Rahbek Sheath Making Article
-
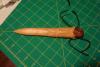
Here is my first attempt at a Scandinavian style knife sheath (my first knife sheath ever actually) and my first attempt at the European technique called "pauting". This style of sheath is a bit different than 'western style' sheaths in a couple of areas. First, the leather used is a special type called rautang (spelled slightly different with special characters) which is a type of half-tanned leather made in Sweden, Spain and Germany. Second, the seam isn't highlighted or prominent like ours as it is very small and hidden down the back side of the project. Lastly, and this has part to do with the construction technique, the sheath is wetformed around the entire body of the knife to to point that during the construction it can become difficult to initially release the knife from the drying sheath. Pauting is a centuries old technique of working the leather (specifically half-tanned) after the sheath if formed. The special leather allows the worker to move the mass around using molding tools & modelers to create ridges and from those ridges, the details are fleshed out (pardon the pun). No cutting and no mauls/hammers or stamps are used even in the very nice sheaths. Long explanation to show my simple first attempt. I had to relearn a few things as the techniques are slightly different from what we do here in the US but hopefully with more practice it will start to work out better as I really like the technique. I made this for my Dad for his neck knife he uses for blackpowder patch cutting, etc.:
-
Sometimes the simpler designs work better, I dig it. And, thanks for the tip about the round braid - not going under. I tried it last night and it's the simpliest trick but creates a whole different look.
-
Need Some Info On Barry King And Wrangler Swivel Knives
Spinner replied to cem's topic in Leather Tools
I have 2 of Barry's knives and one of the standard Tandy knives with a BK blade in it. I preferred BK's handles because he had a larger size than most and in my previous hobbies I was used to larger, heavier tools. He also did the heavier knurling for me on request. Haven't had a touch of problems with them and the blades hold a decent edge. I suspect if you have small hands the LWs will be better for you, especially if they are adjustable. I have the larger BK knives and they have the longer barrel (4 inch overall length) that is .625 inch diameter and weigh about 3.125 oz. The standard, non-adjustable Tandy knife (for comparison) is 1.25 oz. and 3.25 inches long overall with a .5 inch dia. barrel. -
Sounds like you just made your friend happy, got to do some extra leatherworking and have a mostly clean shop...sounds like a good day to me.
-
Thanks guys...now my fear is that in doing the other side I'll think of a better way/design and have to redo this one...LOL
-
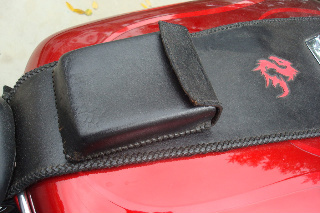
I finished my latest project tonight, well 1/2 of it at least. I've been long thinking about where to put more storage space for little stuff like Honda All-in-one tool, a bandana, etc. without adding a front tool bag or fender bag/saddle bags. So I started looking at 'dead space' areas of the bike, spots where there was just extra room. Lo' and behold, turns out there is a pretty good chunk of real estate being wasted behind the side covers. 1 1/2" on the right and 2 1/4" on the left to be exact. So, I put a call out in the bike forum I frequent to buy a set of covers someone wasn't using and went to work. After 2 days of some seriously focused planning and labor I now have the first 1/2of a set of side covers that are leather wrapped, hand laced/braided with a built in storage pocket. Here is the finished product for the right hand side cover (with the OEM left side cover for comparison) Here's a photo with the flap open: For those that want to see a few more pictures of the process, I set up a photobucket album: Aero 750 Side Cover Project
-
Thanks Joker & dscott!
-
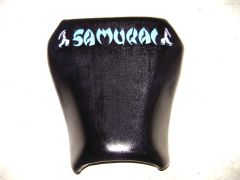
This is the new tank bib I made for my soon-to-be wife's bike. The original one I made was the first pocket I had ever made and ended up being a bit small and could have looked better. So in between projects this week I designed a pattern and constructed it. The carving is the japanese kanji for Fire. Her bike is bright red with flames on the tank, she also named the bike "Fuego" which is spanish for fire, so I went with the theme. The tank bib has a tribal dragon on it above the pocket and the seat, once done, will have a japanese dragon motif so it all kind of ties together. Yes, I've told her that her bike needs a serious bath... Oh and by the way, never let the 'customer' pick out heart shaped buttons...they are horrible to get to work right. New pocket: Inside shot: Old Pocket (photo attached)