Wizcrafts
-
Posts
7,801 -
Joined
-
Last visited
Content Type
Profiles
Forums
Events
Blogs
Gallery
Store
Everything posted by Wizcrafts
-
The post to which you replied with a question to the original poster is almost two years old: Posted 29 July 2012
-
You guys and gals can see the 1541 in action on YouTube. Various people post videos of their sewing machines in action. For those of you who are newbies to sewing leather and heavy canvas and vinyl, I have a video showing how a walking foot machine works, and another showing me sewing a rifle sling on my National 300N walking foot machine.
-
1: Yes, with system 135x16 leather point needles. 2: Yes, especially if you use Titanium coated series 135x16 needles
-
The trick to using home (domestic) sewing machines on leather is to use thin thread, like #69 bonded nylon, with a #16 or #18 leather point needle, a Teflon or roller foot, and sew no more than about 1/8 inch of soft to medium temper leather. This would be 2 to 4 layers of soft upholstery or garment leather, or one 8 ounce belt that isn't too hard. Once you start sewing belts with linings, you'll need to go through 3/16" of leather and suede. This is the outer limits for home machines. Anything thicker will have uneven stitch lengths, and trouble bring the knots up inside the bottom layer. It also tends to break needles as they get deflected by the hard internals that veg-tan leather contains. Not least is the motors on home machines. They are built and geared to penetrate cloth, not leather. You'll have to hand wheel to start sewing and to resume after slowing down.
-
That (RE-607) is a portable dual feed walking foot machine, with a driven outer presser foot and bottom feed dog, both with teeth. It's identical to the Rex RX-607 and Alphasew, Thompson, etc. It is fine for use on small upholstery and sail repair jobs, using outdoor canvas, Sunbrella and Naugahyde or similar vinyls.Not so good on leather, unless it is very thin and soft. Capacity is around 1/4 inch of compressed soft material. It will handle thread sizes up to #92, using a #20 needle, but it will last longer using #69 thread and a #18 needle. The motor is rated at 1/10th horsepower, which is about 1/5 to 1/8 the average power used in real walking foot machines (1/2 to 3/4 HP). That said, if you have any plans to sew medium or hard leather, or any stack exceeding 1/4 inch, or with thread sizes 138 or larger, this is not the machine you want. It will bend the presser foot drive lever and seize shafts in their cheap bearings. These are Chinese clones of other clones of earlier clones of the Thompson portable. The best of the bunch is the current models from Sailrite, as they have beefed up moving parts and connecting rods and better bearings. I made the mistake of buying a machine like this off eBay. It arrived with the main shaft seized from handling by the carriers, although the box had no external damage. The drive levers could be bent with your hands. I was lucky enough to get a partial refund after paying to ship it back.
-
How Do You Sew A Short Edge Next To Raised Surface?
Wizcrafts replied to Mark Moss's topic in Leather Sewing Machines
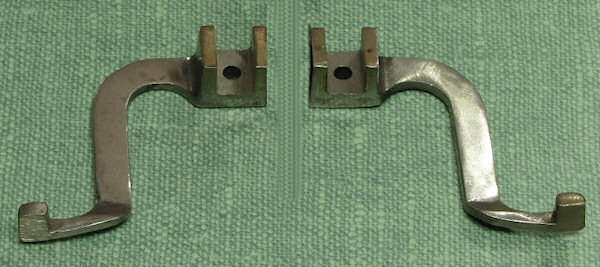
I have an inline presser foot that I use when there is only a narrow sewing flange and a raised shape on the left. I got it from Bob Kovar, at Toledo Industrial Sewing Machines. It is shorter than the standard feet and requires lowering the presser bar. I also have a left and right set of "paddle feet" from him. The right toe paddle foot has a paddle shaped tab that sits in front of the inside foot, while the side sits on the edge of the sewing flange. It saves my butt sometimes when I don't want to readjust the height of the presser bar to accommodate the shorter inline trailing foot.
-
Needle Size, Thread, Spi And Leather Weight Rule Of Thumb?
Wizcrafts replied to Bluesman's topic in Leather Sewing Machines
I try to match the size and breaking strength of the thread to the project. Plus, one has to choose a combination that conceals the lockstitch knots between the layers. So, here are some of my general recommendations for you. For very thin and/or soft projects, 3 - 5 ounces: #69 thread with a #18 needle (below 441 practical limit. Round point only.) (8 /inch) For thin projects, 6 - 8 ounces: #92 thread with a #19 or #20 needle (at practical bottom 441 limit. Round point only.) (7 /inch) For 9 - 12 ounces: #138 thread with a #23 needle (typical, consistent 441 bottom limit. Smallest leather point 794 needle) (6 /inch) For 13 - 20 ounces: #207 thread with a #24 needle (great for stitched belts, single and double leather) (5.5 /inch) For 21 - 28 ounces: #277 thread with a #25 needle (5 /inch) For 1/2" to 3/4": #346 thread with a #26 needle (4 /inch) Extra heavily stressed projects, 3/4" to 7/8": #415 thread, with a #27 needle. (3.5 to 4 /inch) Exceptions Holsters, outside the pants, with security thumb-breaks: If at least 1/4 inch thick, use #277 thread, at 5 /inch. The knots can be buried inside the layers and the 44 pound thread breaking strength resists tearing during a struggle for the gun. Sam Browne duty belts, 1/4" to 5/16" should be sewn with #277 thread, at 5 /inch. Extra thick, double leather (over 3/8") professional weight lifter's belts should be double row stitched with #346 thread, at about 3.5 or 4 to the inch. These belts take a tremendous amount of stretching and abuse. Stitches per inch I use long enough stitches to look good on top without forming loops on the top or bottom when the project is bent (like a belt). Conversely, when the work calls for closer stitches, you have to make sure they don't perforate the stitch line. Why? "S" point needles, like the type 974 Schmetz makes for 441 clones, slice the leather with inline, wedge shaped cuts. This buries the ends of the thread inside the top grain and makes it appear like the stitches are closer together. If properly spaced, thick thread adds to the strength of the package. But, if placed too close, the holes in the leather weaken the package beyond the thread's ability to secure it. In fact, if the holes are so close that the thread is stronger than the leather between the holes, it can slice right through them. Also, the larger the diameter of the thread, the bigger the knots formed by the lockstitches. When sewing with thick thread, like 207 and larger, space your stitches out to avoid slicing through the leather: e.g., no smaller than 6 to the inch. When sewing with #138 thread & 23 needle, you can go a little shorter, to 7/inch. If you use #69 or 92 thread, 8 to the inch is okay. Thread breaking strength list #69 (T70): 11 pounds #92 (T90): ~16 pounds #138 (T135): 22 pounds #207 (T210): 32 pounds #277 (T270): 45 pounds #346 (T350): 53 pounds #415 (T400): 72 pounds -
Parts Needed For Singer 97-10
Wizcrafts replied to DavidMillsSaddlery's topic in Leather Sewing Machines
Strima Sewing sells them in Germany, but only size 250. A box of 100 will cost you $100 US, plus shipping. -
In my case, the Cowboy CB4500 was the answer to sewing leather and webbing up to 7/8 inches total thickness. It sews with bonded thread sizes #138 through 415, but I usually thread it with #277.
-
I own a National 300N triple feed walking foot machine that sews 3/8 inches of leather with #138 thread, top and bottom and has a large bobbin. It is very similar to the Consew 206RB- series, with the -5 being the newest version. I believe that either the Consew 206RB-5 or the Chandler 406RB-1 will fit your stated requirements perfectly. I would strongly recommend the servo motor upgrade, especially if it is a Family Sew FS-550S, with a 50mm pulley. It has the torque to punch through up to 3/8" of soft through medium temper leather at very slow speeds, such as we leather sewers use. I've never seen a roller foot machine with a moving needle. Every one I've owned or looked at had a fixed needle and single row feed dog under the roller. Only the Singer 45K25, Alder 105 and GA5-1 Chinese clones, or the bigger triple feed 441 clones, are heavy enough to sew 3/8 inches of leather, day in and day out. These (GA5 type) machines are bottom feed only and can take needle sizes 23 up to 27, covering thread sizes 138 through 415.
-
I agree with PcCox. I have bought all of my servo motors from Toledo Industrial Sewing Machines. Right now, the cream of the crop is the Family Sew FS-550 that he sells already equipped with a 50mm (2") pulley. You'll need to do some math to get the correct new v-belt length. See if your current belt has a length designation (e.g.: M44, 42", 3L40, etc). Then measure the diameter of the current motor pulley (assuming that the motor tension adjuster is somewhere near the middle of the bolt). Divide the existing pulley diameter by 2" and whatever the result, that is how much shorter the new belt needs to be. Example: Your machine has a 4" pulley on the clutch motor and a 44 inch v-belt (or leather belt). The motor you are buying has a 2 inch pulley and sits about the same distance under the table, for the motor output shaft. Divide 4" by 2" = 2. The new v-belt (type 3L) would be 44 - 2 = 42 inches. Variables are the vertical position of the motor shaft and the current position of the bracket that positions the motor and tensions the belt. If the adjuster is already at the bottom, you'll possibly need an even shorter belt and vice-verse.. This also assumes three bolts holding the motor on.
-
You'll be good to go with the roller feet, especially the top and bottom drive on the post bed machine. They will sew 1/4 inch. I don't know what the thread handling capacity will be. A Pfaff dealer may be able to tell you that. But, the needles that come with the machines should reveal what may have been run through them by the previous owner. He might know and even supply the thread. Otherwise, assuming a limit of #138 bonded thread, using a #22 or 23 needle is a safe guess, until otherwise instructed.
-
Parts For Singer 111W153 Interchangeable?
Wizcrafts replied to Vickilynne's topic in Leather Sewing Machines
Take some photos of the parts and post them here. Maybe they are for a 153 and you got them by accident. Somebody will want them. -
The machine has an integrated oil pump and must spin at about 3,000 rpm or more to distribute the oil to all the bearings. That works out to about 50 stitches per second.
-
The "lift" of the hand lifter lever or knee, or floor pedal is not the same as the amount of material that can be sewn. All walking foot machines must lift at least 1/8 to 3/16 inches more than they can actually sew. This allows the feet to alternate up and down. In you case, that amount is 10 mm, or 3/8 inch. The length of the needle and thickness of the feet determines the maximum thickness that can be sewn. If you exceed that limit, you end up with skipped stitches, or broken needles, or bent crank arms, or a broken thread guide on the bottom of the needle bar. If the needle bar hits the presser foot in operation, it will get knocked out of time.
-
Also, just in case, make sure that the stitch length adjuster screw is all the way down! If it is loose, or up too high, leather doesn't stand a chance of feeding.
-
That is NOT a walking foot machine. It has a spring loaded follow-foot on top. The work is only moved by the feed dog underneath. If the presser foot slips on the top (slick leather or fur), there is no feed, or inconsistent stitch length. I had this very machine for one week, then returned it in frustration.
-
It is a very, very, high speed garment sewing machine. It can sew very thin leather with very thin thread and slim needles. I'm guessing about 3 or 4 layers of garment leather, using a titanium coated #16 or #18 needle. Of course, you would have to change the presser foot to a Teflon or roller foot to sew sticky leather.
-
The Reliable is a standard upholstery grade walking foot machine. As such, expect it to max out with #138 thread, possibly even as thick as #207 on top and 138 in the bobbin. It will sew up to 3/8 inches of material. If this meets your needs, you're good to go. I see that you highlighted thread sizes 92 through 277 in the chart you posted. Do not try using #277 in that machine. It is not built to handle it.
-
Seiko 8Bld-3 - Any Differences From The Clones?
Wizcrafts replied to SLudlow's topic in Leather Sewing Machines
Use a belt sander with fine grit sand paper inline with the left edge of the presser foot, or else rub the foot back and forth over Emory cloth, until the sharp left and back edges are slightly rounded. Then take it to your Harbor Freight dual wheel cloth buffer, apply green polishing compound, and buff the steel to a high gloss, especially along the bottom to side edges. -
Seiko 8Bld-3 - Any Differences From The Clones?
Wizcrafts replied to SLudlow's topic in Leather Sewing Machines
SLudlow; I personally modified my National 300N to sew leather. It started life in an upholstery shop sewing nothing heavier than two layers of medium weight Naugahyde, with only #69 bonded nylon and #18 round point needles. It was equipped with a 1/3 HP clutch motor that was way out of adjustment. Below are the things I did to convert the machine into a leather stitcher. Replaced the old clutch with a servo motor and 50mm motor pulley. Replaced the drive belt with a shorter new v-belt to match the smaller motor and pulley. Replaced the beehive tension spring on the top disks with a heavy duty spring from a dealer. Increased the spring tension and travel on the check spring. Replaced the coil pressure spring over the presser foot with a heavier duty spring (dealer) Bought a swing-away edge guide that clamps over the front of the body and screws down over the feed dog shaft that resides under the front of the machine. Bought a roller edge guide and had a welder secure the screw in the swing-away bracket so I could tighten down the knurled nut with pliers. Dealers will now do this conversion for you. Replaced the upholstery double welting foot set with several standard, left toe and right toe sets. Sanded, rounded and polished the sharp edges of left and double toe outside feet. Applied Emory cloth to the sharp teeth on the feed dog. Played with the position of the crank that controls the balance between forward and reverse stitching to match holes (most of the time). Replaced the old bobbin case with a 6 pack of new Consew 206 M style cases and 2 dozen black steel bobbins. Purchased packages of system 135x16 leather point needles, in sizes 16 through 24. Purchase thread in sizes 92 through 207. Paid for the machine in one month sewing rifle slings with #138 thread, top and bottom, under contract from a local leathercraft store. This is where radiusing and buffing the left edges of the outer feet paid off. I still have that machine, although it is rarely used since I bought a 20 inch body Singer 139. I found that the best needle/thread combination was a #23 diamond, triangle, or LL leather point needle with #138 pre-lubricated bonded nylon thread. I sewed at about 10 stitches per second on the straight-aways, slowing down to single stitching, at 1 per second, around the turnaround where the tail is sewn into the back of the body. The slings and tails were made of 5 - 6 ounce chrome tanned leather on top, with a 4 ounce suede lining rubber glued to the bottom. There were 1/2 inch thick green foam pads sandwiched near the front half. These caused the soft tops to bulge up as I sewed. The feet were gouging a line along the raised edges, until I learned to radius and polish them. I tried another modification that allowed the machine to sew thicker leather (7/16"), but the needles were 3/16" longer and tended to bend or break every day I used them. I had to sew so slowly that it was very frustrating trying to not break the thread or needles. Also, the foot pressure was so strong to hold down the leather, it gouged channels in the top layer and the feeder teeth destroyed the bottom. I fixed this problem by purchasing a Cowboy CB4500. -
Lost All Bobbin Tension.. Consew 226
Wizcrafts replied to Piedmont's topic in Leather Sewing Machines
Check the thread path to ensure that you have threaded through the take-up lever and the check spring. Also, make sure that the top thread is firmly inside the tension disks. Remove the needle and roll it on a flat surface to see if it is bent. Insert the needle all the way into the needle bar, with the scarf on the right side Thread the needle from left to right. -
Best Needle Point For Clean Bobbin Side Stitch.
Wizcrafts replied to MuddyClearWaters's topic in Sewing Leather
I agree. I have owned two ULS machines and both produced bottom stitches almost the same as the top. Presser foot pressure, awl angle, thread size and the width of the slot in the throat plate all play a part in the bottom appearance. -
You'll want to tighten the bobbin thread tension to get the thread to stay inside the midst of the leather. 346 thread pulls the lockstitches very tightly and may overpower #207 unless the bottom has plenty of resistance. About the thinnest workable leather for #346 thread with 207 on the bottom would be 10 to 12 ounces. Otherwise, you'll have knots visible on one side or the other.
-
There's another foot you can buy from Toledo Industrial Sewing machines and maybe even from Cobra Steve.. It is called a paddle foot and they come in either left or right toe. I have both. Paddle feet allow you to sew with the inside foot up against the raised case, on the left, while maintaining firm contact with the narrow sewing flange on the right. With a few exceptions (e.g. sharp corners), they won't push off the edge as happens with the standard right toe presser foot. Paddle toe feet: These feet may not be the same height as your current set and may require some readjustment of the large crank arm on the back of the faceplate. It takes the large hex driver that came with the Cowboy and Cobra 441 machines. It's possible that no amount of adjustment of the crank on the back will bring the paddle foot all the way down, especially when sewing thin leather. If this is the case, you'll need to remove the faceplate and reposition the presser bar downward. This rarely happens to me as most of the shaped cases I sew with the paddle foot are about 3/16 to 1/4 inch thick along the flange. The foot can be adjusted with the big crank arm to reach the bottom and raise the inside foot sufficiently at that thickness.