alb
-
Posts
182 -
Joined
-
Last visited
Content Type
Profiles
Forums
Events
Blogs
Gallery
Everything posted by alb
-
Wood Grain Biker Wallet
alb replied to Big Papa Leather's topic in Purses, Wallets, Belts and Miscellaneous Pocket Items
What do you mean it's made from popsicle sticks??? -
Your shop is shaping up! Looks like you're doing a great job. One note - I have a large cutting table that I also use for doing a lot of my work - riveting, punching holes, etc. It has a large shelf underneath that the previous owner used for leather storage. On the top, one side invariably gets filled up with "stuff" - knives, hole punches, some of the other stuff that I use all the time. If you will be using that table for things other than just cutting, you might want to consider adding a couple of drawers right underneath the cutting surface. It will help keep the cutting surface clear. Thanks for posting the pictures! Ann
-
Stitching A Saddle Horn
alb replied to niftytack's topic in Saddle Identification, Restoration & Repair
It just depends on what shape it's in to start with. Is there still a filler? Is it solid? Is the horn itself in good shape? and the wrap? Need a few more details if you're talking about anything beyond just restitching. Ann -
I love it! My seven year old loves to make monsters on leather using some basic tools. They are his own thing. He comes up with some amazing ways to use the tools and creates some very cool pictures. In a way this reminds me of his work - though at a *very* sophisticated level. Keep posting.... Ann
-
THey look great Bonnie! Love the colors and the long fringe! Ann
-
So I Am Brand New To This And About To Pull My Hair Out!
alb replied to klarr74's topic in Getting Started
you wrote: It's not that fancy, but hope to get more stuff as I learn. Don't worry - You don't need more stuff! LOL You have a lot of stuff! time to get cracking and make something! Every once in awhile when I'm in my shop and a bit nervous about doing something for the first time, I'll put it off by sorting stuff..... Pretty soon I realize what I'm doing, force myself to get started and end up making progress. It can be a bit intimidating to start a new craft. Just remember - don't compare your work to some of the incredible stuff you'll see on this site, especially not at first. Some people feel like throwing in the towel when their early efforts don't compare. You'll probably be frustrated with your progress for awhile but that can be a good thing. Just keep pounding the leather and ask questions after you've tried things and can't figure them out on your own and practice, practice, practice. The place where you bought your tools can be a really good source for help as well. Enjoy! Ann -
no apology necessary. I enjoyed reading your post and I'm sure others did as well. Ann
-
You did that in a day? Wow! I think it's very very well done. It is extremely easy to navigate and to find things. The categories make sense and your photography is excellent. The how to video and mask tutorial are well done and I think that people coming to your site will appreciate seeing those. One note - the second time I looked at your site I clicked on the small mask picture on the right and was taken to the picasa site and a page full of thumbnails of all your masks. It was a real *wow* moment. There are so many fabulous masks. You might want to put something on the front page that lets people know they can click on those pics to see additional masks and if there is a way to make sure the picasa site defaults to thumbnails it would be great. I like the regular "gallery of masks" button as well and I wouldn't replace it but it's sort of a different experience seeing a larger pic and scrolling down to see each one. I think having both there works very well. And your work is just fantastic. I had seen your masks before but hadn't seen some of the other things you do. Great! Great! Great! Thanks for posting = gives me lots of good ideas for when I set up a site. Ann
-
Cool idea to use this. I'd like to see it in action. Too bad I don't have a large air compressor in the shop..... I was in another guy's shop awhile back where they used a spray gun for spraying contact cement. I was amazed at the control they had and the speed with which they worked. Ann
-
Looks great! How do you cut, grind and polish glass? Ann
-
Woohoo - success!!! It turns out the needle needed to be even closer to the left side of the plate, close enough that the tip of the needle missed the edge but just above the tip the needle actually hit the side of the slot and is deflected by the stirrup plate. (this is the setup at least - the needle is probably not hitting once it pierces the leather. ) Of course I figured this out after trying many other things and learning a whole lot more about my machine. I was almost resigned to purchasing a new $250 shuttle but tried this as a last ditch effort. Thanks again David and Kevin for the replies - by the way - what is an air chisel? After getting the stirrup stitched - which turned out great by the way - I can see how getting that gap closed is very important. Ann
-
Would look great as a boot upper!
-
David, Thanks for the ideas. Unfortunately I'm still having the problem. The Ferdinand Bull is not a compound feed, it's a straight needle feed. I was actually sewing a couple of pieces of 8oz scrap as this was the first time I'd stitched stirrups on this machine. My mentor has stitched many a stirrup on it, but it's been awhile. I worked through a few things with Ferdco on the phone today but we didn't solve the problem. They're going to call me back in the morning when the Ferdinand guy gets there. I continue to be impressed with their support - though I wish they had longer hours.... Again, thanks for your response. I appreciate you taking the time. If anyone has any other ideas, I'm all ears. Ann
-
Does anyone have an idea what would cause my machine to skip stitches when changing to the stirrup plate? It's making a beautiful stitch with the flat plate and not skipping anything and upon changing to the stirrup plate it's skipping most of the stitches. I've moved the plate to the right as far as I can (the needle is a cards width from the left side of the slot). I've also checked the timing and that's fine. I'll be on the phone with Ferdco tomorrow but I wondered if any of you have had a similar problem. Thanks, Ann
-
Hello, I have a saddle repair shop and do a lot of stitching on a Ferdinand Bull. I love this machine and I'm getting better at using it as I get more practice. I am wondering how those with more experience check that the tension is correct when you're stitching. Yesterday I sewed an overlay onto a fender and it was only after I finished that I realized my top tension was off. The top stitch looked great. Usually when I'm stitching multiple heavy pieces of leather I grab a couple of scrap pieces that are similar and run a few stitches then check the front and back to check for proper tension and make sure my stitch length is what I want. But it's not practical to do it for everything and for many items it would be quite difficult to lift them up to look at the underside after starting to stitch. What do others do? Also, I have one more question. Every time I back stitch a few stitches and then adjust to go the opposite direction, I have to manually reset the position of the item I'm stitching to hit the next hole, as the machine usually tries to stitch into the hole I just made. I think I'm changing the direction at the wrong point in the cycle of the stitch. When in the cycle should I be making the adjustment to change from reverse to forward and vice versa? THanks!!!!
-
That reminds me, I have a snake in the freezer I need to deal with. What do you all use to get the flesh off? I've only skinned one snake and ended up tearing the skin trying to get the flesh off. Ann
-
What are you using for the folds in the flower petals? Ann
-
I wish I could see this saddle in person. It's gorgeous. If you don't mind my asking, what weight leathers did you use in the skirts and also the back jockey? Ann
-
Wow - what a beauty! Thanks for posting. Ann
-
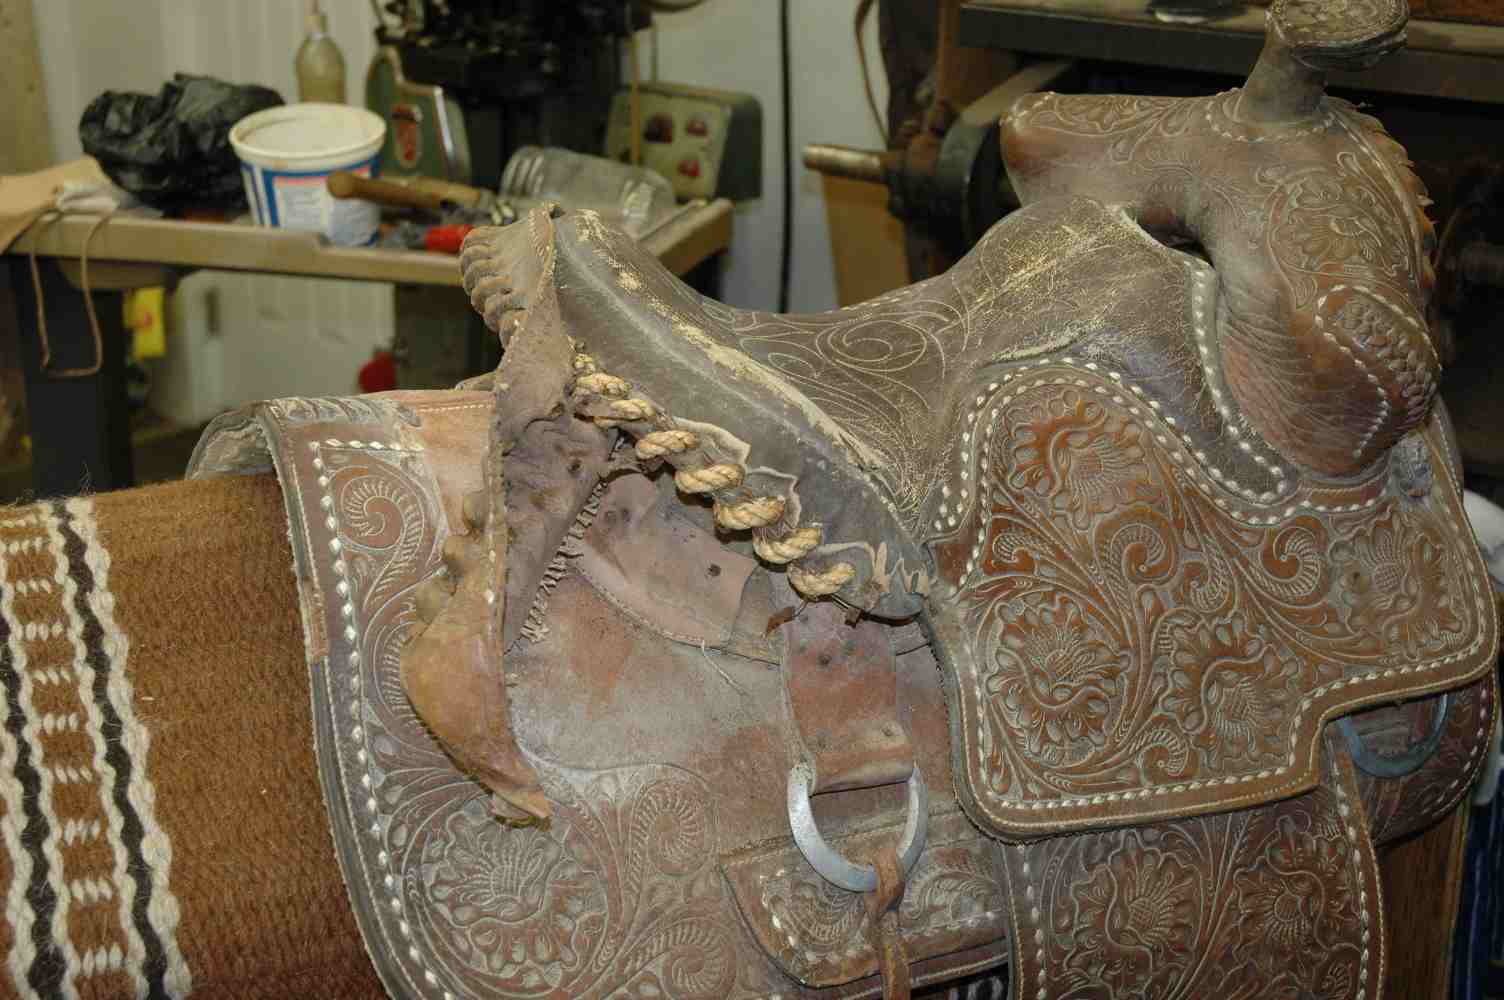
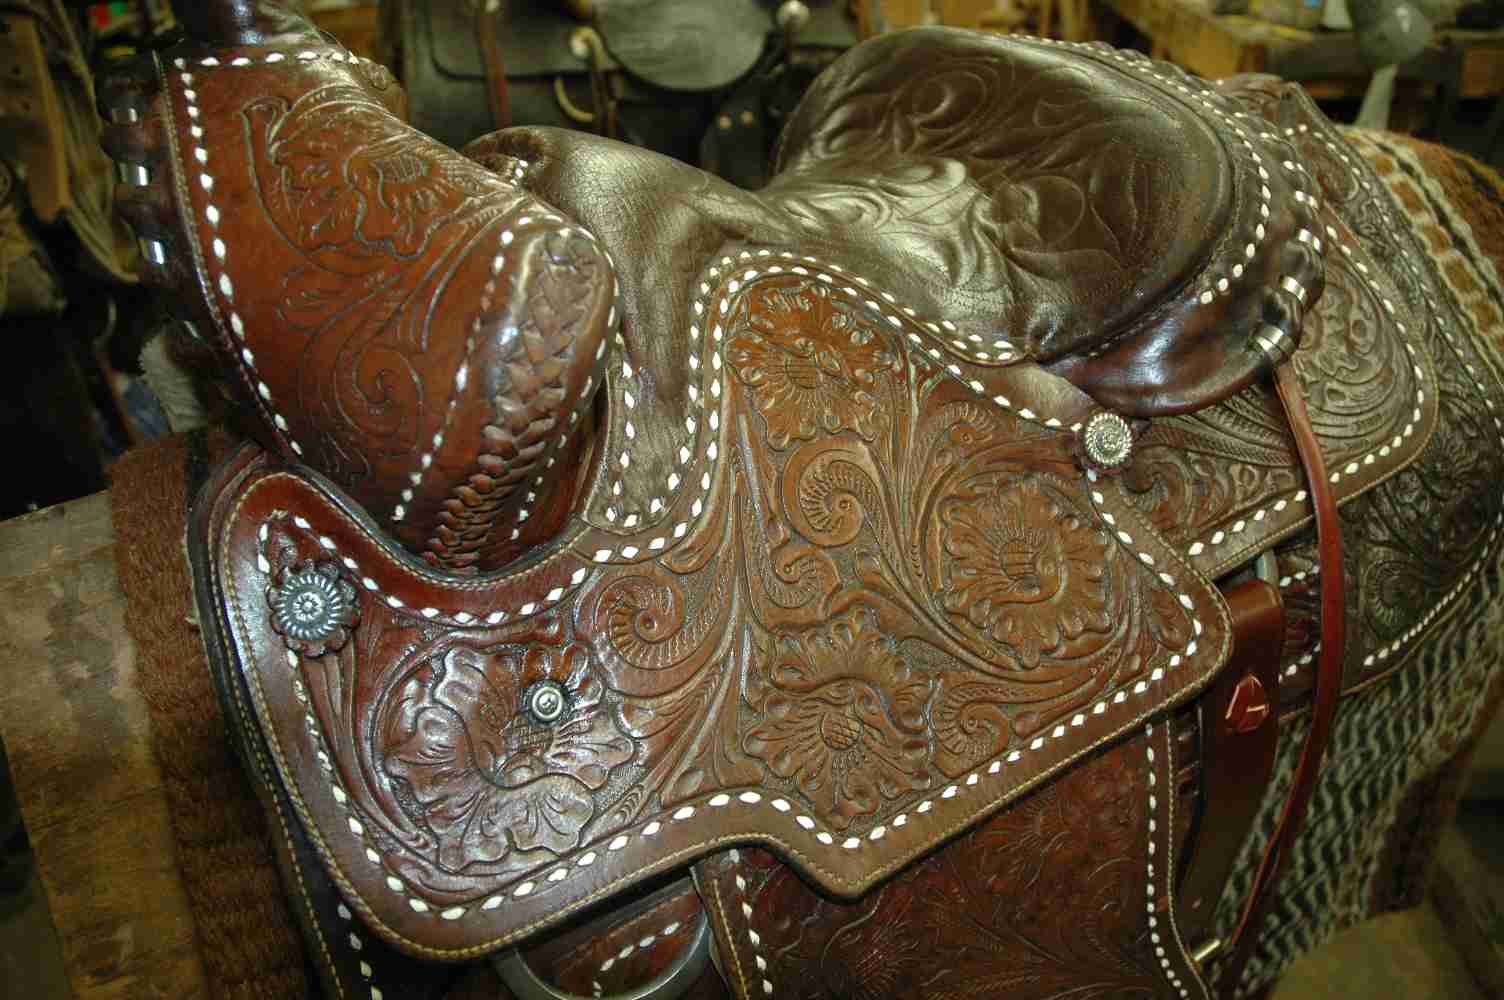
Does anyone else miss saddles after they leave the shop? This saddle has been in my shop for a few weeks while I completed a partial restoration. It has beautiful carving and tooling. It belonged to the father of the person who was having it worked on. It has a lot of sentimental value. The after pics don't do it justice. I thought I would have it done yesterday morning and have a chance to get some good pictures but several hours later I was rushing just to get it out the door with the person who was delivering it. I only had time to snap a couple of photos and the light wasn't great.

-
Steel tree as in a tree made from steel? What did they look at to determine this was a "freak tree"? Ann
-
Bruce - just came across this post and I'm wondering if you are still using this machine 3 years later and what you think of it now. Ann
-
Options For Replacing Zipper On Chaps?
alb replied to alb's topic in Clothing, Jackets, Vests and Chaps
I actually do have some heavy duty velcro. He's coming to pick up his saddle tomorrow. I'll talk with him about trying the velcro. Thanks for the idea guys! Ann -
Options For Replacing Zipper On Chaps?
alb replied to alb's topic in Clothing, Jackets, Vests and Chaps
Has anyone used velcro for work chaps? Any other ideas? Ann -
A gentleman brought a pair of chaps into the shop with a full length zipper. He has arthritis and needs the zipper to be replaced with something easier for him to manage. Any ideas??? Ann