


JLSleather
-
Posts
7,378 -
Joined
Content Type
Profiles
Forums
Events
Blogs
Gallery
Everything posted by JLSleather
-
I would have thought it was the other way around... adapt the thumb break to the holster? I mean, it has to fit the model first. Thumbreak straps can be added to most I would imagine.
-
Yikes. I just noticed a 45 minute long video on making a 3-slot card wallet. The video 'craze' has been out of control for a while now, actually, but does anybody REALLY need to watch a video to cut out 4 pieces (2 pairs) of veg tan (about 3" x 4"), stack em together, and stitch em? I'll re-write this with pics of the actual leather (soon) but for now these make legitimate and painless father's day gifts. still time! card_hor03.pdf
-
Think maybe that book was ©1950-something. I STILL get asked to do belts with those designs
-
You guys is funny Nothing new going on here.. that was suggested by Al Stohlman about 60-ish years ago.... from teh book Belts Galore (recommended).
-
Move buckle and keeper to suit new location.. Again, if you BACK OUT the thread top n bottom, then when you cut it back, put back the same thread and your stitch line will not be broken or spliced.
-
Yeah, maybe get by taking out 2... just long as you dont end up with a button right where you need to burnish .... take back the taper....
-
remove 4 spots
-
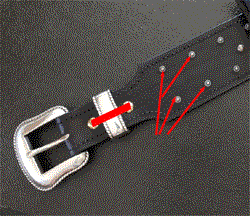
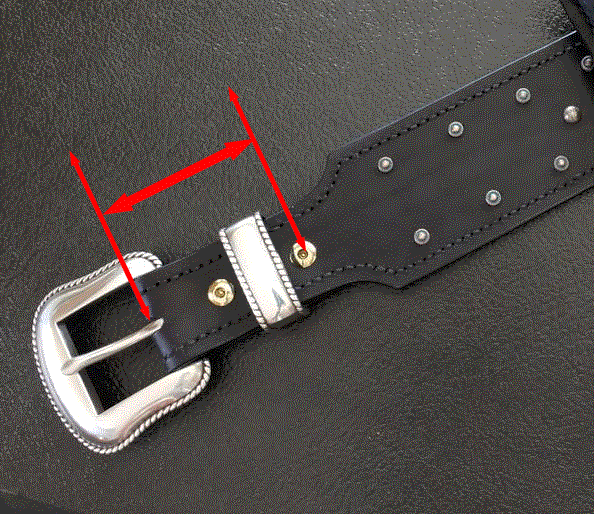
Punch new slot Measure distance end to new slot center. mark SAME distance back on taper.
-
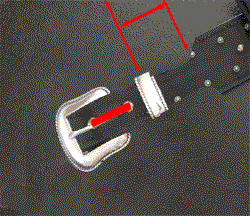
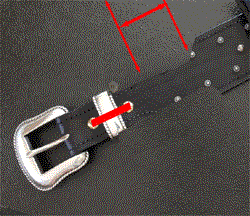
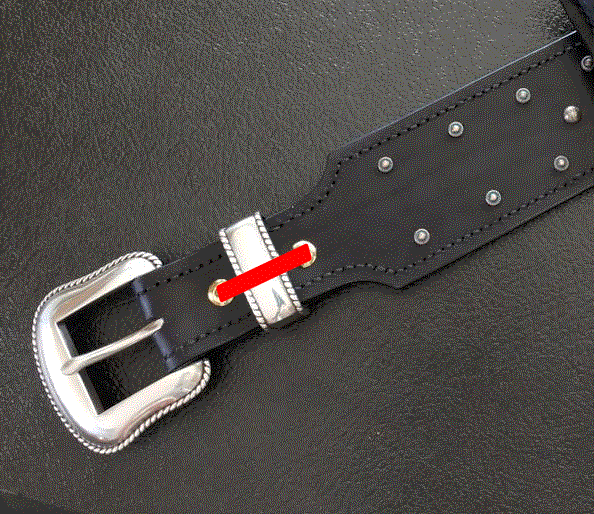
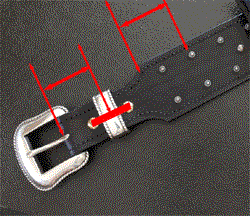
Well that should work, then. Take the buckle off, take teh thread out on both top n bottom a couple inches past teh taper (back it out, don't cut it) and punch a new buckle slot between the screw holes (where the metal keeper is). INCORPORATE both screw holes in teh slot. The leather would then fold where the metal keeper now is, which should leave you about right.
-
How far is this?
-
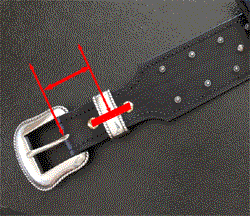
wait... so you made a belt, and the guy fits it in the TIGHTEST hole? lemme do a quic sketch... in 3...2 ... 1... Okay, so if you got this, question is how much is between the holes (light blue) and how long is the tapered end (dark blue on left)? Is there enough distance that you can take it off the BACK end of the belt?

-
Depending on the type of pattern you're referring to. If I transfer the TOOLING DESIGN "pattern", I use tracing film Cheap, and lasts a LONG time before needing replaced (there are some other advantages, but that's another topic). If you're talking about the "pattern" meaning the shape to cut out of the leather, then I usually recommend one of two ways: print the paper pattern on regular printer paper (20# stock, yours may be A4?) and then use spray adhesive to stick it to card stock or poster board, then cut out the pattern --- eliminates errors in making the pattern alternately, have the full-size pattern printed on 100-lb card stock or similar. Most print shops (in the US anyway) will do this for LESS than it would cost to mail you a pattern. Oh -- and the type of "pattern" use makes a difference. If you're making 1 or 2 of something, cut out the paper pattern. If you're making 10 or 20, put it on card stock. And if you're making 100, just have a die made to punch out the shape.
-
Hello there ;>) ANY "pattern" should logically include materials and instructions on the use of that pattern. And I personally don't think a guy should need a password or a 'subscription' to ask a simple question. I have a few patterns on my site - including some small wallets - and I'll be adding a good many more. Got a particular style you're interested in? Don't hurt to ask.. I may have that on the list! Perhaps I should also include measurements in cm / mm, but I figured a guy can trace the line in any language. Since I have listed them in inches only, you are welcome to use them (and the instructions) FREE OF CHARGE due to my "mistake". Least I can do! Got a question about those patterns? Just ask away ... simple. http://www.jlsleather.com/diy/
-
hit the "tween" spots with a F910 pointed beveler leaned WAY towards the point.
-
Well, 'master' is generous, but it seemed like a giffy in 20 seconds was better'n'a fella showin up tell ya watch a hour long video somewheres...
-
Yeah, I figgered ya was gittin all fancy on me with the twotone stitchin' Alex. Looks GOOD that way, actually.
-
Sweet! Good to see you fellas adaptin' them designs!
-
Yep, that's it.. doesn't matter what the tool is if it works. Sounds like what I do... fingers opening while it's still in teh water (specially on a lined holster), bone folders, modeling tools, whatever. Teh gun forms the final shape, but I got it open and close to size before I even pick up the gun. As for 'curving', I have about a 18" (or maybe 20", whatever) piece of "belt" that I actually put through the slots when forming... pulls the leather right where it needs to go. And Alex is right.. I see worse offered for sale all the time. Truth is, a lot of those "pro" videos about making holsters are making stuff that doesn't look as good as yours Oh, being that I marked the slot location, I admit it.. I punch 'em out (straight on through from the front side) after allowing the glue to set and before sewing. Then when I sew, I sew the perimeter and along teh slots all continuous.. only stop is to move to the other side of the holster.
-
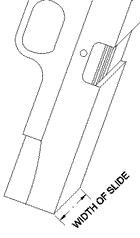
Had to alter a bit again. Apparently, some people think that "width" of the slide means side to side when you're holding the gun, and some think that "width" of the gun means the outline when it's laying on the table. Included a sketch, so hopefully it's quite clear now
-
Oh, yeah.. that trip would take like all day
-
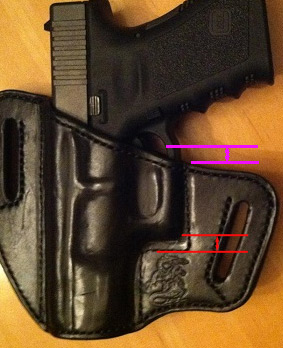
Yeah, gotta agree that aint a bad firsty Looks like ya coulda wenta little deeper with the rig.. looks like the stitch line had room for it - did ya glue a little high, or just not push low? That, and watch yer 'straightness' on yer stitch lines 'n' slots, and looks like ya got it figgered. In teh pic, the red lines and the purple lines are the same lines.. with the same spacing... which looks like if you shove a bit deeper to your stitch line, then the coverage on teh guard would be just about ideal.
-
 There's a simple 'walk thru' up on the site on how to lay out the shape. This is way simple stuff, and honestly takes longer to write the article than it does to plan the design This one is pocket notebook style in general, but I'll put up some actual patterns from actual projects as they are made (i didn't have one of those cheap little books). http://www.jlsleather.com/diy/pattern-making/leather-pattern-notebook-layout/ SNIKEYS! A simple search returns a BUNCH of this type of thing (who knew people wanted to pay for something this simple). One guy wants $6.00 for a pattern of a piece of leather with a fold and a pocket. Well, I guess they "get" you if you don't know, or don't do some simple research ... Next simple project, maybe I should tag onto that article, something clear about how to add a snap flap to the design. Free is good, right?
 -
Pedestal stand, variable speed, blah blah blah. Little use (still on original sanding drums). Prefer my drill press burnisher.... so this is just setting. In the way. Still Pick up only... fit right in the trunk or truck without issue. No trouble. First $250 ... simple.
-
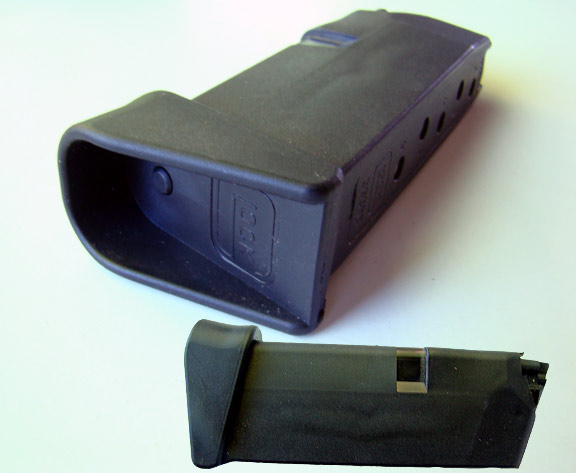
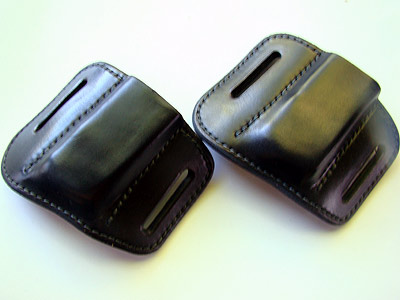
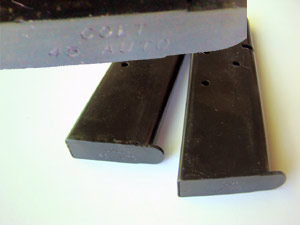
Cleaning out around here, now at the next 'stage' Got some gun magazines used for photo purposes. Never used for actual molding, though they certainly COULD be if desired. I'll list these as I dig them out. Shipping depending on how many you need. PayPal works, or I might trade for blueguns in models I don't have. For the moment, I have : PAIR of Colt 1911 .45, never used for anything other than photographing leather mag carriers: $20 PAIR ONE Glock 43 magazine, never used for anything other than photographing leather mag carriers $25 TWO Glock 43 pancake style mag carriers. Almost finished.... just burnish the edge, apply finish, and use or sell. Pay no attention to the green tint from the tree outside the window... these are solid BLACK with BLACK stitching $25 PAIR
-
Accounting for fold in the spine of book/notebook covers - help
JLSleather replied to RoperDKC's topic in How Do I Do That?
"Generally speaking"... http://www.jlsleather.com/diy/pattern-making/leather-pattern-notebook-layout/