JLSleather
-
Posts
7,378 -
Joined
Content Type
Profiles
Forums
Events
Blogs
Gallery
Everything posted by JLSleather
-
Exactly And don't forget suppliers and employees on the irritation scale! Worst part is, I actually knew a guy who got PAID to fish ('worst' only cuz it wadn' me).
-
Oh, yeah... young fella around here mentioned once he got a "friendly" letter from a wallet maker -- apparently the guy thought he had 'rights' to a shape, or style, etc. But I've seen pics of the wallet he was supposedly trying to "safeguard" the design of, and it's so plain that it's unenforceable. It's also so plain that anybody over age 12 could make them by tomorrow, but that's another story So i (not a lawyer) suggested that the kid continue to make as many as he cares to make, long as he isn't using the other guy's logo on it. I add this to make the point: because someone contacts you about "copying" does not give them any legal rights at all. Again, it first needs to be original, specific, and YOURS to "protect" it. I could protect a pattern for a pancake holster for the Colt Commander (but, I don't.. download it free at will) but I have no rights to pancake holsters, Colt Commanders, or even OTHER patterns for the same thing. Someone else has made holsters for that, and if they choose to sell them there's nothing I could do about it (even if I wanted to). On the lighter side, I'm occasionally amused (again) at the many people who use an airbrush on the edges of something in veg-tan leather. Gibson guitars made that renowned over 70 years ago (back then, they called it "sunburst") but about every other year you see some leather worker "invented" the look (like, last week.
-
It's likely appropriate that this topic went on for years This stuff certainly can be confusing - some of that is no doubt deliberate. I make patterns from time to time, so I did look into it a bit, though I'm not paying the lawyers to give me every line of legal code. Still, there are some things which can be stated fairly clearly. A 'copyright' needs to be fairly specific. If you make notebooks, don't assume that the next person won't make them as well. And it would need to be yours. I've actually heard from people who used elements from Disney, Harley Davidson, and the NFL-- and then got mad when someone else did the same thing. It needs to be ENFORCED. This can get expensive on it's own, so not surprising that not EVERY violation is pursued (much like not every cocaine seller is arrested, doesn't mean it's legal). Some owners are better at "protecting" their property than others, and sometimes "protecting" it means NOT 'enforcing' it (if you aren't following that, don't worry). Finally, it's NOT about how many you sold, or who you sold them to, or even IF you sold them. If you make belts with the Pittsburgh Steelers IP, there might well be a problem (one guy been asking me for a good while now). If you GIVE it away, then that organization could still show that they lost revenue due to your actions (you get the idea). As for someone else's patterns... you may have seen some fancy looking speeches about "for your own use, not for distribution, not for commercial use"or something along those lines. As a rule, if you purchase a pattern, you can make things with that pattern INCLUDING items you intend to sell. What you can't legally sell is THE PATTERN itself. I personally saw one situation not far back. Kid graduated from Iowa State University. Somewhere along the line, he decided it was a good idea to have matching shirts for his buddies, only other boys who had graduated ISU. The boys all kicked in the price of the shirts, and he printed (or had them printed) shirts which used the ISU logo -- about a dozen of them. Now, most likely think of the school as a "state" school, but don't be deceived ... that is a business. Kid ended up on the local news, apparently had been contacted and had agreed to collect and destroy the shirts and not make any more, like "all friendly" like.
-
If I had a girlfriend what hadda job, I'd be doin more fishin' fer sher .....
-
 Thanks Checkin' over at Ebay (sad that I check that before Staples or OfficeMax?) I see they have a 6x9" vertical bound version too.
 -
Well, yeah -- free is good, right? But i understand.. no worries.
-
Anybody else seein' spots before yer eyes? Lookin' good ...
-
How big are those notebooks? I've been thinking about making a pattern for something like this to put on my site.
-
I don't recommend belly leather at all. Not even for prototypes -- since the leather will stretch and give DIFFERENTLY than leather from the shoulder or back portion of the same hide. When I make patterns I want them to fit, so I just 'get over' the "waste" of good leather -- which is like $10-15. But the pattern is already complete on this one, so really just a matter of cutting out and then color inside the lines
-
I thought that was taken care of a while back. Where'd that guy go? I still haven't ruled out wooden burnishers, but what glue is used to stick 'em on the metal shaft? I suppose I could cross-pin 'em (and I might anyway) ... Started actually shopping a bit for lathes this afternoon. I've used a lot of 'em, just a matter of determining which is best suited to what I want to do (cost, space required, electrical connections, etc.).
-
Yeah, I've made a few And a LOT of others have made holsters with those patterns, testin' 'em even further. Honestly, I'm with Alex here - some holsters you see listed as "handmade", "custom" and/or "top"... may well have been made by someone who has no idea what to do with a firearm. If you want to make holsters, START with my free download "about holsters", which will give you some plain english points to remember -- things that might be common sense (and SHOULD be) but don't hurt to mention anyway http://www.jlsleather.com/sdm_downloads/about-leather-holsters/
-
If you feel like you HAVE to see a video, then I'd absolutely recommend this one: Contains everything you need to see to make a quality holster - except the pattern itself - and does it all in half an hour. Very nice, solid looking holster, complete with a discussion of why he's doing what he's doing. Most of us take longer to make the first ones, and then some speed comes later (usually). But if a guy has to break the "how to" into multiple parts, he's likely more interested in promoting his u-tube channel than actually showing you ANYthing. Watching Hank a guy could actually make his own holster. Having seen a number of those videos, just trying to spare you going through some of that...
-
Around here, that would be Nestle Purina Pet Care and Georgia Pacific Gypsum One of the young girls my wife "adopted" started over there last year. Taking home $1k+ per week, which aint bad for a kid who aint 20 yet. Plus vacation, medical insurance, pension plan, flex spending account, .... and so on. She clocks in before 7a, clocks out at 4p, and whatever happens before 7a tomorrow is not her concern. Only job might be better than that is welfare recipient. Go fishin' for a month, and when you get back there's a check there to cover all your bills! Oh, you cut yourself cleaning fish? No worry,... the medical is paid for you too (do I sound a bit jealous?)
-
To clarify my post, when I say those "making any money (profit margin)", I am talking about those making money BEYOND the $60k (give or take) that you can make being the guy on the assembly line with no responsibility at all after 5;00 pm (or whatever time you "punch out") It's fairly simple to supplement your income making leather 'stuff'. But in terms of making a living at it, then I only "count" the part that benefits ABOVE AND BEYOND that simple "job" where all the admin stuff is someone else's problem.
-
Commander length (4.25") 1911 pancake style holster pattern available for free download now. This is still listed over at cutesy, priced at 75¢. REASON for the pricing : cutesy won't allow listing for free, or even a mention that it's available elsewhere for free. SO THEN: ANY pattern of mine listed at 75¢ is there for convenience -- so people already on that site don't need to go somewhere else to download if they don't want to. BUT, if you see it's 75¢, then you auto know that pattern is available FREE on the site. ALWAYS check the free version first
-
You can find free info on making holsters - including some patterns - on my site. I don't go into stitching and simple dye instructions, since those are so simple that a long discussion is ridiculous. You don't need an hour video to tell you that the stitch goes up through one hole and down the next. And yes, you can make that holster for less than $150. The BEST leather, you can still make that for under $20 worth of materials.
-
I know quite a few people who make between $50k - $70k per year doing basically nothing. They have "jobs", but they do nothing. So, any 'craft' you want to do which requires any skill at all should pay AT LEAST that, PLUS pay for the time you'll spend on marketing, advertising, answering messages of one form or another, selling, and tax prep -- all of which is done FOR those people who do nothing. Oh, don't forget health insurance and vacation pay Leather and leather tools can be pricey, so in the end it seems the only ones making any money (profit margin) is those who make relatively low cost, quick-out-the-door stuff that I wouldn't want if it was free. "Carnival" crap... bought to be fun for the moment and then pitched out. As a carpenter, I'm sure you've seen the ones I'm talking about....
-
elegant...meticulously.....painstaking....luxurious.... ANything along those lines is fine. Just leave out "rustic", which apparently these days means "we couldn't be bothered to trim, burnish edges, or even pick decent leather".
-
Actually, .002 is 2 THOUSANDTHS, not hundredths He talks like he jus' wanderin' round wit no idear what he doin', but his pics show the real story.
-
Me, too, Big Souix. Truth be told, a lot of the youngsters only have them because they're terrified of not having what the neighbor has. You'd think they'd learn how to USE them, though. Many of the patterns purchased in the past year (sites like etsy or ebay) are available FREE if you search. Perhaps those smart phones aren't that smart after all. Oh, wait -- yes they are... they're talking people out of $1,000 per year! I actually walked away from one person who said "hashtag" in a conversation. Just left 'em standin' there ...
-
http://www.jlsleather.com/sdm_downloads/ruger-lcp-pancake-holster-pattern-download/
-
I don't mind soundin' like the idiot (again) ... actually quite used to it I just run around blurtin' out what seems to work, and the fellas decide if they like that or not. Sometimes helps to hear a guy goin' on about what DON'T work ...
-
And long as i'm having coffee for way too long today, I'll add that I am re-working the 'avenger' holster for the 19 (and the 17, 22, 23, 31, and 32). Not just quite happy, hoping to get back to that before long ...
-
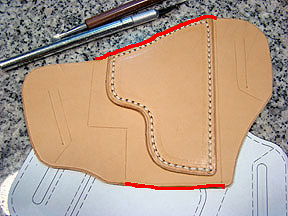
Okay .. well I'll put a 'note' in there, which is not 'mine', but more Gramma's 'trick'. I sometimes line up pieces (not just holsters) and then mark these "end" holes through with an awl. Then take the pieces apart, stitch the top and bottom (in this case) from hole to hole. Then put the pieces back together using permanent contact cement, but LINING UP THE HOLES BY INSERTING A NEEDLE IN EACH ONE. So in teh case of a '50/50' pancake holster, you'd end up with something laying flat with 4 needles sticking up. The tighter the needle fits the hole, the better the alignment, so keep holes small (which, I do anyway) This WILL work, even sewing with a machine. I start these below the rear slot -- doesn't matter just habit, mostly. Sew up around from about 8 o'clock to about 11 (the left vertical stitch line). When you're around the top left corner, pull out the first pin, and 'land' your stitch in that hole to make the turn. Down, and over, and down.. pull another 'pin'... etc. I'm not one who knows sewing, really, but I remember seeing Mom and Gramma put a hem in clothes... they'd pin the thing all around to get it where they want, and then remove pins as they sew. Figured it had to work here too (and it does). NOW, someobody is saying that sounds like a LOT of trouble just for what it does. TRUTH IS, you're talking about a few seconds to make sure everything "works". It actually takes a lot longer to SAY it than to DO it.
-
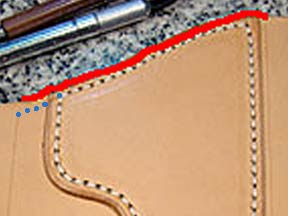
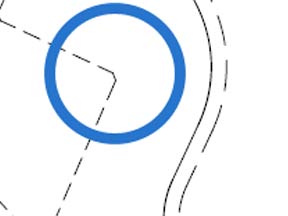
Yeah, that This pic may be a bit larger, showing the way to mark the front panel on the pancake. The witness marks are on the ends of the vertical stitch lines. If you start and end your stitching on the vertical lines, then the finished rig will look like the stitching is continuous (though it isn't). Maybe I should split this a bit more. No time to make one today, but maybe I can explain it clear enough. Not finding my pics of this @!#!$#!! With a lined holster, you would stitch these areas before joining the front and back. This is the same step as stitching the top of a 'western' rig before folding. The stitching in the vertical lines would then go back in teh same holes at the top and bottom. On the right, I've "painted" some stitching holes. Mark the first hole on the vertical stitch line. IF NOT using the panel, just end on the other stitch line. IF using the front panel, then stitch to the first hole of the panel (shown blue) by piercing through with your awl and then run the front thread UNDER the panel edge (I've tried it going OVER.. it's not good ). This assumes that you are stitching the panel down and THEN lining the front of the holster, though that isn't absolutely necessary, it would help to protect the stitching. If using a machine, you'd need to do like 3 stitches "by hand" in that area (1 under, 2 back). Oh, that actual distance isn't critical, but I DO recommend a slight 'bevel" on the inside corner of the stitch line, instead of a sharp turn. Takes a LOT of pressure off that corner, and I think helps the holster form a bit easier due to the radius on the frame of the pistol. I mean this... Just a stitch will do it. Makes more difference than ya might think...