JLSleather
-
Posts
7,378 -
Joined
Content Type
Profiles
Forums
Events
Blogs
Gallery
Everything posted by JLSleather
-

Tuckable IWB for XDs
JLSleather replied to Josh Ashman's topic in Gun Holsters, Rifle Slings and Knife Sheathes
HEY! That sucker's backurds ..! Looking good as usual. -
Got a fella wrote about a pancake holster for a Charter Arms Bulldog 3" .44 revolver. The one he commented on was right handed and black with black stitching, so very likely that's what he wants. Guy is in Houston, so folks in TX given preference but not required. I'd like to recommend someone to get this done for him -- so let me know if you're making these and I'll put the two of you in touch so you can work out your own details and pricing.
-
Pancake holster construction
JLSleather replied to JLSleather's topic in Gun Holsters, Rifle Slings and Knife Sheathes
I think that's 3 of us saying the same thing a different way (I think Dwight was meaning the same thing here). It's the same amount of leather, inside to outside, but the 'air space' with the "flat back" (mine are about 80/20 with a curve, not true "flat") is on the outside. Which is a rather long way of saying that the "back and loops ride tighter" -
Pancake holster construction
JLSleather replied to JLSleather's topic in Gun Holsters, Rifle Slings and Knife Sheathes
Done all sorts o ways. Some 'rough cut' the front piece wider and trim after forming. Others refine their pattern so they mold like that but no trimming required later. One advantage is that the holster need not be as wide - the slots can be closer to the weapon. -
Charter Arms Bulldog 44 Spcl Holster
JLSleather replied to K5HEP's topic in Gun Holsters, Rifle Slings and Knife Sheathes
Oh, sometimes I guess I just assume people know what i mean I don't SPLIT them, like make the whole piece thinner. I was just talking about skiving the EDGES (not the top) down to about half thickness. Then I edge (with an edger) and burnish before stitcher down. Pulls the edges RIGHT ON IN. Big improvement in the finished look, I think (and with exotic leather stiffeners, it's even more drastic improvement). And with a revolver holster, ya git that "wrap around" look -- so if teh lead edge of the stiffener is skived down, it basically disappears from view (without giving up any strength). Now, when I say skived here, I'm just talking about a tad past the stitch line. .. -
Masonite, or Plexiglass. That "stiffener" from Tandy is nothing more than firm paper -- useless.
-
Charter Arms Bulldog 44 Spcl Holster
JLSleather replied to K5HEP's topic in Gun Holsters, Rifle Slings and Knife Sheathes
WOW>. the DESIGN is AMAZING The guy did the layout is SMOOTH Contacted me? More like CORRECTED me But really ... looks good -- keep 'em coming! HEY .. long as we got ya on the line, and you went to the trouble to lay out that 'stiffener'... show us a pic more from the front. Wondering how close you ran the panel to the front stitch line, and did ya skive the panel leather 'afore stitchiner down? -
Pancake holster construction
JLSleather replied to JLSleather's topic in Gun Holsters, Rifle Slings and Knife Sheathes
I agree with the comfort of a (mostly) flat back holster. A bit more time to make, perhaps, but not much. TOO many of the pancakes I see molded "in the middle" or "50/50" have slots too close to the weapon (like an extra 1" of belt space would kill)) which can cause binding of the weapon on a pancake. With a flat (or near flat) back, this is eliminated. Darn.. did I just let out another tip for free?@@! I have GOT to quit that ... -
Art, he wants to use 207 thread... is he good to go on the 18 / 0618?
-
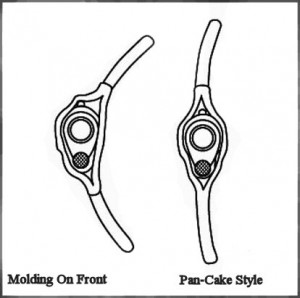
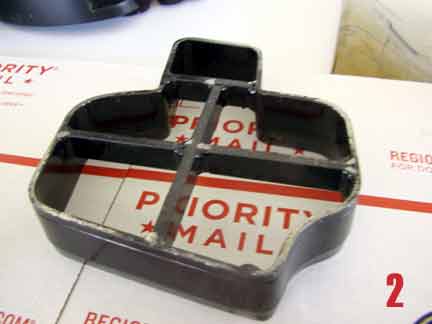
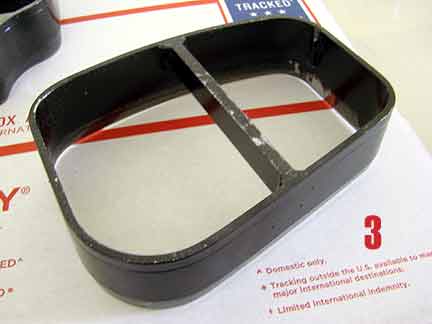
Stumbled across this picture on the web somewhere.. guy claiming that one is thicker than the other and thus his was "better". In under a minute, let me show you why it doesn't matter Here's the picture. Somebody was claiming that the one on the right was somehow "thinner" and thus "more concealable" (and it's debated on a number of gun forums). BUT ... In both 'versions', the gun is the same thickness. And there are two layers of leather, one front and one back. And that's it. The gun thickness plus two layers of leather, is the same either way. While they can be made to RIDE differently, just changing which piece gets the molding will obviously NOT change the thickness of the holster. When worn, there could be a little air space between teh wearer and the holster, especially close to the firearm. But the holster where the gun is will be against the hip (in both cases) and the thickness is the same, so they protrude the same amount. So what's the point? Molding in the front panel, or molding both panels to the middle, SAME thickness.
-
Small Revolver Holster
JLSleather replied to Josh Ashman's topic in Gun Holsters, Rifle Slings and Knife Sheathes
Hey! That does NOT seriously "suck"! I'm jus playin'... looks great as usual! -
This one? https://www.etsy.com/listing/220575650/smith-wesson-mp-425-inch-gun-holster
-
I cut the shoulder section off of sides for belt leather, about 60" from the butt end. This will give you belts about size 50, and then I use the shoulder (which is one piece) for cutting holsters (mostly). This way the belt and the holster (or knife sheath, or whatever) will match in color AND texture. On the odd chance that someone needs a belt larger than a "50", I'd just start another hide. It's only happened twice in about 100 years (ish). Oh, maybe I should add that I cut the belly off as well.. useless for belts, except perhaps to line them. I generally order backs, which is sides with the belly already cut off, but since you said sides, I would cut off the belly.
-
You didn't mention the size thread you wanted to use. BUT, I will say that I have never found the support from steve (or anyone else out there) to be priceless. Or even useful. I have never seen the model 18, and the one guy I knew who had one didn't particularly like it. Art (above) seems happy with his, so that's one vote "for" and one "nay" BUT.. the thing here is.. if your machine leaves (pressure) marks in light weight leather, then you would expect it to be WORSE in thicker leather. I mean, the spring would be compressed MORE the thicker the leather. Fact is, that machine you have SHOULD be able to sew the thickness you describe 8 oz to 12 oz English bridle).
-
new to me pattern matierial
JLSleather replied to Albob's topic in Gun Holsters, Rifle Slings and Knife Sheathes
If you haven't seen it already, check out this other thread. Alex's use of contrasting colors clearly shows why this is done the way it is, and makes a durn right purdy rig in the process -
new to me pattern matierial
JLSleather replied to Albob's topic in Gun Holsters, Rifle Slings and Knife Sheathes
HEY tha's lookin purdy good! I'm not a big fan of basket weave, but I like what you've done there. GREAT - also - to see a guy come up with something that works and SHARE it... not enough of that goes on these days. I've also used non-stick frisket (available in the art section of craft stores or airbrush supplies) and for those I use a LOT, Plexiglas (you can see the leather under it - and avoid 'bad' spots). Definitely ask your friend what he did differently -- those files should print fine if you have the printer set to "actual size" or "100%" or something like that. Make sure your printer options don't say "scale to fit" or some such. When I do these, I mark the ENDS of the stitch lines and the tuns, then just use a stylus to draw in the straight parts. And I don't "join" the stitch lines by the inside of the slots.. the holster is much stronger without it. Stitching all the way across causes a stress point much like scoring a something to snap it. Pic shows what I mean... OH YEAH.. you'll likely find some people going on about a double row of stitching. While this gives another "look" to the finished product, it's not a good plan. MORE HOLES IN THE LEATHER = LESS STRENGTH IN THE LEATHER. Simple With a second row of stitching, the inside (gun side) stitch line STILL takes the brunt of the stress, and the second stitch line just makes holes ...
-
Might depend on which interiors you bought. I glue 'em. But then I also rip out that goofy cardboard junk they put in there (it's fine to keep it flat for shipping, then it gotta go).
-
These are sold.
-
I guess you fellas making them there G43 pancake holsters was wondering where'sda matchin' mag pouch? On the free page (link below) Note this is available in the etsy shop for a small fee. They won't let me list it there for free, but it saves a guy going to another site if you happen to be there anyway. SO THEN< smart money says go get the FREE ones FIRST!
-
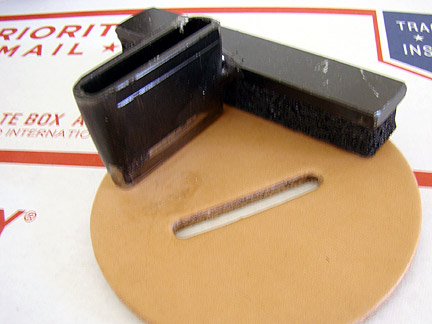
$40 each, or $125 takes 'em all. Shipping is additional, but not over $13 for ALL ($7 for one) #1) 3 3.8" round, for leather coasters and similar. One piece construction. The white "boogers" on the die are from masking tape, it will clean off if you care to do it. Patterns for #2 and #3 are available FREE on my site, so if you're only making a couple I'd recommend just using the pattern. If you're making a few a week, that's where the dies come in #2) Makes mag pouch style 2 #3) Mag pouch style 3 #4 is intended to be used in a press.. it will stand on it's own. The "legs" are covered with a pad, which compresses but does NOT punch. Only punches the SLOT itself. Could be used with a mallet as well. 4) Slot punch 7/32" x 1 5/8" (I like to burnish the slot and end up with 1/4, not start with 1/4" and get wider)
-
Selling some small dies. Some for mag pouches, some for leather coasters, some for small wallets. All are ready to cut. Pics will be uploaded.
-
Aluminum works great, too, in place of board. It's dimensionally stable, lasts forever, won't stain the leather. As for nailing down the leather, that's been done for a LONG time. If you use your tools to form it down (assuming the back is flat) then mark the stitches with an overstitch wheel (or chisel) you can then place the nails right in the stitch line IN THE MARK for a hole, and then when you sittch the hole will be used anyway. I don't do too much of this type of case forming any more, but I still have some COPPER BRADS that I used for the nails. Copper - like the aluminum - won't stain the leather.
-
http://www.holstersmith.com/vcom/index.php?cPath=555_563 http://www.knifekits.com/vcom/index.php?cPath=41_585_586 http://www.alternateforce.net/blueguns-handguns.html http://duncansoutdoor.com/httpduncansoutdoor-comwp-contentuploads201505dummy-gun-inventory-2015-05-22-xlsx/ http://www.ifithermoplastics.com/products/blue-guns-handguns
-
Am I the only one who doesn't "get" the belt loop thing, and the dotted vertical line right in that area?
-
Officially, the two points would be 1) where the tongue meets the buckle, and 2) the hole you want to use, on the INSIDE of teh belt (the outside will not measure the same). I see the graphic is missing.. maybe this will help until if returns Note that the leather is the SAME length in each belt, but the buckle changes teh "size".