JLSleather
-
Posts
7,378 -
Joined
Content Type
Profiles
Forums
Events
Blogs
Gallery
Everything posted by JLSleather
-
We wanna see this "weird" way, and then we'll decide if it's weird or just useful
-
I work from the inside out. Long as the inside fits, you can alter the outside a bit if you care to. Alex is right -- I wouldn't use heavier than 8/9 on a holster that small - you don't gain anything, and I think it doesn't help the look. Particularly if you're using the front "stiffener" panel -- more than about 9 oz is going to be unnecessarily bulky. If you want to line it, you might go with a 4/5 "outty" and a 3/4 "inny" or a double 4/5. Goat IS quite good, but veg cow will work well too. With a lined holster, you'll likely find that the two layers are pulling against each other and the additional "stiffener" panel is unnecessary. As for lining things up ... I pay attention to the 'witness marks' on the pattern. If the'res a little variation in the way you cut out the front and back, not a problem. And I'll throw in a comment about the stitch line here, since it kinda goes together. I glue as shown on teh pattern, then when the glue is ready I line up the witness marks and stick down (it's possible if Alex has pieces sliding around, maybe let the glue set a tad longer before putting together). Once it's stuck together, THEN I even the edges. Again: I trim up the edges AFTER gluing and BEFORE marking the stitch line around the outside. I like my stitch line a "strong 1/8" in from outside edges, but i want a consistent distance, so I even up the edges and THEN mark teh stitch line (divider or creaser). Maybe doesn't matter, but i mark the stitch line even if I'm using the machine. OH YEAH.. also about lining stuff up .. I don't punch the slots until it's together, then punch through all layers together (I hate lining stuff up too). So, even edges, punch slots, then mark stitch lines around perimeter and up the slots. Lefties, FLIP teh pattern. If you're lining the holster, .....you'll want to stitch all edges. This means that where I show the red lines (right side of P3 instruction) you'll want to stitch all the way from the back stitch line to the front (whether using the front "panel" or not). I often make holsters with the leather dyed before stitching. The exception being if I want the thread to match the holster, I'd likely construct and then dip the finished holster in the dye so it also dyes the (nylon) thread. I tool holsters when asked to (you might be surprised how popular those old Stohlman designs still are). As a rule, I don't prefer them tooled, since it adds considerably to the cost (often whether done right or not ) and you're paying for a design which is intended to be concealed! As a rule, tooled is fine for on the shooting range (may get you some business, too) or for open display. I wouldn't care to carry one, since I don't see it going so well somebody asks can they see your rig Okay, if I forgot something, Alex prolly got 'er covered anyway!
-
Welcome .. and keep 'em comin'
-
There's the bottom line right there. I don't mind PAYING PREMIUM prices, long as I'm GETTING PREMIUM leather. This is true wherever I purchase. It does seem like some places rely on people who won't know the difference.
-
Added Alternate Force $43 guns (quick!) bluegunstore name is easy to remember, but the "free" shipping is added to every gun, so buying 3 means paying the "free" shipping 3 times Bunkhouse Tools They have a few models I haven't found anywhere else. Different look, but they work great. Good service, too. Duncan's Customs Aluminum molds - I like these. $50 guns and $15 mags Holster Smith Index Fasteners $45 ($60 for the "holster ready" mulit-molds), plus they have holster accessories (loops, screws, washers, etc) less $ than many places Knifekits Law Enforcement Targets $40
-
Alternate Force $43 guns (quick!) bluegunstore name is easy to remember, but the "free" shipping is added to every gun, so buying 3 means paying the "free" shipping 3 times Bunkhouse Tools They have a few models I haven't found anywhere else. Different look, but they work great. Good service, too. Duncan's Customs Aluminum molds - I like these. $50 guns and $15 mags Index Fasteners $45 ($60 for the "holster ready" mulit-molds), plus they have holster accessories (loops, screws, washers, etc) less $ than many places http://www.holstersmith.com/vcom/index.php?cPath=555_563 These last two appear in search, so I listed even though I've never ordered there. http://www.knifekits.com/vcom/index.php?cPath=41_585_586 These last two appear in search, so I listed even though I've never ordered there. Preferences? I like the Duncans' aluminum molds myself, but if you're determined to use RIngs blue guns then I like Index, due to the selection of other 'stuff' I can pick up in one stop. Also, only takes a minute to do an Ebay search. Occasionally there'll be a guy with one or two used for training and no longer needed. Sometimes find something worth while, just sort by "price plus shipping" and blow past those people who somehow think you'll pay more than $45.
-
Slight revision made to the 1911 5-inch avenger holster. Sightly different look, same fit. Every 2500 downloads, a fresh look don't hurt http://www.jlsleather.com/sdm_downloads/free-1911-holster-pattern/
-
Local flooding not good for walleye fishin', but good for the holster boys ('n' girls). RUGER LCP holster getting uploaded shortly - simple 50/50 pancake style holster pattern with an addition to show how easily this can be converted to an 'inny/outty' rig (the LCP lends itself to this well). Obviously, easily done for other smaller handguns. First stage (simple pancake version) uploaded and ready for use! http://www.jlsleather.com/diy/holster-patterns-diy/
-
I just went through a stack of receipts, saw how many times I got something from down there that I had to return. Yikes! Looks like last time I ordered anything down there was Feb of this year. Paid $150 for a belt bend I had to 'finaggle" to get 3 clean belts out of. They had it down as H.O. "B" grade. Sorry, no rush to get back there.
-
I don't hand sew with it, but I get thread in those weights from http://www.thethreadexchange.com/
-
I usually refer to myself as Jeff, but I have others using various terms
-
If you're making solid color ONE color belts, then certainly pays to use drum-dyed leather rather than dyeing it yourself. Not only a cost savings, but the TIME is greatly reduced, and that's a lot of fumes you AREN'T breathing. Dwight already stated, figure you'll need straps about 10" longer than the finished "size" you need. I buy backs for belts and generally ends up being about $8 per 1" of strap width, so 1.5" is about $12-13 piece. I line mine (with undyed veg tan usually) so that's another $12-13, and then glue, thread, snaps and/or screws,... end up with $26 NOT including cost of the buckle you choose.
-
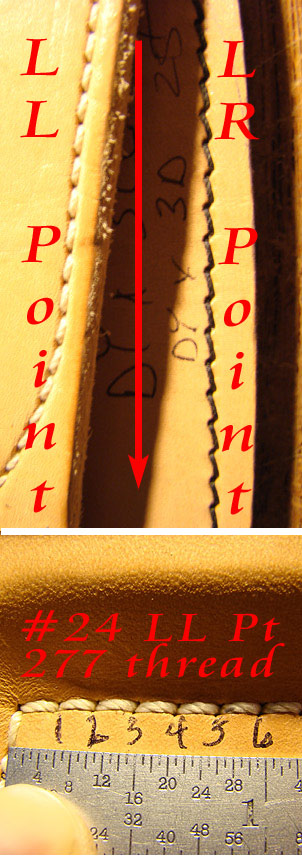
 Re: needle size to thread size. Keep in mind that not all needles are created equal. Two different manufacturers (or even the same manufacturer) may make - for example - a size 24 needle with a different hole size, point geometry, etc. Two needles can BOTH be 794 series and size 24 yet be considerably different. I wouldn't carve needle sizes in stone.. just a place to start - like how hard do you strike a punch (answer: hard as you need to). Red has been on about poly thread for a while now. I tried poly thread (and still have some) but I prefer the nylon. From what I have read, the "advantage" of poly thread seems to be a bit more resistant to UV -- other words less likely do decay due to direct sunlight. This is not a new concept -- my monofilament fishing line has the same issue -- but it doesn't disintegrate over night. So, I largely (not exclusively) use nylon thread. This week I had opportunity to see a tooled handbag I made over 25 years ago -- does NOT need re-stitched Having said that, I've always liked Red's holsters, which appear to me to be both solid AND attractive. Incidentally, my post above must have been 'fat-fingered'.. it should have ready that i prefer LL point needles. The stitch is much straighter, and tighter with the same tension setting. QUICK PIC of the difference, both stitches were done without changing the stitch length or tension... Note that the black stitch on the right (LR point) appears longer due to the angle - it is the SAME stitch length as the left side.
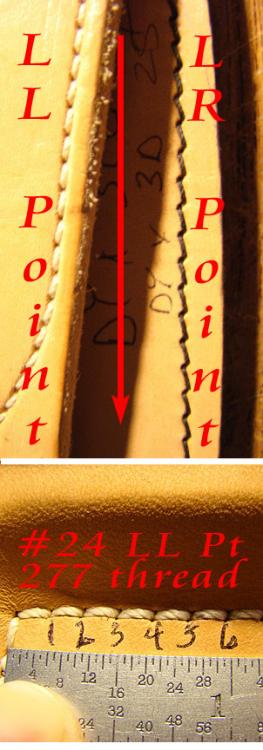
-
Incidentally, if somebody got this same view on a Cowboy machine and cares to send it, I'll put it on my site for FREE viewing by all.
-
I had a video on my computer at one time, must have deleted it after deciding it wasn't my responsibility to answer for questions from someone ELSE'S customer But, to spare you the pain of enduring over an hour of what-have-ya over a simple question, we'll use this one. Well, actually, a small sliver of this one. FF the second video to about 14:30 on the time (slide the red dot on teh timeline). This will show you the "end view" of that machine so you can quickly tell if your problem is in the timing of the needle. No need to turn on the machine and shatter something, just turn the wheel by hand. Note the position of the needle and the the position of the shuttle and presser foot (you can turn the sound off it you like, may help). Looks like about 14:32 the needle is about bottomed out. The hole in the needle is a little lower than the hook. The hook is rotated left and the (outer) presser foot is coming up (center foot coming down with the needle). Continuing, the needle begins to rise and the hook rotates clockwise until about 14:34 the hook arrives to pick up the thread and the presser foot is all the way up. By 14:37 the thread is sweeping the hook assembly and the presser foot is down again
-
exactly. Goes for anything really... easier to learn it right the first time than try to "unlearn" the wrong way. Now, that said, there is some variation in what people consider the "right" way -- not everyone does the same things. I DO think you'll want to get away from belly leather, especially for tooling (NOT the same as the back or shoulder). I'm the guy who NEVER recommends throwing money at books, classes, tutorials, or even burning up time on youtube poop-orials (EVERYBODY got one these days, most of them say nothing). STILL, I DO recommend the new guys git a copy of Stohlman's Tech Tips. Available by digital downloadable file, inexpensive, and got info in there you could learn form for a LONG time.
-
I like 6 stitches / inch most of the time. On tooled belts, I may aim for more like 5/inch but it matters if it's part of a set. If I'm making the holster 6/in, then the belt would be also. I've used a holster plate, but only occasionally. Certainly can help in spots where the project isn't flat, or if you are sewing down a piece with a metal clip, etc. Using the holster plate WILL require you to reset the stitch length and MAY require a change in tension. Thread is most often 277. Smaller projects might get 207 (pocket holsters, small bags / large wallets, etc.) 277 thread I use a #24 needle (some others prefer a #25) and 207 uses a #23 needle. I like the LR point needles. Scraps are good for setting the machine. Set teh machine with leather from the SAME hide as the project you're working on whenever possible. Different pieces of leather act differently, and I don't want to put hours in a project only to "hope" the stitch looks good. I have used the little goofy edge roller guide, but a drop-down guide would be far better. Since everyone here is considerably smarter 'n' me, I'm sure I'm the only one made these mistakes, but I have forgotten that I changed the stitch length for a project and started sewing without putting it back where it should have been for the current project. moved the reverse lever without looking, and not put it all the way up or all the way down (not good); changed the stitch length cuz I wanted a longer stitch, and by not paying attention i shortened the stitch. Again, I'm sure I'm the only one That should get you started. For more technical info, I think it's reasonable that a new machine dealer can handle that themselves (you paid for it).
-
Alrightey, then. That fella has done mosied on up the road
-
Not much reason to add to that If I had 50 open orders ONE time, I'd keep customers "in the loop" and get over it. If I had 50 open orders ALL the time, I may need to hire at least one...
-
Tha's lookin purdy. Is the blue gun the 4" (intended to stick through) or longer (like the 4" will be covered)?
-
Sweet.. a guy who recognizes his weak point and DOES something about it (bitchin' don't count). Best bet is ask the fella who did the work, but I woulda went with CUT lines. I know you can buy "double" swivel knives that would cut both lines at the same time, or some people cut ONE and crease the OTHER (look up beader). Long as I'm here .. the basket weave is a bit much for me, but the stitchin' on BOTH those looks great.
-
Did you search on here? Seems I remember that youngster from South Dakota did something like that a while back (and did it fairly WELL).
-
Pancake holster construction
JLSleather replied to JLSleather's topic in Gun Holsters, Rifle Slings and Knife Sheathes
On the lighter side, I don't mind sayin' what I don't like the idear of 'appendix carry'. Somethin' bout a gun pointed at my 'pendix' that i just kaint git useta -
I just tell them when their order will be shipped. A few times, I've slipped behind a bit. Nobody had a problem with that as long as you contact them to let them know it will be a bit later. But I wouldn't wait until they contact me to tell them I'm not "on schedule". But then I wouldn't wait 10 weeks for a plain belt, either. Using drum-dyed leather and a sewing machine, I can't imagine a belt takes more than a couple of days to make.
-
Lemme look through the mess in the basement, might be able to find something like what you need. If you're in a hurry, Springfield does sell blanks at 72" (or used to), but they's pricey. How you making that belt? Not sure I understood, so here's ONE way, for what it's worth... I take the waist size (in your case 47) and subtract the buckle being used. This is the measurement from the center hole to the fold line. 3 1/2" over teh fold -- this lets me use three fasteners (either snaps or screws), at 7/8", 2", and 3 1/8" from the fold. Then add 6" for the tail (billet) end. So if you had a buckle 1" long, then you would need leather 46" fold to center hole, plus 6' billet (52), plus 3.5" over the fold (55.5"). Then ask yourself what you're making it out of. If teh finished belt will be about 12 oz leather, add 1" in teh measurement (making it 47" fold to center hole and 56.5" over all). Long story, but that works I prolly have both the 9 oz and some 3/4 to line with. The work you're posting has been great --- hate to see you 'splice' a liner... just not a great look.