


JLSleather
-
Posts
7,378 -
Joined
Content Type
Profiles
Forums
Events
Blogs
Gallery
Store
Everything posted by JLSleather
-
Was gonna stick in the link, but by the time I go through that I might as well just copy the photos here! This the right one???
-
I s'pose customers are a necessary irritation ...
-
Girl wants a handbag for her Mom for Mother's Day. "Deciding" for about a month. Now wants this fairly simple bag, standard design, and she's ALMOST sure of the color she wants the orchids painted on the bag. Still wants it by Saturday, though... I'm reminded of Faye Dunaway in that movie years ago (not that in itself is bad, cuz she's STiLL SO cute) ... asks that guy if he hates people ... guy says no, he don't hate 'em, just seems to like it better when they ain't around!
-
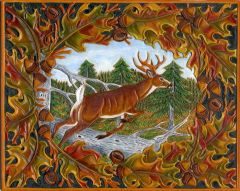
I personally didn't find these as "lame" as you said. Pictures are quite large, so it took me a minute I often wonder if people realize just how many "patterns" they have. Below is an example of what I'm talking about. I rarely draw "from scratch". Exceptions have included a 12" x 18" framed picture of a steamboat on the river from a photo of the one that lady was married on, a Santa Fe locomotive engine coming out of the mountains entering a town with a sign saying "Olen" (his Dad, who retired 35 years with Santa Fe, was named Olen), and a picture of that lady's Afghan dog (which was by far the hardest, scrawny dog with long hair- that couldn't look like A dog, had to look like THAT dog). Burglary a couple years ago got those photos (I still wonder what good they were to anyone but me). Anyway, here's a couple small photos to make the point ... all from one "craftaid" in the interest of speed. One with a deer, dyed with Fiebing's "dark brown" (hence the slightly reddish tint), one with an eagle, dyed in "chocolate" brown, one with Zachary's initial done with a mix of the dark brown and chocolate.
-
Been a while since I ordered tooling leather from them, but ALL of my dyes, finishes, and most of my hardware comes from S-T. The KIDSKIN lining is the best I've found for the money, no contest (this stuff is thin, strong, and gorgeous). S-T Leather Co P.O. Box 78188 St. Louis, MO 63178-8188 Phone: 314-241-6009 Fax: 314-241-8428
-
Hi, Anne - If you have a photo, you can post it by clicking "reply", and under the message click the browse button to find your photo and - having found it - click "Attach This File". If this is a pain, you can send them to me and I'll put them in THIS thread in the morning (off to bed, age thing ). Not going to be able to make your bag in that time frame, but I can shift some colors & designs and post them for others if you like
-

A Bunch Of Dog Collars And Display
JLSleather replied to azrider's topic in Collars, Cuffs, Leashes and Leads
This looks good. Attractive, functional, incorporates the advertising, relatively small investment ... nice job. Only question, then, ... what kind of feedback are you getting from the dogs about color options -
How big is the fish? This one off a small wallet, using a 411 veiner (or was it 412 ... if this is the look you want I'll go check). Fish is about 3 1/2" long.
-
All the older patterns, including craftaids, assumed that style was 9 1/4" x 3 3/8" and used 3/4 oz leather backing (I think the 4/5 oz is considerably too thick for a wallet). Anyway, the liner was then made from 1 1/2 - 2 oz chrome tanned, usually calf or goat. No notches. The sides were made 6" x 4" and then folded in half to 3" x 4", leaving an inch between them. The 1/4" shorter made the wallet bow slightly, which keeps it from "bunching". Tough to sew on a flatbed machine, but otherwise works well.
-
A photo of where you're trying to go would help. USED to be, a "bill-fold" was 9 1/4" x 3 3/8" and folded in half, and a "bi-fold" was 7 1/4" x 4 1/2" and folded in half. So it obviously matters which one you're trying to make. These days, I guess folks 'er calling this a "bi-fold". This what you're trying to do?
-
Maybe I Am Gong About This Wrong
JLSleather replied to TrustCommunicationConsent's topic in Leather Sewing Machines
Doesn't like to pull the lock stitch into the center. Bottom thread not pulled up far enough. NEW tension assembly didn't really make any difference. New bobbins and bobbin cases ... same thing. Thread size doesn't seem to matter. I'm using it, but the thing is so moody that I have to "organize" a bit much ... as in sew ALL of that type of leather I need sewed in the near future before changing to something else. Just too much trouble to put it back again. Here's the irritating part... really no money in this thing but I certainly wouldn't trust it to sew a project I have hours of carving/painting in. Then, I've never really minded hand sewing, but after ordering three different awls from three different places - all of which were useless until you regrind them ("sharpen" doesn't cover it) - it just added to the aggravation. I ordered leather from "40 years experience" and got a hide that I wouldn't use for a drop cloth. These and other "new" items were just waste-of-my-time irritations, but I'm unlikely to be so forgiving if I spent $2k on a new machine and got the same "service". A "guarantee" that I can return it is useless to me - just means I killed time twice. So, I'm done letting it stress me out. I could have spent the wasted time making other projects for the upcoming show and easily made more than I invested in this thing. Pro'lly just throw it in somewhere out of the way in case I ever need parts - or a place to clean some fish. Please don't invest your time in diagnosing the machine - I'm done with it. I'd sell it for what I have in it, but honestly can't be bothered to ship it. All this other stuff was just wondering out loud if anybody else is seeing the same things. -
Maybe I Am Gong About This Wrong
JLSleather replied to TrustCommunicationConsent's topic in Leather Sewing Machines
I got an issue with this 16-188 too (I THINK it's just BEFORE the 111). Killed a day picking it up, another day messing with the tension, another day ordering parts, one more day having it checked out. It works, but I can't seem to keep the tension adjusted. At this point, the time I lost is worth more to me than the money I have in it. With four days, I could have profited more at the upcoming leather sale than this cost me. Ordered several sewing awls, figured I'd get some done by hand while waiting on the machine. Wouldn't you know it, every one of them dull. What happened to the "old days", when new meant working? I spent $100 and got some dull metal. I spent several $100 and got a machine that sews OK if you have the patience (and a good bit of the same leather you're using) to set it up repeatedly. All of this has me pretty much gunshy about buying a machine. But, I NEED to have things sewn, so I'm not really sure where to go from here. In the process of calling around to get this machine serviced, I got alot of "we don't do that any more", so I assume it would be the same with the new machine. -
Who carries leather needles for this Singer 16-188?
-
Tricks To Making Flaps Even On Any Type Holster
JLSleather replied to mmirob's topic in How Do I Do That?
FOLD your pattern material, then cut one side of the pattern line, cutting through both layers. When you unfold it, it WILL match. NOTE: You'll want to measure/mark the INSIDE of your pattern. This will make it fit your item. The thicker the material, the farther off it will be on the outside. Think of it this way... you make a 12" x 12" x 12" box from 1/8" thick masonite. Inside of the box measures 11 7/8 x 11 7/8 x 11 7/8. Make the same size box out of 3/4" lumber, inside the box is now only 11 1/4". Leather the same way. Any type of case that is going to custom fit the item should be made with the INSIDE dimensions in mind. -
Expensive Lesson Learned On Aerostitch
JLSleather replied to BillinOK's topic in Leather Sewing Machines
Hey, Bill- If that's an "expensive' lesson, I'd say you must be living right! I can honestly say I don't make MANY mistakes, but when I make one it's usually WAY more than $35. Not that I'm proud of it, just by way of giving you an "attaboy"! Now that I'm thinking about it, the stitches in my finger are definitely NOT going to be in the $30 range. That was me, failing an idiot test Note to self: put down any knives BEFORE sorting the stuff on the table ... -
Really irritated that I can't seem to find some plain english information on sewing leather. SO, I'll throw this out once, see what happens. I used to enjoy hand-sewing leather (no, really). Awl got busted up, so I ordered a new one. Came with dull blades. Too much to do at the moment to sharpen them, so I ordered more blades from a different supplier. Guess -- yeah, dull as... Ordered from yet another supplier -- the blades don't fit the haft. Ordered one of those little stitching pony things from the Tandy store down the road. This thing is ridiculous ... whole thing is so twisted that it only clamps on one corner. English doesn't have words for this situation ... NO way this should be this big a pain. Got this Singer 16-188 machine, used and [apparently] reasonable. I don't sew with a machine, so I'm assuming I'll destroy some leather, ... fine. A few new parts, under $100, and maybe $100 worth of lightweight leather. But I'm about frustrated with the whole thing. Recognizing that it's possibly operator problem, I kept trying to adjust this n that. When the thread tension is "buggered" on the bottom, is it the top tension, bobbin tension, needle, thread, ... manual is pathetic, what I could even find. Wife called a place about an hour from here, says they "service" these machines. I drove 10 miles PAST this place to pick it up. My fault, I suppose ... had I known that at the time I would have let them service it BEFORE I brought it home. In the end, I just want to sew small items -- wallets about heavy as it would get. 3/4 oz carving leather, and 3 layers of 2 oz chrome tanned lining. And my wife has purchased some garment hides her and the girls from work want purses made from. Should be simple, right??? By now I've messed with the thing enough that I'm behind on the other stuff. Knowing I could have hand-sewn some stuff with a decent awl blade has got me picturing that hammer in the cabinet. So I click, click, click through the leather machines site, and get a page that says to call us. Wow. SO -- 1.) anybody can tell me where to get a decent awl haft that comes with sharp blades? 2.) how many machines should it take to sew - say - up to 10 oz leather?
-
Anybody ever buy Tandy's "lacing pliers"? You can get the same thing at harbor freight for .99 cents ... only they call it a needle-nose pliers. Tandy's were just under $10 for a while. Even MORE obnoxious, Ebay is full of people selling Tandy stuff that has been marked up AGAIN! And people are BUYING it ??? If you're making small projects (wallets/checkbooks/clutch) S-T's goat lining just can't be beat for the money. TOUGH, and BEAUTIFUL.
-
Fiebings Dye
JLSleather replied to BillinOK's topic in Dyes, Antiques, Stains, Glues, Waxes, Finishes and Conditioners.
Bill - I had this problem with these spirit dyes, LONG time ago. They contain a sediment, basically little color "flakes". This is oversimplified, but these "flakes" suspend in the reducer. Some of the particles were either too large or too many to be absorbed. The darker colors are worse than the lighter. I would suggest that you let them settle out (NOT shaking/mixing it in). Siphon the dye from the bottle without sucking up the plates from the bottom, put it in a different bottle. I still use these dyes, haven't seen that issue in a long time. Saves MOST of the dye. -
I haven't used the W&C, but I have part of a side of 3/4 oz Royal Meadow I'm working on now. Good leather, I picked through a dozen hides, and they were all pretty good looking. But, I paid over $6/foot, and that was the "wholesale" price. Would have liked to pay a little less, but I've mail ordered from some others and didn't like what I got (in fact, one guy I will NOT buy from again - I'd hang up the tools first). Max is right about the Tandy stuff, too... I paid the $6/foot because there was nothing else in the store worth buying, leather wise. And King is right, it's very "blonde" ... but I happen to like that.
-
I think you're on to something here. Those of us who work with leather already have most of the tools we need, so our "cost" for a new holster is a chunk of leather, which is likely less than $20 for some really nice cowhide ('course, we buy $125 and cut it out). If leathercraft is something you're interested in, then there is alot of information and assistance around here. If what you want is one holster, then you probably want to purchase a finished one. I'm not familiar with the ones you displayed. They certainly look good, but I have no idea about the quality. One note from the "odd" guy ... while I LIKE hand-crafted, I will NOT say that hand-made is necessarily better than "commercial". I cut with a knife, "they" cut with a die -- doesn't really matter.
-
First Place Masters 2010
JLSleather commented on Little John's gallery image in Our Leatherwork Galleries
 I'm not usually big on this type of color, but this is nice! How big is that?
 -
Here's some stuff, which may give you some insight as to the "why"... I use 3/4 oz leather for carved bilfolds AND checkbooks. Lined with 1 1/2-2 oz ... goat when I can get it but calf will work. For these small projects (or smaller, like key cases) that I'm going to paint only, I'll step down to a 2/3 oz back and use the same lining. I don't want a wallet that's more than an inch or so thick before I put anything in it. ALSO 3/4 for clutch purses, though I have been known to use a 4/5, since it's not going in somebody's pocket. I like a belt to be 8-10 oz TOTAL, so if it's lined I'm likely to use a 6/7 with a 2/3 lining. Carving still good and deep, and lining has some substance. There's only a couple of times I could think of for a belt heavier than that ... ONCE made a belt was about 12 oz total for a guy with a 52" waist. Not that it needed to be that heavy to hold his britches, but a thinner belt wouldn't have looked "natural" on a fella that size (consider the opposite - 9/10 oz leather doesn't make a great looking 3/4" strap). Weightlifting belts are generally 18 oz total, give or take. I made a double-holster western rig for this big fella with a set of matching .44's that was about 12 oz, with the holsters 9oz with a 2 oz lining and 9/10 oz ranger style billets. Carrying a good bit of weight, but then it's 2 1/2" wide (closer to 4" where the holsters sit). If you have a truck that needs pulled out of the mud or snow. But then, I have a chain and tow strap, so this is not an issue. And handbags, I really don't think you can say ONE weight. Smaller bags - say up to about 10-12", I want them to be about 6-8 oz total, including the lining. Very large bags, which you don't see too much any more, MIGHT go 8-9 oz (total) if they're spanning some distance (nothing in between supporting it). Beyond that, might as well make it out of wood, cuz you kin knock on it the same way.
-
Depends on how heavy you're looking for. The Leather Guy had some stuff the other day in an "antiqued" or "marbled" brown tones. Nice looking 3 oz or so. They're in the directory.
-
I know that feeling ... airbrush seals went out the other day, and "puked" dark brown die all over the project. SOME notice would have been nice ??? Just a man's wallet, so not alot of money invested, but there goes an afternoon. Naturally, it's the one that has to be done by Saturday for the guy's birthday ....
-
Got a couple of these, and I don't really want to work with them. 1 Revival Bag, I Pacesetter Bag All linings and hardware included. I'm not going to make them, and they're in my way. Need to be gone by next week. $50 each, or $85 for the pair, includes shipping (U.S.). Yeah, I kin send a photo, but not gonna post pics here unless there's an interest. Oh, wait ... make that 3 of 'em. There's this "possibles bag" thing, don't know why I have it at all. Brand new, never assembled, buy the other two and you can have it.