Ryan Barto
-
Posts
57 -
Joined
-
Last visited
Content Type
Profiles
Forums
Events
Blogs
Gallery
Everything posted by Ryan Barto
-

Finally Cracked the Shoe Code
Ryan Barto replied to Reegesc's topic in Shoes, Boots, Sandals and Moccassins
Nice work. That one looks like a pair of Desert Treks. What'd you use for the midsole board? I've been trying to figure that out for a pair I'd like to make. -
Hello, I used to buy forentine calf lace from Tandy in 3/16" that was nice and beveled. Looks like they discontinued it. Does anyone know of another supplier for the same thing? All I can find is flat with no bevel or deer tanned, which is too stretchy for me. Thanks for any help anyone can give.
-
I recently helped my wife make a few pin boards covered in burlap and I had a few extra pieces of the soundproofing board that we used. I decided to use one to pin notes above my workbench, but I didn't want to use fabric or burlap to cover it. I had quite a few 1.5" strips from making belts in the past, so I skived them down to about 2 oz and glued them to the board. I then cut out a stencil of my logo in vinyl, stuck it to the leather, and inked the logo with stamp ink using a piece of an old t-shirt. I was trying to go for an aged appearance in the logo, but it only looks that way if you get close to it. From far away, the logo looks more solid. This was a fun project, and the biggest issue I ran into was getting the glue to work with the soundboard. I'm still fighting with some of the leather to keep it from pulling away, but overall it is pretty stable. Hope you guys like it.
-
I started looking into this, but a lot of places will have large minimum orders. I do remember seeing conchos.com stating that they make custom conchos. They don't have pricing on their site for custom work, but they do have a phone number to call.
-
I have made a lot of natural belts and the only time I do anything to the backside is if it isn't nice and clean when I buy it. I have purchased some hides from certain suppliers that needed cleaned up (stringy flesh sides) and for that I used gum tragacanth and slicked it with a metal spoon. I've heard a glass slicker would be better, but the spoon worked in a pinch. I try to buy hides that are already slicked though.
-
Silhouette Printer/cutter: Pattern Transfer Made Easy
Ryan Barto replied to billw's topic in Computer Help
I know I'm bringing up an old thread, but I have been using a silhouette portrait to cut leather. I've had great success with veg tanned calf 2-3 oz. My leather was coming in at 1.16mm at the thickest point. Used 2 pass cutting with the stock blade. It really makes the cutting mat dirty, so I may end up replacing the cutting mat more often than it is worth, but so far I have done 2 full wallets, 3 lighter cases, and a few card holders and the mat is still slightly tacky. I bought the machine to cut patterns out of cardstock, but I tend to push machines to their limits. I was pleasantly surprised by what these little machines can do. -
I use 2-3 oz calf for my wallets. It holds up really well, but I don't think it would be very good for tooling (I prefer inlays, so I haven't tried tooling it) the pockets hold up really well, so you could easily use 2-3 for the interior and thicker for the outer shell. I am told that calf has a tighter grain, so that may be why the card slots hold their shape so well.
-
Cor Et Manus Wallet
Ryan Barto replied to workingman's topic in Purses, Wallets, Belts and Miscellaneous Pocket Items
Very nice. I like how you handled the creasing in the center of the bill pocket. I never would have thought to have the leather fold inward like that. Does that cause any excess bulk when the wallet it closed? -
I like the 3M Spray adhesive for gluing fabric and leather together. I did that with my lined wallets, and it turned out great. I did find that I needed to make sure the fabric was thick enough to keep the glue from soaking through.
-
How Do I Do That -Monster Card Case Face?
Ryan Barto replied to Erystawi's topic in How Do I Do That?
This is a modified case. They bought a leather Magic: The Gathering box like this one: http://www.amazon.com/gp/aw/d/B004I694KO?pc_redir=1397068413&robot_redir=1 Then they used a soft thin leather to glue on top of the front flap with wrinkles in it to make it look like a face and eyelids. The eyes are probably clear cabochons with an eyeball printed on paper and glued to the back. The person who made the one you posted did a really good job executing this. I made a belt buckle with an eyeball using the same technique (just on a smaller scale). -
In the wallet you have pictured, the outer shell is a bit longer than the inside. You are correct in this allowing for folding. I make my bifold wallets the same way.
-
You can get "demo" or "dummy" phones on Ebay by searching for those terms. Watch out for the model numbers though, some models in different countries have different model numbers.
-
I have done this with fabric, and I prefer to stitch it. I always worry that the glue just won't hold. The fabric I prefer is a polyester lining fabric that I found at Hobby Lobby. I couldn't find it at any of the other fabric shops where I live. I like the ribbon idea, but I prefer the fabric to be the width of the card slot. If I find ribbon wide enough and still really thin, I may give it a try.
-
How To Keep Things Clean When Dyeing Leather?
Ryan Barto replied to HC009's topic in How Do I Do That?
I do all my mixing over a sink, but my dye area gets covered by a cheap shower curtain liner I buy from walmart. It is just a piece of frosted plastic and costs less than $2. It is thick enough to keep reusing, I just wipe it down after I'm done dying (I spray all my dyes now). The curtain gets stained, but when I want to replace it, it will be really cheap. Each curtain can be cut, I get 3 sheets out of each one. I use a separate one to spray my resolene. -
Nice find for the price. I keep seeing the one on ebay for $1000 and thinking about saving up for it next year.
-
I use the same bench for my work as well. Had it for almost 2 years now and really like it. I find that the holes aren't that bad, and I tend to stick my awl in one of them so it doesn't roll off the table and onto my foot (it likes to land point down).
-
They use the same as gum trag in those books. I have one of their wallet books. I did this with a piece of veg tanned that was a bit furry on the backside, using a metal spoon to flatten it, as I don't own a glass slicker. The slicker would probably work better as long as it doesn't stretch it out. May want to cut your leather after slicking.
-
If you order online (you mentioned Springfield Leather) you could try Zack White as well. I have used ZW and Springfield and really like both. ZW is closer to you for shipping (North Carolina I believe).
-
I design my smaller items on the computer with Inkscape, print it out and glue to posterboard to cut. Works great for pieces that fit on computer paper (wallets, card holders, etc.) For larger items, I just draw the design on the posterboard. It holds up relatively well as long as I use my scratch awl to go around the pattern. If I try to cut around the pattern, I end up cutting into the posterboard, so using the scratch awl to transfer the design first is the best way I have found to make them last longer.
-
Wallet Sewing > Technique For Bi-Fold Wallets
Ryan Barto replied to Csr111's topic in How Do I Do That?
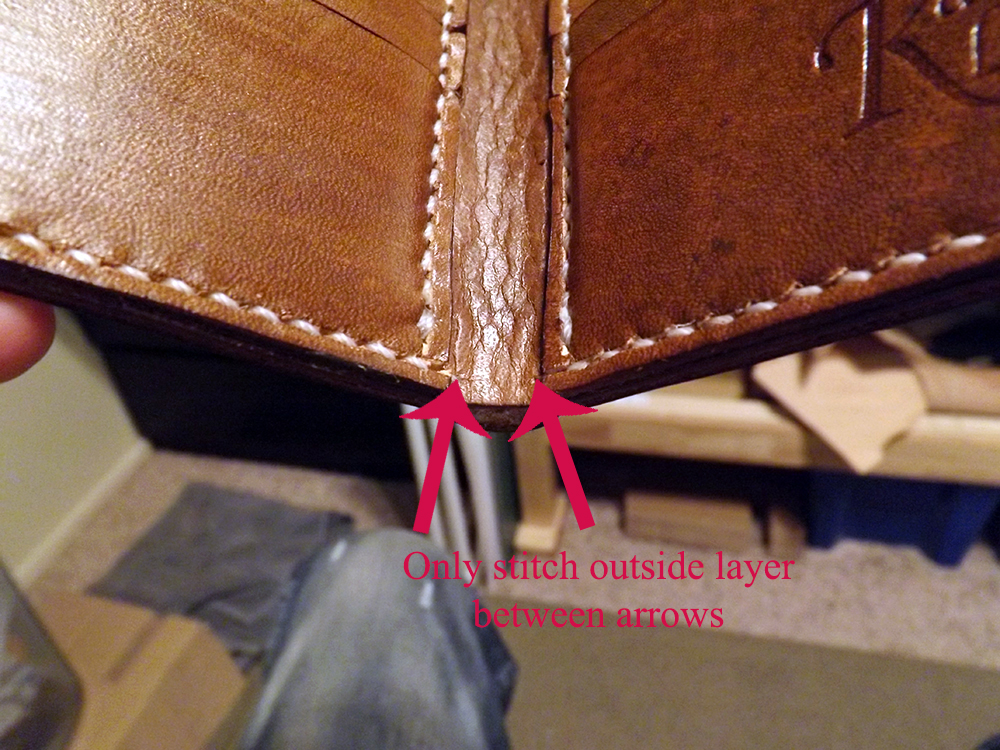
On the picture that you attached, the inside piece of leather that is creating the bill pocket is not actually being stitched to the outer shell in the space where you have highlighted. They do this because they are sewing it on machine, and I'm not sure if there is a good way to machine sew that spot with the inner pocket being slightly smaller than the shell. The stitches you see in the picture at the highlighted area are only going through the outer layer of the wallet. To do this on a machine, you'll need to notch out that section so the stitches don't catch the inside pocket in that area, or fold it up, as they do in the picture. Now if you are stitching by hand, I like to make my stitches in that section only on the outside shell. First I'll attach the card pockets to the inner layer. Then I'll stitch the shell to the back, gluing the two sides first, then gluing the bottom from the corners until I have the gap (or pucker) that is needed to allow the wallet to close. When I stitch I start at one side (top corner), go down the side and across the bottom until I have stitched to the point where the card pockets stop. On that last stitch, I make sure that the needle that was coming from the outside of the wallet to the inside only comes through one layer, essentially exiting from between the layers rather than through both. I'll then stitch only the outer shell across that pucker, until I come to the point where the other card pockets start, and I'll start going through both layers of leather again and finish up the side. It is a lot harder to explain than what I thought it would be. Sorry if this is confusing at all. I'm attaching pictures to show what I mean, hopefully you can make sense of them.

-
Thank you guys very much for your input. I was thinking this type of plastic should be tough enough to handle it, but I wanted to make sure I wasn't going to do something that someone had already tested. I'll post an update when I get around to turning the handle on it.
-
I was thinking about making a maul myself. I bought the acetyl plastic rod for the head and some wooden handles online. The store I bought the plastic told me that it is easy to cut even with a handsaw, but I now know differently. So, I have a rod of acetyl plastic 2.5" diameter and about 10" long. I'm curious if anyone has made a maul out of only this material, turning the rod on a lathe to make a handle but keeping the entire maul one solid piece. I'm thinking it may weaken it, causing the head to break off, but I may give it a try in the next few days. Anyone try this yet?
-
Your briefcases are amazing! Are you willing to share what thickness and type of leather you are using?
-
I also use paypal to do all of my domestic shipping. I go to the post office only for the occasional international shipping because I ship first class international with registered mail option for those. I have 3 of those little blue mail drop boxes within a mile of my house, so I just drop domestic packages in one of them. They all have a sign on them that say you can not use the box for stamped mail over 13 ounces, but the labels printed by paypal (and I'm sure other ship from home options) have "metered" postage. The 13 ounce restriction is only on actual stamps. I needed to buy a scale to help weigh my packages, so I bought this one from harbor freight: http://www.harborfreight.com/digital-scale-95364.html It says it will weigh up to 11 lbs., but I haven't needed to use it for more than 2lbs, so I'm not sure of its high end accuracy. I round up to the whole ounce on all of my packages and have never had a problem with the weight being off.
-
I just bought the Harbor Freight airbrush compressor (just the compressor, not the kit) and am using it with my old Paasche Millennium airbrush that I've had for about 3 years now. I used to use a big compressed air tank to spray acrylic paint on masks, but now I plan to use the new compressor and old airbrush for leather dye. The first tests that I've done with it are giving me really great and even results. I wanted to spray my diluted resolene through the airbrush too, but I was too worried about messing up the airbrush. I went back to Harbor Freight and picked up their Quickchange Airbrush Kit because it is external mix, so I wouldn't need to worry about deep cleaning if I really gunked it up. Here is the one I bought. This cheap little brush is really good at laying down an even spray of 50/50 resolene and it comes with 5 bottles. Just make sure you adjust the cap on top of the bottle to find the right height for the best flow of liquid. Sorry, I have nothing to add to the original question about durability. I didn't notice a difference between the airbrushed and hand dyed ones I did, but I only messed around with them after I had applied resolene to both. I will say that I no longer have any streaks in my resolene, which is what I was most concerned about. Edit... addition. If you try the quick change kit that I mentioned, make sure you only use acrylic or water based liquids/dyes/sealants in the bottles. I hear that some other types of paints and liquids can melt the plastic.