barra
-
Posts
836 -
Joined
-
Last visited
Content Type
Profiles
Forums
Events
Blogs
Gallery
Store
Everything posted by barra
-
Saddle to identify - mclellan looking
barra replied to pella's topic in Saddle Identification, Restoration & Repair
The term 'Pattern' refers to a specification as laid down by the British War Department to govern the manufacture of equipment for her armed forces. These patterns ensure that the various companies contracted to manufacture this equipment supply items of a known and compatible standard. Of the various patterns the 1912 was the one with the swivel bars and I believe this was actually patented in 1909. The UP 1890 and UP 1902 had fixed bars. Other interesting changes to the 1912 was that the flaps on the 1912 were buttoned to the bars instead of screwed and the cross straining webs were stitched onto the flap on one side and laced to the other. Back to Pella's saddle. I agree with BBays, the pommel is very Grimsley-esq and the cantle looks like an Artillery drivers version of the Grimsley. I don't believe this saddle is Military because of the tooling. Also the Serge lining directly against the underside of the bars with no apparent flocking makes this a very interesting saddle. Barra -
http://www.torbandreiner.com/images/French..._gas_cooker.jpg I have a gas cooker like this. They are darn cheap and can be found in camping stores, Wallyworld type stores or Asian groceries. In Aust they can be found for less than $20 and the gas cartridges are also cheap. I stick my lead in a pan and it melts together fairly quickly. When the lead block gets too mangled from using punches I just panel beat it with a ball pein hammer. Maybe once a year I will remelt it. I also have some small lead blocks that I leave in it's own little pan and use these as weights to hold items like patterns steady. just like using shot bags. Lead can be scrounged fairly easily from scrap metal merchants, car batteries, plumbers but my favourite is find the fisherperson in the family and steal their sinkers. Barra
-
Does it have a model name imprinted on it eg Siegfried, Tristan, Rex etc. Barra
-
MONKEY GRIP HANDLE FOR AUSTRAILIAN STOCK SADDLE
barra replied to Clyde's topic in Saddle and Tack Accessory Items
TK. Yes this is used as is a Nightlatch and as something to grab when mounting. Barra. -
Thanks for that David. I had lost the contact details for Jeff. David is of course correct in saying that a "traditional" Australian Stock saddle is basically constructed as is an English saddle. This is going to be a big project. As far as i am aware Jeff Freeman used to work for a company called Fouright. They were a well respected tree making firm of years gone by. I have an old Fouright tree here that I pulled out of an old saddle. Going by the style of the saddle, it would have been made in the 40's/50's and is as straight and true as a dye and as solid as a rock. Here is a link to Troy Porter's site that illustrates Freeman trees. http://www.porterssaddles.com.au/PSSaddles.htm I guess the best resource for you is to get hold of Ron Edwards book Making a Stock Saddle from http://www.ramsskullpress.com/crafts.html This gives a good description of the construction as well as excellent illustrations. Barra.
-
MONKEY GRIP HANDLE FOR AUSTRAILIAN STOCK SADDLE
barra replied to Clyde's topic in Saddle and Tack Accessory Items
There are a number of ways to make a monkey strap so I will give you a few options. 1. One can be made from a single strap. Work out the distance between your saddle staples/D's, double this length as well as factor in the length needed to give the strap the clearance needed to be able to grab it and finally allow for the buckle turn back. The slide loops are used to lock off the strap and hold it in place at the staples. 2. The twisted up version can be made from some sort of flexible leather like red hide or latigo. The width can vary but of course it needs to be able to pass through the staples. Starting a couple of inches up one end make a slit in the strap. You will have to work out how long to make the slit but when it is done you bend the strap so the slit is divided in two equal parts. Now twist the two peices of leather either side of the slit, pass the strap through the front staple and through the two twisted portion of your strap. Pull the free end of the leather through and you have formed a sort of larks head knot. Now take the free end of the strap over to the other staple and pass it over the top of the staple and through, then head back toward the first staple. Adjust the strap to get the clearance you need to be able to grip it. You then commence wrapping the free end of the strap over and over the rest of the strap that is between the staples. When you get to the second staple, pass the strap again through it and with the length of strap left, weave it over/under the lashings you have made. I hope this makes sense. Barra.
-
MONKEY GRIP HANDLE FOR AUSTRAILIAN STOCK SADDLE
barra replied to Clyde's topic in Saddle and Tack Accessory Items
Leave it with me. I,ll put together a tutorial in the morning. Barra -
Try a ships chandler store for a Marlin spike. Barra
-
http://www.outdoorxscape.co.uk/store/shop....knife/p_62.html I cut a lot of webbing (Aircraft harnesses) and this is the type of hot knife we use. For many years we used the hot wire cutters but the blade versions are much better. As a cheap alternative you can use a soldering iron and have a wide blade for cutting and a tip for holes. Bare in mind that where you have cut or burned a hole and the nylon has fused together that it will be someone brittle. ALSO, watch the fumes. We have industrial fume extraction systems but you need to avoid breathing the fumes. Depending on how much webbing you will envisage cutting you can make a cheap booth with a vaccuum cleaner and some sort of hood. Alternatively cut in a well ventilated area and have a fan on to blow the fumes away. Barra
-
Nomex is made by DuPont. I'll look up where we get it from in Australia tomorrow. Barra
-
As someone who deals with Aircrew safety and survival equipment, I use a fair amount of Nomex thread and can extol it's virtues. Characteristics remain after laundering. Chemical resistant. Mildew resistant. Resistance to heat. Abrasion resistant. Flame-resistant. (does not melt or drip but chars at about 700F) Barra
-
I'm with Bob here. What works for one individual may not work for another. When teaching sewing, we would give the students a couple of methods and let them choose or develop their own methods. For me I don't use a guide. If I am stitching into a grooved/raced channel I forget the foot exists and concentrate on the needle. If I am sewing a seam I position my foot at my desired seam allowance from the edge and when sewing I keep the edge of the foot at that distance from the edge. It does take practice and comes together eventually like muscle memory. I think a dob of paint would assist as a guide. Also when I sew as soon as I sit at the machine I push my heal onto the base of the pedal (brake). I never apply pressure to the top of the pedal until I am darn sure I want to commence sewing. As soon as I have stopped a run, the heal goes back to the brake. This has become a drill and I don't even think about doing it (saves oopsies). Also when teaching we would make it a drill that as soon as stitching had stopped the students were made to turn off and dissipate power. I never dissipate power now but we had to teach it due to the PC OCC health and safety world we live in. Barra Barra
-
http://leatherworker.net/forum/index.php?s...c=15263&hl= Barra
-
I don't think I'll worry about a headstone. Some skanky leatherworker will only knock it off to stamp leather. Barra
-
http://www.abbeysaddlery.co.uk/product_listing.cfm?page=4 Or http://www.leffler.com.au/saddlery/tools_dixon.htm With the value of the Aus to US dollar it might be worthwhile shipping from Australia Barra http://www.josephdixon.co.uk/ Contact details for Joseph Dixon
-
Is Union Special 54200F a good machine
barra replied to yotebuster1200's topic in Leather Sewing Machines
Yotebuster. Overlocking is the bound edge you see mainly on apparel. Have a look at the inside of the seams on you shirts or jeans. Overlocking also is referred to as Serging and sometimes Merrowing after the inventor of machines that form this type of stitch. Barra -
-
http://www.nptc.org.uk/qualifications/default.asp?area=128 Scroll down to Saddlery Advanced Certificate Level 3 (4750) Then open Scheme Handbook. I think the competencies for saddle fitting are mentioned there. FROM http://www.mastersaddlers.co.uk/ Click on saddle fitting via the buttons at the top of the page and then fitting course via the buttons on the left side of the page. The introductory course is aimed at SMS members, members of the British Equestrian Trade Association and some other equestrian professionals and it provides a two day introduction to the principles of saddle fitting: INTRODUCTORY COURSE IN SADDLE FITTING The Qualified Saddle Fitters course is a more advanced course aimed at Society members who have been fitting saddles for a number of years and who want to refine their saddle fitting to the standards promoted by the Society and approved by City & Guilds / NPTC. Once a Saddle Fitter achieves their qualified status they attend additional training seminars to maintain their knowledge to current standards: QUALIFIED SADDLE FITTERS COURSE The Society has a relatively large sphere of influence overseas and also runs courses for overseas saddle fitters: OVERSEAS RETAILERS' QUALIFIED SADDLE FITTERS COURSE US INTRODUCTORY SADDLE FITTING COURSE I am yet to find or know of anything related to Western saddle fitters qualifications (or saddle makers qualifications for that matter). More research needed. I might start a new thread so as not to hijack Denise's "fitting" thread Barra Barra
-
Denise, you are delving into dangerous territory. from Denise. I have been hearing and reading more about "Professional Saddle Fitters" lately and I must admit that this is a new concept to me. My questions are: What or who qualifies someone to be a professional (or non-professional) saddle fitter? Is there any regulation of the industry anywhere? What type of training do they have? How much they charge? Do they sell saddles too or is that considered a conflict of interest? We have quite the selection of people from around the world here so I wonder if it is different over in Europe or Australia than here in North America. I can touch on English saddles. Training is provided via the SMS leading to assessment by the City and guilds/National proficiency tests council http://www.mastersaddlers.co.uk/ In Australia when it comes to saddlery, every man and his dog throws around the terms qualified, fully qualified, accredited and Master saddler. To gain formal trade recognition (on any trade) your Training must meet certain competencies via training provided by an RTO (registered training organisation) leading to a nationally recognised qualification. Here is a link to saddle fitter training in Australia which I will research further. http://www.warmbloods-australia.com/genera...ding_saddle.php Your head would spin when you start to delve into all the Govt. regulations leading to gaining trade recognition here. Barra
-
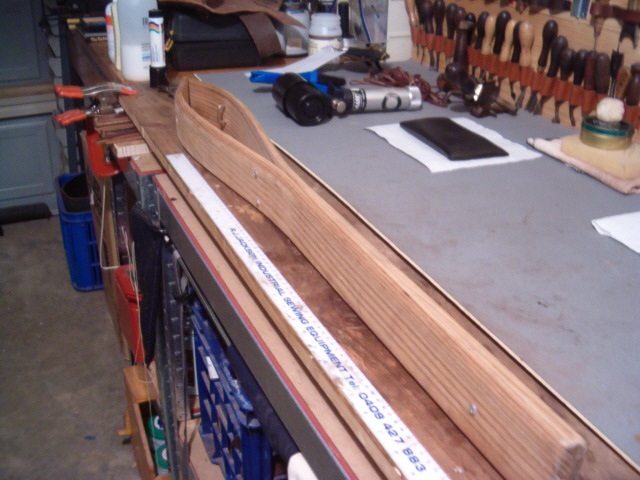
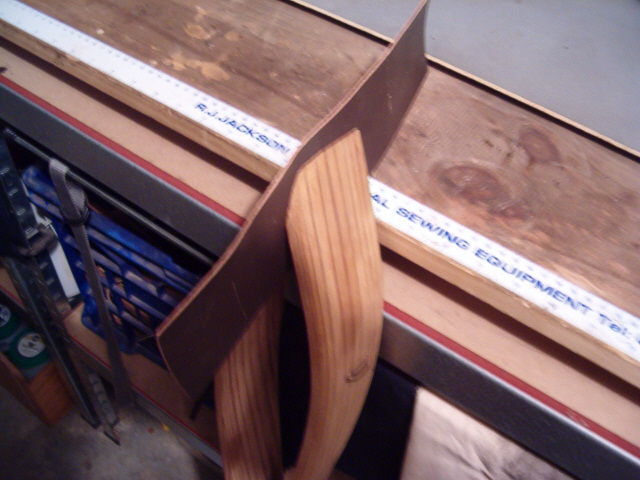
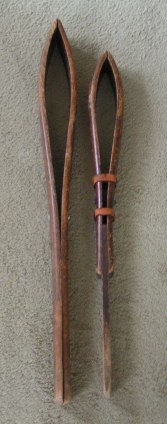
Jim. Barra's Clams can be made also by the Steam method and just insert a Leg into the Jaws. As per the smaller set of clams in the photo with the 2 sets. Barra
-
Other than the version that Oldtimer posted, no I have never seen them hinged. Barra.
-
The overall length of mine are 41 inches. From the botton to where it starts to bend is 20 inches, the jaws are 20 inches and 3 inches at the widest. The extra 1 inch difference is where the 2 halves are screwed together. The timber halves are 1/2 inch thick. You can make them longer to suit the individual by adding another length of timber at the bottom and screwed in place between the 2 halves. Barra


-
http://www.aarons-books.co.uk/isbninfo.php...ddId=0851316409 This book crops up from time to time. I'll keep an eye out. You might also try the working saddlers handbook by Keith Savory. Barra
-
If looking for Connolly hide food, It is now called Hide Care. I think they had to take away the reference to "food" Barra
-
Is this the same saddle in the Morgan saddle thread? Barra